
We played Imperial Struggle a few weeks ago and the game is even better than it’s predecessor Twilight Struggle. Very different, but better. I didn’t think that was possible but it is. I still like TS a lot but this game fills a whole new niche and I have really enjoyed exploring it. Imperial Struggle deals with what historians refer to as the Second Hundred Year’s War and covers the period of 1697 through 1789 stretching over four different wars. The game uses cards and Investment Tiles to allow the player to take various actions that change their fortunes across the globe with diplomacy, economic growth, and if all else fails war. Players will score Victory Points from the domination of Regions, controlling various Markets and from victory on the field of battle. There are so many options and strategies available in this game that it makes for a very deep and lasting experience that only gets better with time and more plays.
In Action Point 1, we covered the map focusing on the different Regions and Sub-Regions and the various spaces, boxes and lines located in each. In Action Point 2, we examined the very interesting limited action selection mechanic using the Investment Tiles and the Advantage Tiles that enhance them and what that means for the player and their efforts. In Action Point 3, we looked at the various Event Cards and Ministry Cards to get an idea for how these fit into the design. In this Action Point, we will take a look at the Game Sequence, including the differences between Peace and War Turns, Action Rounds and the different actions available including Diplomatic, Military and Economic Actions.
Game Sequence
Imperial Struggle covers 100+ years of action and consists of six Peace Turns, interrupted by four Wars, which include the War of the Spanish Succession, the War of the Austrian Succession, the Seven Years’ War and the American War of Independence. The first two Peace Turns and the War of the Spanish Succession makeup the Succession Era, the next two Peace Turns along with the War of the Austrian Succession and the Seven Years’ War makeup the Empire Era and finally the last two Peace Turns and the American War of Independence makeup the Revolution Era.
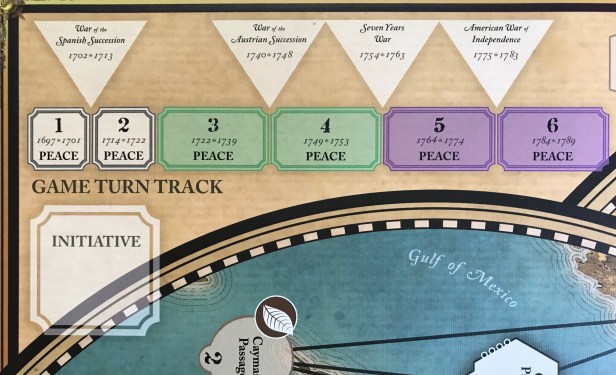
As you can see on the Game Turn Track pictured above, Peace Turns are typically alternated between War Turns as the first Peace Turn lasts from 1697-1701 followed by the War Turn the War of the Austrian Succession from 1702-1713 and then comes the 2nd Peace Turn 1714-1722 followed by an extra Peace Turn from 1722-1739.
Peace Turns
During each Peace Turn, players will alternate taking Action Rounds. An Action Round is made up of selecting one of the available Investment Tiles from the Investment Tile Display and if possible then playing playing an Event from hand and then spending the Action Points generated by the Investment Tile. At the end of the turn, players will then score the Awards for each Region and bonuses for dominance of the commodities in Global Demand.
One thing that you will need to keep in mind during Peace Turns is that you are mainly working toward scoring Awards by the end of this Turn but you should also be working toward the upcoming War Turn in order to make sure you are positioned well to win those individual battles throughout the various theaters.
War Turns
During War Turns players will resolve each theater of war individually. To resolve a Theater, each player simply reveals all their War Tiles that have been placed in that Theater, including both Basic War Tiles and Bonus War Tiles. The Theater winner will be the player with more total strength from
tiles and board bonuses which come from Alliance Spaces, Squadrons, among other things and also depending on what the theater lists as eligible bonuses. The winning player then receives spoils of war based on the margin of victory.
Let’s take a look at one of these Wars and examine the War of the Spanish Succession which occurs after Peace Turn 2. The first thing you will notice about the War of the Spanish Succession Card pictured below is that it is broken up into four distinct Theaters of War including Central Europe, Spain, Queen Anne’s War (which was fought from 1702–1713 and was the second in a series of French and Indian Wars fought in England’s Thirteen American Colonies during the reign of Anne Queen of Great Britain. It is also known as the Third Indian War or as the Second Intercolonial War in France) and the Jacobite Rebellion (which was fought in 1745 and is also known as the Forty-five Rebellion or simply the ’45 and was an attempt by Charles Edward Stuart to regain the British throne for his father, James Francis Edward Stuart). Each of the theaters have a holding box for both French and British War Tiles. When War Tiles are placed in these boxes, they are hidden from your opponent but can be examined by the owner at any time. Because the War Tiles are hidden, you will never really know what your total strength is until all tiles are revealed.

You will also notice that there is a box that is titled Bonus Strength and then lists various territories and countries that appear on the map. During the War Resolution step, each player will consult the Bonus Strength list in the current theater and adds one for each flagged element to their total strength. Each country on the Bonus Strength list grants one strength point to the controlling player per flagged Political Space marked Alliance
that it has.

You will also see that there is a box near the bottom of each theater that calls out the Spoils of War that will be gained for the winner based on the conditions of Margin of Victory. For example, in the Central Europe Theater for the War of the Spanish Succession, if a player wins the theater with a Total Theater Strength difference of from 1-2, they will immediately score 2 Victory Points while the Loser will gain 1 Treaty Point. As the Margin of Victory increases so does the reward. If the player wins by a Margin of Victory of 3-4 they will gain the 2 VP mentioned earlier but will also gain 1 Conquest Point that can be used to place an influence marker into one of several special boxes on that map called Territories. Territories are square spaces and represent physical control of the land. These Territories are different than Political Spaces and Markets though as Territories cannot change hands during Peace Turns as a result of Political Actions. They only do so as a result of Wars. Territories serve as an anchor point for expansion. The player can only expand into areas where they have influence normally but in the case of Territories they can expand into them as a result of the gaining of Conquest Points as a reward for victory in a War.
If you look at the bottom of the Central Europe Theater you will see that there are Available Territories that are listed. These are the specific locations on this map that the winner can use their Conquest Points to take control of those specific listed Territories.

Each theater is typically slightly different as we can see by taking a look at the Jacobite Rebellion Theater from the War of the Austrian Succession. In this one, there are different results depending on whether France or Britain wins the Theater. The winner gains VP while the loser loses Treaty Points but the winner also can gain the ability to unflag 1 Political Space in Europe. This can be very valuable as this can save your Action Points in the next turn to accomplish the same thing.
War Tiles
There are two types of War Tiles, Basic and Bonus. Each side has its own set of War Tiles. When initially placing War Tiles in the theaters indicated on a War Display, Basic War Tiles are used. The only way to get Bonus War Tiles is when a player uses Military Action Points to purchase additional War Tiles. When purchased, these additional tiles are drawn only from their pool of Bonus War Tiles.

Some War Tiles offer special effects rather than a bonus strength point that the player will add to their Theater Total Strength. These special effects including the removal of an opposing flag from the map, an increase in their opponent’s Debt, and owner’s choice of opposing fort damage or Squadron removal. Players will use the same Basic War Tile set for each war. However, there are four different sets of Bonus War Tile which have unique references to each War. The different sets offer the same game effects but have been given historically accurate names or figures from each side. If you decide to use each of the War specific sets, which isn’t required as mentioned, when each War is resolved, the players should remove all of the Bonus War Tiles matching that War from the game, and replace them with the set designated for the next War on their playmats.
Players must pay attention to the Wars as they go through their Action Rounds. Ignoring them will most assuredly lead to your opponent running away with them and you will find yourself losing your control on your hard earned Empire. I always like to counteract any actions of my opponent in regards to the Theaters. If they place a Bonus War Tile, I will typically make sure to either place one of my Bonus War Tiles or make sure that I use my Action Points to take Political Actions and undo their control of one of the listed Bonus Strength countries. This continual back and forth tug of war over the War Turns will either result in hard fought VP and Conquest Points or in you seeing your opponent slowly dominate regions through adding Territories to their control. Now that we have covered War Turns, lets move our focus to Action Rounds and the different actions available including Diplomatic, Military and Economic Actions.
Action Rounds
There are three kinds of actions listed on Investment Tiles including Economic, Military and Diplomatic. If you remember from our discussion in our 2nd post in this series, Investment Tiles will always display two of these three types, one designated as a Major Action and the other as a Minor Action. Each of these Investment Tiles will show the number of Action Points received for the Major Action, which will range from between 2-4 Action Points. Minor Actions will always yield only 2 AP. Players can use the Action Points gained from Minor Actions in the same ways as from Major Actions, with some minor exceptions.
During the Action Phase of each Peace Turn, players have four Action Rounds. On a player’s Action Round, an Investment Tile is selected and then the player can spend the Action Points shown on the Investment Tile. The players can augment their Action Point allotment from the Investment Tile by either incurring Debt or spending Treaty Points. This game boils down to which of the two players can best manipulate the various Advantage Tiles, Investment Tiles, Ministry Cards and Event Cards that they have to garner the most Action Points to spend each turn.
Economic Actions
Economic Action Points can be spent on trying to gain a foothold and monopolies in various Markets throughout the globe by Shifting a Market.
In order to Shift a Market, that Market must be connected to a Territory, Fort, or Naval space the player controls, or be connected to another Market the player controls that does not contain a Conflict marker, is not Isolated, and did not change control during the current Action Round. Remember that a Market is Isolated if it contains a flag, but it cannot trace a chain of friendly-flagged Markets free of Conflict Markers to a Territory, Fort, or Naval space its owner controls, at the start of any Action Round. Very similar to the way this action worked in Twilight Struggle, the player cannot “Daisy chain” Market shifts from Market to Market in the same Action Round, but you may only shift a Market connected to a Territory, Fort, or Naval space that the player gained control of in the current Action Round.
Shifting a Market costs equal to the Market’s Economic Cost. Normally a Market’s Economic Cost is the value printed in its space on the board. This cost can be effected by several factors including whether a Conflict Marker is present in the space of whether a Fort or Squadron is present in the area which protects the space. If the Space contains a Conflict Marker, it costs 1 instead. Any cost reductions due to Events or Advantage Tiles are applied before increases. Similarly, the cost to shift a Market can never be less than 1. Let’s take a quick look at an example of Shifting a Market.

In this example, the French player chooses an Investment Tile that grants 4 Economic Action Points for the Major Action and 2 Military Action Points for the Minor Action and they play an Event Card that grants them another +1 Economic Action Point giving them a total of 5. They also decide to take on 2 new Debt and spend 1 Treaty Point to gain another +3 Action Points for a total of 8 Economic Action Points. The French player also controls the Rum Advantage Tile which will allow them to unflag a Market at a cost of -1 Economic Action Point.
Their first action this turn will be to use the 2 Military Action Points to Deploy one of their Squadrons from another Sea Zone on the board to replace the British Squadron found in the Bahama Runs Port. This causes the British Squadron to be returned to the Navy Box requiring the British player to use precious Military Action Points to deploy it from there. This action will make it so they won’t have to pay extra to unflag the spaces that were protected by that Squadron.

Then as a follow up they will spend 2 Economic Action Points along with the Rum Advantage Tile to unflag Bahamas Run North and also spend 1 Action Point to unflag Bahama Runs West. The reason that this only costs 1 Action Point is due to the presence of a Conflict Marker which sets the Economic Cost of that Market to only 1 AP. Once the flags are removed in those two Markets, they then decide to spend 5 Action Points (3 AP in Bahamas Run North and 2 AP in Bahamas Run West) to place their flags in both of those spaces. This is allowed as they have Influence in the Bahamas Run East space before this round. They now cannot spend additional Action Points to spread further to adjacent Markets as they cannot Daisy Chain new spaces to control spaces beyond their new conquest. As you can see, there are lots of considerations about how to use your limited Action Points and because you can use them in any order, Major and Minor Actions can be used at any time, you can find lots of ways around costly inhibitions to your plans.

Diplomatic Actions
Diplomatic Action Points may be spent to shift a Political Space. Unlike Markets, Political Spaces do not require any kind of connection to shift.
Shifting a Political Space costs equal to its Political Cost which is printed in the space on the board. If the Space contains a Conflict Marker, it costs only 1 instead. Like with Markets, cost reductions are applied before increases. Similarly, the cost to shift a Political Space can never be less than 1.

The player can also use Diplomatic Action Points to purchase a new Event Card. For the cost of 3 Diplomatic Action Points, a player may draw an Event card from the draw pile. This is a very expensive cost for such a random benefit and I would recommend that you think twice before doing this as some Events are really situational and more difficult to use than others. I would rather see those 3 Action Points be used to unflag key Political Spaces or to place your own flag there.

Military Actions
Military Action Points may be spent in a number of ways. In fact, there are the most different Political Actions available than the other two combined.
Bonus War Tiles
Military Action Points may be used to purchase Bonus War Tiles. The cost to buy a Bonus War Tile is 2 AP and a maximum of two Bonus War Tiles may be purchased per Action Round. For each Bonus War Tile purchased, the player will randomly draw a War Tile from their Bonus War Tile pool, gets to examine the Tile to deduce where it can best be utilized and then places
it in one of the theaters for the next War.
Each Theater has a limit of two Bonus War Tiles per player. If a player draws a Bonus War Tile and wishes to place it in a theater that already has two Bonus War Tiles, they musty choose one of their existing tiles to replace with the recently drawn tile and then they can move that tile to a different theater. If every Theater already has two of a player’s Bonus War Tiles, that player cannot buy any more.
I will say this about Bonus War Tiles. If you are spending so much of your Action Points on buying them that your theaters each have two, I would ask you to reconsider your choice as you will be unable to keep up with the rest of the game if you are so focused on this one aspect. The game can be won on the field of battle through gaining VP, Conquest Points and Treaty Points and requiring your opponent to lose flags but it can also be lost to a shrewd player who is focused on Political control and Market monopoly.
So what happens when it is near the end of the game and there are no more upcoming Wars to fight? What can you then do with your Military Action Points that you would have used to buy Bonus War Tiles? Well, only on Turn 6, players may spend 2 Military Action Points to buy 1 Economic or Diplomatic Action Point, which then can be spent as if they came from a Major Action. This means that if you take a tile with 4 Military Action Points, you could buy either 2 Political Action Points or 2 Economic Action Points, but not one of each.
Remove a Conflict Marker
The cost to remove a standard Conflict Marker is 2 AP, or 1 if the Conflict Marker is in a protected space. These Conflict Markers can be a real pain as they stop you from gaining connectivity between Markets and can stop those Markets counting toward your total in an given Region. Getting these removed is very important and should be a goal of yours if you have surplus Military Action Points.

Build a Fort
The cost to build a Fort in a Fort space and place a flag there is listed in the Fort space on the board. To build a Fort, a player must first control at least one Market, Naval Space, or Territory connected to the Fort. Similar to other control requirements the spaces must have been controlled at the start of the Action Round. An opposing Fort space cannot be taken during a Peace Turn using Military Action Points unless it is Damaged from a previous action. But, the Fort can be taken by using Conquest Points during a War Turn.
Repair a Fort
To repair a Fort, a player simply removes a Damaged Fort Marker from
a Fort by expending Military Action Points. The cost varies depending on if the Fort being repaired is friendly or opposing. This action is permitted on both friendly and opposing damaged Forts. To repair a friendly damaged Fort, the cost is the number noted in the Fort space minus 1. To repair an opposing damaged Fort, the player must first control a connected Squadron or Market and then pay Military Action Points equal to the number in the Fort space plus 1. This removes the Damaged marker and the player who repaired the Fort takes control. You might ask what this represents? Well it simply denotes the player being opportunistic with a steady expansion of their military presence in a Region and taking advantage of their opponent’s carelessness or inability to fund improvements to fix the damaged Fort.

Construct a New Squadron
The cost to construct a new Squadron is 4 Military Action Points, which frankly is a lot of AP but these Squadrons are well worth it as they offer lots of benefit. There are several game effects allow Squadrons to be constructed more cheaply. The one thing about Squadrons is that they are a large investment and take a lot of Action Points to get constructed and deployed onto the board. Squadrons must be constructed and will be placed into the Navy Box before they can be deployed.
Deploy a Squadron
The cost to deploy a Squadron into an empty Naval space is 1 Military Action Point. If the Naval space contains an opposing Squadron, the cost is
as listed below 3 AP if the deploying Squadron is in the Navy Box or 2 AP if the deploying Squadron is already on the map. In both cases, the opposing Squadron will be returned to the Navy Box. I can tell you that this is a good feeling as you know that it will take your opponent several actions to get that Squadron back onto the board and it will eat up their AP to do so. One final note, there is no connection of any sort needed to deploy a Squadron.
Planning out how to utilize the Action Points that are gained from Investment Tiles is at the heart of the game. Understanding what you want to accomplishment this Turn, choosing your Investment Tiles to drive those goals during the Turn and not being distracted and lose sight of that goal during the Turn is very important. Like many of these type of back and forth tug of war games, you must have a plan and know how to execute that plan. But you also have to keep one eye on your opponent and their designs and make sure that you are not falling too far behind in each area.
In Action Point 5, which is the final entry in this series, we will delve into how a Turn is scored and how the game is won.
-Grant

I bought IS but I can’t get fired up about playing it for some reason. Odd, because this grand strategy type game is usually right in my sweet spot.
I get intrigued reading your action points though. Maybe I’ll give it a try soon.
LikeLiked by 1 person
how does one send an email to you and Alexander?
LikeLiked by 1 person
theplayersaid@gmail.com
LikeLike
I think in the example for economic actions you have made a mistake. You start the example by using a minor action to replace an opponents squadron. I dont think this is aloud or am I wrong?
LikeLike
You can take either the Minor or Major Action in any order.
LikeLike
The order is fine , removing an opponent’s fleet with minor action is not
LikeLike
Nice post! One mistake tho. You state: “… Total Theater Strength difference of from 1-2, they will immediately score 2 Victory Points while the Loser will lose 1 Treaty Point”
But the loser will get a Treaty Point, not lose. It’s a nice balancing mechanism. You score victory points but make’s your enemy stronger.
LikeLiked by 1 person
Thanks for pointing that out. I will correct.
LikeLiked by 1 person