I just wanted to put together a series of assembly and painting posts for the Open Fire! Starter set from Battle Front Miniatures. This is for their 15mm tabletop miniatures war game: Flames of War.
You can take a look at the entire contents of the starter kit here: Open Fire! Starter kit.
Today we’ll take a look at the steps I took to paint up the Stug III G assault guns for the German faction.

The sprues are fairly simple, the tracks are single pieces that attach to the chassis, outside of that you stick the gun on the body and then put the top and bottom together. Battlefront did a great job of making them easy to put together, whilst maintaining a fantastic level of detail.

You can see them constructed above – I chose to leave the schuertzen off, at this point so I could prime them separately. I chose to do this in order to get better paint coverage on both the model and the schuertzen themselves, as well as being able to paint the wheels without worrying about being too neat working around them. I’m glad I did it this way because it meant fewer awkward spraying angles with my rattle can primers. I will 100% be doing them separately on all future models as well.
I primed the tanks in Army Painter’s Italian Armour. I chose this colour because that’s what my FLGS had, and I’m lazy and didn’t want to shop around. With enough weathering, the colour will tone down to be a more accurate tone. You can see in the two circles above that I did a pin wash with Citadel’s Agrax Earthshade. This really started to make the details pop, so to speak. A pin wash is where you take a fine detail brush with the wash and apply it carefully to just the shadowed and recessed parts of the model. A regular wash on the other hand is where you brush the wash fairly liberally and cover the entire model. The pin wash method is a little more time consuming, but you get a better contrast without ugly pooling and streaking on the flat surfaces.

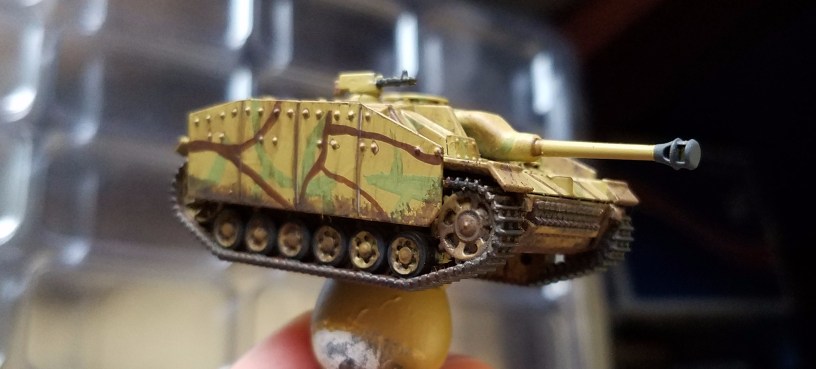
Having done the wash, I painted the road wheel tires, and the machine guns with a colour called Pavement. It’s one of those 99 cent paints from Walmart that I just love the tone of. The dark grey is a little softer than black and gives a more weathered tone. I then used a couple of Reaper’s MSP series paints for the camo: Ruddy Leather and Olive Green. I regret using the Olive Green, as it’s too light for my tastes. I picked up a colour called Muddy Olive that I will use on future models, it’s still a great shade of green but it’s darker, which will make the camo pop more. As you can see, I did a couple of different camouflage schemes just to get back into the swing of things (I haven’t painted historical models since I was like 12 and that was at the larger 20mm [1/72] scale). The tracks were also painted Ruddy Leather, and then I did a black wash on them with Citadel’s Nuln Oil to dirty them down.

After the camo, comes the fun part – weathering. On a model this small you don’t really need to go all out on the weathering. There’s so much you can do with paint chips, scratching, rust, dirt and filth, etc. that really the sky’s the limit. But again, at this scale how much of that detail would you really pick up? Always remember: I am a lazy painter. I’m doing these (and the rest of the box set) in a production line style. They just need to look tabletop ready, and be quick so that we can play. I’m not trying to win any competitions. With that in mind, all the weathering I did on the Stug III’s was with a single paint called Typhus Corrosion from Citadel’s Technical line.

I used a small brush, that was thrashed to death. I cut the bristles off the brush because it was beyond saving as far as regular use was concerned. I would then load the brush up with Typhus Corrosion and then wipe some of it off onto a paper towel so the brush was not saturated. I used the brush to stipple the paint on heavily to the area around the wheels and skirting of the armour panels to look like sprayed up mud. I did a once over on the tracks and then stippled heavily on the front under belly and rear under armour of the assault gun too. Using the same brush I would wipe off almost all of the Typhus Corrosion in order to get the much lighter toned streaking effects on the paneling. I made sure to consistently use the brush in a downward stroking motion so it looked like it was natural weathering, from rain streaks and other elements.
The only thing I really screwed up was due to my impatience. I did all the weathering before I got the water slide decals. So now I’ll have to apply the decals and then re-weather those parts again. But outside of that, painting these models was really easy. I’m happy how they turned out after the weathering as they look well used and it also hides a lot of blemishes and mistakes from rushing through these.
I’ll do a few posts of other models in the set in the near future, including infantry, so watch out for more in the future!
-Alexander


