Welcome back to another miniatures painting guide for Flames of War! You can check out some other guides for the Shermans or the Stug III’s as well.
Over Christmas I picked up some more Flames of War miniatures to fuel my ever growing addiction. I’m a late war kind of person (at the moment) but this was one of the few cases where the mid war kits crosses over. I got the American M7 Priest battery but wanted to do them up as a Royal Artillery battery for my 11th Armoured Division. The battery came with three Priests, a set of midwar American decals and a small sprue of soft plastic american drew men.

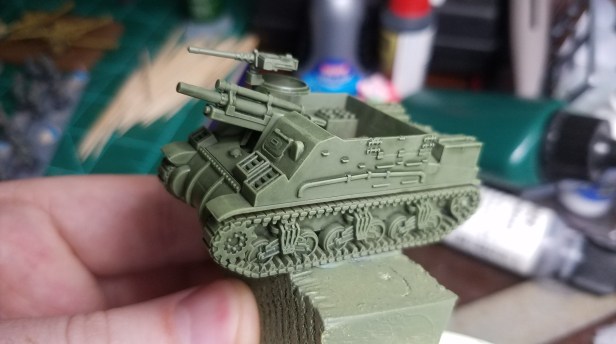
The self propelled guns went together very easily and were well constructed. I didn’t have any problems with gaps or obscene mold lines or anything like that. I also finally invested in some real sprue cutters and will never go back to hacking away with a hobby knife again. I purchased some Xuron cutters from my FLGS but you can see them here as well. Seriously…I spent years modelling as a kid in 1/72nd scale using only a hobby knife and I’m now 29 and got my first sprue cutter. I feel like I’ve been living as a cave man!
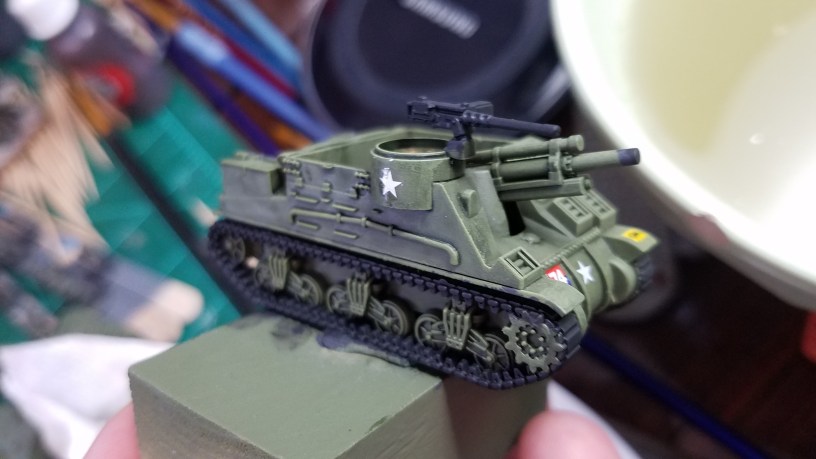
If you read the Sherman guide there’s a lot of similarities (actually almost identical) in the method used to paint these. I base coat them with a ‘Chieftan Green’ spray can, then do an overall wash with Army Painter’s green wash. This step gives the dark shadow effects to the model and is a really simple way, especially at 15 mm scale, to get some good contrast and realism onto the kits. The final step was doing a very light dry brush with an olive colour to contrast the shadows with some highlights. Overall, I was very happy with the results. I preferred the Army Painter wash over the Citadel Agathonian Camoshade because I felt that it wasn’t as severe and it wasn’t as dark in the areas it pooled.

I used my 99 cent Walmart ‘Pavement’ Grey for the tracks, MG’s and other details. I opted to not paint the road wheel tires because a) I’m lazy and b) upon doing the mud and weathering on the Sherman V’s that level of detail was utterly lost. You’ll see this near the bottom. I then did a Nuln Oil wash on the grey areas to give some shadow and depth to them.

I purchased the British Late War decal set to use on the Sherman’s and I brought them out again. I don’t know if the Open Fire set didn’t come with Decals (I assume it did) but I think I lost them so I got the big pack of them retroactively from Battlefront. This time I applied the water slide decals before weathering! This provides a much more realistic look to them when all is said and done.
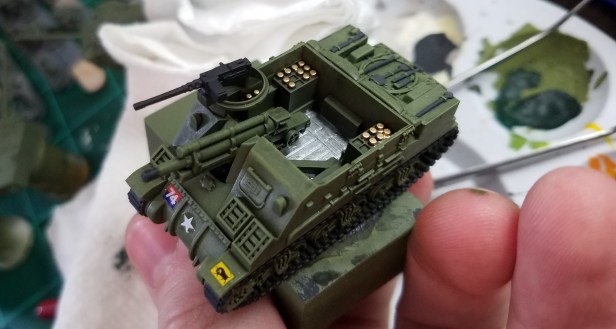
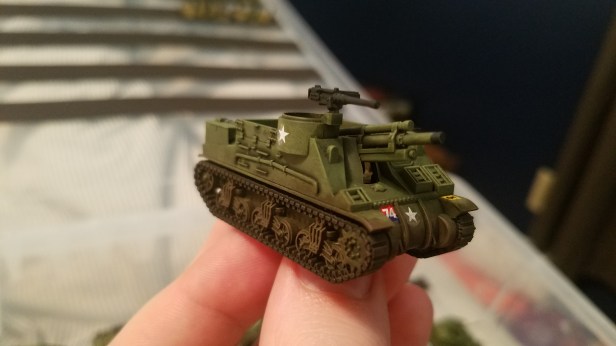
There’s some great details on the Priest model considering the scale. I used Testors enamel paints for the floor and the shells. I love these little enamels because the metallic colours are very vibrant and seem to really make the model pop.

It’s kind of hard to see, but I used Typhus Corrosion Technical paint from Citadel as a pseudo wash on the interior floor. The paint also has sand and grit in it so it looks very dirty and well used as any good WWII AFV should.
Finally came the weathering. I used a very dark 09426 Charred Brown from the Master Series Paint line from Reaper Miniatures. I applied this very liberally on the wheels, tracks and undercarriage. Then I used a very small amount of lighter brown to dry brush dirty highlights on those same areas. I also went back and did this on my Sherman’s as the effect was so pleasing.
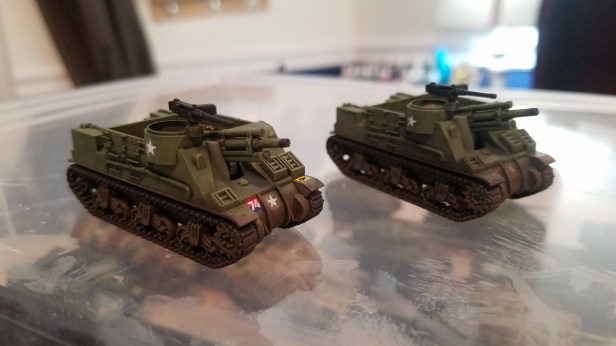
 So here she is! I only need to get a British crew for her and she’ll be battle ready. I’m very happy with these minis, and I’ve slowly been improving on my colour scheme and technique. I’m not winning any competitions, but I’m also not trying to. I just want it to look good on a table, and for me to not have to spend an age getting there.
Watch out for my German Panzer Grenadier post coming soon!
-Alexander

You did a nice job on the M7. I especially like that you painted the ammo inside. The wash you used looks good. It should really pop on a table top good job.
LikeLiked by 1 person
Great job! Have you played the new Flames of War Rules? I’d like to know your opinion of the latest version.
LikeLiked by 1 person
I have not yet, just putting the pieces together to play it. I’d also be a terrible reference because I never played V3. I’m a newbie!
LikeLike
I just wanted to let you guys know that I’m excited to see what you think of Flames of War. I enjoy your work here and it is a highlight of my day to read/watch a new post from you guys. When I went home for Christmas a few weeks ago, I was excited to get my old paints from my brother’s house and work on some old D&D minis for fun. Alas, the paints were all dried out. This post got me to thinking that maybe I’d be better off using my decent skills to paint up some stuff for this game instead, since I have to buy new paints anyways. Eagerly anticipating your take on the game system!
Grant’s review of Comancheria convinced me to get myself a copy for Christmas (thanks Mom!) I haven’t had a chance to get in to it yet but hey, it will be there when I have time. Keep it up, it makes me smile to see an email alert from you folks.
The tanks you have painted up look amazing! Can’t wait to see how the game goes. It might even satisfy the odd urge I’ve always had for building a model railroad if you have to cobble together some terrains and towns, etc. to really get in to it.
LikeLike
I’m glad that you were able to get a copy of Comancheria and I am glad that you found my review interesting. That game is awesome and I love the depth of it. Not many solo only wargames like that focus on so many different aspects, such as the technology development. Great mechanisms and I think that the AI is simply fantastic. I love to watch the wave coming as I can see the actions that are building up, especially the dreaded Culture Attack. Let me know your thoughts when you have played a few times.
LikeLike