

When the August update for GMT came out, one of the new offerings on P500 was Holland ’44: Operation Market-Garden. I immediately ordered it and then went about reaching out to its designer Mark Simonitch to see if he would entertain an interview with me about this new battalion-level World War II game. To my surprise, he was very willing to talk to me and gave me some good information on what we can expect from the game. Without further ado, please enjoy the interview:
Grant: What changes have you made to the system from Normandy ’44?
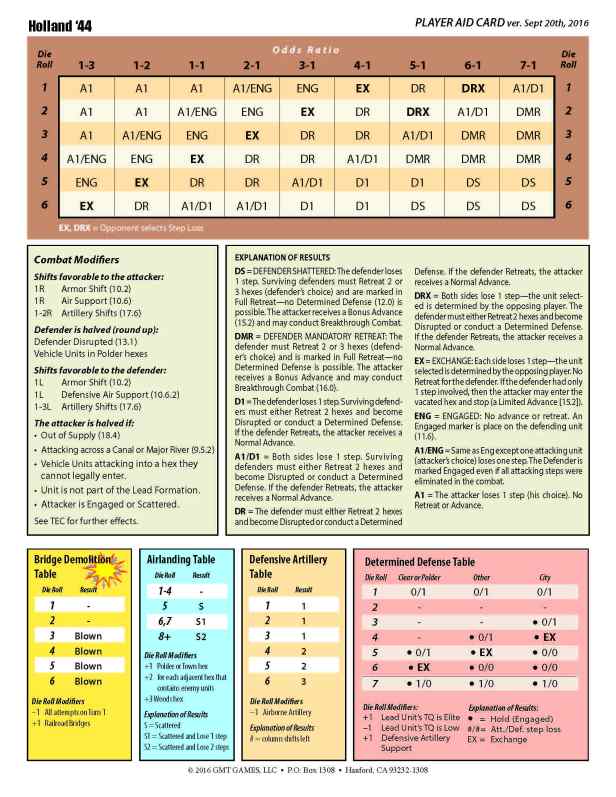
Mark: All the basics are still there: ZOC BONDS, Extended Movement, Tactical Movement, Determined Defense and an easy CRT. But there are a lot of little modifications. For example, the Determined Defense Table was modified to make battles last longer. Support Units now have ZOC’s but cannot form ZOC Bonds, and Low Morale Units no longer suffer a shift when attacking since their low Attack Strength already reflects that
The main change was I really had incorporate was to expand the bridge blowing/building and water obstacle rules since it is so prominent in the campaign.
Grant: What are the force structures and what historically accurate units make an appearance?
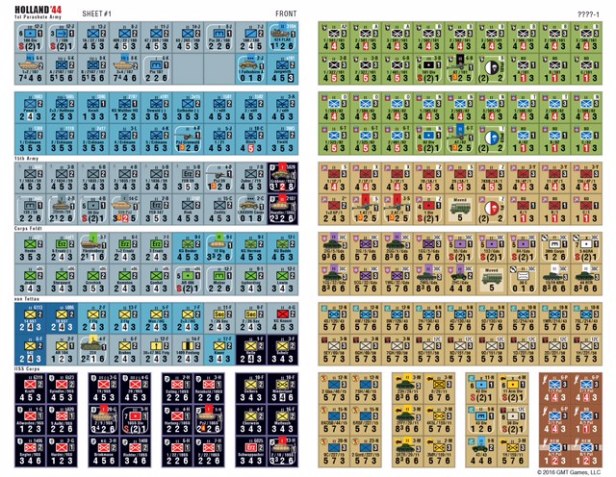
Mark: The Germans are divided into 5 commands: 2nd SS Corps, 15th Army, 1st Parachute Army, Corps Feldt, and von Tettau. The Allies are divided by divisions: the three Airborne Divisions, Guards Armored, 11th Armored, 3rd, 15th, 43rd, and 50th Divisions. No more than one unit from another command can assist in an attack of another formation.
Unlike most Market-Garden games, this one also covers 8th Corps advance to Helmond and beyond to Venray. A part of the British 12th Corps sector is included but their participation is abstracted.
Grant: How do the Polish units factor into the game?
Mark: They act as part of the 1st Airborne Division and usually arrive on the 4th day — although it is possible for them to land on the 3rd or 5th day. They are the only units that may land in the polder south of the Lower Rhine River.
Grant: Tell us about the sequence of play. What role does weather play?
Mark: The Sequence of Play is as follows:
Weather Phase (determine both the AM and PM weather on the AM turn)
Artillery Resupply Phase = flip a limited number of Artillery Units.
Bridge Phase = Build and destroy bridges
Airlanding Phase (Allied Player Turn only)
Movement Phase
Combat Phase
Recovery Phase
Supply Phase
Traffic Marker Phase (German Player Turn only)
WEATHER: Weather is very important and similar to how it worked in Hell’s Highway. There are three types: Clear, Cloudy and Overcast. The better the weather, the more Airborne reinforcements that can land and the more Air Units available. The Poles can only land in Clear weather. Airborne Artillery units can only be resupplied on Clear turns.
Grant: What is the traffic marker phase and what historical aspect does this represent?
Mark: This phase is identical to the same phase in Ardennes ’44. It just slows down Allied Movement a little and reflects the traffic jams the Allies experienced at the bridges.
Grant: How is air support represented in the game?
Mark: Very simple: each air unit gives a favorable shift to the CRT. The Allies get 2 air units on Clear Turns and only one air unit on Cloudy turns. None on Overcast or Night Turns. Air Units can only be used for battles involving non-Airborne units.
Grant: How does the breakdown unit box work?
Mark: Each side has a limited number of company-size breakdown units they can create from their battalions. The breakdown box is where the breakdown units are held until needed.
Grant: Your maps are always so well done! What role do you believe the map plays in the game and how do you feel it sets the tone for the operation? How many changes have you made to the map? What were the significant changes?

Mark: I think accurate maps are extremely important to a game design. Terrain has a huge affect on campaigns and when you get that right, your design has a better chance of succeeding. I occasionally find that when something a-historical happens during testing, it is because my terrain analysis is wrong. I go back and study my source maps to see why such-and-such didn’t move that way — then I usually discover an obstacle I didn’t see before.
Grant: I just love your maps and feel that they are usually an overlooked component of the game and I am so impressed with your attention to historical accuracy and detail. It makes a HUGE difference! I’ve heard that the map has an 8.5″ extension for the 30th Corps/Valkenswaard section. What is this and how does it work?
Mark: My initial idea was to have the board edge end around Eindhoven and the 30 Corps would appear as reinforcements, but that soon was discarded. To cover the area from Eindhoven to the start line I needed another 8.5″ — one map panel.
Grant: Is the map to be mounted? Please say yes!
Mark: A lot of my customers live overseas and the cost that adds to shipment is a burden for them, so the maps will be paper. I will ask GMT to print a mounted map for separate purchase.
Grant: Where do the paratroopers first land on the map? How difficult is it for them in the early going?
Mark: On turn 1 they must land on their drop hexes printed on the map. As the days go by the restrictions get looser. By the 4th day they can land on or adjacent to any Drop Hex printed on the map or on/adjacent to any Airborne Supply Depot.
The airborne units have a lot to deal with right away. While the Allied Player turn of Turn 1 is easy, the Germans appear right away and cause pressure on all sides. In this game both sides are attacking all the time.
Grant: Generally how many rounds does it take for the allies to reinforce the beleaguered paratroopers?
Mark: There are three turns to each day, and it usually takes 3-4 turns to reach the 101st, 5 to 7 turns to reach the 82nd, and it varies wildly how long it takes to get to the 1st Airborne. I played one game as the Allies and couldn’t even reach the 82nd.
Grant: Why have rules such such as ZOC Bonds, Determined Defense, Extended Movement all made their reappearance? Do you feel these rules are critical to a good battalion level game?
Mark: Most are not critical to a good battalion level game, but all are elements I have found to make a fun, easy-to-play game. Determined Defense is critical because it is the only way one battalion of paratroopers is going to hold the Arnhem bridge for 7-9 turns. When I first started the design I didn’t think that would happen very often, but I’ve seen it occur about half the time. It is fun to see it happen.
That brings up an observation I’ve had: Even if the Germans capture the Arnhem bridge early, or the 82nd captures Nijmegen right away, it doesn’t alter the game that much. If the Arnhem bridge is captured early and more German units enter the island, then that will slow down the reduction of the 1st Airborne pocket. If Nijmegen is captured early by the 82nd it is still almost impossible for them to get across the Waal until 30 Corps arrives.

Grant: Was it difficult to design the game to be true to the terrain of the Netherlands?
Mark: Yes, and No. I enjoyed the terrain analysis but I had a hard time trying to figure out what the effects of Polder would be. Would armor be halved attacking and defending? Would units be doubled in defense or given a favorable shift? In the end, I treated it as a hex-wide shallow river hex. So if all attacking units are attacking from it, then the defender is doubled. Silhouetted units are halved in defense strength to reflect their vulnerability on an elevated dike road. Polder is treated like Clear Terrain on the Determined Defense Table so it is hard to hold your ground. The battle on the island (Betuwe) really becomes a fascinating part of the campaign.
Grant: How much special attention was given to river crossings, bridge building, and fighting in the flat polder terrain?
Mark: Lots of attention. I mentioned bridge building and polder fighting above, but I also worked extensively to get the cross-river attacks of Major Rivers just right. In the game, their are two engineer units that make that possible–one in 30th Corps and one with the 43rd Division. With artillery and air support it is pretty easy to get across, but only the two battalions stacked with the Engineer unit can advance after combat across. So they are vulnerable to counter-attack.
Grant: What are the victory conditions for each side? Which side has the harder time of meeting them?
Mark: We just recently tweaked this to a point system. Each side needs 10 VP’s. The Allies get theirs from the city hexes, the towns of Overloon and Venray, and (most importantly) getting units across the Lower Rhine. The Germans get theirs from eliminated Allied units. Hopefully it is even, but that is why we are still testing.
Grant: What are the various scenarios? Which scenario do you like to play and why?
Mark: Just two scenarios so far: The campaign game and the short game. The short game is designed for tournaments and ends when the Allies get across the Waal River. I like both scenarios.
Grant: While this is mainly a battalion level game I understand there are some company sized units. Which ones are they and why did you include them?
Mark: I had to include companies because most of the German armored units were at company strength. There are very few Allied companies.
Grant: What is the typical play time for the full scenario? For the 10 round scenario?
Mark: You can easily finish the campaign game in 2 days. You can easily finish the Short game in an afternoon.
Grant: Is this game easy to learn for new players? What is key for them to understand to be able to pick up the game play quickly?
Mark: I try to make my games as easy as possible, but it is still a moderately complex game. To help, I’m going to load up the rule booklet with examples and have an extended example of play in the back of the rule booklet. I noticed my play testers catch on really quickly, so if you’ve played one of my other games it should be an easy learn.
Grant: What are the player aid cards like? Can you spoil them with a picture for us?
Mark: I like all the critical information to be on just one card. It is not yet finalized, but I’ll include a JPEG for you.

Grant: What mechanics still need work in the game?
Mark: Little things are always being fine tuned. But now we are mainly working on balance.
Grant: How is Playtesting progressing?
Mark: Nicely. I’m hoping we just have one more round to go.
Grant: Are you pleased with the response on P500 with 795 orders as of October 3rd? (I’m one of those by the way!)
Mark: Yes, very pleased with the interest. I’m fortunate to have enough supporters so that I don’t have to spend much time plugging my games.
Grant: What other games do you have in the works?
Mark: On the side burner I have two projects: The Expansion to Normandy ’44 and a Hannibal style game on Caesar in Gaul.
Thanks for the great information on this amazing looking game. I am very excited for its release and can’t wait to devote a weekend to playing out this amazing campaign. If you are interested in ordering Holland 44′, follow this link to the P500 page: http://www.gmtgames.com/p-600-holland-44-operation-market-garden.aspx
-Grant


Great interview with a lot of good information!
LikeLike
An expansion for normandy 44? Can’t wait for more details!
LikeLiked by 1 person
I love Normandy ’44 and look forward to seeing the expansion.
Would somebody please ask Mr Simonitch to design a ’44 style 1980’s WW3 game? I would love to see his take on the genre which still holds great fascination for a lot of older gamers.
LikeLike