


I finally was able to get my hands on a copy of Combat Commander: Mediterranean this month and after punching and clipping the counters and then organizing them into 2 GMT trays (1 of which came with the game – Thanks GMT!), I was ready to try out the first scenario (Scenario #13) with my gaming buddy Alexander. So on War Game Wednesday, we got together and were able to play. I have done a Preview of CC:M so you might take a look at it to see what is new in this edition of this great game.
Scenario Setup
From the Playbook we read the following about the scenario:
“Near Maleme Airfield, Crete, May 21, 1941 – Captain Van Etten’s parachutists had been in many chaotic skirmishes with Allied forces in and around Maleme Airfield since the airborne landing on Crete the previous morning. His forces wearing thin, he decided to temporarily reassemble in the high ground to the south.
As it happened, elements of the 5th New Zealand Brigade had decided to cross those very same hills in an attempt to withdraw southeast of the airfield for a future counterattack. Van Etten’s depleted company attacked and surrounded a platoon of withdrawing New Zealanders belonging to the 22nd Battalion unaware that more were fast approaching.”
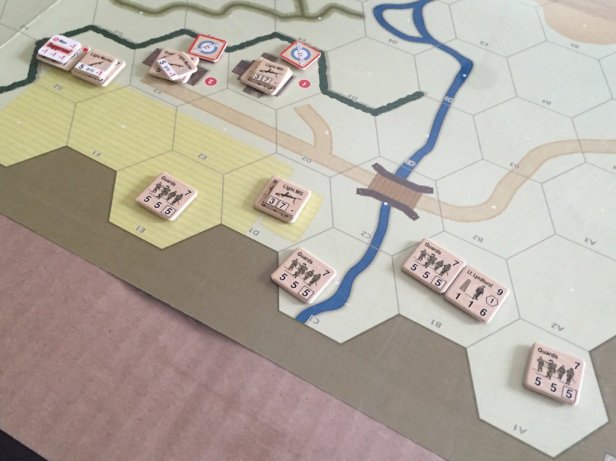
I chose to play as the Germans who are the Defender in the scenario and Alexander played the ANZAC forces which were the Attacker. The Surrender level was set at 6 for the Germans and 9 for the Allies. The scenario required the Allies to set up first and they had to place 6 of their Guards units in the 1 space of the Time track. They could optionally place any number of their other Leaders and Weapons in the 1 space as well and he did so, placing Lt. Lyndhurst (Command 1, Morale 9) along with one of his two Light MG’s. He then set up as follows:

The Germans were allowed to set up afterward and with the elevation that the hills offered and no Weapons for the scenario, I decided to place my units in two separate teams in order to take advantage of the +1 Fire for the elevation of the hills. I placed a forward fire group led by Lt. v.Karsties (Command 2, Morale 9) consisting of 3 Parachute units (FP 5 (boxed), Range 4 (boxed), Move 5 (boxed)) with 2 being located in the trees with the 3rd unit being located on the higher elevation above the trees to be able to see over and still bring fire on the Kiwis. I then placed my 2nd team led by Lt. Lauerbach (Command 1, Morale 9) to the east on the opposite side of the hills with 2 Parachute units to try and bring fire on the Kiwis as they would inevitably try to advance up my left flank. I also placed one lone Parachute unit in the grove to the west of the road in the brush to guard that advance (this would be important later in the game!). Due to the Open Objective Chit W being in play (this Objective doubles the points for exit), I was immediately worried about my ability to react to their movements to the left flank and in the end, this would be the element that doomed me for the scenario.

Hilltop Fire & Fast Marching
With the setup being completed, we started and as the Axis, I took the first turn. My very first action was to play a Fire Order using Lt. v.Karsties group to fire on the Guards unit led by Sgt. Hawes. I was able to bring a very effective fire to bear on them with a total FP of 20 leading to both Sgt. Hawes and the Guards unit to break! I then followed that up with a Rout Order which caused the Guards unit to retreat, but only one space. Only one more space and it would have been eliminated!


The Kiwis spent their 1st few turns moving into Objectives #1 & #2 to establish a base of operations out of the buildings taking advantage of their cover bonus of +3. I was very fortunate and was able to play a Fire Action in reaction to their moves and slowly whittle them down setting me up for my 2nd Fire Order from the hilltop killing 2 of his units. This brought my total VP to 8 and I had 4 of his units on the Surrender track, only needing 5 more to force his capitulation!

At this point in the game, we hit our first Time Check which brought in a large amount of Kiwi troops as reinforcements from the Time Track. As they were reinforcements from the Time Track he was able to place them anywhere along the back edge of the map and as you can see, he decided to place a majority of the units on the west side of the river which would allow him to attempt to “run away to fight another day” and take victory with points granted by Objective Chit W, which doubled exit points! Over the next few rounds, I kept up my withering fire on the Kiwis leading to several more kills. I tried to begin the slow process of moving my Fire teams from the hilltop to the left flank to stop his advance and attempt to run off the board but I just wasn’t able to draw enough Move or Advance Orders to get into position quickly enough to make a major difference.
I was very effective with my Fire Orders and was able to kill 2 more units bringing his total losses to 6 units, only 3 away from Surrender. Conversely, when he tried to execute Fire Orders or Actions, he was fairly ineffective and I only had 2 or 3 units break the entire game, usually being able to play a Recover Order to get them back. One time, he used his famous British Marksmanship Actions 3 times in one attack giving a him +6 for a total of 23FP. I was able to defend one of those units and only had one unit break from this amazing feat!


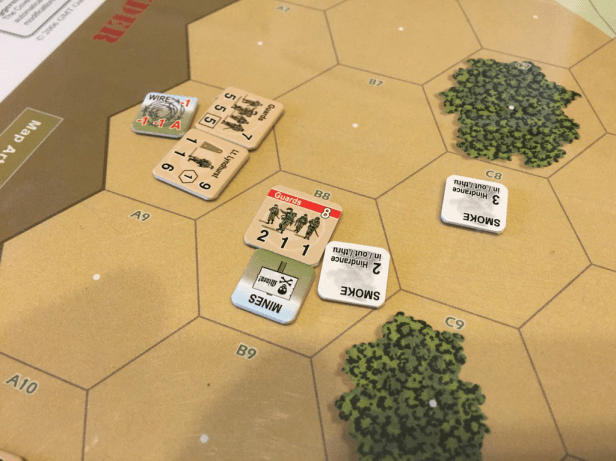
The game began to near its end with the Germans having 18VP but the Kiwis had 4 units only one move away from the edge of the board on the left flank. If he could get these units off the board, he would score 15VP and bring the victory within striking distance. As you can see from the below picture, I was able to play a Hidden Mines Action that broke his Guards unit as it tried to move slowing him down as I was trying to advance my units from the east to get into position to bring fire down on him.
The German units finally were able to arrive within range of the Kiwis and began to put a withering fire on them breaking Lyndhurst and the Guards unit but being unable to finish them off! You will also notice that he was able to lay some good smoke cover along his left between me and his units which made it more difficult to hit him with Fire Orders. He was able to play a Recover Order the next round, rallying his broken units and then used his Move Order to move off the board before I could finish him. Had I killed at least 1 or 2 of those units, I would have taken 4-8VP from him and gained myself 2-4Vp for a total 6-12VP swing. This would have made the difference in the end but alas, it wasn’t meant to be.

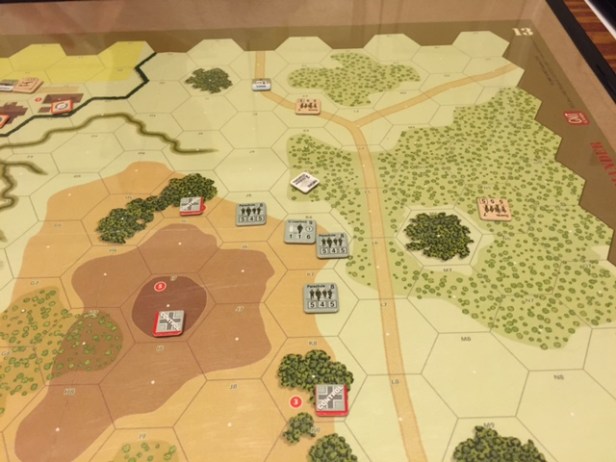
With those units running off the board on the left flank to score VP for Alexander and the ANZAC cause, the very next Time Check saw him placing those very same units back on the board, but this time on the very far German right flank. This forced me to double time march across the board to try and intercept him before he could run off the board again. You will notice from the above picture that my lone Parachute unit placed in the grove of trees in the brush at the beginning is nowhere to be found as I had moved him to the left flank to assist with the attack there. That was a really bad tactical move as he never was used to improve the FP of any of my Fire Orders and was never really able to even get close to the action. He should have stayed where we was placed and done what was intended, to be the last line of defense.
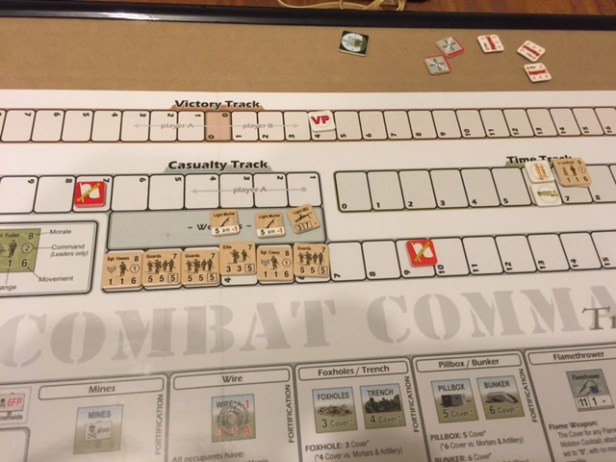
I was able to get another Hidden Mines Event that slowed his advance but it was not enough as he was able to get an additional 3 units off the board scoring an additional 11VP. At the 1st Sudden Death, the game didn’t end but it did at the 2nd with the ANZAC having 4VP and winning the match.
Summary & Debriefing
I learned several lessons from this scenario that I would like to share with you so that you can possibly avoid the same problems when you play it:
- Go with your gut! – I knew that the game would come back to the right flank and my initial placement of the Parachute unit near the road to guard that exit was exactly correct. My problem was that I felt later that he would be better utilized on the right flank. Don’t change your plans after you have carefully considered all options and have a workable contingency in place. This change caused me to lose the match!
- Elevation is extremely important – I was able to take advantage of the hills to gain elevation adding +1 to my Fire Orders. This +1, while it may seem very small and insignificant, was the difference in the early game as I was tearing through his units and had 6 kills shortly into the 2nd Time Check. More importantly, the elevation difference protected me from his being able to fire back at me.
- Don’t hold cards – I didn’t talk about it much in the AAR but I held onto a Reinforcements Action for several turns near the end of the 5th Time which caused my hand to clog. This clog kept Fire Orders out of my hand that would have won me the game. I was holding the card because I was wanting to place a Bunker in a hex that he fired into as I had several units without cover. This was total rubbish as he was not interested in firing at me and two had not even come close to doing any damage to me the entire game.
So now our head to head record is 5-3 in my favor but I have now lost 3 scenarios in a row to Alexander! He has definitely caught on and is doing a much better job of his initial setups and moving his forces together effectively to capitalize on Command radius and Fire groups. It is great to see the things that we have learned about the game over our 8 plays and I look forward to many future plays of Combat Commander!

