The ’40X Series is not a formal series or category of games from GMT Games. However, typically the term is used to refer to a collection of games sharing certain key characteristics such as operational level WWII campaigns that have key concepts and mechanics such as the Zone of Control Bond or ZOC Bond, Desperate Defense and a few other aspects. Typically, these are designed by Mark Simonitch and some of the games included in this category are France ’40, Holland ’44, Ardennes ’44, Normandy ’44, Salerno ’43 and North Africa ’41 to name just a few. The system is really solid and are playable hex and counter wargames. We have played most of them, with the holdouts being France ’40 and Ukraine ’43 as well as the few as of yet unreleased titles including North Africa ’40 and Italy ’43, which are in currently going through the design process. With that introduction, here are my Best 3 Games with…’40X Series!
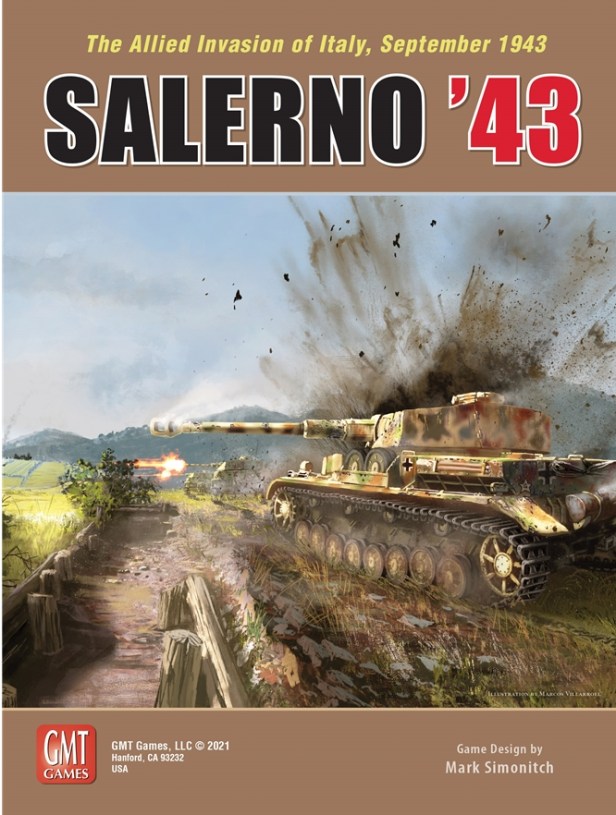
3. Salerno ’43: The Allied Invasion of Italy, September 1943 from GMT Games
Salerno ’43 is a well designed game that has a short scenario of 8 turns and a full campaign game of 22 turns. I think that this game is very good and will be one that you can play over and over again until you get the strategies down and can really stretch its legs at that point. But the game plays fast and furiously and was frankly a very good way to spend a Friday evening for 6 hours. If you are a fan of the ZOC Bond System, then this is a no brainer for you as it carries out that system well. If you are wanting to get into that system, this is probably the very best place to start.
I wouldn’t classify it as an introductory game, it is more a smaller ZOC BOND game, which requires some understanding of the finer points of this system. Also, the important concepts to understand for the Allied player are the limits of terrain on both movement and supply and how to overcome them. The German player has got to understand ZOC Bonds and how they can use them to their advantage to plug holes and hold back the Allies while also using Determined Defense at the appropriate times. With that being said, the game is low counter density, with really well written rules and fantastic player aids. There is no reason that even a novice cant pick this game up and give it a go. The hard part to pick up will be the strategies as described above but I will state emphatically that anyone can play this game.
After the Allies land on the 7 beaches/ports, they have got to get off of the beaches and create a shield to protect those precious Beach Head Markers. This is where the ZOC Bonds mentioned at the outset of this post came into play, but more on this later. Suffice it to say, the Allied player has got to get organized and moved off the beaches in order to create the shield needed to hold back the advancing Germans. One of the really interesting parts of the design is the terrain bonuses that are given to defending units. These include the Hills, Mountains and Minor Cities. While a defending unit is holed up in one of these 3 terrain types their defensive value is doubled with the exception of any tank silhouette units which are not doubled. If a good sized stack of German defenders can get to a few of the Minor Cities just out of the Salerno valley they can really be sticky and hold off multiple attacks from Allied units. Because of this, it somewhat becomes a bit of a race. Not necessarily a race to get there first, as the Germans are not far form them, but a race to get there and keep the pressure up with repeated attacks before fresh units can arrive to spell the beleaguered German units.
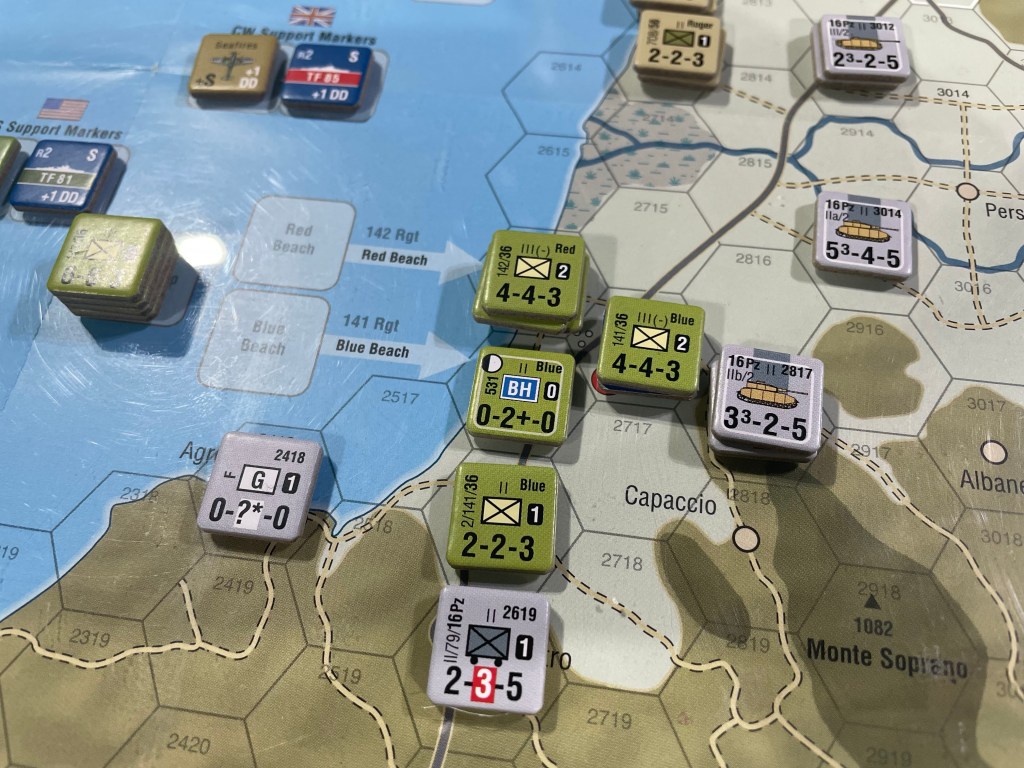
The other aspect that I thought was really interesting was the Allies angst over protecting their Beachheads as they are under pressure by very capable German units just a few hexes away. I remember talking with Mark Simonitch in an interview we did with him where he stated that some of their play-testers has lost a couple of Beachheads from German counterattacks. I actually didn’t think this was possible until we started playing and then I felt the same angst! Waiting for the Allies is the full-strength 16th Panzer Division, which is soon reinforced by elements of six others: the 3rd, 15th, and 29th Panzergrenadier Divisions, the 26th Panzer Division, the Hermann Göring Division and five battalions from the 1st Fallschirmjäger Division. As you can see in the above picture, the 16th Panzer has some good units in their Stug III’s, and mobile infantry. Their good Defense Strengths make them tough and several of the units are also elite (shown by the red box around the Defense Strength). This can lead to a column shift if the attackers don’t have an elite unit present and couple that with the doubled Defense Strength in the hills and it is a long and hard road to push them out of the hills to allow for Allied breakout.
I guess one of the real problems with the invasion was that the Allies just didn’t possess enough shipping. After they dropped off the four initial divisions it took them 6 to 8 days to return with additional divisions as well as fuel, ammunition and food. This fact lead to the Allies being stalled on the beaches for the first 3-4 days of the invasion and this is modeled pretty well as it takes at least 2-3 turns to make it off the beaches. The Allied air support and the support unit artillery make it possible for some column shifts as most of the attacks early on are on the 1/1 column of the CRT and they are not good with fully 4 of the results being bad for the Allies.
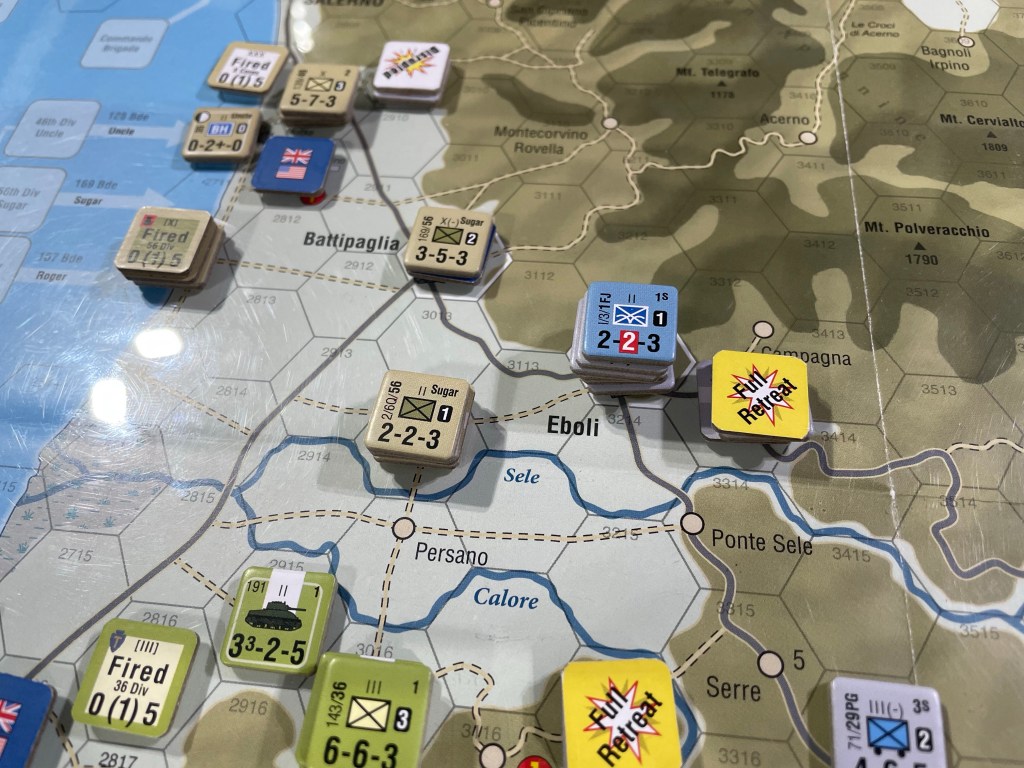
As I mentioned in the introduction, the ZOC Bond System is really made for these type of low counter density games where you don’t have enough units to cover the ground you need to defend and have to rely on these sticky ZOC’s and ZOC Bonds. We found in this game, that ZOC Bonds were only important in the early going though or until the Allies can break out of the Beachheads and begin making progress up the mountain roads and passes. At that point, they turn more toward effecting the supply status of defending units as an infantry unit’s ZOC can extend over a hill side or mountain hex side. This can be very important in the effort to disrupt supply and isolate German units. This doesn’t happen that often but I found that I was looking for those opportunities as an additional way to cause losses through attrition.
I really think that this is a great example of what a ’40X Series games is trying to do and the game was also very fun to play. I loved the terrain and the challenges it brought and also thought the victory conditions were very well done.
I posted a First Impression of the game and you can read that on the blog at the following link: https://theplayersaid.com/2022/05/18/first-impressions-salerno-43-the-allied-invasion-of-italy-september-1943-from-gmt-games/
We also posted an interview with the designer Mark Simonitch on the blog and you read that at the following link: https://theplayersaid.com/2021/05/17/interview-with-mark-simonitch-designer-of-salerno-43-from-gmt-games/
Here is a link to our video review:
2. Ardennes ’44: The Battle of the Bulge from GMT Games
Bulge games. There are a ton of them. They all try to cover this titanic last gasp struggle of the dying Wehrmacht and Nazi war machine. Some do it well. Some not as much. But, what I found with Ardennes ’44 was that it did the Bulge well. I am probably feeling this way because I am familiar with the ’40X Series and just really like it. There is just something to be said for the very cool ZOC Bond system as well as Mark’s efforts to inject battle specific chrome and processes into each of these games.
One of things that I really enjoyed about the game and the situation was that the Germans have to roll on the Fuel Shortage Table at the beginning of each of their turns. They roll 2d6 and each of the dice link separately to either Table 1 or Table 2. This table identifies the formations that will be out of supply in the coming round. Being out of supply has several effects, including Attack Strength being halved, only being able to use Tactical Movement that is basically 2 hexes, Artillery Units may not flip to their Ready side and will be unable to provide artillery support in attack or defense, units are eliminated if they are forced to retreat 3 or more hexes as a result of combat, don’t gain the Road Bonus when moving and cannot receive Replacements. It was pretty funny in our game that he rolled the 2nd Panzer and Panzer Lehr divisions on 3 of the 4 rolls and they really were never able to mount any serious offensive move against the center of the board which allowed the Allied units to get in great defensive positions in some of the more heavily wooded areas around St. Hubert, Rochefort and Marche-en-Famenee.

I also really liked the Traffic Markers that are provided to each player to simulate the difficulty with moving so many men and machines down 1 lane country roads through heavily wooded terrain. This is a mechanic that has appeared in several of the series games and think they are genius. Each side has these markers and may place those that are available to them on roads in an attempt to slow down the movement of enemy units. But, in the rules it stated that these Traffic Markers are not just representative of the roads and their tightness but also roving German commando teams, SNAFUs, psychological disruption and air interdiction after the weather clears up in Turn 14. The Allied player has Traffic Markers while the German player has Greif Markers. These Traffic Markers act to increase the entry cost of the hex by +2 MP’s for all units. These markers do not however effect units that are performing Tactical Movement or that are retreating due to combat. Also the player’s own placed Traffic Markers have no effect on their units.
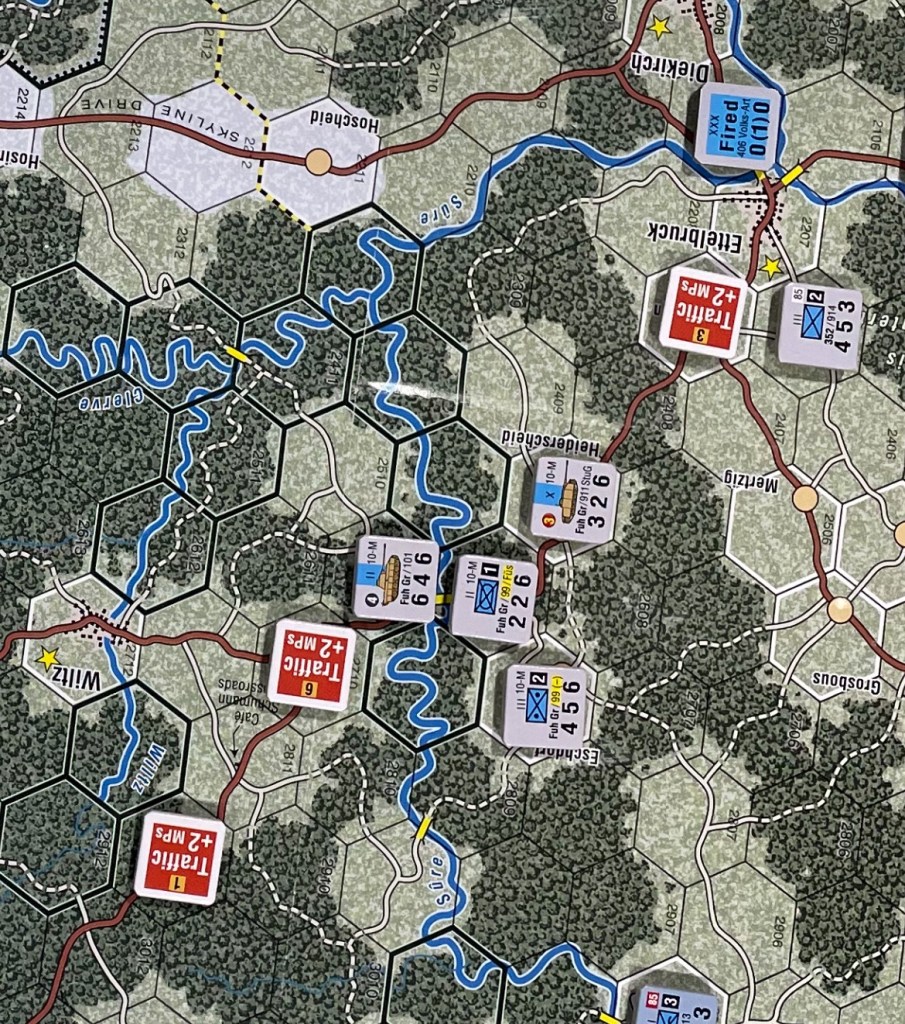
Each turn, each player will roll 2d6 and each of the numbers generated will refer to one of their numbered markers 1-6. When the marker number is rolled, they will have to remove that Traffic Marker from the board and keep it off map until the next Traffic Marker placement. This was pretty cool as you never quite knew what markers would last and which would be removed. If you are lucky and roll doubles, only that number is removed and will leave you with 5 other Traffic Markers on the board. Several times, these markers made it so one of us couldn’t quite make it to a hex that we wanted to attack or get to in order to reinforce or defend. I also found that at first, I was unsure about where to put them but as the game wore on, we learned and it became more evident where they would make the most difference. You cannot place them in adjacent hexes so they have to be separate by at least one hex but you can really make moving hard with some well placed Traffic Markers.
As expected, Bastogne is a big focus of the game. Located in the center of the western map, Bastogne started this scenario completely surrounded by elements of the 47th Panzer Army supported by multiple Stugs. The defending 101st Airborne are in a bad way but have been able to construct makeshift Improved Positions (IP), which gives them a +2 Defensive Combat Bonus to their Defense Factors turning these infantry into 6 Strength units. Not a huge difference, but in this situation each of those Defense factors help keep them alive. It is important to remember though that the +2 DCB is used in place of the terrain DCB as the two elements are not cumulative. Therefore, constructing an IP in a Village, Town or City hex will have no effect since those hexes already have a DCB value of 2 or greater.
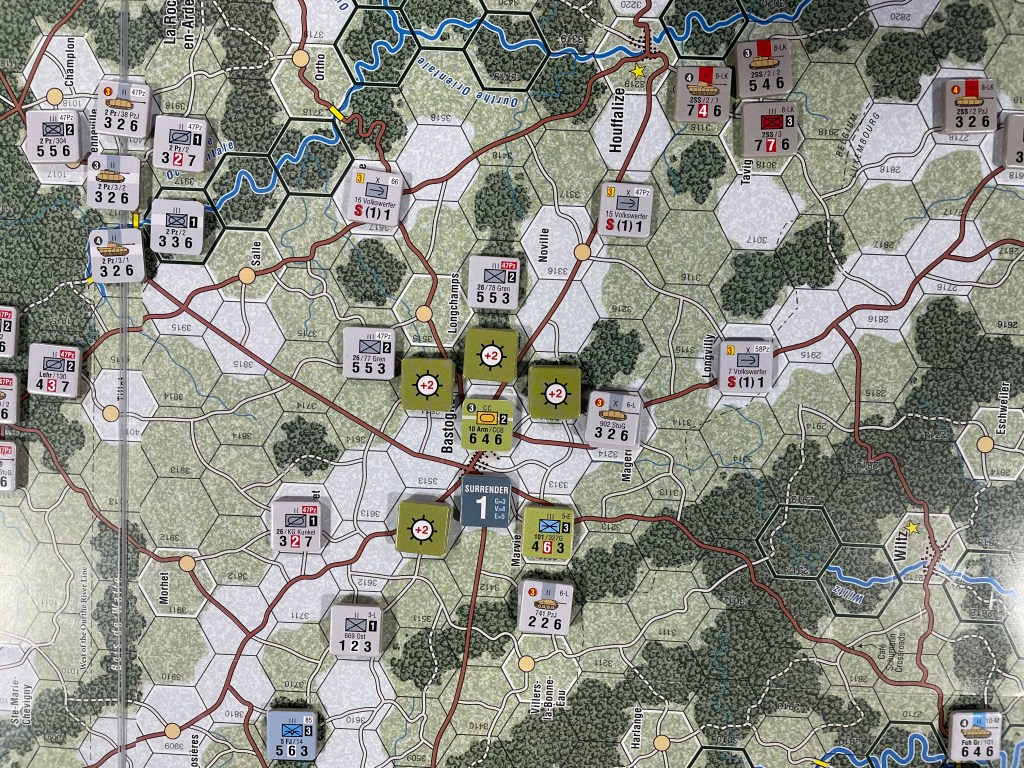
You might have noticed the large Surrender 1 marker located right in the middle of Bastogne. This represents an Isolated formation as they are unable to trace the 4 hex range to a road to gain Supply due to being surrounded by enemy ZOC’s and units preventing them from tracing to roads. This marker represents the level at which the Isolated Group of units will surrender. At the end of each round, the player surrounded will roll a D6 and consult the Surrender Table. The result is the number of Surrender Points that the Isolated Group will accumulate that round. Sometimes, if the roll is very low, they will actually gain resolve and reduce their Surrender Points due to having received an Air Drop). An Isolated Group will surrender when the Surrender Threshold for the unit types is reached through this process and those Surrendered Units will be immediately removed from play and cannot be replaced. The Surrender Thresholds are as follows: Green Unit Threshold: 3 Surrender Points, Normal Unit Threshold: 4 Surrender Points and Elite Unit Threshold: 5 Surrender Points. If the player can somehow make it until the weather clears in Turn 15 this roll will gain a –2 DRM for the Allied player only.
In the game, my units in Bastogne are Elite Units and therefore have a 5 Surrender Point threshold but at the end of Turn 15, after rolling very poorly, were sitting at a 4, just one point away from surrendering. This is really bad for the Allied player as this will then free up those German units to press the attack into the eastern map and bring added firepower to push the Allies back. I was able to break a few scattered Allied units through the line along the Attert River and get up to attempt to break the siege but the Germans were pretty tough there and it was going to take a few turns to do anything that would dislodge them.
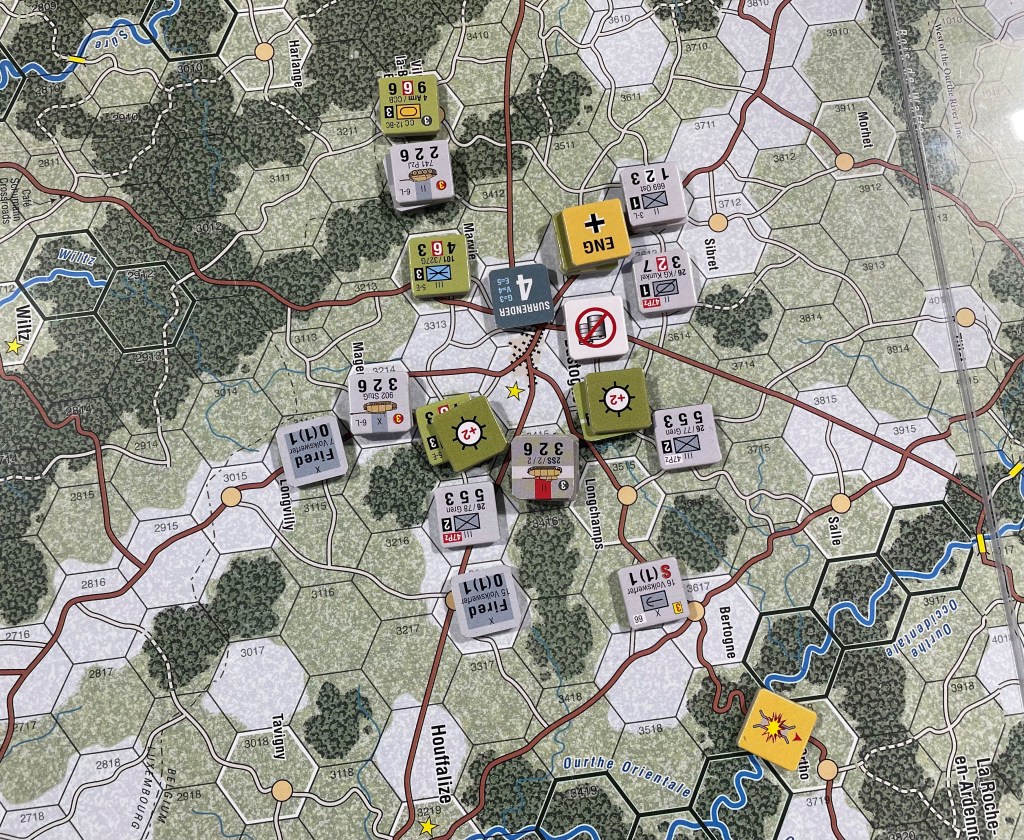
Combat was also great and that CRT is tough at low odds, particularly at 1-1. There are some very interesting results as well including Engage (the defending unit being unable to move away from the fight on their impulse), FF (Firefight), which is a version of Desperate Defense but for the offensive to be able to break through and keep moving. This would be used when you absolutely have to get through to either open up supply or force the enemy to retreat out of supply. There also is the very cool and unexpected Engage+, which is mostly the same as Engage except the attacking units will be given an Attacker’s Advantage marker. This marker stays on that stack of units until the next time they attack at which time they will gain a column shift.
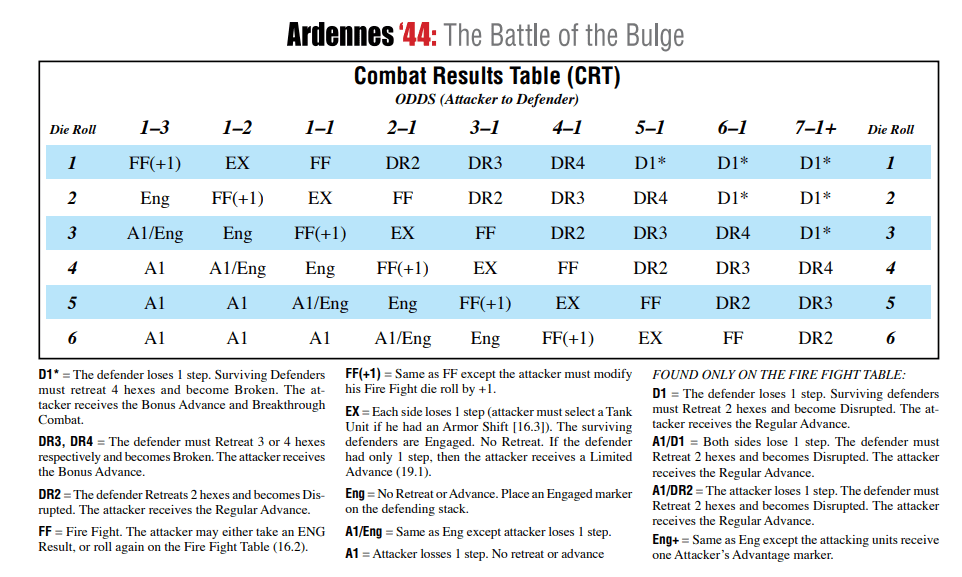
Rolling low on the CRT is the key and frankly having to roll low always causes me issues as I just always seem to roll 4-6 in most other games. That is one of the reasons that I don’t play ASL! Hahahahahahaha. Just kidding, there are other reasons. But combat is clean and reminiscent of the other ’40X Series games.
The final comment I will have is that the game is just sexy! All of those colors, with a majority of them being differing shades of browns and greens, just look great and that counters really seem to pop off the board even though most of their colors are also in the browns, greens and grays scale of the color spectrum. Just a great looking game that was really fun to play and experience!

We really enjoyed Ardennes ’44! In fact, I think that this is an understatement and the game has moved up on my list of Bulge games but also is amongst my favorites in the ’40X Series. I hesitate to say the game felt fresh, as this is one of the first few games in the series, but it definitely had some different elements than the other games in the series we have played.
Here is a link to our video review:
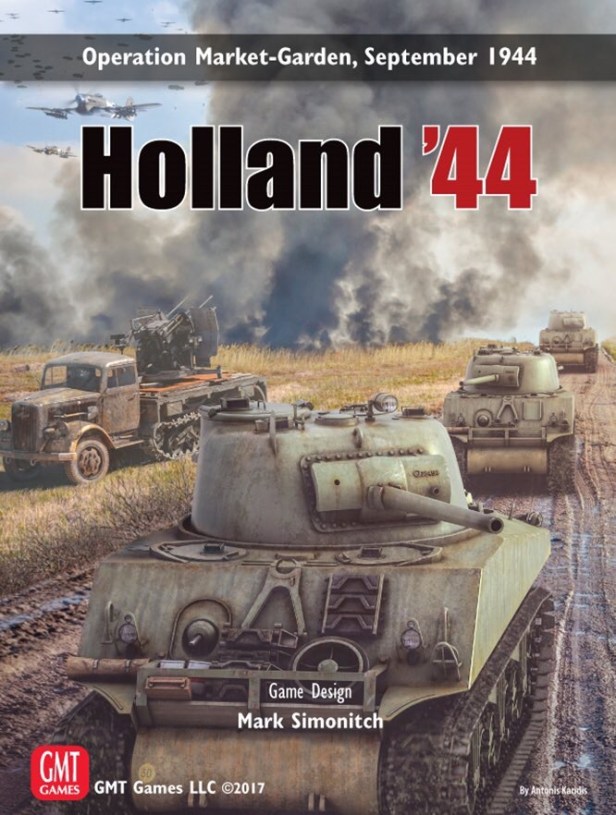
1. Holland ’44: Operation Market-Garden, September 1944 from GMT Games
Holland ’44: Operation Market-Garden from GMT Games is a hex and counter wargame that focuses on the September 1944 invasion of German occupied Holland in an attempt by the Allies to secure a bridge head over the Rhine River leading into Germany itself. The game uses ZOC Bond System, which is pretty simple to understand and provides realism in the various aspects that are being modeled.
In this game, airlandings, bridge demolition and traffic congestion are all expertly modeled to create a fun, interactive and most importantly tense experience for either side. The particular historical elements from the campaign are really important to the game but also to the design and layout and functionality of the map, including Airborne Operations, such as paradrop landings, supply sources, landing zones and bridge capture, as well as a focus on traffic congestion on Highway 69 (Hell’s Highway), bridge destruction by the Germans and rebuilding them by the Allies, and the terrain of Holland amongst other things.

Holland ’44 is quite the game and has a beautiful board to back up the fantastic game play! The board just transports one to the battlefield and really sets out the tone of the game and creates a unique vantage point on this ill fated and probably overly optimistic plan by the Allies during late 1944. Prophetically speaking before the operation was British Lieutenant-General Frederick Browning, who was a Deputy Commander of the First Allied Airborne Army under Montgomery. He’d supposedly said ‘I think we may be going a bridge too far’ before the operation. Well, that statement came to be true and the Allied campaign failed just one bridge shy of victory.
When Airborne units jump into combat behind enemy lines, they have to take what will sustain them through combat until those enemy lines are breached and a link is created with other friendly units. This is the case in Holland ’44 as the British 1st Airborne Division, the American 82nd and 101st Airborne will jump into combat with no immediate hope of linking up with their allies. They have to carry their supply, which includes medical supplies, ammunition, food and water amongst other items with them into their drops. Supply is something that you have to worry about as the Allies. Out of Supply units are not effective fighters and cannot be depended upon to meet their objectives.
In the picture below, you can see the 101st Airborne Division’s Supply Head located near their initial landing zone north of Son and the Wilhelmina Canal. This Supply Head will last for 5 full rounds, at which time it will be flipped to its depleted side. This will mean that at the end of round 6, the units that depend on it for Supply will be considered Out of Supply if they cannot link up with XXX Corps coming from the south. 6 rounds may sound like a lot but it is really not as each of these Airborne units must get to their objectives quickly and then hold on, hoping that XXX Corps can get to them before they are Out of Supply. This hope burns pretty brightly for the 101st and 82nd Airborne, as it is very likely that they can hold on until they are linked up with XXX Corps but this is a tall order for the British 1st Airborne Division. There main hope is that they capture the bridge head at Arnhem quickly and simply go on the defensive as their Supply depletes itself. You see, when units are Out of Supply, their movement is limited, as they are then only allowed to use Tactical Movement, their Attack Strength is halved and Artillery will not be flipped back to their ready side so are out of the fight. So when Out of Supply, those hefty Elite Airborne units start to look like green rookies as their Attack Strength will be reduced from 4, 3 or 2 to 2, 2 and 1 respectively. Not really numbers that will strike fear into the heart of the German player!

Supply is also very brutal in the terrain of Holland as it is criss-crossed with rivers, polder and large distances. If you are located on a road or next to one, you have no problem reaching your Supply Source as there is no limit to the range of a Supply Path on a road, but when you have to go overland, there is a maximum of 4 hexes allowed and then you will be Out of Supply. The Supply Path also cannot cross an un-bridged major river. Planning is very important and also protecting these vulnerable Supply Heads. If they are attacked, they do offer some resistance with an Attack Strength of 1, but if this happens you are in trouble. Be cautious, plan well how to maintain supply and you will be fine.
There is so much to like about this game but one of the really great parts of the design is the use of Traffic Markers by the German player to simulate the traffic jams that plagued XXX Corps as they advanced up the highway. Single lane roads jammed with lines of tanks, trucks and other vehicles, worked against the Allies and their meticulous plan. This is very well modeled in the design with Traffic Markers.

This game is fantastic and I have really enjoyed my two solo plays and our lengthy 10 hour marathon play. I can say that this game rewards aggressive action, both on the Allied part to move as fast they can toward the bridges and with the Germans as they receive reinforcements that must push to the center of the map to fill the gaps and delay the Allies advance for as long as possible. I also really enjoy the Traffic Markers that can be placed by the Germans on the highway, simulating traffic jams and destroyed vehicles on small one lane country roads. Lots to like here that will be received well by many acolytes of the ’44 system.
I wrote an in-depth look at the game and its systems in my review post and you can read that at the following link: https://theplayersaid.com/2018/07/19/i-think-we-may-be-going-a-bridge-too-far-a-review-of-holland-44-operation-market-garden-from-gmt-games/
I also wrote an entry on the game in our Beautiful Boards of Wargaming Series and you can check that out at the following link: https://theplayersaid.com/2022/12/09/the-beautiful-boards-of-wargaming-holland-44-operation-market-garden-september-1944-from-gmt-games/
Here is a link to our video review:
Well there you have it….my list of the Best 3 Games with…’40X Series! Please let me know what your favorite games are in the series.
-Grant

Great article. I only have 3 ‘40’ series games. Salerno, Normandy and France.
France40 is the most interesting for me as a Belgian. Great game but a huge challenge for the German player. The French always win if they cover their rear.
I plan to purchase the Italy follow up for Salerno.That one is great too.
Overall
It is a good solid system but a bit too classical.
For the Bulge operation I like Enemy Action Ardennes more because it has such a brilliant solo system.
And the Last Blitzkrieg offers more strategy and detail with better mechanics. I combine TLB with Race for Bastogne…
All in all great write up by you.
10/10.
LikeLiked by 1 person
Thanks. France 40 is on our list and will get played…this year hopefully. Odd that France can win a lot. That seems like a miss no?
LikeLike
My opinion is that the Germans need to push extremely fast in order to obtain the final objective, which is to cut the roads from North to South.
I still find it a great game though.
LikeLiked by 1 person
I have only played France 40(2nd) from the series (and only Sickle Cut).
Salerno is on the list to get (I do own the other two and Normandy 44 as well). Holland is probably the next to try (after like 15 other shelf-of-shame games).
I played France 40 solo and thought it was decent, but also felt like France didn’t have much to do with(they just need to harass and hinder the Germans so they can’t get across the map by the last turn).
LikeLiked by 1 person
Give France 40 a try. Quite interesting.
LikeLiked by 1 person
It is on the docket for this year…hopefully!
LikeLike
Another great review Grant. Have played all 3 of these, with Ardennes only the once (managed to sneak Pz Lehr into Bastogne early on).
Holland and Salerno are my 2 favs of the “series”. Looking forward to Italy 43.
Cheers
LikeLiked by 1 person