
2023 is now complete! Well, it has been for a few months but we always put our lists together in March as we have to get around to playing some of the late year releases that come out in November and December and this year there were several that we definitely wanted to get played. But now comes the impossible task of distilling an entire year’s worth of gaming down into a list of the 10 games that we most enjoyed. I hate doing this. I love writing about, thinking about and sharing my experiences about the games we have played but hate having to make somewhat objective choices about which is better and which games should even be considered for the list. The first comment I would have is that not all games are the same. Not the same scale, the same play time, the same mechanically or even historically. Each game is unique and in my opinion, all games have something objectively good about them. Secondly, we didn’t get around to playing some of the new releases in 2023. I say some but we actually didn’t play a lot of the new releases and did the best that we could to play as many as possible. So we might leave off a game that you thought was very good and deserving and it probably is but we either didn’t get around to playing it or it just didn’t hit with us. But, in the end, I have to make this list and this is my best effort at doing just that!
In 2023, we played nearly 40 unique titles from 22 different publishers. Some were solitaire only games, some were operational, strategic or tactical scale. Some used counters. Some used cards. Some used wooden bits and some used miniatures. Some were only card games with no other components and some were cooperative. We played a lot of games! And here I present to you my list of the Top 10 Wargames of 2023!

10. Warfighter WWII North Africa / Mediterranean from Dan Verssen Games
If you know nothing about Warfighter, you need to because it is simply a fantastic solitaire and 2 (or more) player experience that gives lots of tension and decisions about how to attack your enemy and how to traverse difficult terrain to reach your objective before the timer runs out. Warfighter is a tactical card-based game for one to six players, where players will select and equip a squad of soldiers, and then attempt to execute the mission assigned by fighting your way to achieve the objective.
In 2023, we got not one but 2 new entries released in the Warfighter Series including Warfighter WWII North Africa and Mediterranean. We played both of these games entirely co-op, which makes for a really nice change from our normal 2-player at each other’s throats wargaming. This system is just FUN! It’s a type of side scrolling, pulpy, run-and-gun romp that elicits the feeling of a 1950’s style comic book.
There’s been several iterations of the system over the years in their own stand along products, providing you with different theatres, weapons, nationalities, etc. but these 2 new ones gave us a really different experience as we were able to play British (North Africa) and Italian (Mediterranean) troops which was a bit of a change. The game is very much customizable and we have a good time trying to choose our soldiers, their skills, weapons and other equipment to stay within their allotted points for the scenarios. The decisions that players have to make in this game start from the outset and you have to know what your objectives are and the type of things that you might need to take along with the team.
There are also a lot of small pack expansions to add even more scenarios and cards to play with so this game is very much a lifestyle. Is this game an uber realistic historical simulation of the battles fought in these theaters during WWII? No, but that doesn’t matter. Because the game is just that much fun to play and you can really take this one out at anytime as the setup is pretty simple. The best part about the system, and the way that it works with the cards and the different enemies you will face as you move down the board are the stories that come out of the game. There are moments of heroism, bombastic exploits and exciting risk that you must take. There are also laugh out loud moments as you just can’t seem to get a card you need, or the dice hate you, but the whole experience is just plain fun. Something a lot of other wargames cannot claim.
For these reasons, I have placed both North Africa and Mediterranean on this list (kind of a 2 for 1 deal) as they are just that good. The system is not for everyone but is a light, cheeky and fun filled exercise in moving across terrain that is unfriendly, presents you with various challenges and tests and puts you up against some units that you have no business fighting. But it is very playable and we love it!
Here is a link to our full unboxing video for both games showing the components:
Here also is a link to our full video review of cooperative play for Mediterranean:
Here also is a link to our full video review of cooperative play for North Africa:
If you are interested in Warfighter WWII North Africa/Mediterranean, you are going to have a hard time finding one but there are a few copies out there online. You will just have to search for them.
You can find at least some copies of Mediterranean at the Miniature Market website at the following link: https://www.miniaturemarket.com/dv1-036by.html
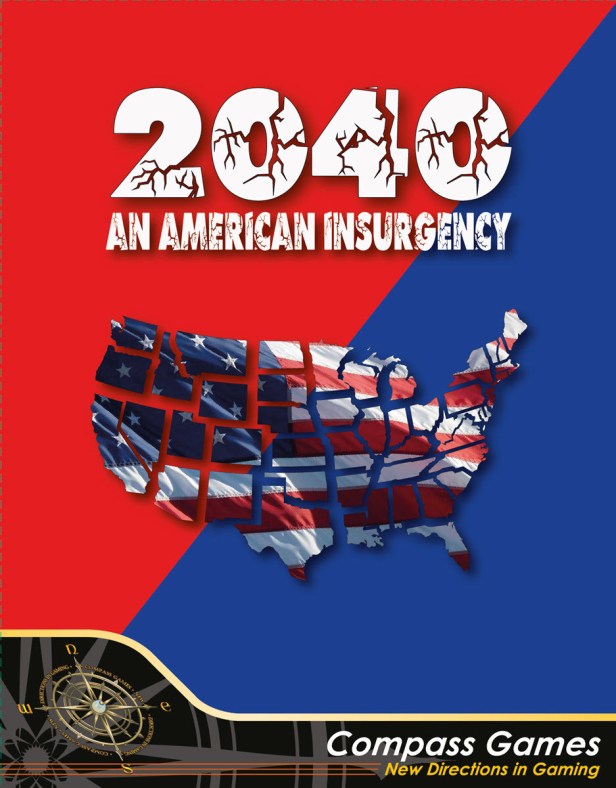
9. 2040: An American Insurgency from Compass Games
This game is not perfect and it has some issues and the graphics are not that great frankly. So then why in the heck am I putting this one on this list? Because, I actually felt like it was a pretty decent game, with some very interesting mechanics on an interesting topic. I know it isn’t perfect and in some ways the designer was so careful not to offend anyone in the game that he really didn’t get to say anything and the game somewhat suffers from that. But it was interesting and I believe that we are about the only ones who played the game.
2040: An American Insurgency is a card driven game that attempts to simulate a near future US civil war in the 21st century. In this 2-player game that plays in less than 3 hours, the blue team is the Federals representing agents of the government in Washington. The red team are the Rebels including militia groups trying to seize control of states, highways, and cities. The conflict spreads across the entire continental US, from Miami to Seattle and from Los Angeles to New York.
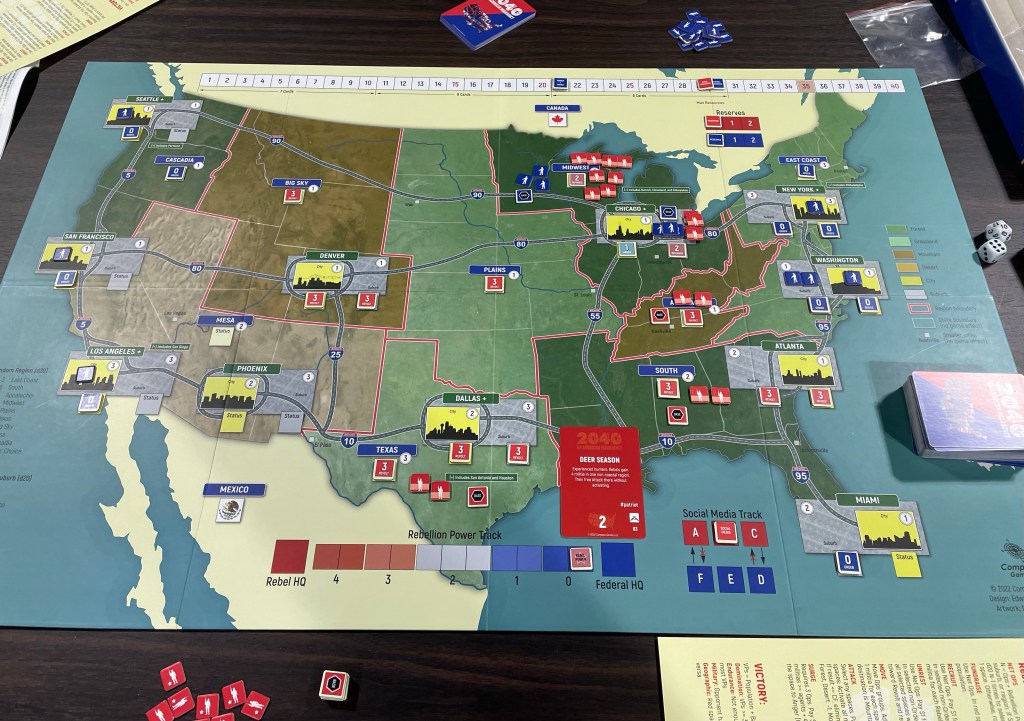
Two scenarios are included in the game. One depicts a rebellion that emerges from rural areas in the Midwest and South. The other puts the rebellion in urban areas along the coasts. As such, the game is open to multiple interpretations of future politics in the US. The game was designed not to make political statements of one kind or another, but rather to accurately model counter-insurgency operations in the continental US, regardless of who the rebels happen to be. This was one of my complaints. But it is very playable and interesting.
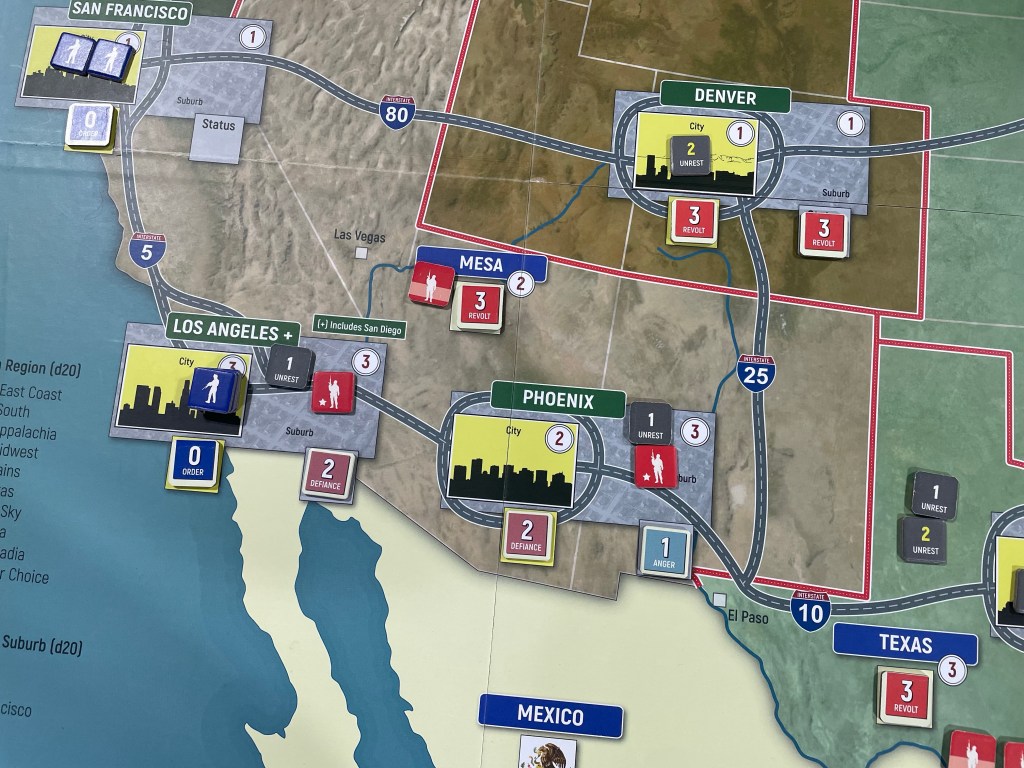
The best part of the game was the way that players could manipulate the Social Media Track to provide them with different bonuses and advantages. I will be honest though that this track felt a bit underwhelming and sort of half-baked but it was very interesting nonetheless. I actually think the game did what it set out to do, making a playable card driven game on a subject that no one wants to think about or see happen, but that can be explored and experienced. I also really liked the mechanics of what it was that I was trying to do and it seemed to work well. Not anything that you want to look at though as the graphics are very basic, which was a major missed opportunity.
Here is a link to our full unboxing video showing the components:
Here also is a link to our full video review:
I also posted an interview with the designer Edward Castronova on the blog and you can read that at the following link: https://theplayersaid.com/2023/04/04/interview-with-edward-castronova-designer-of-2040-an-american-insurgency-from-compass-games-currently-on-kickstarter/
If you are interested in 2040: An American Insurgency, you can order a copy for $69.00 from the Compass Games website at the following link: https://www.compassgames.com/product/2040-an-american-insurgency/
8. Iron, Blood, Snow & Mud from PHALANX
We have all played lots of East Front wargames. These games are always focused on things such as weather, movement, supply, and of course combat as the combatants fought it out over the fate of World War II over the short period of a few key months in 1941. Typically, these games all tell the same outcome, that of the Germans punching the Soviets in the mouth for the first few months of June, July and August 1941 until they got their feet underneath them and then punch back as the weather worsened and the Soviet people mobilized to defeat the invaders. The outcome of these East Front games are not necessarily pre-ordained, but unless something different happens, their outcome rarely if ever changes. That is where Iron, Blood, Snow & Mud from PHALANX comes into play as the game is a fun, light, fast playing strategic level wargame that we found to be extremely interesting and definitely up for grabs as either side seems to be capable of winning.
One of the big strengths that the game has going for it is that the rules are fairly simple to grasp, yet interesting, and the game is fast playing as it can be played in 90 minutes once players are familiar with the rules. Our first play took about 2 hours but that was because we were just trying to get comfortable with the movement, which in my opinion is the best part of the game! I found that the rule book used pretty clear language and also had some good use of symbology that was consistent and easy to interpret. This really helped in the quick playing arena as we were able to identify a symbol, remember its meaning, and then generally go about doing what it was without too much reference to the rulebook.
I also really appreciated the Turn Track and how they would include in each year’s box a couple of symbols that had the red circle around them and were then crossed out to let you know that due to the weather that year, these certain actions could not be taken. For example, Convoy Movement is a very important aspect of the game that we will be covering later. Convoy Movement is shown by a symbol of a 2 1/2 Ton Truck drawn on the board. When you see the symbol on the Turn Track, this means that you can take Convoy Movement because the weather is favorable. A very nice graphical representation of one of the more complex and important parts of the game in movements and the weather’s effect on it. This helped us to pick up the game quickly, not worry over remembering so many rules and just focusing on the game itself and having a good time.

One of my most favorite aspects of the design is how movement works. First off, as would be expected, it is dependent on the current weather and will effect whether a player can do certain types of movement. Initially, the movement seemed overly simple but as we got through turn after turn I noticed that the key to movement is planning. You have to understand how your units can move and what “obstacles” as they are called in the rules will prevent certain types of movement. Being efficient with units as well is very key as you have to sort of leapfrog your units forward in order to gain the most advance possible. This is a really well done part of the game and I really liked it. The way you leapfrog is through the use of Convoy Movement and it does require careful thought. You have to know where it is you are going and then line those units up to allow that this to happen. A chain of units that are connected is the key here but also not having Obstacles in your way like rivers. Convoy Movement is extremely important for units located in the back as if you separate them from your advancing forces, they will inevitably get stuck and will only be able to move one hex at a time. I will say that the low counter density was a positive part of the game to highlight this type of Convoy Movement and made each and every move important.

But, with the front attacking forces you will have to sometimes take a chance and get away from the slower Convoy Movement by Blitzing with your Tank units. I felt like this Blitz Movement, which is somewhat risky as you are breaking away from the Convoy line and potentially opening up gaps that twill slow down the forces in the rear, is also handled very well and integrates some historical tactics into the game itself. You can try to move that armor another space by rolling a D3 and on a result of 2 or 3 you can move again….and what is more, you can then keep trying to do this until you fail or reach your target. This aspect at first kind of bothered me but I think that this represents the weather element a bit and how the terrain was unforgiving when wet or snow covered or even frozen. If the Blitz Movement fails, your unit will be out on an island and can potentially become a target and is easy pickings for the Soviets.
Overall, Iron, Blood, Snow & Mud is a great little game that was fun to play and most importantly looked really good on the table. The production quality of the game is very high, as has come to be the norm with PHALANX but this one also is absolutely beautiful! The board is very eye-catching and the components are top notch. It was a joy to play with the game and also to play the game. I would recommend this one to anyone the likes fast playing, rules lite yet satisfying game that plays in 90 minutes, scratches the wargamer’s itch for maneuver, combat, focus on supply and the risks of moving ahead quickly while awaiting your support units to arrive. This is a really great little gem and I am glad that we gave it a chance.
Here is a look at our review video:
I also wrote a full First Impression review on the blog and you can read that at the following link: https://theplayersaid.com/2024/01/09/first-impressions-iron-blood-snow-mud-from-phalanx/
If you are interested in Iron, Blood, Snow & Mud, you can order a copy for €30 ($32.51 in US Dollars) from the PHALANX website at the following link: https://phalanx.co.uk/games/iron-blood-snow-mud-2/
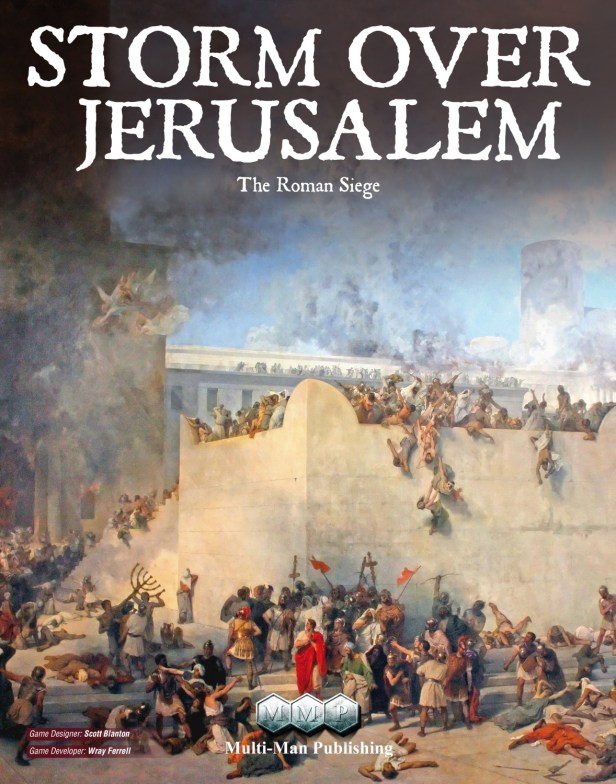
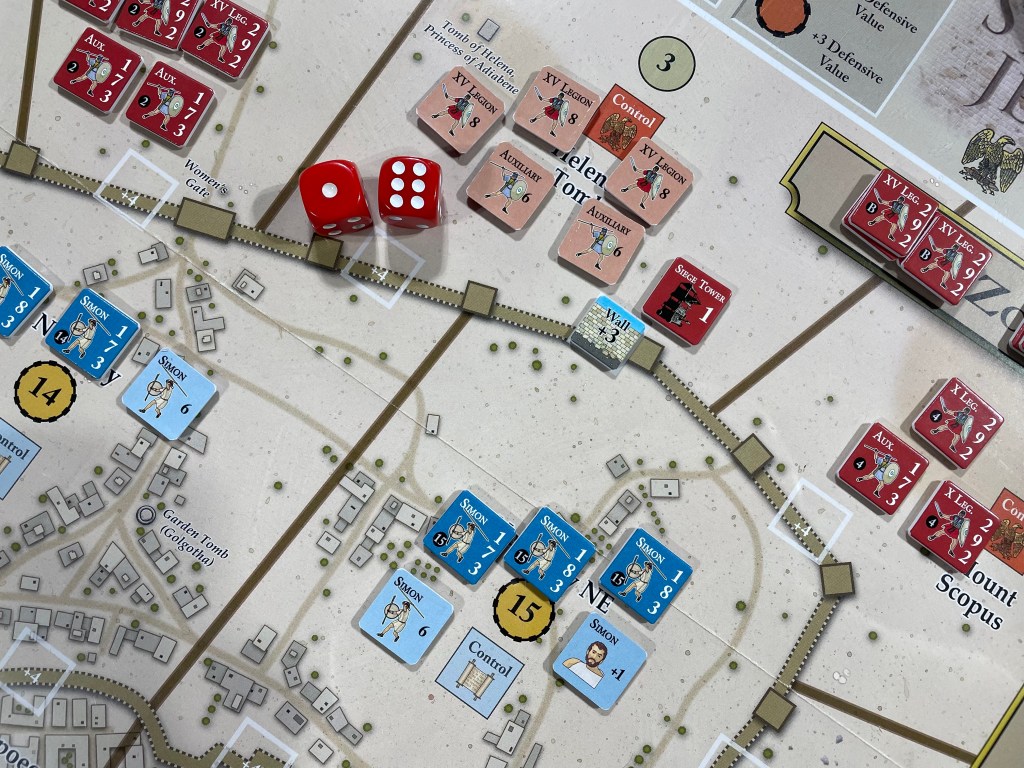
7. Storm Over Jerusalem: The Roman Siege from Multi-Man Publishing
The Storm Over Area Impulse Series has been around for a while and includes games such as Storm Over Arnhem (1981) from The Avalon Hill Game Company, Storm Over Stalingrad (2006) from Multi-Man Publishing and Storm Over Dien Bien Phu (2014) from Multi-Man Publishing amongst several others. The hallmark of the series is relatively low complexity for a wargame and a very simple combat system that calculates total attack versus total defense and adds a roll of 2d6. The losses from combat can be absorbed by either retreating from the attacked areas or destroying units. The game system has mostly been used to model more modern wars including the Franco-Prussian War, World War II and the French conflict at Dien Bien Phu in Vietnam.
Previously, we have never playing any of the games in the series, but once Storm Over Jerusalem was announced a few years ago, we pre-ordered a copy and eagerly awaited its arrival. Storm Over Jerusalem: The Roman Siege is a 2-player wargame that simulates the Roman siege of Jerusalem during 70 AD. One player controls the mighty Roman forces, who are truly master of siege warfare with their siege towers, ballista, battering rams and onagers, and the other player controls the Judean forces, which are divided into 2 separate factions with different leaders. The game is 8 turns long, but can be shortened by the play of a few event cards, at the end of which time the winner is determined by calculating victory points that come from overall losses, holding of certain VP areas and keeping the Romans out of the city.
We were very impressed by the game and its overall clarity of rules, quality components and interesting tactical choices and really had a good time learning and playing it. The Judeans are obviously outclassed by the powerful and skilled Roman Legions but they have several of their own tricks to use to hold out long enough to win the day. There is a lot to like here and I am really glad that we decided to give the system a try.
The first thing that I would like to talk about is the beauty of this game. From the cover art, to the beautiful map, to the fantastic art found on the cards and the counters, the whole package is just lovely! This one is a great looking wargame and really breaks the mold of the genre. As I look at the map itself, it is really well done with the outer and inner walls of the city clearly defined, even having little battlements on them, the boundaries between different areas cleanly outlined, and great detail of the city itself with inner streets, buildings and famous locations like Temple Mount, Herod’s Palace, Gethsemane and the Pool of Siloam to name just a few.
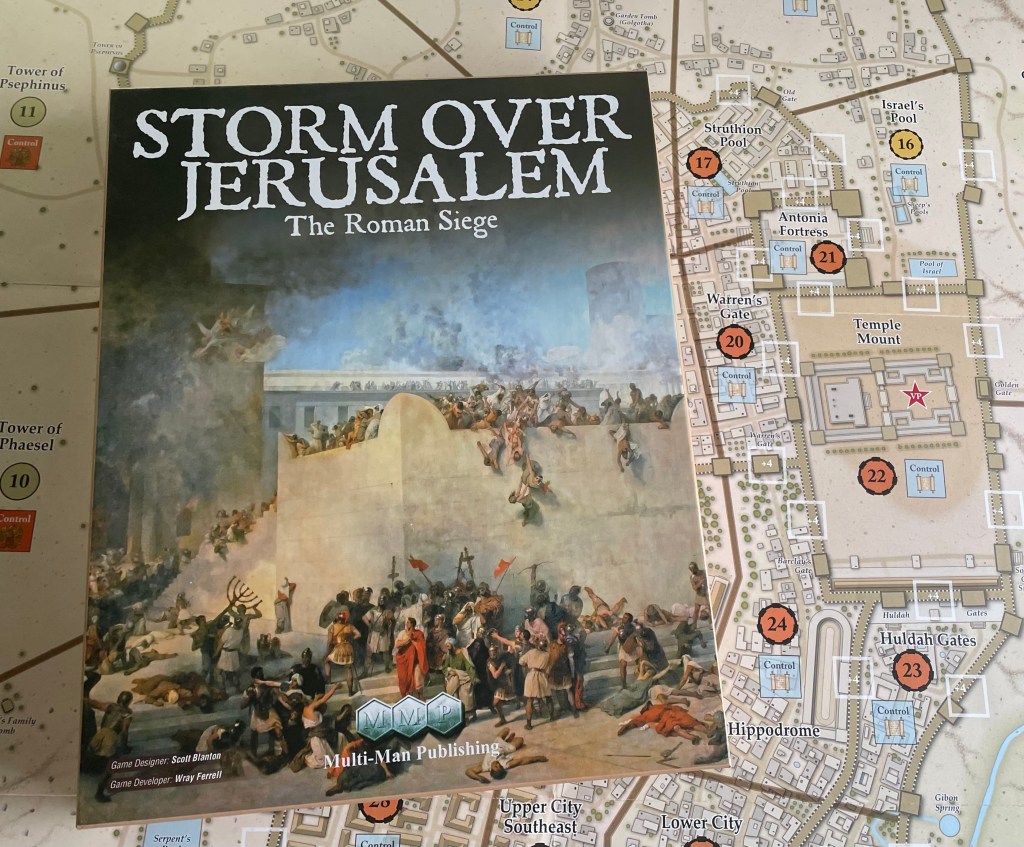
The game is an Area Movement game and as such the areas on the map are divided up to make an interesting tactical puzzle for the invading Romans as they have an easier time breaching the outer walls, because there are several adjacent areas that provide the opportunity for multiple attacks from different armies stacked in different areas, but have a much more difficult time of it as they approach the inner walls which squeeze the accessibility to them down to just a few spaces.
The counters are very simple and well done also. The Judeans have 2 different factions represented in their forces including those lead by Simon bar Giora (blue) and John of Gischala (purple). These two leaders were not aligned but worked together against their larger enemy the Romans. The Judeans have a mix of heavy infantry and light infantry, that are not quite as good as the Roman units as is expected. Their light infantry also have ranged attack capabilities, which are important in picking off exhausted Roman Legions when vulnerable after a failed assault on a wall.
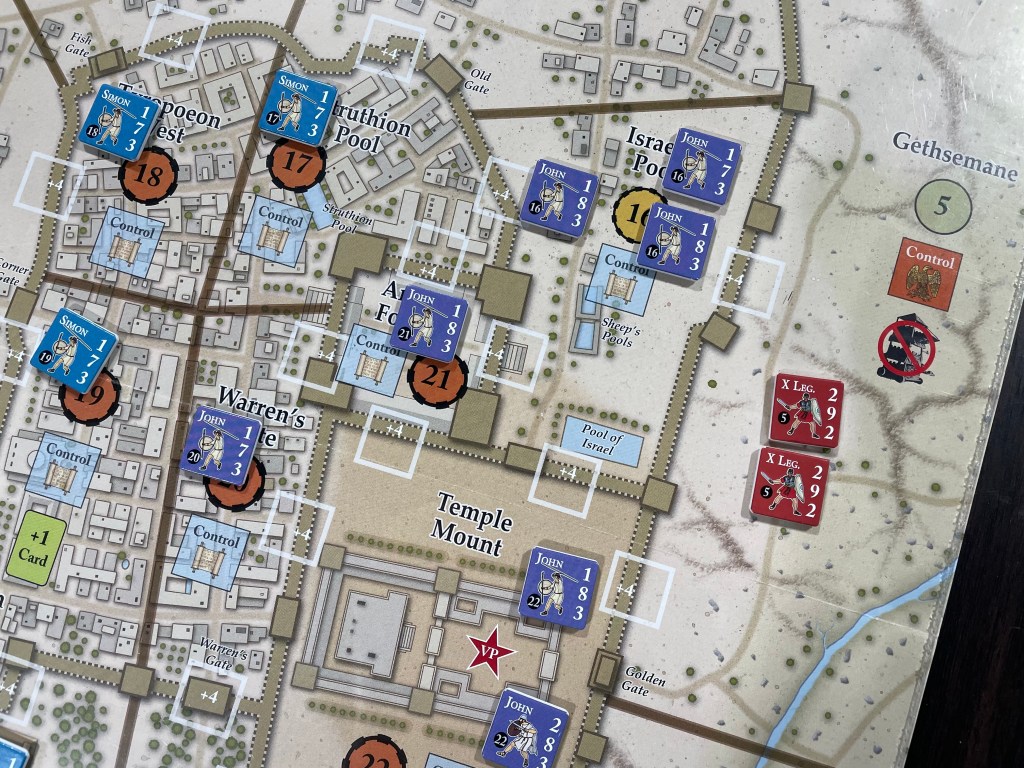
As mentioned earlier, each side has their own unique deck of cards that typify their tactics and strategies. The Judeans are about foiling attacks more than about winning these battles and the Romans have lots of toys to throw at the walls of Jerusalem. Each of the cards have unique art and clear language about how the card can be used. In the upper right hand corner, is a number in a colored circle with red for the Romans and blue for the Judeans. These points can be used for special actions such as rebuilding walls or bringing in Siege Towers.
The cards in the game are very good as they provide special actions that normally cannot be accomplished but that make a huge difference to the player using them. The deck is made up of a total of 55 cards consisting of 27 Roman Tactical Cards and 28 Judean Tactical Cards. All cards are separated into two stacks, one with all the Roman cards and the other with all the Judean cards. There are some cards that have a specific Green color that identifies them as Response Cards which allows them to be played out of turn during the opponent’s impulse phase. Each turn, the players will draw cards from their deck until they have the number of cards in their hand allowed for that turn, which is indicated on the Game Turn Track. The other enforcer of asymmetry in the game is that each player gets a different number of cards each turn as shown on the Game Turn Track. In addition to the number of cards listed on the Game Turn Track, there are a few areas on the map that will grant bonus cards to whomever controls them. These are Area #19 (Tyropoeon South) and Area #30 (Lower City). If there are no enemy units present in these areas, the player controlling them may draw one bonus card.
The cards are so very good and create some of the most tense moments in the game. For example, during our first play, I had a card in my hand that could decimate Roman Siege Towers as they attacked one of the sections of the wall. I held this card until Alexander chose to attack and then unleashed it on him which allowed me to roll a die and remove that many Siege Towers from the targeted Area where the attack was focused. I luckily rolled well and removed 3 of his Siege Towers leaving him with none for the attack which failed because he couldn’t overcome my defensive bonus. On the other hand, the Roman player’s cards are simply brutal and will do things like utterly destroy a segment of the wall (Battering Ram) and allow the Romans to pour into the city. Lots of the Roman cards also target the Judeans ability to refresh spent troops by reducing their supply. The cards are definitely weighted toward favoring the Roman player but the Judean can hold their own with cagey play and timely unleashing of their more powerful events.
The Leaders are a very good part of the game because the Judean player can play them at anytime to aid in an attack or in defense to add to their troops. During the Judean Revolt against Rome there were many factions fighting amongst themselves in Jerusalem. When the Roman Legions approached the city, they decided to have a “truce” between themselves and banded together against the Romans. I love that the designer included the Leaders to the system and the game as it really created a new tool to be used.
So how do these Leaders work? Well, they are kept off board and placed by the Judean player as an action. They can be placed during an attack to add +2, but they can also be placed to help with defense and add +1 to the defense of a unit. One of their most important uses is to be placed to rally spent units in an area. Their last ability is called Common Enemy and reflects the history of the internal struggle between the factions, which allows units from the two factions to activate together. Once these Leaders are placed on the map, they have to stay in those areas and are then subject to being captured by the Romans as they attack into that Area. At the end of the turn, Leaders are removed from the map. This ability gives the Judean player the opportunity to strike from the shadows and impact their troops.
I really enjoyed our plays of Storm Over Jerusalem. The game was beautifully put together, with fantastic components, but also had some really amazing details and depth to the gameplay. This one is a winner and really has me interested in the other games in the series. I know that this game had a siege focus, which is not necessarily in each of the other games, but I really liked the simple combat system, great card play and very interesting tactical choices that were there for players to have to make.
Here is a link to our full unboxing showing off the beautiful components:
Here also is a link to our full video review:
I posted an interview with the designer Scott Blanton on the blog and you can read that at the following link: https://theplayersaid.com/2023/06/19/interview-with-scott-blanton-designer-of-storm-over-jerusalem-the-roman-siege-from-multi-man-publishing/
I also wrote a full First Impression review on the blog and you can read that at the following link: https://theplayersaid.com/2023/06/07/first-impressions-storm-over-jerusalem-the-roman-siege-from-multi-man-publishing/
If you are interested in Storm Over Jerusalem: The Roman Siege, you can order a copy for $86.00 from the Multi-Man Publishing website at the following link: https://mmpgamers.com/index.php?main_page=product_info&products_id=355
6. Fighters of the Pacific from Capsicum Games
In today’s world of board gaming, our attention is typically captured by the overproduced. Glitz and glam is what draws out attention. Custom dice. Neon lights with lots of cool gotta-have-it stretch goals. And miniatures. Lots and lots of plastic. And you would think that a game that features WWII vintage airplanes and Aircraft Carriers would be a prime opportunity for these things. And without them, you might have just overlooked a great thing backing another title that did meet those standards. But, then you will have missed a well designed ballet of mechanics that is expertly put together, rules lite, interesting, highly playable and a deeply strategic air naval wargame.
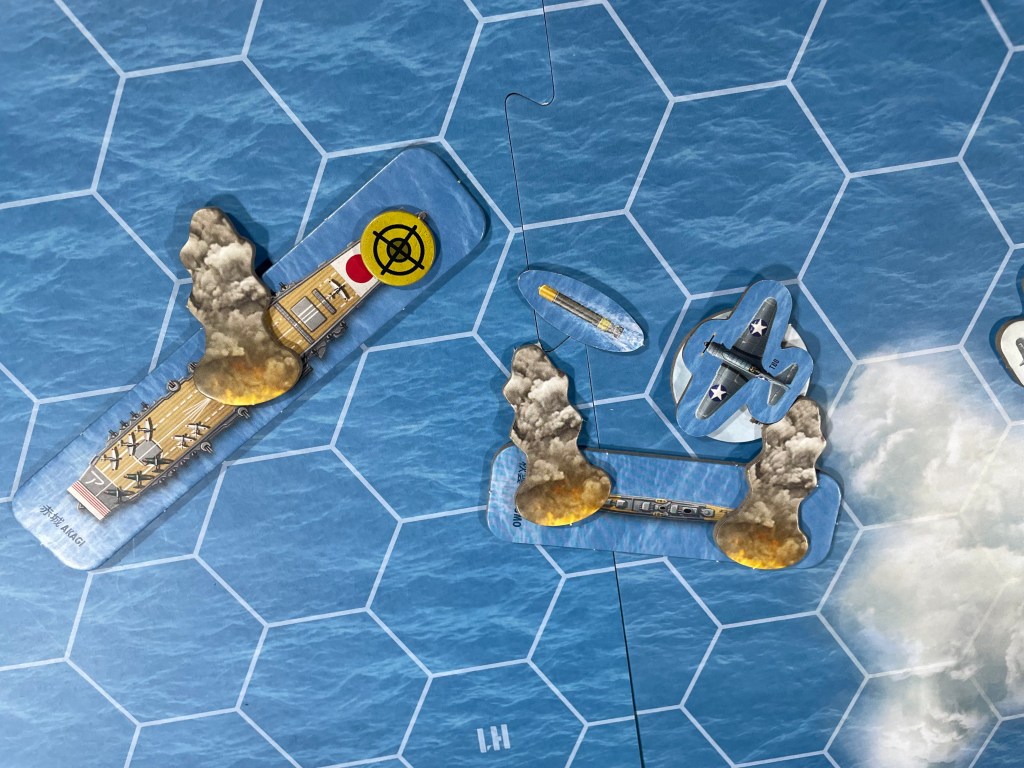
During the summer of 2022, I saw a very interesting Kickstarter and was immediately drawn to it, because you know, the little cardboard airplanes and ships. But also because I really enjoy air naval games set in the Pacific Theater of World War II. Fighters of the Pacific from Capsicum Games is a simple introductory wargame that covers the major battles that occurred in the Pacific between the Empire of Japan and the United States. But instead of being focused on overproduction, including tons and tons of plastic miniatures, the game is focused on the game play and that really sets this one apart from many such miniatures based aerial combat games that we have played over the years.
As you might expect to find in a game focused on air naval operations in the Pacific during World War II, there are lots of little cardboard cutout plane counters included in the game. The planes are drawn in 1:500 scale and the cardboard counters follow the shape of the plane so that it looks like you are actually pushing a plane on the table, not a counter. This was a really amazing experience for me as we maneuvered dozens of planes through the clouds and along the wave tops to attack targets such as Destroyers and Aircraft Carriers. Of course, there was lots of obligatory vrooms and rat-tat-tat sounds made as we did this and this was one of the best parts!
Surrounding the outline of the plane itself on each counter is a sliver of background with one side having a background that is the clouds in white, to show that the plane is currently at high altitude, while on the other side the background is blue like the ocean, to show that the plane is at low altitude gliding over the water. During play, players will just flip these counters over when they are performing either a Climb or Dive maneuver. Through this simple yet ingenious mechanic is contained the concept of altitude. This really keeps the game on the simpler end as altitude is represented with just these double sided counters. No plastic standees. No confusing relative altitude. Just straight up high or low altitude.
Back to the planes themselves. We played the Core game as we didn’t back the game on Kickstarter (a big regret at this point) and missed out on the two expansions offered that added not only scenarios but additional planes. So these comments will focus on the Core game only. In the Core game there are 6 different types of planes with 3 types provided for each nation. The planes chosen were the 3 typical aircraft types that were utilized on the Aircraft Carriers in the Pacific Theater of Operations including Fighters, Dive Bombers and Torpedo Bombers. The Americans have the F4F Wildcat (Fighter), the SBD Dauntless (Dive Bomber) and the TBD Devastator (Torpedo Bomber) while the Japanese had the A6M Zero (Fighter), the D3A Vale (Dive Bomber) and the B5N Kate (Torpedo Bomber). These are the most iconic planes of the war and are found in droves as each side has plenty of counters of each type and the scenarios differ in what planes are available as well as the number for each side.
The planes are not activated individually but in groups. When a plane is activated, it must complete its entire movement while focusing on their possible maneuvers and their cost in movement points. If a plane has an enemy plane in its Fire Zone at the end of its movement, the plane can take a shot and the target plane has an opportunity to dodge only if it has not yet activated in the turn. If it can’t dodge due to already having been activated this turn, it takes damage automatically. There is no dice rolling. No CRT’s to consult. This game is about positioning and maneuver and not about the luck of the dice. Damage is based on the type of Traits the planes have such as the 20mm Gun found on the Zero. This 20mm Gun will do 2 Damage if it has an enemy plain in its sight and the x2 red hex in their Field of Fire is lined up on the target plane. This was my favorite part of the game and I love that the real challenge lies in getting into the right position to shoot, and if possible at a target that has lost its combat potential or in other words has already been activated. The dodge attempt might be automatic, but in order to succeed, it is necessary to be well placed, because once a first plane has been dodged, a second one may very well be maneuvered by your opponent to take advantage of your activation. Everything on the battlefield boils down to choices having been made and how those choices either set you up for success or place you in harm’s way!
While playing, we immediately picked up the Sequence of Play as it is really very simple. A game turn is just divided into three phases. Phase 1 is when the players count their handicap and determine who has the initiative for the turn. Phase 2 is where the action happens and players take turns activating their planes. Phase 3 is after all of the planes on the board have been activated and then players will have to move the ships, torpedoes that have been dropped and reinforcements will arrive. That is it! They really did a great job of keeping this one simple and to the point. This was mainly accomplished due to the simplified activation system and how other things like altitude are abstracted to either high or low. The Sequence of Play is perfect for the goal of this game which is not so much to be a highly detailed simulation of aerial dog fighting and maneuvers but a simplified skirmish type game that has some heady strategy and decisions while keeping things simple.
I even really enjoy the fact that there are no dice. You either hit or your opponent dodges you. There is no chance. No dice luck. And no frustrating reliance on luck. You make decisions and those decisions seal your fate based on a simplified view of the aerial battlefield. Just a really great experience that I know we will come back to in the future! Remember, there are lots of cute little cardboard planes. And ships!
This game was a big hit with us and we are really glad that we spent the $50.00 to get it after the Kickstarter had already delivered. We missed the Kickstarter so we missed out on the extra content but what is in the Core game box is enough to keep any air naval combat enthusiast entertained. The game play with this one is just really smooth and keeps you engaged as each decision, whether made about your planes moving or attacking your opponents planes, is an opportunity. But opportunities are short lived and will not wait on you so you have to be engaged and have a plan in order to survive in the air over the Pacific Ocean.
Here is a link to our full unboxing showing off the beautiful components:
Here also is a link to our full video review:
I also wrote a full First Impression review on the blog and you can read that at the following link: https://theplayersaid.com/2023/05/09/first-impressions-fighters-of-the-pacific-from-capsicum-games/
If you are interested in Fighters of the Pacific, you can order a copy for 50.00€ ($54.18 in US Dollars) from the Don’t Panic/Capsicum Games website at the following link: https://www.dontpanicgames.com/en/shop/boardgames/fighters-of-the-pacific/
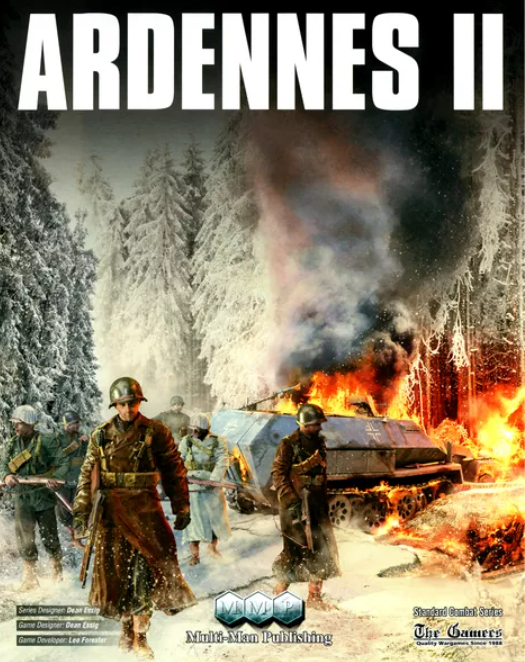
5. SCS Ardennes II from Multi-Man Publishing
Not often does a game get a 2nd Edition. And even more rare is a 2nd Edition with new rules, new art and new graphics. But SCS Ardennes has done just this with the release of Ardennes II from Multi-Man Publishing. Ardennes II is a part of the Standard Combat Series and is a reissuing of the award-winning game Ardennes from 1994. The new edition uses the additional research available from BCS Last Blitzkrieg, which was published in 2016, and also changes some basic concepts from the SCS system.
In addition to spotlighting the better OOB and map research first used in Last Blitzkrieg, the game has some differences from the first printing mainly in the area of how artillery works and and as well as giving units the opportunity to withdraw before an enemy attack. The game also removed some major focus on chrome rules which caused more playing issues than they were worth. But there are still really familiar and solid mechanics here from the Standard Combat Series and the game is a joy to play and look at as the graphics are significantly better in every possible way.
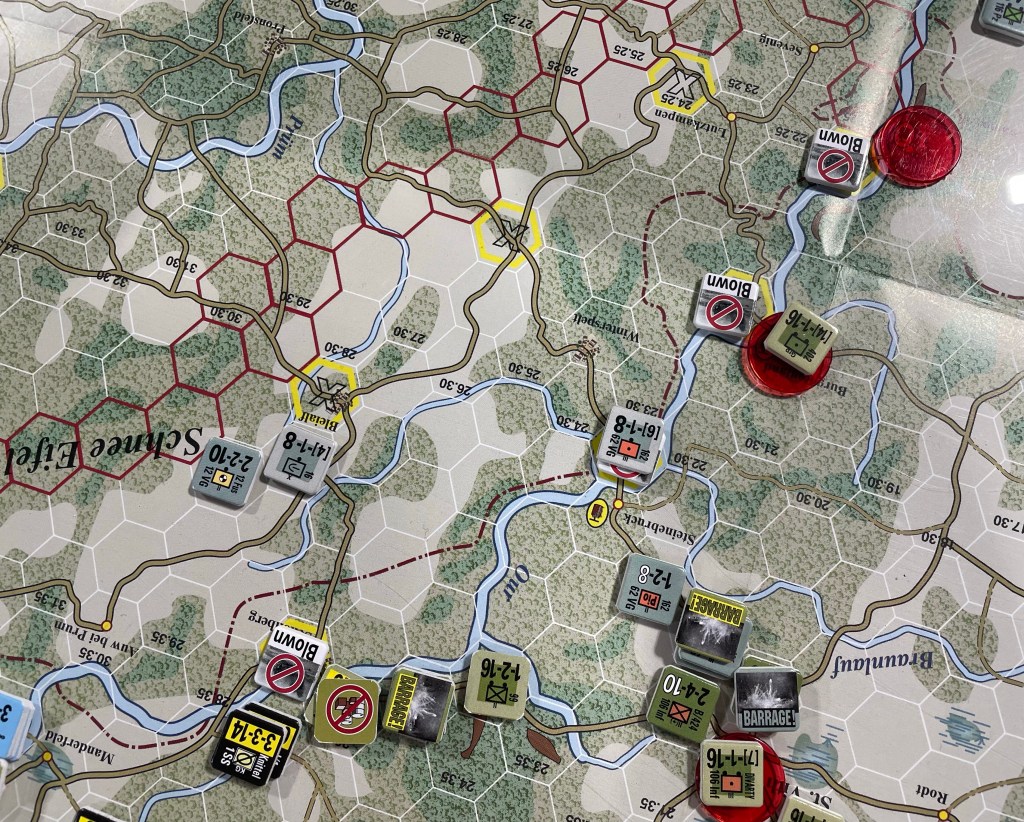
There were several large changes with the game and system to include changes to how Barrage works, the stickiness of ZOC’s and several other factors. These changes made for a really good play experience.
The change in Zones of Control in this volume was very interesting as the ZOC’s were not sticky and players can simply pay an additional +1 Movement Point to move one hex adjacent to an enemy unit to another such hex. But, this change was dwarfed by the addition of the ZOC Bonds. A ZOC Bond can form between two different 2 step infantry units. The hex between the units will become a ZOC Bond and will add a required additional +4 Movement Points for enemy units wishing to move into that space. These can be used to keep attacking units at bay and will be best used to slow the German overall advance. Another element that is unique here is that retreating units that are required to move through a ZOC Bond because of CRT results will be unable to retreat through and will have to stick and take step losses for each remaining required retreat space.
The ZOC Bonds also will block supply for units caught behind them and this is an important aspect of the game in many regards as being out of supply has significant combat effects. If a friendly unit is in the hex it will negate the blockage of supply and this is another aspect that both sides need to consider.
The addition of these ZOC Bonds was a good one in my opinion as the map is very difficult to get moving on because of the thick forests and terrible terrain and the punitive requirement for +2 or +4 Movement Points to even get into combat with a unit would have made the game that much more difficult for the German player. That is another thing that I really liked about this game was the attention to detail of these type of things in the overall focus of the simulation. Very well done!
Traffic Hexes are shown on the map with a yellow highlight in the hexes with a large X in the center. These hexes will apply a DG Marker to any German units that start movement in or enter these hexes as they simulate the trouble with driving lots of tanks, trucks and other vehicles on the small one lane roads throughout the Ardennes. You can stack in the Traffic Hex, but only if you move the units as a stack into it. If you send one unit into the hex, no others can enter it. Once you move a stack in there, the hex becomes prohibited for all others afterward which is the intent of the designer to stop other units from entering whether just to go there, or to attempt to scoot past the traffic on the road by using the off-road MP costs.
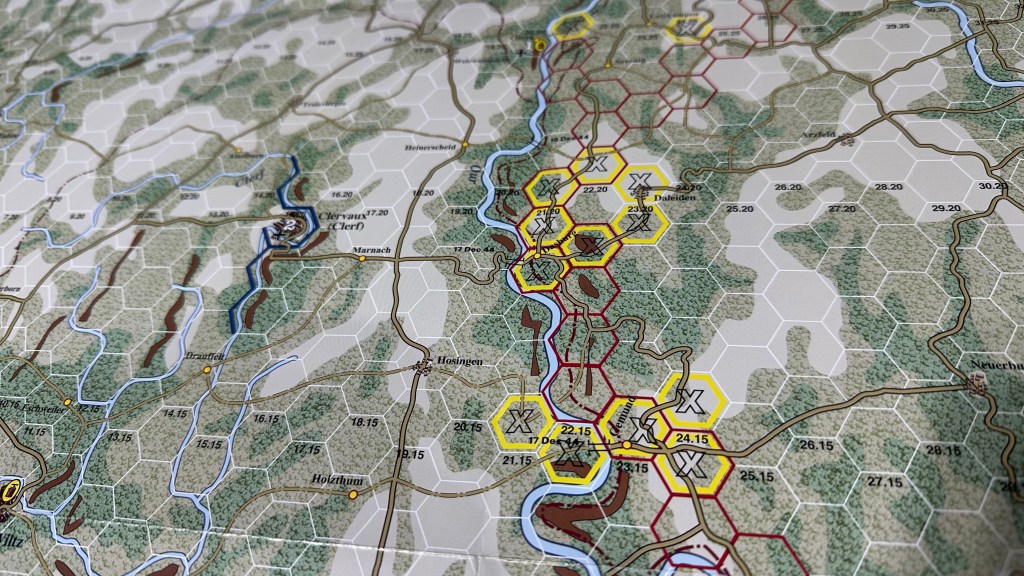
The end result of these hexes is that the Germans have a bear of a time moving their units at the outset and their progress is really slowed as this will turn into a real crawl as units will stack up and become ineffective with those DG Markers.
After the Traffic Hexes are cleared, mobile units like tanks must stay on roads. The terrain here is very brutal and the roads have very weird loops and double backs into the same spaces which simulates these issues. Tanks also simply cannot enter the forested hexes and have to do their fighting from the road hexes.
I never had the opportunity to play the original, but victory in Ardennes II is achieved through the accumulation of Victory Points for taking and holding key towns and cities. This Victory Point total though is a sort of continuum that will ebb and flow as areas are taken by the Germans and then recaptured by the Allies. The Victory Condition is the high water mark of the German VP’s so if you get the highest total of a 45, that is the measurement you will use at the end of the game when calculating victory. At first glance, this is a tough one for the Germans, and historically that is accurate so I have no real problem with this aspect. Major German/Major Allied Victory will lie at the extremes of the continuum and Minor victories and a Draw will be found in the middle. As we only played once, I am still trying to understand a better working strategy for the Germans but this Victory Continuum was a very cool addition to the system that I really liked. I can’t really say whether a German victory is possible but I can say that the way it is setup it is probable. With some luck, good dice rolling and some minor Allied mistakes, the Germans can push into the Ardennes and threaten many of the larger Victory Hexes. I will posit that based on my limited experience, both sides have an equal shot at coming out on top.
Ardennes II is a really great wargame. The Standard Combat Series is quickly becoming one of my favorite WWII systems and for good reason as the mechanics make sense but are also very playable. I really love the push your luck nature of playing the Germans and the many decisions forced upon players about how to best use their limited artillery and where to fall back and defend. I really like the addition of the retreat before combat rule and the ZOC Bonds as they created a very interesting puzzle for both sides. I would play this one again in a heartbeat and really would like to get this back to the table soon.
Here is a link to our unboxing to give you a good look at the components:
You can also check out our video review at the following link:
I also wrote a full First Impression review on the blog and you can read that at the following link: https://theplayersaid.com/2023/11/07/first-impressions-scs-ardennes-ii-from-multi-man-publishing/
If you are interested in SCS Ardennes II, you can order a copy for $80.00 from the Multi-Man Publishing website at the following link: https://mmpgamers.com/ardennes-ii-p-377
4. Traces of War from VUCA Simulations
Sometimes good, old fashioned hex and counter wargames are the best! You line up your counters in long continuous lines and attack, pushing the enemy back, having your own forces fall back after an attack, waiting for your opportunity to pounce. Once a line is broken, scrambling to bring up units in reserve to try and plug those holes. Maintaining supply and trying to cut the supply of your opponent. Good stuff! And these kind of games on the East Front are always interesting for various reasons. Earlier this year, we acquired a copy of a new game from VUCA Simulations called Traces of War which is a two-player game that simulates the intense fighting between Axis and Soviet forces just after the battle of Kursk during August 1943 to March 1944. A major Soviet offensive is launched against a German mobile defense.
The game uses a modified version of the Victory Lost Series game system (sometimes referred to as the Red Box Series) but is now being called the Fierce Fight! Series designed by Tetsuya Nakamura. We played and gained some experience with the series last year with A Victory Awaits: Operation Barbarossa 1941 from Multi-Man Publishing and really liked what we saw. The system was very approachable and the rules were well written so we were able to get up and running very quickly. The system uses a chit-pull to activate different formations and plays very quickly with some hot and heavy action. I want to share my thoughts here about Traces of War in this First Impressions post.
One of the things that I like about the games in this series is that they are pretty standard fare, meaning movement, supply, combat, etc. are what we are used to from playing other hex and counter wargames. We played A Victory Awaits from Multi-Man Publishing and also designed by Tetsuya Nakamura in November last year and even though that was several months before we played Traces of War, the system came back to us with very little fuss and just a cursory review of the rules. Now, we had to focus on the differences here that have been added to make this one unique but it just felt comfortable. Like that favorite shirt, pair of jeans or your couch. With that being said, there was some uniqueness here with one major distinction. The rules work well together to create a lot of choices and opportunities for the players that typically are not found in other wargames. For example, the Zone of Control rules are quite unique and I found that it caused us to come with more out of the box thinking about how we would go about trying to execute movement. The rules state that to enter or leave any ZOC will cost the unit 2 additional movement points. Normally, ZOC’s are much more rigid or sticky and enforce no separation of units once engaged but I really liked this change here and it made for very enjoyable maneuver action.

We also really felt like this game, and in many regards all of the games in the system, can be used to introduce wargames to new gamers who might not be comfortable with the mechanics and concepts at play here. It is a game that can be taught fairly quickly in less than 30 minutes, with about 15 pages of rules and excellent player aids and notations on the board for setup, played quite easily and understood by anyone, be they newbie or old crusty grognard. It also felt very intuitive to me and will feel natural to players to allow them to play the game and not worry about gaming the rules and spending hours trying to understand complex and involved concepts.
Also, as an Operational Scale game, the tactics and strategy seemed to me to be very understandable and allowed me to work toward those goals without having to do something that was totally unexpected or out of the way. I was able to set my strategy and then follow through with it only having to adjust due to my opponent’s response and not due to my mistakes. A really well laid out game that was a blast to play!

We really enjoy Chit-Pull Activation in wargames. It really creates a lot of chaos and tension as you just really cannot control what chits are drawn and when. You need to activate your Southwest Front 3rd Ukrainian Formation to hold off an attack there? Well, you just have to draw and may pull it out or you might not! Or do you desperately need to move up the 8th Army to bring in some muscle with the infantry to hold the line until you can again activate your 1st Panzer Army? Well, you cannot guarantee that will happen and might just be overrun there and lose several key units. The Chit-Pull Activation in Traces of War is really pretty standard stuff as some of the formations have multiple chits and can be activated several times per turn. This is especially important for the Germans who have to use their best Panzer units to punch a hole in the Soviet defensive lines and put pressure on them to give up ground or be surrounded and cut off.
The Chits that are drawn out of the cup are called HQ Command Chits and are tied to specific HQ’s located on the board. When these HQ Command Chits are drawn out of the cup, this allows the player who controls that formation to activate the units that are within Command Range of the HQ on the board. This aspect really enforces the concept of Command and Control and requires the players to be focused on locating their HQ’s within range of their units. Sometimes, a unit may need to be activated and go out of Command Range to fill a hole or attack a lone defending unit, and this is important to the overall game, but you must remember that once out of range of the HQ that unit will be unable to activate again until it is brought back within that range.
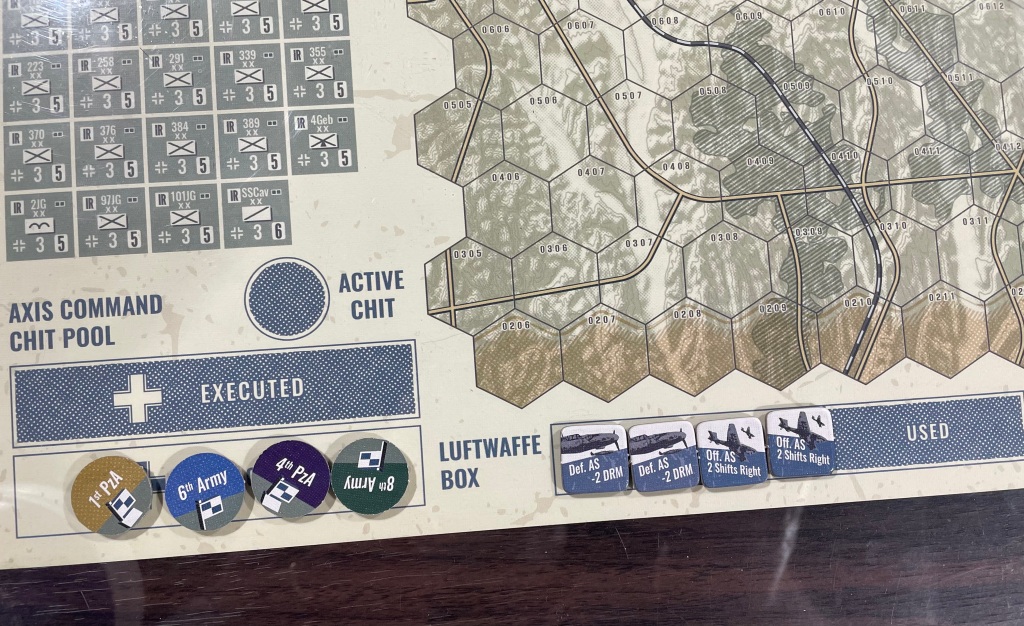
Aside from Command Chits, there are several Other Command Chits or special event chits which are also seeded into the chit cup. These are chits such as Supply, which will require the players to enforce supply rules at the time of the chit draw, Soviet Reinforcements, Soviet Airborne Chit, which allows for a the drop of a lone Soviet unit behind enemy lines to pick off a stray Supreme Command Order marker or to create some interesting situations with supply and attack and then there are the very powerful Soviet Stavka Chit and German OKH Chits. These special chits actually break the rules of the Chit-Pull Activation system to allow the player some choices about what formations they activate with the chit and make for a very interesting addition to the standard format. I also really liked the pacing of when the number of chits increases for the players. During Turn 1, the poor German player will only have access to 3 chits. This lack of chits really creates some very tense decision right from the start as the Soviets have more units and more chits to activate those units and if the German player is not smart about their use then right from the start they can be off balance and have to play a bit of catchup. And in later turns, the German Player will gain access to their very important and key OKH Chits which can be used to either interrupt the actions of the Soviet, giving them the ability to get a head start against that Soviet formation, or as an option to simply activate any of their formations where they are needed the most. I really liked this part of the design as it balanced things out for the two commanders as the Soviets seem to be able to do what they want, where they want and at anytime and the German player is somewhat more reactionary.
Traces of War is a damn solid wargame. Of all the games that I have played on the Eastern Front, and I admit that I have not played nearly all of them, this Fierce Fight! Series from designer Tetsuya Nakamura is just fantastic. Traces of War is extremely playable, enjoyable and really has some great chrome added in like the Supreme Order Commands and the OKH and Stavka Chits. This is a great implementation of the Chit-Pull mechanic and really creates a tough yet easy to grock system. I marvel at the ease at which the games creates some of the most trying decisions for players and the addition of the interesting non-sticky ZOC rules was a genius move as it just creates so many options.
Here is a link to our full unboxing video showing off the beautiful components:
Here also is a link to our full video review:
I also wrote a full First Impression review on the blog and you can read that at the following link: https://theplayersaid.com/2023/10/17/first-impressions-traces-of-war-from-vuca-simulations/
If you are interested in Traces of War, you can order a copy for $78.00 from the VUCA Simulations website at the following link: https://vucasims.com/products/traces-of-war
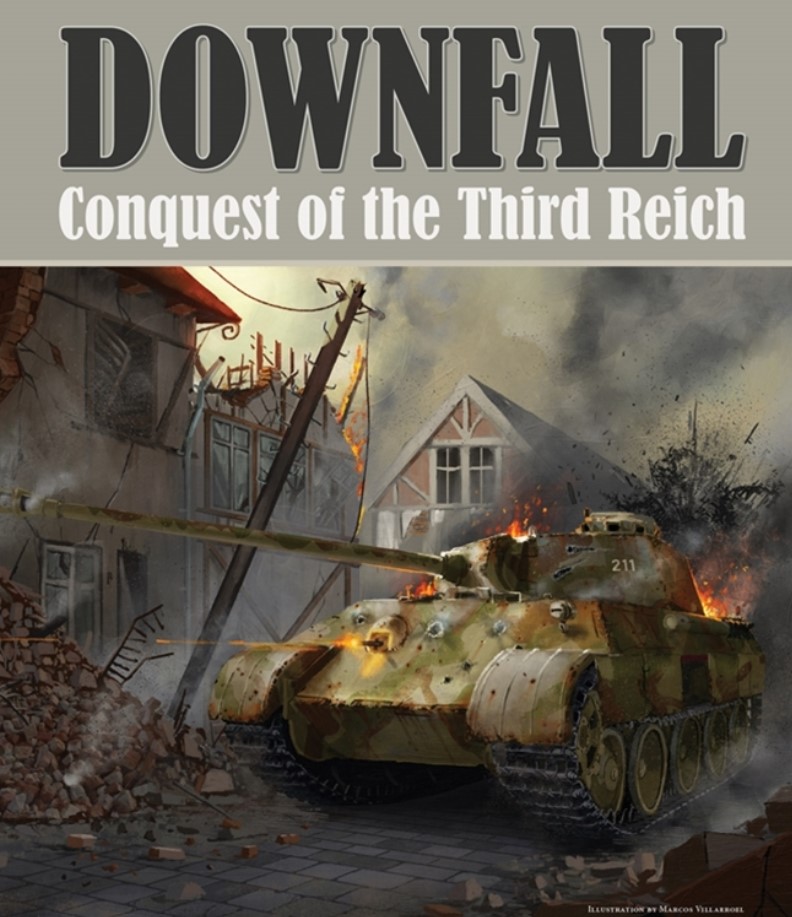
3. Downfall: Conquest of the Third Reich, 1942-1945 from GMT Games
When Downfall: Conquest of the Third Reich, 1942-1945 was announced a few years ago, I was immediately interested because the game was a strategic level wargame and looked to me to be similar in scope and scale to one of my other favorite games covering WWII at the strategic level in Unconditional Surrender!. As I started to do a bit more research on the game and look into it, I realized it was a collaboration between 2 really great designers in the late Chad Jensen and the great John Butterfield, and I was very much anticipating the game. I also saw where the game has the players not only handling one of the opposing Allied sides including the Western Allies and the Soviets but also has each control the opposite defending German army as well. This combination really sparked an interest in me and when the game released late in 2023, we readied ourselves to play and finally a few weeks ago we got our chance.
Downfall is a 2-player game that focuses on the conquest of the Third Reich in World War II. The game is set starting in November 1942, as the Soviets steady themselves after the initial shock of Operation Barbarossa and begin to punch back while the Western Allies are mopping up in North Africa and planning for the invasion of Italy and lasts through until the end of the war in May 1945. As I mentioned earlier, one player will handle the Western Allies while the other the Soviet Union in this joint effort to destroy the Axis. The 2 players share the goal and responsibility for defeating the Reich, but also each seeks a victory that favors their position and power in post-WWII Europe. To demonstrate this, each of the players will control 2 different factions. The Western Allies player will command the Western Allies made up of Britain and the United States of America as well as the German OKH faction who are on the East Front fighting the Soviet armies (Oberkommando des Heeres). While the Soviet player will command the Soviet Army and the OKW faction, which consists of the German and Italian armies facing off against the Western allies in the west (Oberkommando der Wehrmacht).
I know that this model was used in some older games, most notably Battle for Germany from Decision Games (1975) designed by Jim Dunnigan. I have never played that game but I now am very much curious about it.
This is one of those things that Alexander says a lot as he is British and this marketing slogan was used in England. The game “Does Exactly What It Says on the Tin” is a very descriptive comment about the design. With a title like Downfall and then a sub-title of Conquest of the Third Reich, there is no secret what is going to happen with the game. The Allies are going to defeat Germany and the other Axis powers and wipe them off of the continent. The forces of the Axis are really no match for the might of the Allies during this time of the war being late 1942 through May 1945 and the goal of each of the players is to destroy the defenders and push them back at every opportunity racing toward Berlin and the end of the war. There should be do delusion here that with the player controlling one of the German fronts that they can actually significantly stop or even push back the attacking Allies. This is just not the case. They don’t have the available forces. They don’t have enough air power to significantly change the odds of combat. It is not going to happen. And they will also have very little power to actually do consistent counter attacks. They will just have to sit and defend as best they can, utilizing the terrain and simply focusing on slowing the advance just enough to make a difference.
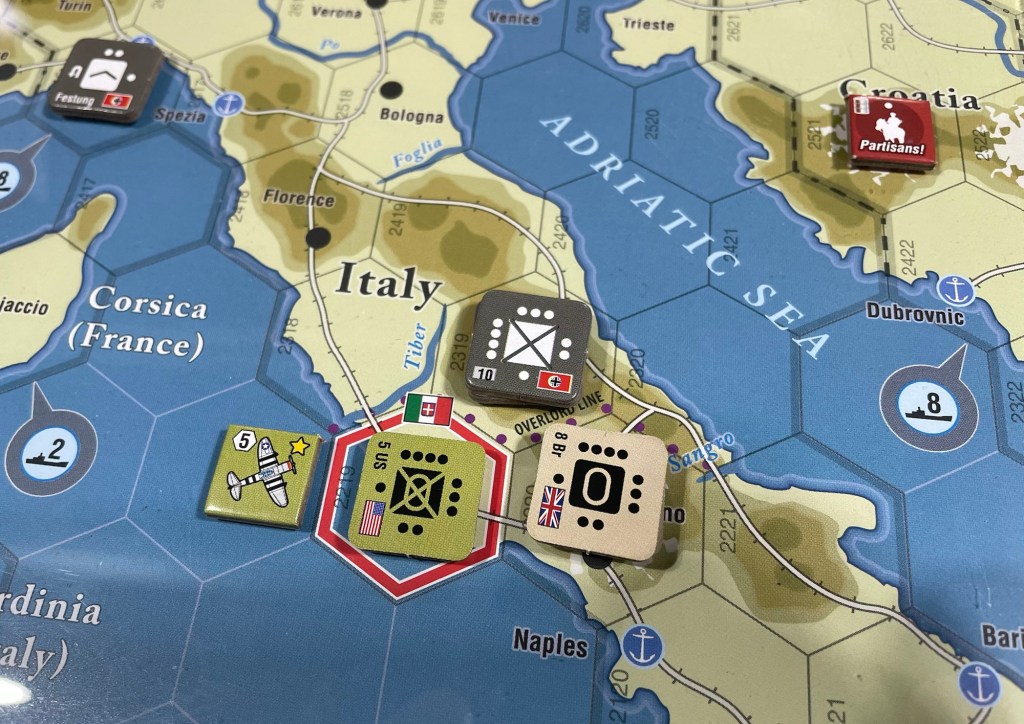
So, controlling either the Western Germans (OKW) and Eastern Germans (OKH) is all about making ground difficult to take and slowing down the advancing Allies while you try to make good progress with your own Allied force. This dichotomy in the design is really cool and was very interesting to see played out on the board. I would defend, defend, defend with my Germans in France, trying desperately to hold off the Allies crossing the channel for Operation Overlord, and then do my best to use my limited options to replace my lost units, move units up from in reserve in Paris to fill gaps and just try to hold one more turn. In Italy, I found myself trying to stay in the rugged terrain including hills and mountains to get that extra defensive bonus on my strength. Just hoping to survive from turn to turn and make Alexander do yet another low odds attack to try his best to dislodge me.

One of the best parts of the game was the concept of Initiative and how it worked with the various Orders that players choose and when they can go in a turn. Around the edge of the board is the Initiative Track that goes from 1 to 91 and represents a year. The amount that the Initiative Track moves is determined by the Order that was chosen that turn by the player who held Initiative. You see the faction lowest on the Initiative Track can continue to go each turn choosing Orders until they pass another faction and then that faction is in the lowest space and will get to go. Just a really well done part of the game as this creates lots of opportunities to take many smaller Orders, creeping up ever so slightly on the Initiative Track while training the Initiative and being able to continue going. This can be used to great effect to get units moved up against the enemy units in preparation for an offensive. These different Orders all have an Initiative Cost. Some are small, such as the 3-5 Movement Orders that allow the player to move units on the board, while others are large and take a great investment of time and resources to pull off such as Strategic Warfare (+18 Initiative Cost), Recruitment (+21 Initiative Cost) or Mechanization (+16). But the other cool thing is that each faction has a different cost to their Orders to throw in some asymmetry to the game and make it even more challenging to game the system.

One other important part of the Initiative Track is the concept of the Event Deck and how these Events are triggered. As the Initiative Marker is moved along the board by an amount determined by the type of Order the player just took that turn, it will pass over Event Spaces on the track that are aligned with one of your controlled factions and you will get to then manipulate the Event Deck and change up the order of these events shown on the board. So there are 3 cards showing in the Event Deck display on the board and these cards effect a few different aspects. They give a number of aircraft that are available to the players by simply counting up the shown aircraft icons on the 3 cards in the display. They also sometimes provide bonuses to combat with a +1 DRM or other such benefits. And finally, there is the Event Card text that actually shows the player how they can manipulate that card to score Victory Points or even win the game by meeting the conditions shown on the active event. Sometimes players might take a larger Initiative Cost Order in an attempt to change up the Event Cards that are showing as when you pass over one of your Event Spaces you can then move the Active Event down to the Discard Pile covering up that card and taking away its advantages, getting the Event Card text to activate by being in the Active Event box in the middle or even bringing on a new Event Card from the Draw Pile. I just really liked the concept of how my operations and orders would effect the outcome of what I was trying to do on the board.

The combat mechanic in the game is a bit different than the usual CRT in a large hex and counter wargame like this. But, it is very well done and works for the design. Combat is simple, not overly crunchy or difficult, and rewards planning with the use of combined arms, shock troops and armor as well as positioning of support units for flanking support as often as possible. Each unit has a certain number of strength pips that serves as its attack base for the lead unit. You then add to this various factors such as +1 for each flanking unit (defined as a unit in an adjacent hex to one you are attacking), +1 for shock infantry, +1 per non-German armored unit in the combat during Fair Weather, +1 for having more Elite Badges (stars) than one side or the other, etc. Then the defender will calculate their attack value as well using the same elements but also getting bonuses for the terrain type they are located in including +3 for mountains, +2 for hill or forest, +2 defending across a beach hexside, etc. These numbers are then totaled and the attacker’s value is subtracted from the defender’s value to fine the Difference. You consult that column and that is what will be used for combat. Then the attacking player will roll 2D6 and add various Dice Roll Modifiers.
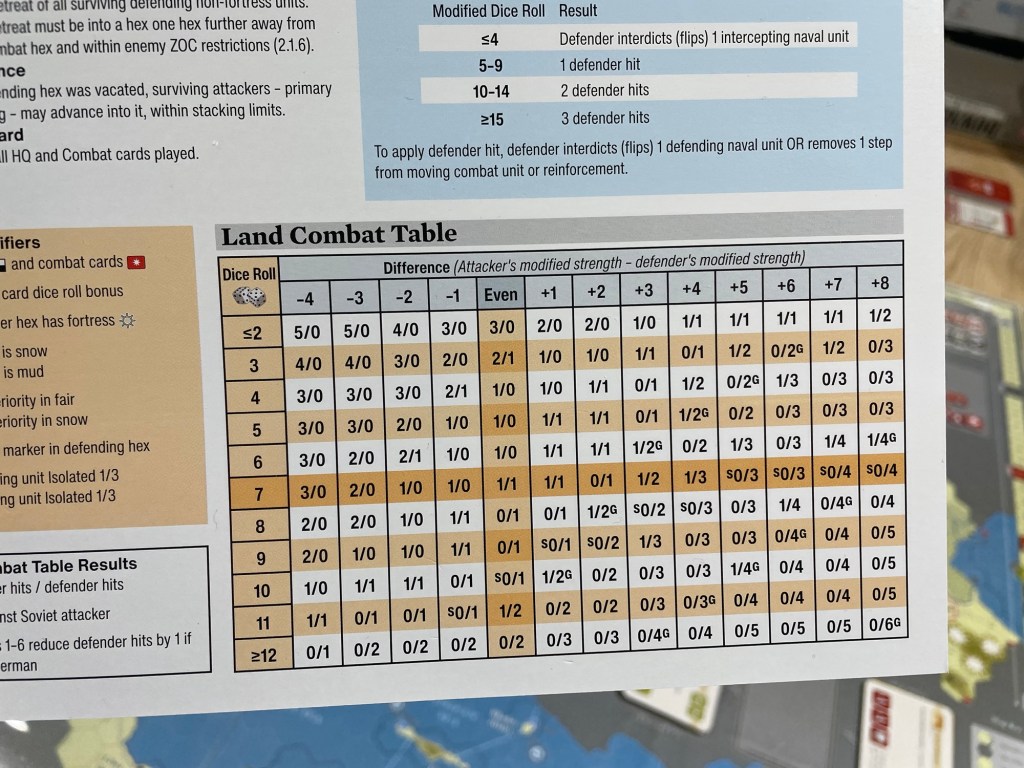
These DRM’s included all types of things such as bonuses from Combat or HQ Cards played, +1 for Event Card bonus, -2 if the defender is in a fortress, -2 in snow, -3 in mud, etc. and then the results are checked and the losses applied. You might also see the little G’s and S’s printed on certain results. This is in reference to German units and Soviet Units and these are very interesting as they apply additional losses or reduce hits.
My final comment here is that this one very much felt like a game. What I mean by that is that there is a lot of luck in your Event Card draws, in your Action Card draws and in how your opponent is doing. At times you feel like you have it all under control, only to see things change immediately and you are now on your back foot. This is very much a game. Lots to do. Lots to think about. Never forgets, in the end it’s a game. And that is a good thing.
We absolutely had a blast playing Downfall! We played the Overlord Scenario, which begins in Turn 4 and lasts until Turn 8 and we played a full 3 turns ending the game in the latter part of Turn 7. At that point, Alexander conceded as I had a 2 VP lead and had really locked him up in France and Italy and he saw little opportunity to gain back those 2 VP’s. I desperately want to play again and really look forward to that opportunity.
Here is a link to our full video review:
I also wrote a full First Impression review on the blog and you can read that at the following link: https://theplayersaid.com/2024/03/12/first-impressions-downfall-conquest-of-the-third-reich-1942-1945-from-gmt-games/
If you are interested in Downfall: Conquest of the Third Reich, 1942-1945, you can order a copy for $59.00 from the GMT Games website at the following link: https://www.gmtgames.com/p-944-downfall-conquest-of-the-third-reich-1942-1945.aspx

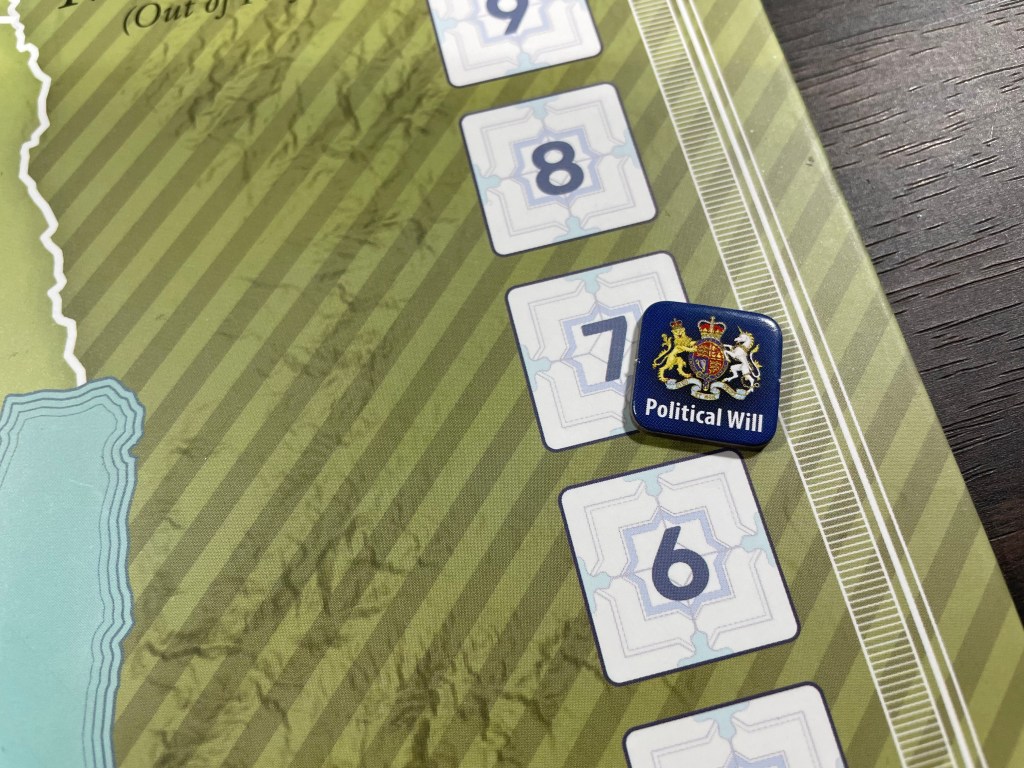
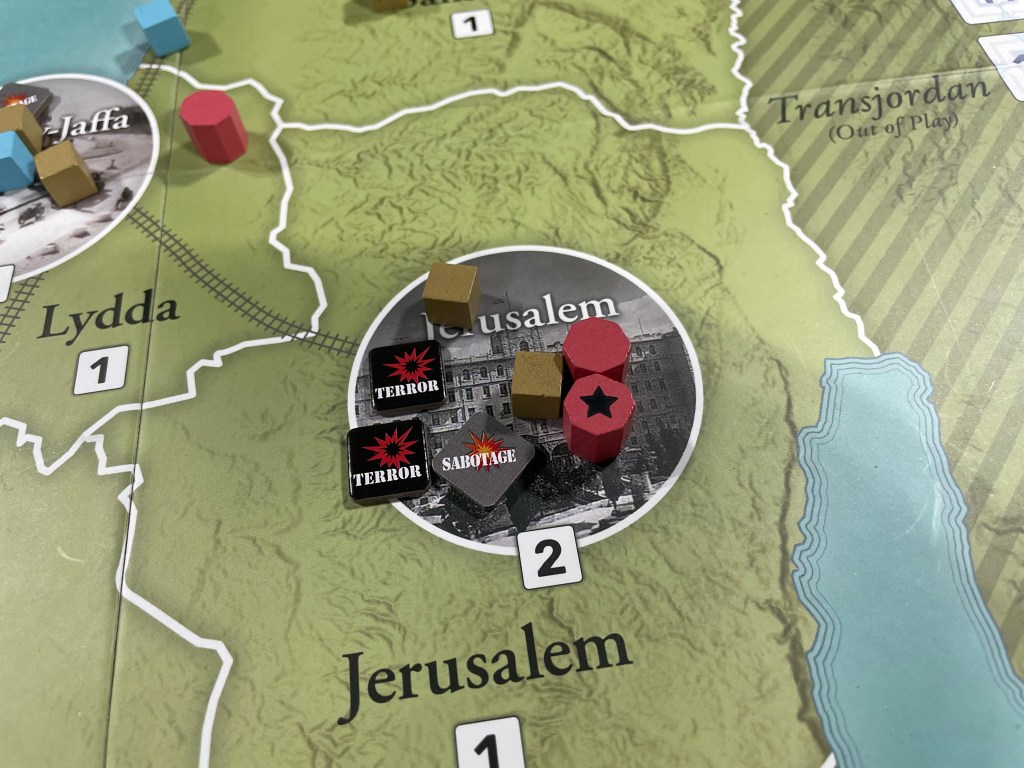
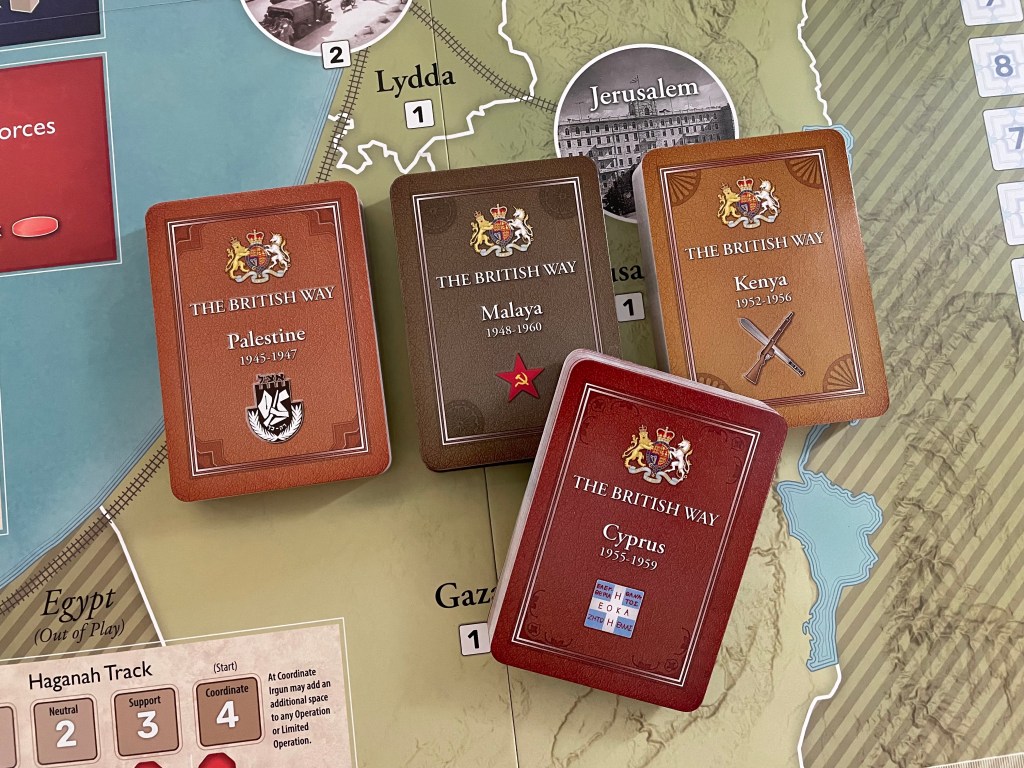
2. The British Way: Counterinsurgency at the End of Empire from GMT Games
The COIN Series is a very popular series that has had some good longevity and growing interest even after 10+ years on the scene. The system deals with counterinsurgency across many different conflicts, historical periods and even different methodologies to model revolution and counter revolution. There are currently 10 published volumes with an additional 5 that have been announced and are in different stages of design and development. 2 of those volumes have added expansions (Falling Sky with Ariovistus and Fire in the Lake with Fall of Saigon and Sovereign of Discord) and there are other expansions for more popular volumes, including Resisting Revolution for Cuba Libre already announced on P500. In 2023, we saw People Power released and should see Red Dust Rebellion come out this year.
The system is well respected and recently has even been gaining some ground in the traditional board gaming world with coverage from several large outlets including Watch It Played and Rodney Smith, who has at least 2-3 games of COIN going at any one time, amongst several others. The system is a gateway between the traditional board gaming world and that of historical simulations. It uses colorful wooden bits to represent forces on the board including troops, police, underground cells, bases, castles, casinos, weapon caches and plunder. The game uses area movement and at its heart is an area control/area influence style wargame where each faction has their own unique asymmetric victory conditions and menu of actions. About 2 years ago, a new format was announced for the COIN Series with the Multi-Pack. These Multi-Packs are quadrigames that focus on four similar style counterinsurgency efforts in various parts of the world that have a thematic connection. The first announced Multi-Pack was The British Way: Counterinsurgency at the End of Empire which deals with the British and their efforts to put down revolution across their colonial empire over the period of the late 1940’s through the early 1960’s. Included in this volume are games covering Palestine, Malaya, Cyprus and Kenya and each has their own board, their own unique set of rules and their own individual thesis about the effort. These British counterinsurgency campaigns take place during the process of decolonization immediately following World War II and include campaigns against larger insurgencies that sought to contest territory and topple colonial rule through armed conflict such as in Kenya and Malaya, but also smaller and more clandestine armed groups that sought to wear down British prestige to force a withdrawal as in Cyprus and Palestine.
I say this tongue in cheek but these little games feel like “Baby COIN”. They feel this way for a few reasons. One being their focus on just 2-players and the other in their size and clever use of the same pieces and counters across all four of the games. The British Way is everything that I have come to expect from the COIN Series with asymmetry, great events, tough choices, moral dilemmas in carrying out your more less than palatable Sabotage and Terror Actions and difficult to achieve victory conditions. The only thing that is missing really is the dynamic between multiple factions controlled by multiple players. This is where COIN shines in my opinion. The inter-factional dynamics keep the game tense and players on the edge of their seats as they sweat the next Event Card to be revealed or whether their ally will follow through with their commitments. The negotiation between factions is always one of the highlights for me as you try to work with your frenemy to ask for help, or at worst to not intercede before you can do what it is that you are trying to pull off. These smaller games are made for just 2-players and this aspect is missing.

The size of the games included is also diminutive. The game boards for each game in the Multi-Pack are all 17″ x 22″ so the same size as the board found in Cuba Libre. The reason for this is that all of these conflicts were fought over fairly small geographic areas compared to other larger games in the series. The smaller footprints are intentional and ensure that the two factions presented are forced to interact and compete over the small numbers of spaces rather than being able to easily avoid each other by building up in their own sections of the board. For example, the Palestine board has just 9 playable spaces, with 3 of those being cities where a lot of the action takes place. There are also 4 different sections of Railways that are also playable spaces that are used mostly by the Irgun insurgency as they occupy them to perform Sabotage to weaken the British Political Will. The British Troops and Police cubes will ultimately move onto those Railways to cleanup the damage done by the insurgents but they will spend most of their time in the cities protecting them from Sabotage and Terror. So, with just 13 total spaces, Palestine is officially tied with Cuba Libre for the fewest spaces in a COIN Series game.
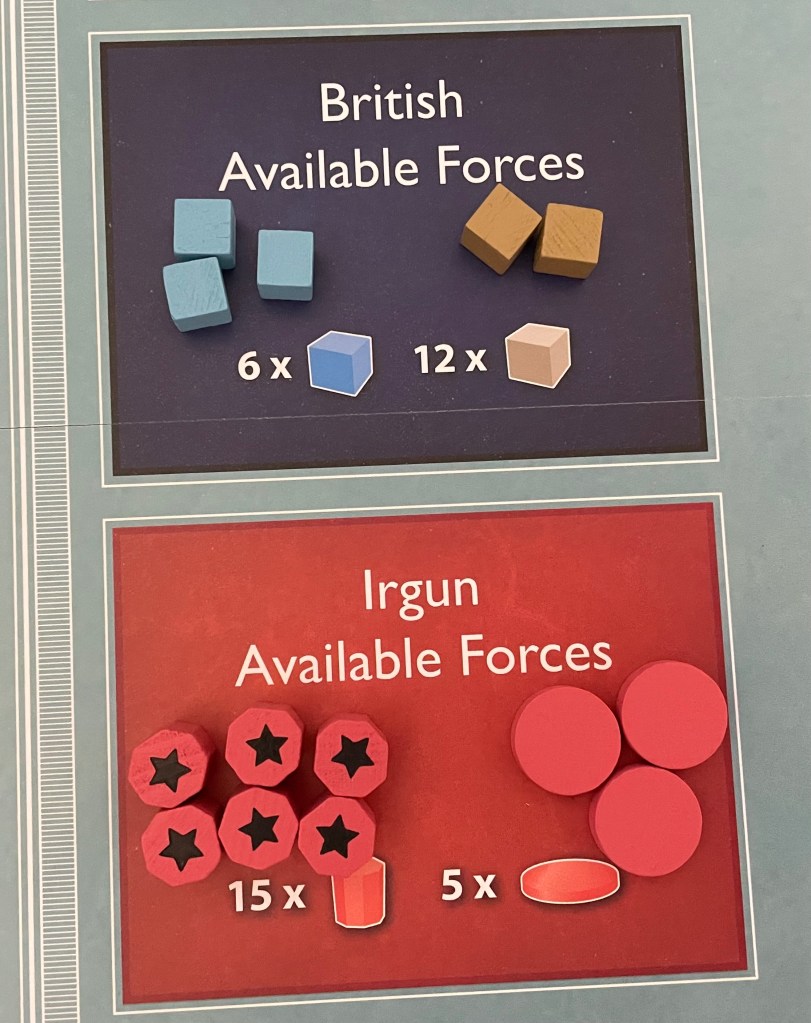
One other aspect that makes the game feel like “Baby COIN” is the relative lack of pieces for either side in the game. As you can see from the British and Irgun Available Forces Boxes, the British have 6 Police Cubes and 12 Troop Cubes for a total of 18 pieces at their disposal while the Irgun have 15 Cells (cylinders) and 5 Arms Caches (discs) for a total of 20 pieces. This means there are never a ton of pieces on the board. Especially with the Irgun and their complex relationship with Haganah, who is the paramilitary armed wing of the Jewish Agency, and the British attempting to arrest and detain insurgents in Prison, they will more than likely have just 11 pieces available during the mid-second Campaign and the third Campaign, but more on this later.
I really like the size and scope of these games and enjoyed our playthrough of Palestine. We have lots to explore and plan to play all four of the games in due time but I think that it is safe to say at this point that this Multi-Pack, while diminutive as compared with the other volumes and some might say a bit cute, offers strategic depth, complex actions and a very interesting challenge for both sides involved. “Baby COIN” is just a nickname that I have given this offering as a term of endearment and would stack this one up against any of the volumes in the COIN Series as a good game.
I know that the question that you are all wanting to have answered is “what is different about this Multi-Pack as compared to other COIN Series games?” and I think that is a very fair question. I will attempt to answer that question in this section and give you at least a taste of what is different. Remember, as I have already explained, this was our first exposure to the game and we only were able to play Palestine so the answer will be from that perspective. I fully expect that we will uncover more unique aspects and elements as we explore the rest of the games included in the Multi-Pack.
Initiative Track
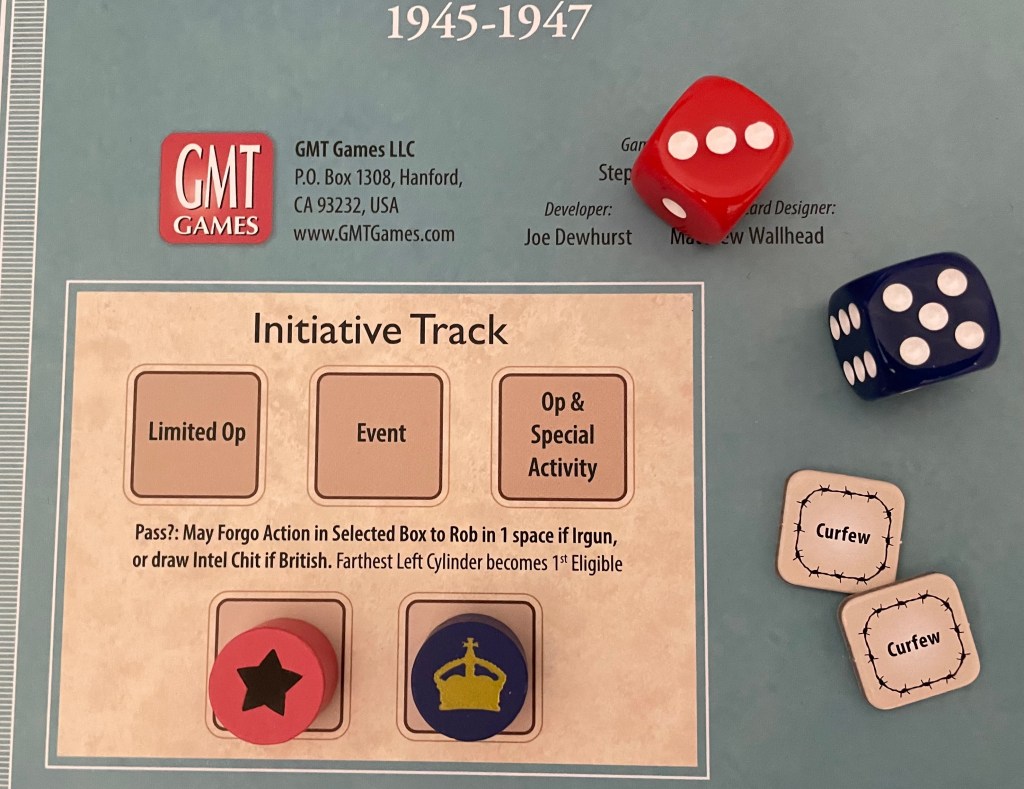
One of the biggest changes involves the Initiative Track and how it works with just 2 players. If you are unaware, Brian Train designed Colonial Twilight, which was the first 2-player COIN Series game and for that design he created a modified Initiative Track. As you can see from the picture below, the Initiative Track was designed specifically for 2-players and as such has incorporated a very unique method into its function. Each new round, the FLN (insurgent player – black marker) will start as the 1st Eligible, meaning that they will get the first choice of the actions they will take, until that is they take an action that causes them to lose the Initiative. First off, you will notice that the various spaces are color coded with the 1st and 2nd Eligible boxes. The light tan spaces are similar to the 1st Eligible box, while the darker gray spaces are aligned with the 2nd Eligible box. As long as the Initiative holding player takes a light tan colored action (such as a Limited Op, Pass or Event), they will be 1st Eligible in the next round.

This 2-player Initiative Track concept has not been totally abandoned but just overhauled slightly. After both players have selected and executed their actions, each of the Eligibility cylinders will be moved from the spaces back to the 1st or 2nd Eligible faction. The Eligibility cylinder that is located closest to the left of the Initiative Track will become 1st Eligible, and the other cylinder 2nd Eligible. This was a calculated decision on the designers part to make this Initiative Track matter in the largest way possible. The player that decides to choose the Limited Operation will be guaranteed to be the 1st Eligible on the next card. Also, choosing the full boat, or the Operation & Special Activity guarantees 2nd Eligibility on the next card. I think that the largest change here is that players can choose a box and then decide to voluntarily Pass. In the past, there was a specific Pass Box. This is a great change in my opinion and this is the only way to block Events in the game and makes this Initiative Track very intriguing and I cannot wait to see more in our future plays. It is important to mention here that on a related note, in The British Way only one card is ever showing so you cannot see the next card when taking actions as you could in other volumes in the series. This is a related change to the Initiative Track but really creates a different experience that I enjoyed significantly.
Victory Conditions
The Victory Conditions have been changed as well to work off of the concept of an overall Political Will Track. There are games in the Multi-Pack that still use the concept of Control, Support and Opposition but they are are funneled into the Political Will Track. Being COIN veterans, as we were setting the game up and noticed there were no Control, Support or Opposition boxes on the map, we were confused as to what our Victory Conditions were. We checked the player aids and they all referred to how to effect the Political Will for both sides, with the Irgun trying to decrease it through Sabotage of Railways, Cities and Sectors and placing Terror in Cities and the British just trying to undo what damage had been done to increase (or rather prevent decrease) Political Will. This took a moment to grasp but once we did, it seemed really new and fresh and made for a simplified path to victory that was easier to grasp.
Ultimately the purpose of the change in these Victory Conditions and the use of the concept of Political Will is that each side has their own motivations here as to what they wish to obtain from the conflict. The insurgent factions are trying to drain British Political Will to apply pressure to the government to give up the fight and eventually leave on terms that the insurgents desire. The British want to demonstrate success against the insurgency in order to increase their Political Will and the support of the local populace and even those back home to ensure an honorable and planned exit from their colonies. These competing ideologies lend their to be two different styles of Political Will Tracks found in the games. In Kenya and Malaya, which we have yet to play, there is a more symmetric track with each side having the goal of pulling Political Will toward their side to achieve a minor or major victory. While in Cyprus and Palestine, the insurgents are tasked with simply wearing down the British Political Will to zero. If they cannot be successful in getting it to zero, then the British will win at the end of the game.
Decks
All of the games have the same deck structure. There are three campaigns in each game that consist of 6 Event Cards and 1 Propaganda Card, shuffled in with the bottom 2 Event Cards of each campaign. This means that the game length will be 16 and 18 Event Cards. Due to the fact that each side will always get a turn to activate and take actions, this means that a full game of Palestine, or any of the four games, is roughly equivalent to playing a 36 card multiplayer scenario. This change seems to put a premium on each of your actions though and really makes decisions a lot more important and tighter as you must have a plan and not waste time in executing it.
Available Pieces
This is a key difference in The British Way and is divergent from the rest of the COIN Series. Unless otherwise instructed, forces may only be placed from or replaced with those pieces that are located in the Available Boxes. It is vitally important to remember this…factions while executing an Operation, Special Activity or the text from an Event Card that provides them with the opportunity to place their own forces out on the board, may not take them from elsewhere on the map if the called for force type is not in the Available Box. Unlike other games in the COIN Series, even including two of the games from this Multi-Pack Malaya and Kenya as you can in fact remove pieces from the map when there are none in Available, if there are no pieces in a Faction’s Available Boxes they may not be taken from those on the map to place elsewhere. This is a huge change and really makes it important to protect and maintain your pieces on the board. I found that I had to think twice about doing some of the Irgun Operations and Special Activities as it exposed them to being removed from the board and placed into the Prison Box.
It feels like these changes have sped the game up and made the game seem a bit more visceral as there really is very little wasted time. Players are also right on top of each other from the get-go and it becomes a fight from the moment it starts. The smaller footprints of the boards, and their more simple Operations and Special Activities, make the games in the Multi-Pack a perfect jumping off point for new fans of the COIN Series.
There is a lot more to this one but I really like this focus on 4 smaller and thematically linked conflicts and look forward to what other Multi-Packs are announced and come out over the next few years. You probably already know but a early last year, Multi-Pack II was announced called The Guerilla Generation and takes a look at 4 Central/South American insurgencies near the end of the Cold War in El Salvador, Nicaragua, Peru and Uruguay.
Here is a link to our full unboxing video showing off the beautiful components:
Here also is a link to our full video review:
I also wrote a full First Impression review on the blog and you can read that at the following link: https://theplayersaid.com/2023/04/18/first-impressions-coin-series-multi-pack-i-the-british-way-counterinsurgency-at-the-end-of-empire-from-gmt-games/
If you are interested in The British Way: Counterinsurgency at the End of Empire, you will have to wait a bit but can pre-order a 2nd Printing copy for $69.00 from the GMT Games website at the following link: https://www.gmtgames.com/p-1095-the-british-way-counterinsurgency-at-the-end-of-empire-2nd-printing.aspx
1. North Africa ’41: The Western Desert, March to December 1941 from GMT Games
I love a good North Africa wargame! To me, the reasons that I love it are several but the focus on supply and how difficult it was in this theater as well as the various elements of infrastructure used to perform that supply, such as shipping, ports, trucks, etc. are always good fun. I also love the scope and scale of the North African Theater. The front covered an area over 2,000 or so miles stretching from Morocco on the western coast of the Atlantic, through Algeria, Libya and onto Egypt. Names such as Tunis, Kasserine Pass, Tripoli, Benghazi, Tobruk, El Alamein, Malta (I realize not a part of Africa but an important cog in this theater) and Alexandria. There is something about this theater and the games we have played we have absolutely loved.
Well, when you pair this interesting theater with a great system in the ’40X Series and a great designer in Mark Simonitch, you have a recipe for a really tasty treat! And after playing the game a few weeks ago, I was amazed with how much I loved it even though many of the systems and hallmarks of the ’40X Series, such as the infamous ZOC Bonds, were not really present but there were other interesting things to take their place.
One of the things that has become synonymous with Mark Simonitch and his ’40X Series are the concepts of a ZOC Bond. The ZOC Bond System is a combination of the traditional concept of a Zone of Control or ZOC with the additional concept of a Bond that extends along the hex spines from one unit to another creating an area that cannot be exploited by enemy units. In a normal Zone of Control, a unit will generate a ZOC in the hexes they are adjacent to that forces enemy units to stop when they enter. These units can on a later turn move through the ZOC, usually with a movement penalty or cost of some kind, and get at non-combat units in the rear such as HQ’s, artillery or disrupt supply.
The main difference with a ZOC Bond is that the area between 2 units that are separated by only one hex is considered to be impassible, with the exception of certain terrain features that will nullify this ZOC Bond. As an added kicker, this ZOC Bond also will prevent free retreats through the area and also will stymie supply from reaching units on the other side of an enemy ZOC Bond. This system is the perfect situation for a low counter density game. Because you don’t have as many units to create a long, unbroken line of units preventing enemy units from getting through, these smaller scale units use their maneuverability, fire power and positioning to create the same effect.
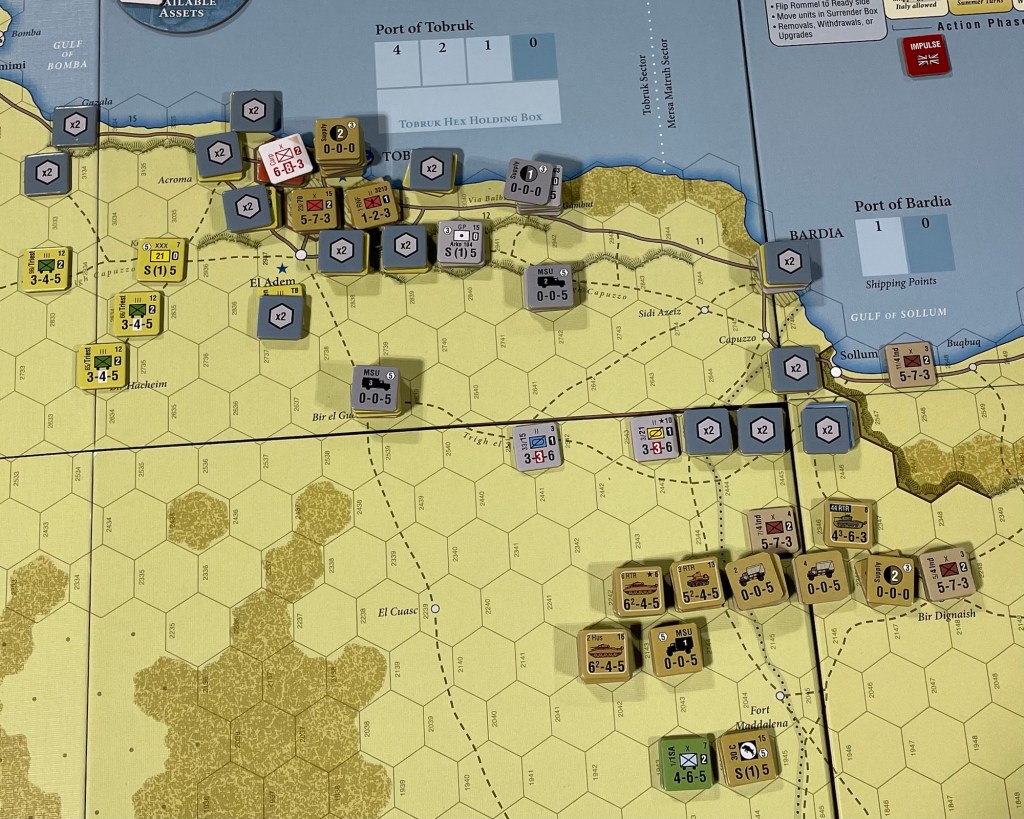
But, with North Africa ’41, there are no traditional ZOC Bonds. You might be saying “Well, Grant has finally gone totally daft!” But, the fact is that there are no ZOC Bonds. No ZOC Bond and it works out well. I think that part of this change for this volume was the terrain of the North African desert and the large dust storms that would be created from large formations or men and vehicles passing through the arid landscape. This means that tank units, recon units and even mighty Panzer tanks can subtly move through the terrain of the desert. And there is a lot open ground on the board but there are lots of rocky areas, escarpments and hills that can be used by both sides to defend and prevent breakthroughs and simply hold up or slow down advancing enemy units. This change had me a bit off kilter during the first turn and my brain reflexively had me moving my units one hex apart to create a stalwart defensive line of ZOC Bonds but after realizing there were none, I quickly was able to change and move into a more traditional unbroken line of units with tanks and other heavy hitters just behind to prevent breakthroughs and to counter attack when the moment was right and once I could get supply into position to do so. There are Limited Zones of Control as well as Overlapping Zones of Control in the game but they are different than the traditional ZOB Bonds and I think this change was very much a need here in the North African Theater to replicate the concepts of broken and inhospitable terrain, great distances and issues with equipment maintenance and breakdown due to sand overload.
The turn structure is also very different from other games in the series. The turns are not traditional turns where each player gets to activate and move all their units and then fight and the turn ends but is made up of 3 separate impulses called the Action Phase. All 3 of these impulses have movement, combat and there are things like the Events that happen with a roll on the Events Table. You may also notice that the 2nd Impulse is skipped during Summer Turns because of the hot weather and the taxing effect it had on operations. Supply Attrition happens after the end of the 3rd Impulse which is important to take note of because you will have a full 3 activations and opportunities to put enemy units out of supply or to break through enemy lines to restore supply. The importance of supply cannot be overstated, especially for the beleaguered Allied troops holed up in Tobruk. The Axis has got to work hard to encircle them, destroying their ports and shipping to limit the number of units that can be supplied per turn, and also prevent the advancing Allied forces from the south to breaking through and relieving the siege.
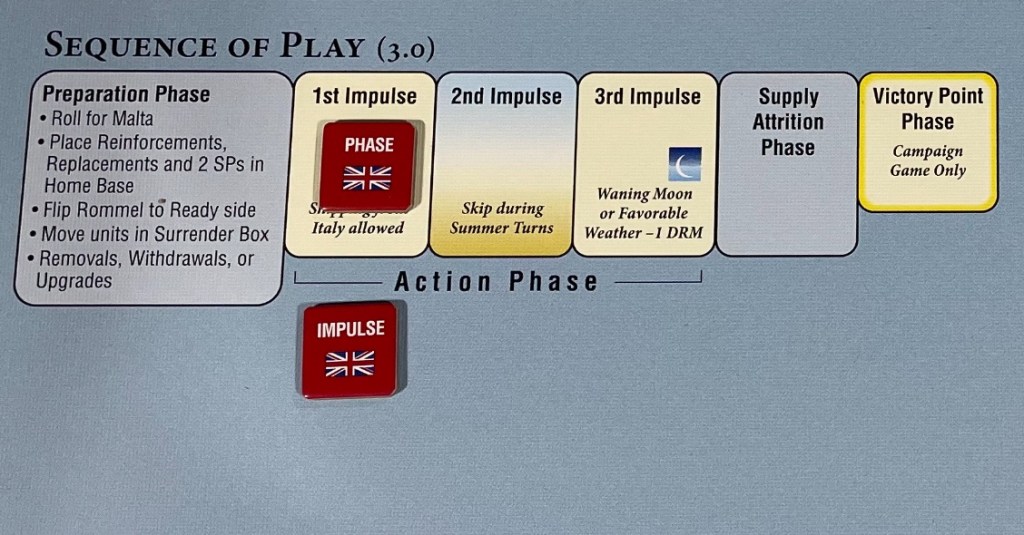
This entry in the series has a focus on assets in the form of Supply and Resource Points. Typically, Supply is more abstracted in wargames and is just assumed to be there if you have open supply lines to your supply sources. But in North Africa ’41, Supply assets are critical and actually provide the ability for units and artillery to attack. We will disucss supply a bit further in the post but Supply is more of a resource than a concept and you must keep that in mind or you will find yourself unable to do much of anything but defend. There are also an important focus on Trucks and their ability to move this supply around the battlefield. The trucks are used to carry Combat Units, Replacement Units from various ports to the east and west or Supply Points to the fronts. Each of these trucks may carry either one combat unit of any size, one Replacement unit or one Supply Point using the Mechanized Movement rate. These trucks may also use Extended Movement to expand their movement potential. These trucks do not have to pay extra Movement Points to pick up or drop off units as the truck merely enters the hex where the unit is located, picks it up and then continues with movement. But if you move a unit with a truck, that unit must stay with the truck for all of its movement allotment. There is no picking up or dropping off units here and there. I really liked having to manage and juggle my trucks. The Germans can also attack and steal some of the Allied trucks and have counters to represent these commandeered vehicles. You have to make sure you are moving them efficiently as it takes a long time to move from ports to the front and you have to kind of have a chain of them coming and going. There is a Truck Special Transfer rule that allows the transfer of a Truck to a friendly Off Map Box or in any hex that contains a friendly Combat Unit that is currently in Full Supply. This transfer rule specifically is for empty trucks and once they have a combat unit or Supply Point, they will be unable to do this. This means that you have to place a few units in the rear to allow this teleporting, also an exercise in prioritizing front line versus rear troops and then placing where most needed.
Resource Points are also important and allow the players to purchase various available assets. These assets include things like air support units, air transport, bombing raids that are important for damaging ports to reduce their supply points, forts and then finally the very important Commando Supremo chit which when used will allow German and Italian units to coordinate and attack together, which is otherwise prohibited. They did provide a nice little Available Assets cardboard circle that you can pickup and move around the battlefield reminding you of the assets you have at that time so you don’t forget them. This was a nice touch that aided in game play.
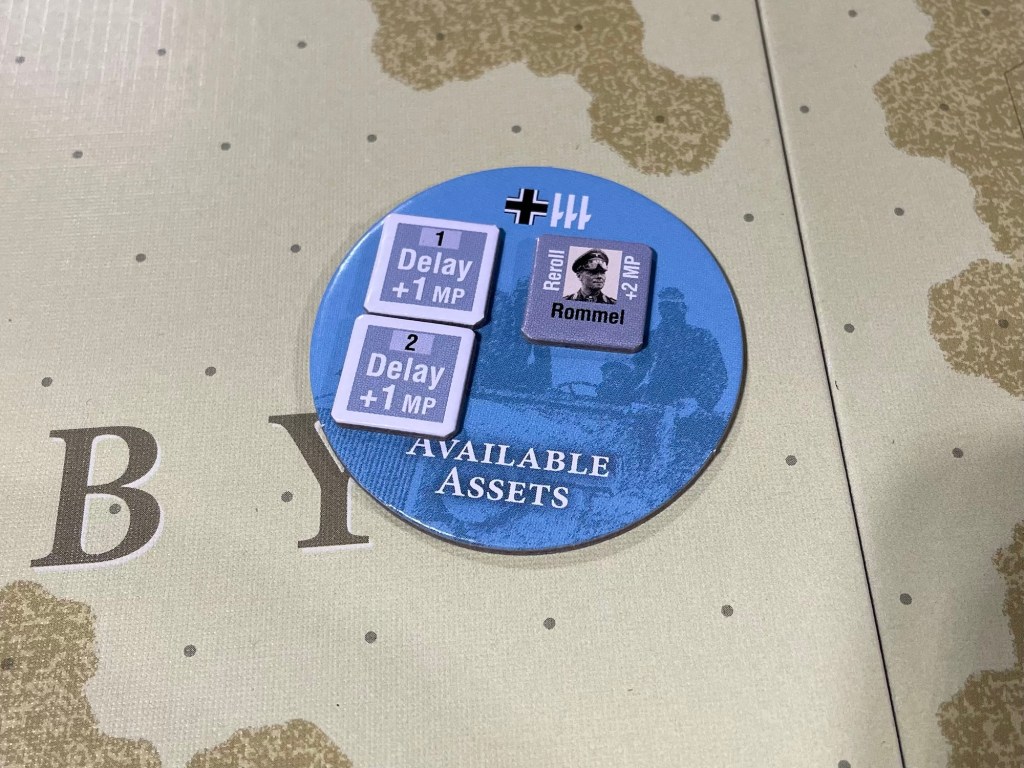
I am not a true historian and don’t know everything about North Africa. But it was pretty early in the war and both sides, particularly the British and the new Americans, were working on their concepts of how to use their limited numbers of tanks in the desert. In fact, Liddel Hart wanted to keep tanks dispersed and not mass them to attack. This Tank Doctrine is enforced on the players with some pretty simple rules. The Allies can only attack with a limited number of tank steps. They may have a good amount of tanks at their disposal but they cannot use them all…and not just because of supply limitation. They can only attack with no more than 3 tank units in any given attack. This is a real limiting factor but appears to be a good reflection of history and I liked having to figure this aspect out.
Tanks are very important to both sides as they offer several different types of combat bonuses typically in the form of Tank Shifts on the Combat Results Table. The impact of tanks is modified or restricted due to terrain and the concept of Attack Supply being needed to activate any attack consisting of greater than 9 Attack Factors. The attacker can gain or even suffer Tank Shifts during combat. Tank Shifts can never be gained if the defender is in a Fortification, Jebel, or City hex. Tank Units also attacking across an escarpment or into and across any Tobruk Perimeter hexside cannot be used to gain the Tank Shift. While not gaining the shift, a tank’s presence will prevent the defender from gaining the shift. The players will have to compare the best single Tank Rating among all of the tanks that are participating in the combat. If the defender has no tank units or 88mm Flak units then their Tank Rating is . If the attacker has the higher rating, then they gain a number of column shifts right equal to the difference that difference. This will be limited however to no more than 2 shifts. There also is what is called an Elite Combined Arms Shift which is gained if they attacker has both an Elite Tank unit and an Elite infantry unit in the attack. This will lead to a favorable column shift on the CRT of one column to the right. The defender though will not earn shifts for Elite Combined Arms. I really liked the various different types of tanks involved and how they were used by both the Allies and the Axis. Tanks are key and they are the real brute force on the battlefield. Without them, attacks are not going anywhere.
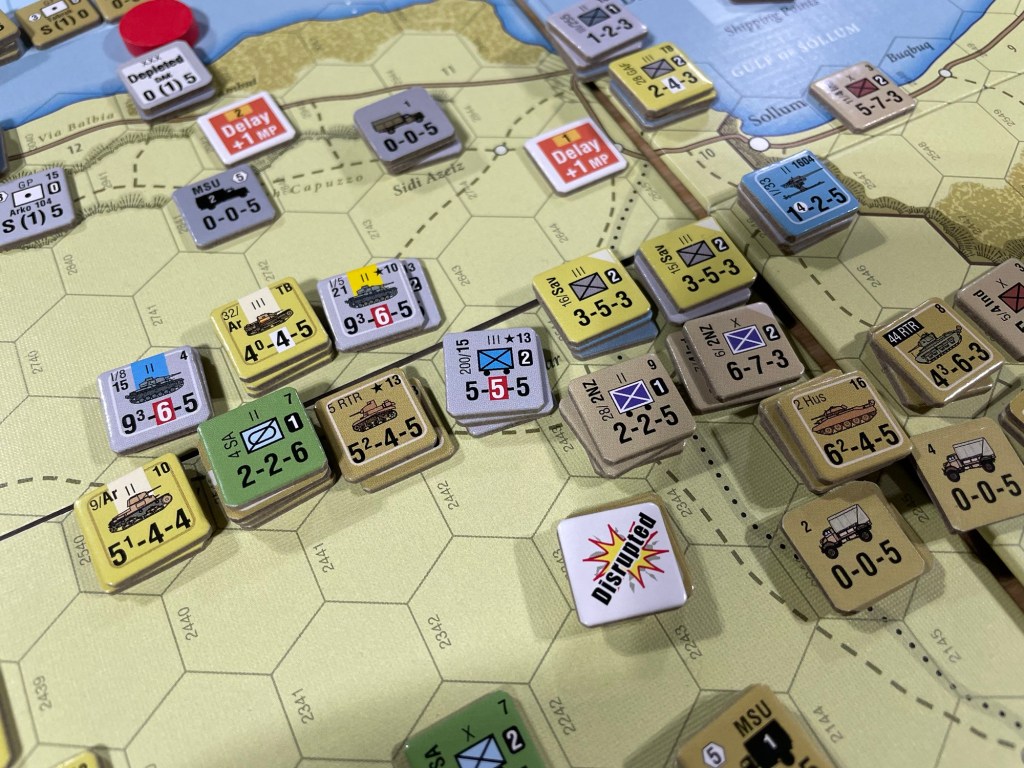
As is usually the case with a Simonitch design, we had a great time playing North Africa ’41. I am glad that we cut our teeth on the shorter scenario though as we made plenty of tactical mistakes and early had to learn the benefits of the different elements available to the players. I learned a lot about North Africa from this one and really look forward to exploring this game a bit more. There are a lot of other points that I just simply couldn’t cover in this post as the system has a huge amount of aspects but overall we really liked what we saw and I hope that you have the opportunity to give this one a spin.
Here is a link to our full unboxing video showing off the beautiful components:
Here also is a link to our full video review:
I also wrote a full First Impression review on the blog and you can read that at the following link: https://theplayersaid.com/2024/01/24/first-impressions-north-africa-41-the-western-desert-march-to-december-1941-from-gmt-games/
If you are interested in North Africa ’41: The Western Desert, March to December, 1941, you can order a copy for $65.00 from the GMT Games website at the following link: https://www.gmtgames.com/p-962-north-africa-41.aspx
Honorable Mentions:
Each year I feel compelled to tack on some games to this list just because they were so very interesting or dealt with unique settings that I feel are worthy of mentioning.
Land and Freedom: The Spanish Revolution and Civil War from Blue Panther – Land and Freedom is a very interesting and unique card-driven in which players are play the roles of various factions who are attempting to work together to repel the Fascist attack on Spain’s sovereignty. The three sides, including the Moderates, Anarchists and Communists, have to work together in a loose alliance against the Fascists but also in an attempt to keep each ideology in check and win the game by amassing the most glory. The game looks at Spain in the framework of 4 separate geographic Fronts, which players have to defend using only their wits and the cards at their disposal. These cards can be used for their powerful events or placed into a tableau where in later turns the play of matching symbol cards here can trigger a very powerful and game changing momentum swing. The game is semi-cooperative, and what is meant by that is that all of the players will lose the game if 2 of the Fronts or Madrid are lost but if they sufficiently work together to keep the Fascist invasion at bay, they can then win individually for their ideology by amassing the most Glory through their brave deeds, skillful manipulation of the turn order and focus on increasing their hold on important aspects such as government control, external support from world powers in the form of Foreign Aid, the increase of individual liberty or a focus on collectivization.
Here is a link to our video review:

Road to Independence: The American Revolution 1775-1783 from Blue Panther – Not every wargame has to be deep. Some of them are light and fast playing and are just fun and interesting to experience. But, with this lightness, that doesn’t mean that the game isn’t a good representation of the history or an interesting play experience. Such is the case with a new game called Road to Independence: The American Revolution, 1775-1783 from Blue Panther.
Road to Independence: The American Revolution, 1775-1783 is the second in a planned series of games that will simulate various important conflicts in American history in a casual format. The first game was called French & Indian War from The Historical Game Company and the third game will cover the American Civil War. In this game, two players clash and take the sides of the British or the Americans fighting over the control of the Thirteen Colonies. One of the interesting things about the game is that it not only includes the Eastern seaboard but also the conflict in the far Western territory, a theater not often covered in games on this conflict. Both players will fight for control of important locations using specially made dice that represent British and American regulars, Native American allies, militia units, and (for the Americans) French and Spanish forces. Each player also has their own deck of Event Cards that will allow special events and actions to occur, ensuring that no two games will play the same.
Here is a link to our video review:

The Russian Campaign Deluxe 5th Edition from GMT Games – The game is true to its name as it represents the entirety of the East Front of World War II stretching from Leningrad and Finland in the north all the way to the Caucasus Oil Fields, Rostov and Stalingrad in the south. I have said this before, but there is something a bit romantic about East Front games. Long lines of contiguous counters. The German blitzkrieg pushing the Soviets back for the first dozen turns. The Soviets gaining their strength, bringing up bigger replacement units and pushing back. A continuous bloody wave of motion and combat and attrition. Bad terrain, bad weather and bad luck all combining to spoil the best laid plans of commanders. It is all here. The entire East Front in all its glory and beauty and I think that this is one of the main draws of the game and the genre. Can my decisions lead to better advances? Can I do more than historical? Can the Germans break the red wall of Soviet units and capture Moscow to knock them out of the war? All great questions that can be answered in this fairly simple and standard wargame. This game is a very fine example of a classic hex and counter wargame that is very playable and has enough opportunity for the Germans to win as the Axis. I have heard many people say that The Russian Campaign was their first wargame and that they played it so much that they wore the ink off of their counters. I used to think that this was just nostalgia and a fuzzy mind speaking but now after playing it I can fully understand and feel their affinity for the game, its system and mechanics. They all seamlessly work together in perfect unison to create a memorable and classic gaming experience.
Here is a link to our video review:
The Hunt from Salt & Pepper Games – I have played several hidden movement games over the years and enjoyed them all. Some of these titles have included wargames such as They Come Unseen from Osprey Games, Sniper Elite: The Board Game from Rebellion Unplugged and Bomber Command from GMT Games as well as a few board games including Hunt for the Ring from Ares Games. The concept of moving cautiously, attempting to evade pursuers, all while trying to locate and acquire or destroy objectives. These situations can make for some really tense games that cause your head to ache and your wits to be tested. But they rely on some bluffing as well. Trying to force your opponent to anticipate where they think you should be and then trying not to be there. A really great mechanic in board games but not always easy to pull off and make for a very playable and interesting game. Recently, I became aware of a new design from Matthias Cramer and Engin Kunter that took this hidden movement concept and put it into a historically based game about the struggle over control of the South Atlantic between the British Royal Navy and the German Kriegsmarine during the early years of World War II. I gave it a few plays last year and simply had a blast!
Here is a link to our video preview:
There I am finally done. My list of the Top 10 Wargames published in 2023. I had fun playing them and putting this list together as I got to revisit each of the games and think about why they were included on this list.
Please let me know what your top games of the year were and what you think of my choices and what games you would have placed on such as list.
-Grant

Grant, Alexander,
If you have not already heard, I saw this post on MMP’s site today:
It is with very heavy hearts that we have to let his many fans and admirers know that our friend and for the past almost twenty five years fellow MMP’er Dean (Essig) passed away peacefully in his sleep.
His children plan on a memorial in his home town, probably several weeks in the future, we will be sure to post whatever information we have once we get it.
This is quite a shock to us as to how quickly he was overcome by this terrible disease.
All reactions:
688688
140 comments
50 shares
Like
Comment
are
LikeLiked by 1 person
I did see that announcement and am saddened by the news. I didn’t know Dean personally but it is terrible what happened with his health. Loved his games. SCS is just some of the best gaming out there.
LikeLike
Very sad news to hear today and a great loss to the community. I have just received my first BCS game, Valley of Tears, and am loving the BCS rules. Both a fascinating and refreshing look at handling warfare on that scale.
Grant I’m surprised you didn’t mention The Hunt in your recent blog post on hidden movement games? You really seem to enjoy it.
LikeLiked by 1 person
I did really enjoy it and I mentioned it in the last summary paragraph as a game that was very good.
LikeLike