We have all played lots of East Front wargames. These games are always focused on things such as weather, movement, supply, and of course combat as the combatants fought it out over the fate of World War II over the short period of a few key months in 1941. Typically, these games all tell the same outcome, that of the Germans punching the Soviets in the mouth for the first few months of June, July and August 1941 until they got their feet underneath them and then punch back as the weather worsened and the Soviet people mobilized to defeat the invaders. The outcome of these East Front games are not necessarily pre-ordained, but unless something different happens, their outcome rarely if ever changes. That is where Iron, Blood, Snow & Mud from PHALANX comes into play as the game is a fun, light, fast playing strategic level wargame that we found to be extremely interesting and definitely up for grabs as either side seems to be capable of winning. In this First Impression post, I would like to share my overall thoughts on the game.
Is Iron, Blood, Snow & Mud Just an Introductory Game?
One of the big strengths that the game has going for it is that the rules are fairly simple to grasp, yet interesting, and the game is fast playing as it can be played in 90 minutes once players are familiar with the rules. Our first play took about 2 hours but that was because we were just trying to get comfortable with the movement, which in my opinion is the best part of the game! I found that the rule book used pretty clear language and also had some good use of symbology that was consistent and easy to interpret. This really helped in the quick playing arena as we were able to identify a symbol, remember its meaning, and then generally go about doing what it was without too much reference to the rulebook.
I also really appreciated the Turn Track and how they would include in each year’s box a couple of symbols that had the red circle around them and were then crossed out to let you know that due to the weather that year, these certain actions could not be taken. For example, Convoy Movement is a very important aspect of the game that we will be covering later. Convoy Movement is shown by a symbol of a 2 1/2 Ton Truck drawn on the board. When you see the symbol on the Turn Track, this means that you can take Convoy Movement because the weather is favorable. A very nice graphical representation of one of the more complex and important parts of the game in movements and the weather’s effect on it. This helped us to pick up the game quickly, not worry over remembering so many rules and just focusing on the game itself and having a good time.

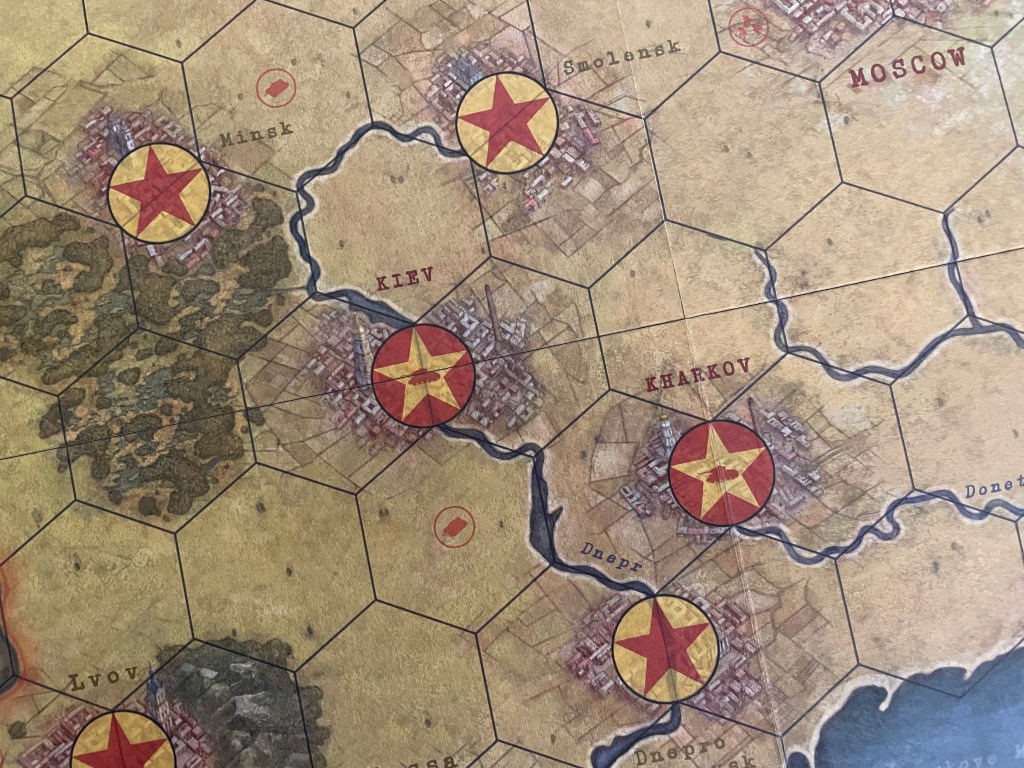
The only issue that I had with grasping the concepts was the focus on the urban areas and how they are controlled. Each of the cities found in the game, including Leningrad, Kiev, Smolensk, Odessa, Lvov and Moscow, have one or more hexes that have the urban terrain feature. These 1 or more hexes combine to represent the entirety of the city and in order to control the city you will have to have a unit, either an Infantry or Panzer Army, located in each of the hexes of the city. Once you do that, at the end of the turn you can place a Control Marker in the hex representing that it has been defeated and then continue your drive on Moscow. Due to the puzzle like movement of the game, you cannot always get enough units into the 1 or more hexes of a city to control them. This will sometimes take you 1 or more turns to accomplish, particularly if the Soviet player gets a reinforcement and is able to spawn it from the city hex or hexes that you don’t occupy. I really loved this rule as it made perfect sense, especially in this fight as the Soviets retreated and burned down the areas they left rather than leaving them for the Germans to capitalize on. I just had a really tough time for some reason remembering this element and it bit me in the rear end multiple times, ultimately slowing down my advance and causing me to not be able to capture my ultimate objective quickly enough.

Movement and Convoys
One of my most favorite aspects of the design is how movement works. First off, as would be expected, it is dependent on the current weather and will effect whether a player can do certain types of movement. Initially, the movement seemed overly simple but as we got through turn after turn I noticed that the key to movement is planning. You have to understand how your units can move and what “obstacles” as they are called in the rules will prevent certain types of movement. Being efficient with units as well is very key as you have to sort of leapfrog your units forward in order to gain the most advance possible. This is a really well done part of the game and I really liked it. The way you leapfrog is through the use of Convoy Movement and it does require careful thought. You have to know where it is you are going and then line those units up to allow that this to happen. A chain of units that are connected is the key here but also not having Obstacles in your way like rivers. Convoy Movement is extremely important for units located in the back as if you separate them from your advancing forces, they will inevitably get stuck and will only be able to move one hex at a time. I will say that the low counter density was a positive part of the game to highlight this type of Convoy Movement and made each and every move important.

But, with the front attacking forces you will have to sometimes take a chance and get away from the slower Convoy Movement by Blitzing with your Tank units. I felt like this Blitz Movement, which is somewhat risky as you are breaking away from the Convoy line and potentially opening up gaps that twill slow down the forces in the rear, is also handled very well and integrates some historical tactics into the game itself. You can try to move that armor another space by rolling a D3 and on a result of 2 or 3 you can move again….and what is more, you can then keep trying to do this until you fail or reach your target. This aspect at first kind of bothered me but I think that this represents the weather element a bit and how the terrain was unforgiving when wet or snow covered or even frozen. If the Blitz Movement fails, your unit will be out on an island and can potentially become a target and is easy pickings for the Soviets.
I already alluded to this above but the handling of weather is another great design point, and it is not a difficult thing to handle with the rules. No DRM’s or column shift but simply you can or cannot take certain actions. When weather is rainy resulting in mud, you will be unable to use Convoy Movement that run nor can you blitz. If the weather is cold and snowy, there will be no use of your air power. These simple weather rules create truly important strategic opportunities that players will have to plan for and adjust to on the fly. But remember, you know when these weather problems will arise if you just look at the Turn Track.

Overall, movement is a very important part of the game. I think that you have to optimize your moves to make sure you have the ability to adjust at the end of the game if and when Stalin escapes the closing net of tanks in Moscow. Getting out to a quick start with good progress in the first 2 turns is key to victory for the Germans. Another key is a general progression of all units on each of the fronts as you have to have made forward progress to then catch up to Stalin if he runs. Also, battles for the Germans have to go well in the early going or they will end up spending an additional round or 2 in cleaning up straggler Soviet Infantry units that are holding onto urban areas. You have to clear those out to make sure they cannot spawn behind you and cut your supply.
Cities are Tricky
Urban Locations, which both cities and industrial centers, are designed to make life difficult for the advancing Germans. The Germans have got to move and keep moving or they will get bogged down and not be able to reach their ultimate objective in time. But they also have to worry about keeping their lines in supply. Controlling Cities is very tough as the German player will have to have units on each hex of the Urban Location before the end of any given turn to place a control marker there. If they do not control the entire Urban Location and all of its hexes, this leaves them open to having a Soviet unit spawn in an industrial center (identified with a red tank in the middle of the star).
These urban locations also confer defensive bonuses to the player who controls them as they will grant a +1 die bonus in combat, both on offense or defense. The German player will be frustrated by this as they have to move quickly and remove any resistance and that +1 die bonus is massive for the defending Soviets and can make the difference in them holding on or not.
Combat is Lite and Fun
I thought that the Combat mechanic was really well done in this one as it was lite yet fun and interesting. Combat depends on the type of units involved and then supporting units which are adjacent to the attacked hex. Each unit type gets a certain number of dice with Tank units getting to roll 3 dice and Infantry units getting only 2 dice. And these are D3’s as they are a 6-sided dice that have only results of 1-3. Players then will get a +1 die bonus if they control the Urban locations where the fight is taking place and then +1 die for each supporting Infantry unit that is adjacent to the hex. Moving up Infantry to support is very important for the Germans but also for the Soviets as they can stack up Infantry units supporting each other in these Urban hexes and will be rolling generally similar number of dice to the Germans with their Panzers.

The dice are rolled and then hits on the dice are totaled up and compared. The player with the most hits wins the Combat. In the case of a tie, the player with the Initiative wins and if the winner has double the hits that unit is destroyed and removed from the game. The loser has to Retreat and they have to retreat away from the unit attacking and also cannot retreat into an Obstacle such as a River or another unit. If they cannot Retreat, then the unit is eliminated. This becomes very much about posi9tioning and attacks. If you can get units behind and surround your targets they are doomed as they will not have a safe path to get out.

The attacker can also get added dice from the use of Air Power Units and Naval Units but they are harder to use and are not consistent as they come and go with the weather or with the fronts advancing beyond the ports of Leningrad and Odessa.
Support Units are Well Done including Air Power and Partisans
I liked the addition of Support Units in Air Power and the nasty little Partisans. They added some nice depth to the design and provided some additional challenge to the supply for the Germans. Air Power is determined by the current weather as when it is snowing, they cannot be used. The players will gain Air Units from their holding boxes off the map during Phase 1: Fleet and Air Support. It is important to note that not all Air Units are available for the Soviets at the beginning of the game. Players will then place them out on the board but they are not necessarily sure about where they might be needed as the player who holds Initiative will go first and things could change slightly. These Air Units will give an additional +1 die in Combat but also can act as blocking of movement of units so they are dual purposed. Players can place multiple Air Units into a single hex, but they cannot place them on a Swamp or Mountain hex, and Air Units will be unavailable during Snow Season as previously mentioned. What this really means is that you have to use your insight and understanding of your opponent and their strategy to understand where the place these properly as you place before you know where Combat will take place.
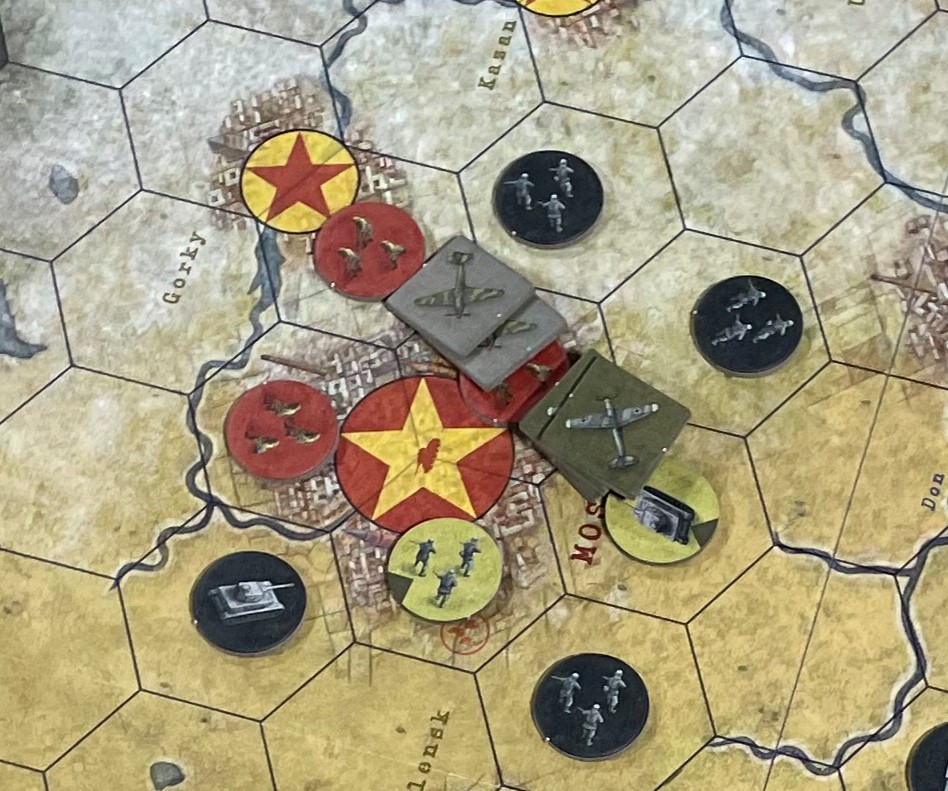
Air and Fleet Units are treated as Obstacles for the enemy and if they have to retreat into them they will be eliminated which is something that I made sure to take advantage of as the Germans. This was a bit counterintuitive to my brain but I now see that it was a great design choice and a way for the Germans to get ahead a bit.
The Partisans were pretty great for the Soviets as well as they create a behind the lines drama as they are being placed to cut your supply lines but also to act as a road bump to getting additional German units to the front. Partisan are obtained by the Soviet player during the Reinforcements step as they will roll a die and the result of the roll is the number of Partisan Units that Soviet player must deploy. These Partisans are pests and the Soviet player can deploy them in any empty hex thought units of either side adjacent in Soviet territory. These Partisan units can never move. They are static units whose purpose is to act as an Obstacle for the Axis player’s Convoy Movement, Retreat and for the purposes of calculating Supply. They will stay on the board in the place they were deployed until they are removed by an Axis unit being placed or moved into their same hex. It is important for the German player to make sure they have at least a unit are two in the back ground to be able to work on keeping the Partisans contained. A lot of their effectiveness will be determined by their number and in our play Alexander didn’t roll very well so he never got more than 1 or 2 Partisans per turn to deploy and I was able to keep them under control. I also made sure I could get Supply from a few different routes and was not focused on just one. These Partisans were fun to deal with and I am really glad they were included to make the game feel a bit more puzzle-like.
Victory Condition Angst
My final point here is a bit of angst about the Victory Conditions for the German player. It is not take and hold Moscow, although that can be a part of the recipe for success, or kill all Soviet units on the board (this really is difficult) but it is to capture the elusive and slippery Stalin Meeple. Now, there are a few other ways to win but the focus is on the hunt for the mustachioed leader and he can slip away from your net by simply rolling a die! I was stunned when we read that rule and was a bit disappointed that it came down to a die roll. But, there are other ways to win. Here are the Victory Conditions as printed in the rule book:
As the Axis player you win if:
● In the Victory Check Phase you Control the City where Stalin is located; OR
● At the end of the Snow Season 1944 (the end of the game) you have Destroyed at least 1 Fortress and Control either Moscow or 3 Industrial Centers.
As the Soviet player you win if:
● In the Victory Check Phase you control any City in Axis starting territory; OR
● If the Axis player does not win by the end of the Snow Season 1944 (the end of the game).

The Stalin escape roll is not easy but it just felt a bit wrong. I mean, I had Moscow surrounded on all sides but one and he was able to roll and get out. The Soviet player attempts to relocate Stalin from Moscow if they have concern over the German player getting too close and fearing capture. To do an escape, the Soviet player rolls a die. If the result is a 2 or 3, they can then move the Stalin Meeple to any Friendly-Controlled City that is not an Industrial Center. This roll can be attempted once per Season.
Now if the German player can destroy one of the 2 Fortresses on the Board (Leningrad or Odessa) and control Moscow plus 3 other Industrial Centers (any three of Kiev, Kharkov, Rostov, Stalingrad, Maykop or Grazny), then they can secure victory so all is not lost if Stalin slips between your fingers.
I just wanted to see something different as a Victory Condition I think but in the end it still is an interesting and well put together game.
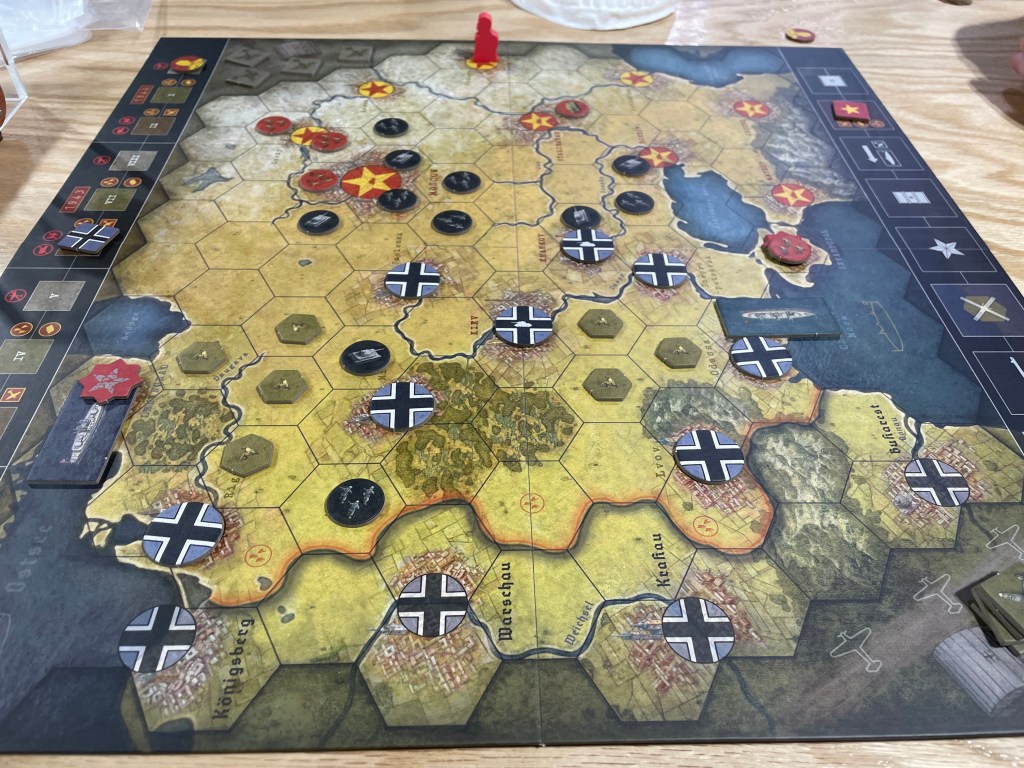
Overall, Iron, Blood, Snow & Mud is a great little game that was fun to play and most importantly looked really good on the table. The production quality of the game is very high, as has come to be the norm with PHALANX but this one also is absolutely beautiful! The board is very eye-catching and the components are top notch. It was a joy to play with the game and also to play the game. I would recommend this one to anyone the likes fast playing, rules lite yet satisfying game that plays in 90 minutes, scratches the wargamer’s itch for maneuver, combat, focus on supply and the risks of moving ahead quickly while awaiting your support units to arrive. This is a really great little gem and I am glad that we gave it a chance.
Here is a look at our review video:
If you are interested in Iron, Blood, Snow & Mud, you can order a copy for €30 from the PHALANX website at the following link: https://phalanx.co.uk/games/iron-blood-snow-mud-2/

Looks intriguing! The victory conditions for the German player look very difficult indeed – after all, the Axis controlled not even one of these industrial centers by 1944! If the game is still equally easy to win for both sides, it might give the Axis quite a boost compared to the historical outcome.
LikeLiked by 1 person
Well, both sides are symmetric in their abilities and units but asymmetric in the way they get units. Russia getting units as the game progresses, but being weak at the start of the game. With Germany starting with many units but not getting reinforcements. Even the air superiority will be eroded year after year. In short, winning with the Axis is difficult, but even resisting and counterattacking with the Soviet is not a piece of cake…
LikeLiked by 2 people