
When Downfall: Conquest of the Third Reich, 1942-1945 was announced a few years ago, I was immediately interested because the game was a strategic level wargame and looked to me to be similar in scope and scale to one of my other favorite games covering WWII at the strategic level in Unconditional Surrender!. As I started to do a bit more research on the game and look into it, I realized it was a collaboration between 2 really great designers in the late Chad Jensen and the great John Butterfield, and I was very much anticipating the game. I also saw where the game has the players not only handling one of the opposing Allied sides including the Western Allies and the Soviets but also has each control the opposite defending German army as well. This combination really sparked an interest in me and when the game released late in 2023, we readied ourselves to play and finally a week ago we got our chance. I want to share my initial thoughts on the design with you in this First Impressions style post.
But first, what is the game about? Downfall is a 2-player game that focuses on the conquest of the Third Reich in World War II. The game is set starting in November 1942, as the Soviets steady themselves after the initial shock of Operation Barbarossa and begin to punch back while the Western Allies are mopping up in North Africa and planning for the invasion of Italy and lasts through until the end of the war in May 1945. As I mentioned earlier, one player will handle the Western Allies while the other the Soviet Union in this joint effort to destroy the Axis. The 2 players share the goal and responsibility for defeating the Reich, but also each seeks a victory that favors their position and power in post-WWII Europe. To demonstrate this, each of the players will control 2 different factions. The Western Allies player will command the Western Allies made up of Britain and the United States of America as well as the German OKH faction who are on the East Front fighting the Soviet armies (Oberkommando des Heeres). While the Soviet player will command the Soviet Army and the OKW faction, which consists of the German and Italian armies facing off against the Western allies in the west (Oberkommando der Wehrmacht).
I know that this model was used in some older games, most notably Battle for Germany from Decision Games (1975) designed by Jim Dunnigan. I have never played that game but I now am very much curious about it.
The Game “Does Exactly What It Says on the Tin”
This is one of those things that Alexander says a lot as he is British and this marketing slogan was used in England. The game “Does Exactly What It Says on the Tin” is a very descriptive comment about the design. With a title like Downfall and then a sub-title of Conquest of the Third Reich, there is no secret what is going to happen with the game. The Allies are going to defeat Germany and the other Axis powers and wipe them off of the continent. The forces of the Axis are really no match for the might of the Allies during this time of the war being late 1942 through May 1945 and the goal of each of the players is to destroy the defenders and push them back at every opportunity racing toward Berlin and the end of the war. There should be do delusion here that with the player controlling one of the German fronts that they can actually significantly stop or even push back the attacking Allies. This is just not the case. They don’t have the available forces. They don’t have enough air power to significantly change the odds of combat. It is not going to happen. And they will also have very little power to actually do consistent counter attacks. They will just have to sit and defend as best they can, utilizing the terrain and simply focusing on slowing the advance just enough to make a difference.
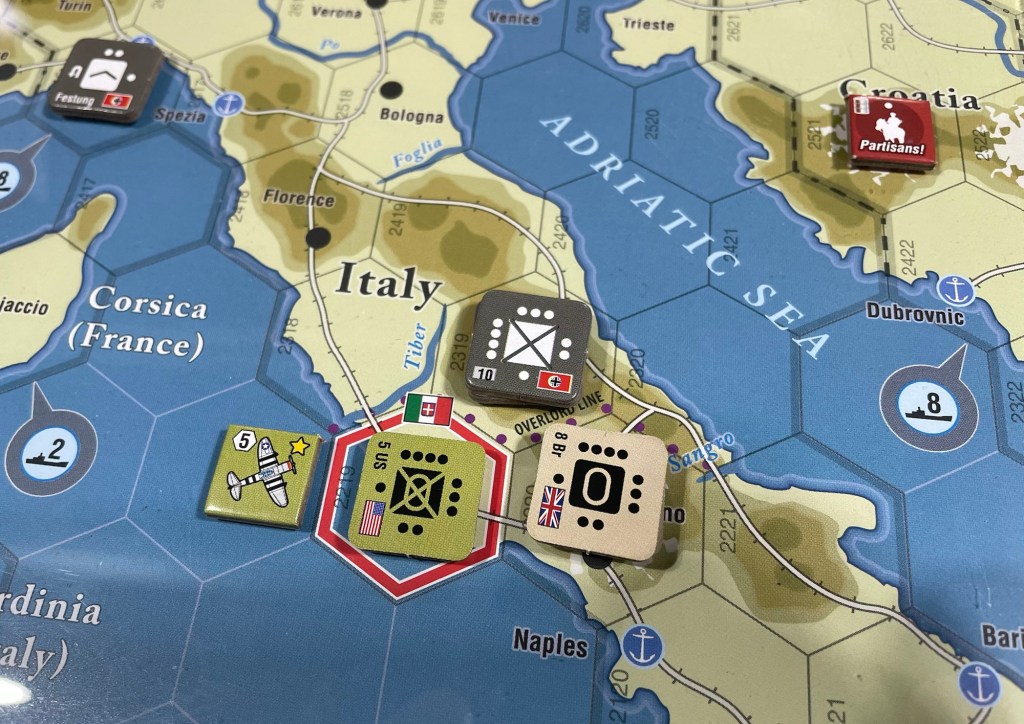
So, controlling either the Western Germans (OKW) and Eastern Germans (OKH) is all about making ground difficult to take and slowing down the advancing Allies while you try to make good progress with your own Allied force. This dichotomy in the design is really cool and was very interesting to see played out on the board. I would defend, defend, defend with my Germans in France, trying desperately to hold off the Allies crossing the channel for Operation Overlord, and then do my best to use my limited options to replace my lost units, move units up from in reserve in Paris to fill gaps and just try to hold one more turn. In Italy, I found myself trying to stay in the rugged terrain including hills and mountains to get that extra defensive bonus on my strength. Just hoping to survive from turn to turn and make Alexander do yet another low odds attack to try his best to dislodge me.

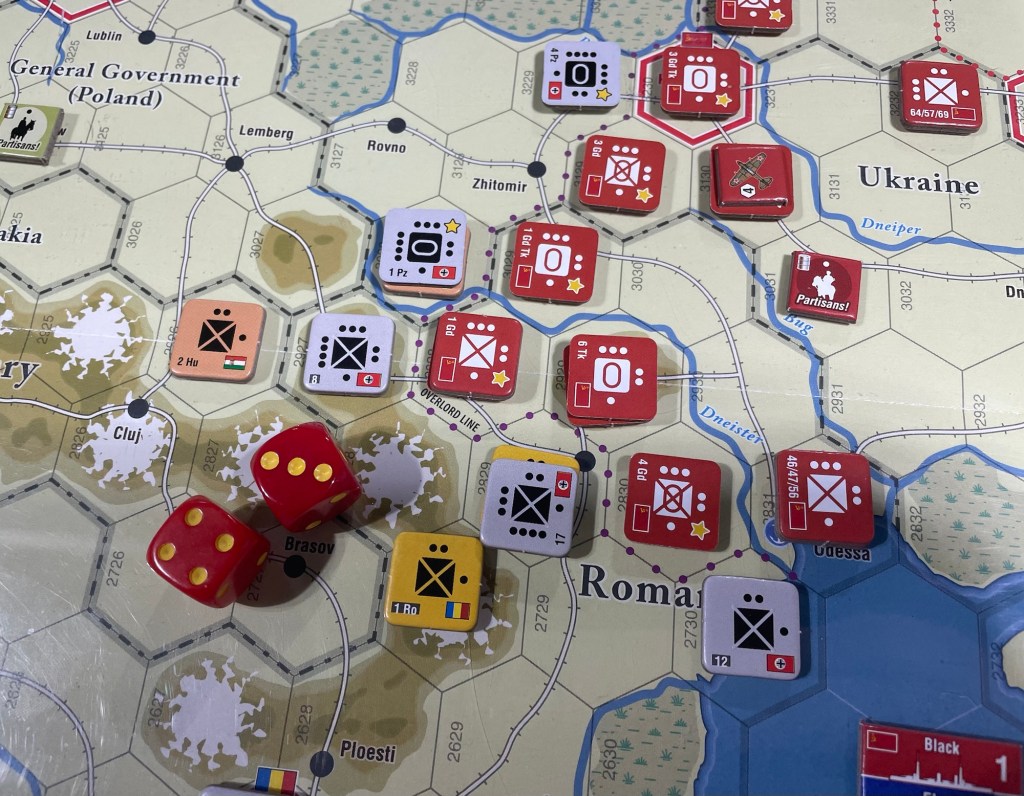
The other real key in defending is understanding how to keep the enemy units from being able to get multiple units into position to offer the all important Flanking Bonus of +1 in combat. See, you get a +1 Flanking Bonus from each of your units that are adjacent to the target hex you are attacking. So, if you can somehow best position your limited defending units in a wide interlocking field of Zones of Control, you can really limit how many units can get into position to offer this aid. I really saw this put to great effect by Alexander in the mountains in Romania. Just made it incredibly hard to pus them out of this area and it took me many attempts to make any progress.
So, keep in mind that the name of the game is Downfall and that the Axis is going to fall. It is all about how quickly you can get that done. A very great part of the design that we loved very much!
Initiative System is the Bomb
One of the best parts of the game was the concept of Initiative and how it worked with the various Orders that players choose and when they can go in a turn. Around the edge of the board is the Initiative Track that goes from 1 to 91 and represents a year. The amount that the Initiative Track moves is determined by the Order that was chosen that turn by the player who held Initiative. You see the faction lowest on the Initiative Track can continue to go each turn choosing Orders until they pass another faction and then that faction is in the lowest space and will get to go. Just a really well done part of the game as this creates lots of opportunities to take many smaller Orders, creeping up ever so slightly on the Initiative Track while training the Initiative and being able to continue going. This can be used to great effect to get units moved up against the enemy units in preparation for an offensive. These different Orders all have an Initiative Cost. Some are small, such as the 3-5 Movement Orders that allow the player to move units on the board, while others are large and take a great investment of time and resources to pull off such as Strategic Warfare (+18 Initiative Cost), Recruitment (+21 Initiative Cost) or Mechanization (+16). But the other cool thing is that each faction has a different cost to their Orders to throw in some asymmetry to the game and make it even more challenging to game the system.

One other important part of the Initiative Track is the concept of the Event Deck and how these Events are triggered. As the Initiative Marker is moved along the board by an amount determined by the type of Order the player just took that turn, it will pass over Event Spaces on the track that are aligned with one of your controlled factions and you will get to then manipulate the Event Deck and change up the order of these events shown on the board. So there are 3 cards showing in the Event Deck display on the board and these cards effect a few different aspects. They give a number of aircraft that are available to the players by simply counting up the shown aircraft icons on the 3 cards in the display. They also sometimes provide bonuses to combat with a +1 DRM or other such benefits. And finally, there is the Event Card text that actually shows the player how they can manipulate that card to score Victory Points or even win the game by meeting the conditions shown on the active event. Sometimes players might take a larger Initiative Cost Order in an attempt to change up the Event Cards that are showing as when you pass over one of your Event Spaces you can then move the Active Event down to the Discard Pile covering up that card and taking away its advantages, getting the Event Card text to activate by being in the Active Event box in the middle or even bringing on a new Event Card from the Draw Pile. I just really liked the concept of how my operations and orders would effect the outcome of what I was trying to do on the board.

I also like that the Weather Marker is found on the Initiative Track and as players pass over it and it becomes lowest counter on the track it will then cause a Weather Roll to see if the marker advances. Players will roll 2D6 and move the Weather Marker by that amount on the Initiative Track. This one is not really able to be manipulated by clever play of Orders but will keep moving along as they weather will either zip on by with higher rolls or linger causing gridlock on the advance on fronts as it is very challenging to attack during Snow and Mud weather.

Initiative System is the bomb and creates some really interesting opportunities for player decisions during the game. Making decisions about what Orders to take is key and understanding how those Orders will move the Initiative Marker along, possibly allowing your opponent to get a dreaded double move at the wrong time. Sometimes it is best to gather yourself, take smaller Orders that will move the Initiative Marker along at a slower pace, allowing you to reposition your units and then get ready for a future larger attack when the time is right.
Combat
The combat mechanic in the game is a bit different than the usual CRT in a large hex and counter wargame like this. But, it is very well done and works for the design. Combat is simple, not overly crunchy or difficult, and rewards planning with the use of combined arms, shock troops and armor as well as positioning of support units for flanking support as often as possible. Each unit has a certain number of strength pips that serves as its attack base for the lead unit. You then add to this various factors such as +1 for each flanking unit (defined as a unit in an adjacent hex to one you are attacking), +1 for shock infantry, +1 per non-German armored unit in the combat during Fair Weather, +1 for having more Elite Badges (stars) than one side or the other, etc. Then the defender will calculate their attack value as well using the same elements but also getting bonuses for the terrain type they are located in including +3 for mountains, +2 for hill or forest, +2 defending across a beach hexside, etc. These numbers are then totaled and the attacker’s value is subtracted from the defender’s value to fine the Difference. You consult that column and that is what will be used for combat. Then the attacking player will roll 2D6 and add various Dice Roll Modifiers.
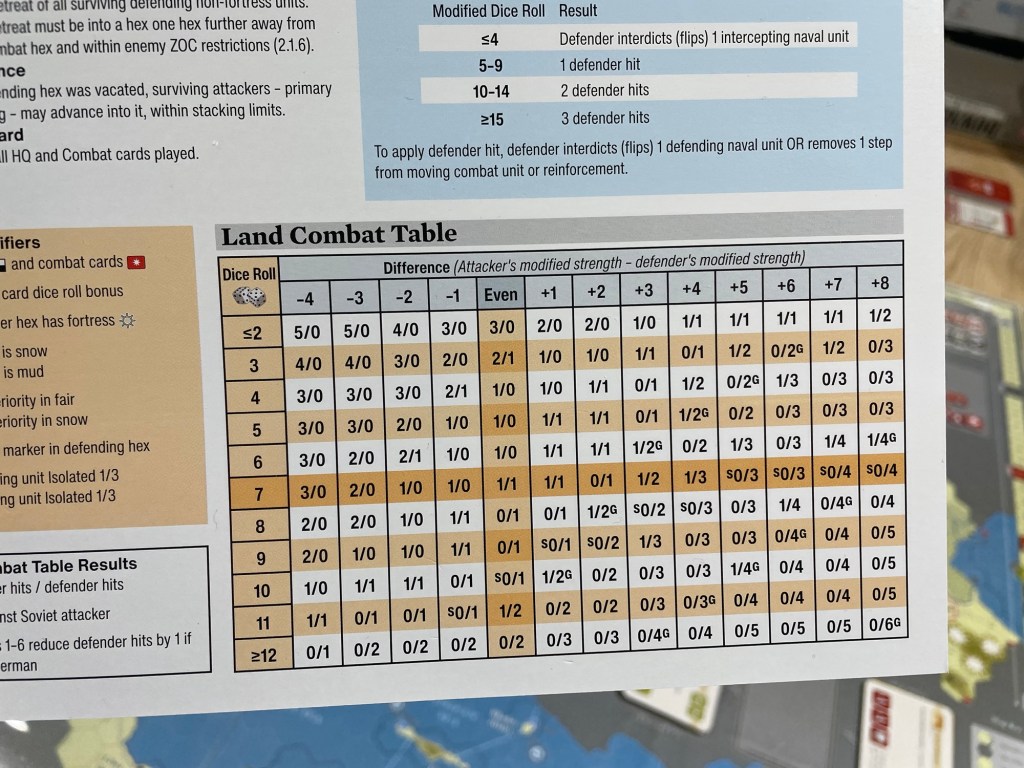
These DRM’s included all types of things such as bonuses from Combat or HQ Cards played, +1 for Event Card bonus, -2 if the defender is in a fortress, -2 in snow, -3 in mud, etc. and then the results are checked and the losses applied. You might also see the little G’s and S’s printed on certain results. This is in reference to German units and Soviet Units and these are very interesting as they apply additional losses or reduce hits.

Then losses can be taken in several different ways. The defender can take half their losses rounded up as retreats where they move back that many hits and reposition themselves. Or they turn their counters over if an armor unit becoming an infantry unit. The counters are treated the same as blocks with steps identified on the counter and the current value being that which is at the top of the counter facing the top of the board at the time of the attack. Just very clean and well done. We had a bit of a slog to grock it during the first few attacks but then began to understand how to get better results by using different unit mixes and avoiding certain terrains.
Mindset for the Game
When we first started playing, I had my mind on a traditional wargame where I was concerned about keeping my lines organized and advancing at a somewhat relative velocity to try and maintain a bit of control and security against counter attacks and breakthroughs. But this is a racing game and you are desperately trying to move ahead at all costs. You have to gain ground each and every attack and lost battles can readily spell doom for your chances of victory.

You have to get out and go. You simply cannot move slowly. But have to focus on forcing the action and making your opponent have to respond to your progress by taking their own chances. I always told myself after each attack. Good you made 1 hex progress. You are closer to the victory point hexes. And conversely, each round that my opponent couldn’t make progress made me smile!
You just have to have a mindset that the game is about movement. The defending Germans, whether they be OKH or OKW are really just speed bumps and you have to keep trying to run them over, racing from unit to unit trying to break a hole that you can exploit. And when you do break a hole, don’t let it close. Keep the pressure on, keep moving. Forward, ever forward. That is what this game is about and I loved that.

Final Comment is that this is Very Much a GAME!
My final comment here is that this one very much felt like a game. What I mean by that is that there is a lot of luck in your Event Card draws, in your Action Card draws and in how your opponent is doing. At times you feel like you have it all under control, only to see things change immediately and you are now on your back foot. This is very much a game. Lots to do. Lots to think about. Never forgets, in the end it’s a game. And that is a good thing.
We absolutely had a blast playing Downfall! We played the Overlord Scenario, which begins in Turn 4 and lasts until Turn 8 and we played a full 3 turns ending the game in the latter part of Turn 7. At that point, Alexander conceded as I had a 2 VP lead and had really locked him up in France and Italy and he saw little opportunity to gain back those 2 VP’s. I desperately want to play again and really look forward to that opportunity.
If you are interested in Downfall: Conquest of the Third Reich, 1942-1945, you can order a copy for $59.00 from the GMT Games website at the following link: https://www.gmtgames.com/p-944-downfall-conquest-of-the-third-reich-1942-1945.aspx
-Grant

The game you were looking for is The Battle for Germany designed by Jim Dunnigan.
Thanks for this review. I never played Dunniga’s game, which focused on the last year of the war. I’m interested by its larger scale
LikeLiked by 1 person
Thanks.
LikeLike
For me it is one of the best games about ww2 in Europe.Innovative , easy to grasp and you never get bored.The only downside some might find is the long time the campaign takes.
But in the end it is an excellent game.
LikeLiked by 1 person
Yep. It was truly a great experience and fun. But, I agree it was very long. We played 3 1/2 turns and it took us about 7 hours. There are at least 40 chits to get through each turn and that takes some time. But it was engaging and very interesting.
LikeLike
When one Axis player controls both fronts, he can simulate Hitler’s decision to short the Eastern front to build up that West for the Bulge. Is the game able to handle that?
LikeLiked by 1 person
Movement is very limited and would not really facilitate that type of movement. In my opinion the game is best played by 2 as the best part is seeing the even and flow of the fronts and how it effects each players thought process.
LikeLike
This was first done in the old SPI folio game that came out in 1975, Battle for Germany. Same thing as this game, which clearly inspired it. We played the crap out of it in highschool when it came out since it was small and quick.
LikeLiked by 1 person
There is another game that used Western Allies and eastern Germans vs. the Soviet Union and western Germans. It’s the late war scenario for Europe Engulfed.
LikeLiked by 1 person
I was impressed by its ingenuity but less impressed with the game play and rules. I have three game under my belt and am part way through what I think will be my last game of this. Probably one of the most frustrating wargame I have.
LikeLiked by 1 person
Thanks Grant for sharing your first impressions, always welcome. On BGG I am reading some comments which state that OKW is much more able to stop the Allies than OKH is capable to do the same on the Eastern front. Is this also your impression?
Thanks, Chris
LikeLiked by 1 person
After only a first play hard to say but I would lean in that direction. Yes.
LikeLike
Thoughtful write-up on an interesting game!
There’s a lot I like about Downfall. The initiative system is extremely smooth – you always know what to do (no looking up of “which phase comes after the one we did now?”), and it structures the game in small bites (no chit takes longer than a few minutes to resolve), so it’s also easy to pause or play in instalments.
It works well both with two players and solo, and on the table as well as in Vassal. Not many games can claim that!
Very important to me: Despite starting in late 1942, the war is not on rails. You can make strategic decisions other than those taken by the historical actors and see if they succeed. Sure, landing in Italy in 1943 and in northern France in 1944 is an option, but so is going for the jugular with a North Sea landing close to the German border (I’ve seen Joel Toppen pull it off on Twitter), or just taking Sicily in 1943 and landing in Toulon in the winter of 1943/44 (that’s what I did in my current solo playthrough).
My main complaint is that sometimes the game feels a little too much like that – gamey. When I played it with a friend on the table and his Soviets seized the advantage in the east, my answer was to do a move with the West which would advance time far enough to enter a new season in which the mud would stop the Soviet juggernaut and give me time to rebuild the frontline. Now imagine the Combined Chiefs of Staff getting word of a major Soviet victory in 1943 – but instead of breaking out the champagne, they start making plans on how to influence the weather gods (or calender gods?) to stop their allies from capitalizing on that success! Felt odd.
Still, it’s a very enjoyable game to play. I think it might come back to it when my current playthrough is done, and from what you write, you sound like you might do the same!
LikeLiked by 1 person
I think we both saw it as a game because of some of the things like weather. But it still is good as long as you keep that in mind.
LikeLiked by 1 person