
I really like a good unique solitaire wargame. I get to learn something about a subject I know little to nothing about and also get to play a new system. Recently, I started playing a very cool themed solitaire game called That Others May Live: Combat Search and Rescue – Vietnam from Hollandspiele and while I struggled with it at first, mainly with the concepts and how I was to go about doing what I was supposed to be doing, it has finally clicked and really grown on me. That Others May Live is a solitaire card-driven wargame that tackles the subject of Combat Search and Rescue missions during the Vietnam War. The player will take on the role of a CSAR commander tasked with the rescue of downed American aircrew in North Vietnam and Laos. The game is scenario based, and you can even play the scenarios in a mini-campaign. I really want to share this game with our readers and this is a perfect way to do that.
In Action Point 1, we took a look at the Mapsheet (game board) and discussed its simple layout and how it works for the player. In Action Point 2, we discussed the various types of Aircraft and their movement and interactions with the Zones they enter. In Action Point 3, we reviewed the Action Cards to understand what tools the player has at their disposal. In this Action Point, we will discuss how the Resolution Deck works and then show a few examples of the process in the areas of taking Hits from Anti-Aircraft Guns, attempted Rescue operations, Bombing of Enemy Guns and enemy Searches for the downed Survivors.
Resolution Deck
At various times throughout each game, the player will have to randomly draw cards from the Resolution Deck to determine the outcome of actions such as taking Anti-Aircraft Fire, an attempted Rescue Operation, Bombing Enemy Guns on the board or for Enemy Searches of downed pilots. The Resolution Deck is a separate deck that is made up of various cards with icons found on them that coincide with these actions. Each of the Resolution Cards has one (or more) of these icons printed on them that is used to resolve the outcome of actions in the game.
The following graphic shows all of the symbols found on the Resolution Cards:

The Blast icon is used to determine the outcome of Hits to the player’s aircraft as they take Hits from Enemy Guns. The Blast does in fact mean that the aircraft has been shot down and is destroyed killing the pilot and any Survivors that might have been on board. Also, if a Blast icon is drawn, when attacking an Enemy Gun the player will remove the Enemy Gun from board. Crosshairs icons are used to determine if Enemy Gun Fire scores hits on an aircraft. The Rifle icon is used to determine the success of an Enemy Search as they look for your target Survivor on the board and if drawn the Enemy has found the Survivor and the game ends immediately. It also is used during an Abort Check and if drawn, the player will immediately lose the game. The Roundel icon is considered a Wild and has a bit of a different effect depending upon which action is being determined. If drawn when the player is Determining Hits on aircraft, the player will Discard Hits drawn up until that point. This is very good and when it happens, you will shout out loud with joy! I promise you. If drawn when attempting a Rescue, the Survivor is saved and placed on the helicopter. The Wild icon is a bit different as well as the player may use this as any type of symbol when it is drawn. If drawing for aircraft Hits, the player decides which aircraft in the Zone is hit. Alternately, the Wild Card may be treated the same as a Reshuffle Card. Also as the game is extremely difficult, and sometimes very unkind, to mitigate randomness in draws, players can choose that when the first time during the game that a Rifle icon is drawn during an Enemy Search, it does not capture a Survivor. Instead, place the Rifle icon card in the discard pile. Immediately remove the Wild Card from the Resolution draw or discard pile and place it face down next to the play area for the remainder of the game. If another Resolution Card with a Rifle icon is drawn during a subsequent Enemy Search, a Survivor is captured.

Because you are drawing from a single Resolution Deck for the outcome of all of the different actions in the game, I think that it is important to understand the makeup of this deck and the number and relative frequency of each type of icon that appears on cards. There are a total of 30 Resolution Cards found in the Resolution Deck. The following is the break down of the frequency of the various icons on the cards:
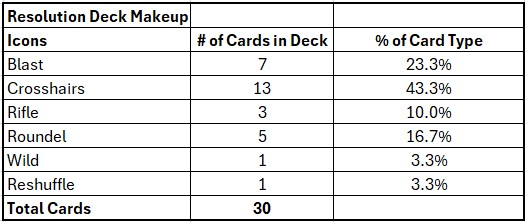
As you can see, the majority of the Resolution Cards are in the Crosshairs area, which is used to determine the number of hits on the players aircraft when moving into or through Zones with Enemy Guns. There are a total of 13 of these Crosshairs icon cards in the deck and they make up over 43% of the total deck. The other common card icon in the deck are the Blast icons which are used to determine the outcome of Hits scored on aircraft. Remember, it is a bad day when one of these Blast icon cards is drawn as your aircraft and its pilot are immediately killed. This is really bad as it moves the Abort Level up and makes the game end draw nearer. The Blast icons appear on 7 cards , which represent a total of 23.3% of the cards in the Resolution Deck. Just remember, according to Murphy’s law, “anything that can go wrong will go wrong” and you will pull the exact card you didn’t want to see!
I also wanted to give you a bit more insight into the makeup of the Crosshairs icon cards as there are differences in the number of hits that each card will score. There are a total of 13 Crosshairs icon cards with 5 of those being single Crosshairs or 1 Hit, 6 being double Crosshairs or 2 Hits and 2 being Triple Crosshairs or 3 Hits.
I know that players don’t typically enjoy card counting but in this game it is somewhat of a benefit to have a general idea about what has been pulled already and what is left. Think of this as not gaming the game, but more as using your recon and intel about the enemy forces in the area and knowing what their capabilities are.
Now that you have an idea about the makeup of the Resolution Deck, let’s take a look at the mechanics of Resolution. When players are directed by a rule or a card, they player will draw from the Resolution Deck the required number of Resolution Cards. The player will continue drawing cards even if the action is successfully resolved before all of the required cards have been drawn. This is important and can help you in these attempts as you may have passed and then draw a Rifle icon card later on that has no effect on your test but will aid you in later Enemy Search Resolutions. You also need to understand that sometimes the game will require you to draw a card not for the icons but for random determination of a result. When directed to do so, the player will draw a Resolution Card and refer to the “ones” value of the card number. In the picture below, I have circled the card numbers for easy reference.

This process can also be used to make random determinations with multiple possible outcomes. The player will simply decide to assign a value to a certain outcome (Enemy Gun will attack Zone A on an even result or Zone B on an odd result) and should divide up the results as evenly as possible amongst the range of numbers found on the cards between 0 and 9 and then draw a Resolution Card and look at the numbers to decide the outcome.
The most hated card in the Resolution Deck in my opinion is the dreaded Reshuffle Card. You would normally think that this card was pretty innocuous and really just reshuffles the deck. Well, that is what it does but it basically wipes the whole slate clean and you have to then draw cards with great hesitation and fear as your accumulated knowledge about the remaining cards in the deck is wiped out. When the Reshuffle Card in any situation the player immediately has to combine the Resolution
Deck discard pile with the draw Pile, reshuffle them to create a new draw pile and the continue with drawing new cards for the results you are testing against. The Reshuffle Card doesn’t count toward any other group of icons and also does not count as a drawn card. So, you draw it, wipe out your intelligence and then have to continue drawing the same number of cards you were required to draw! But that is what keeps the game interesting and really ratchets up the tension. This game has some very cool mechanics that do combine for a fun play experience.
Now that we understand the makeup of the Resolution Deck as well as the meaning of the individual icons and card types, let’s take a look at one example of the process with determining hits from Enemy Gun Fire.
Enemy Gun Fire Resolution
In this example, we are assuming that the player has moved their 2 Sandys (number 2 and 4) into the East Zone that contains a total of 2 Enemy Guns, 1 with a 1 Firepower Rating and the other with a 2 Firepower Rating. We first have to determine the Zone Firepower Value by taking the highest single Firepower Rating, which in this case is a 2, and then add +1 to that for the 1 Firepower Rating Enemy Gun also located in the Zone as it will support the higher Firepower Rating Enemy Gun. That makes the Zone Firepower Value a total of a 3. Remember, that regardless of their individual Firepower Ratings, each Enemy Gun of equal or lesser Firepower Rating firing into the same Zone will add +1 to the Base Firepower Value. The sum of these values is referred to as the Zone Firepower Value.

Now that we have determined the Zone Firepower Value for the East Zone, we will now draw Resolution Cards from the Resolution Deck in the amount of this ZFV. With the ZFV being 3, we will draw 3 cards one at a time and consult the icons in the bottom center portion of the card. The 1st card we draw is a Double Crosshair icon card and is equal to 2 Hits, we then draw a Blast icon card which is equal to no hits (this is only counted when determining the results of Hits), and the final card drawn is a Single Crosshairs icon card for 1 Hit. This totals 3 Hits on the Sandys in the East Zone.

A total of 3 Hits is not good with just 2 aircraft in the Zone as at least one of them will ultimately be destroyed. But, never fear, the game allows for the player to discard Action Cards from their hands to reduce the number of Hits by the amount of Action Cards discarded. We happen to have 2 Action Cards in our hand and decide to discard them to prevent 2 of the Hits. Think of this as pilot skill, a bit of luck or just a glancing hit that didn’t cause any real damage. One note thought, you must always suffer at least 1 Hit when taking Enemy Gun Fire and cannot discard cards to remove all of those Hits.

So, we now have to deal with 1 Hit and have to do another draw from the Resolution Deck to determine the fate of the hit. We will draw a single Resolution Card for the remaining Hit, and then remember we will take a look at the Aircraft icon and the ID number to determine which aircraft is hit. If a drawn Resolution Card doesn’t match any of the aircraft in that Zone, you just continue drawing until it does match. Also keep in mind that the Wild Card allows you to choose which aircraft in the Zone suffers a Hit. If there is just one aircraft in the Zone, or there are enough Hits to eliminate all aircraft in the Zone, you do not need to draw cards. So in this example, we draw a card that identified Sandy 2 as the target of the hit (I flipped over the Sandy counter to its white side to make it stand out) but the card also contains a Blast icon which means the aircraft is destroyed and removed from the game. The Abort Level will be moved up 2 spots as the mission is beginning to spin out of control.

Normally, the first time an aircraft is Hit, you will simply flip it over to its Shaken side and if it then takes or would take an additional Hit, the aircraft will be removed from play. If the aircraft is not destroyed but shot down, if the card number is even, the player will place a Healthy Survivor in the Zone. If odd, place an Injured Survivor and this will result in the Abort Marker being moved 1 spot. toward Abort.
I really enjoy the Resolution Phase of this game and how the Resolution Deck works and is constructed. This one is very deadly and I have found that when your luck runs bad, you will get bad draws consistently. But, sometimes your draws are good and you skate on by to accomplish your mission. Just a really great and innovative way to adjudicate the outcomes of various situations.
In Action Point 5, which is the conclusion to the series, we will discuss some basic strategy concepts that helped me to understand the game.
-Grant

What a fascinating subject for a game! Your “Action Point” approach is really interesting way to explain the game. I am really looking forward to part 5 and similar approaches to other games in the future.
I come from euro game background and my newfound interest in war games is in great part founded on their ability teach me history and let me dig really deep in the subject. This kind of “slow journalism” blog approach seems to fit the genre very well.
LikeLiked by 1 person
Thanks. I really like doing these and do about 2 posts like this per month. Thanks for reading them.
LikeLike