
I really like a good unique solitaire wargame. I get to learn something about a subject I know little to nothing about and also get to play a new system. Recently, I started playing a very cool themed solitaire game called That Others May Live: Combat Search and Rescue – Vietnam from Hollandspiele and while I struggled with it at first, mainly with the concepts and how I was to go about doing what I was supposed to be doing, it has finally clicked and really grown on me. That Others May Live is a solitaire card-driven wargame that tackles the subject of Combat Search and Rescue missions during the Vietnam War. The player will take on the role of a CSAR commander tasked with the rescue of downed American aircrew in North Vietnam and Laos. The game is scenario based, and you can even play the scenarios in a mini-campaign. I really want to share this game with our readers and this is a perfect way to do that.
In Action Point 1, we took a look at the Mapsheet (game board) and discussed its simple layout and how it works for the player. In Action Point 2, we discussed the various types of Aircraft and their movement and interactions with the Zones they enter. In this Action Point, we will review the Action Cards to understand what tools the player has at their disposal.
Action Cards
There are 3 separate and distinct decks of cards that are used for very specific purposes in That Others May Live. These include the Resolution Deck, Event Deck and Action Deck. In this Action Point, we will take a deeper look inside the Action Deck and discuss the utility of these cards.

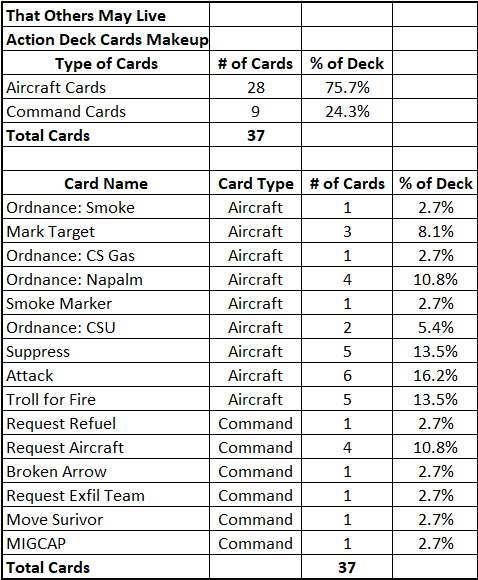
The Action Deck consists of a total of 37 cards made up of 2 different types. The red banner cards are called Aircraft Cards and the blue banner cards are called Command Cards. There are a total of 28 Aircraft Cards and 9 Command Cards and each of these serves an important role in the players hands.
Each of the different Aircraft Action Cards has a silhouette of the aircraft type that the player can assign the Action Card to. These aircraft silhouettes are very specific and coincide with one of the different types of aircraft discussed in Action Point 2. If there is not an aircraft of the required type in play as of yet, then the Action Card cannot be assigned for its benefit. But that doesn’t mean the card is totally useless as it can be used during the Hit Resolution Phase to be discarded to avoid a hit from enemy guns. For each Action Card the player discards, 1 Hit can be canceled. But, regardless of
how many cards are burned, at least 1 such Hit result must be taken by the player. Action Cards held in the Reserve may not be burned in this way and Command Cards may never be burned.

Cards that are left over after a turn can either be discarded or the player can place them in the Reserve section of the Mapsheet to be saved over to a later turn and used. Having a card in the Reserve will reduce the number of cards drawn at the end of the round however.
Some of the Action Cards will contain bold text directing the player to remove the card from play after it is played for the effect. It is important to note though that a card is only removed from play if the card was used for the effect and not if it was discarded for any other reason, such as when discarded to prevent a hit from enemy guns. After a card is played, and not directed by bold text to be removed from play, the cards will be placed into the discard pile. If the player ever has to draw cards and there are none remaining in the Action Card Deck, they will simply reshuffle the cards to form a new Action Deck.
The Aircraft Action Cards can only be assigned to a Zone with a friendly Aircraft of the type that is indicated on the card (the aircraft silhouette). But, a maximum of 2 Aircraft Action Cards may be played in the same Zone during the same turn. When played, the player will place the Aircraft Counter in the Zone that is taking the action on top of the card in the Action Card Boxes. Remember, that Sandys and FAC’s may only be assigned 1 such Action Card per turn while a Fast Mover may be assigned 2 Action Cards per turn. That is one of the reasons that Fast Movers are so important in the game. They can do lots of actions where your other Aircraft are limited and the Fast Mover Action Cards are typically more powerful and allow you to Suppress, Remove or Attack Enemy Guns. I really like to assign 2 Action Cards to a Fast Mover as it blows through the Zone and do something like drop Ordnance: Napalm to suppress the Enemy Guns and Ordnance: CBU to then move that pesky Search Marker back to 0 or even remove an Enemy Gun that I was unable to add a Hit Marker to.
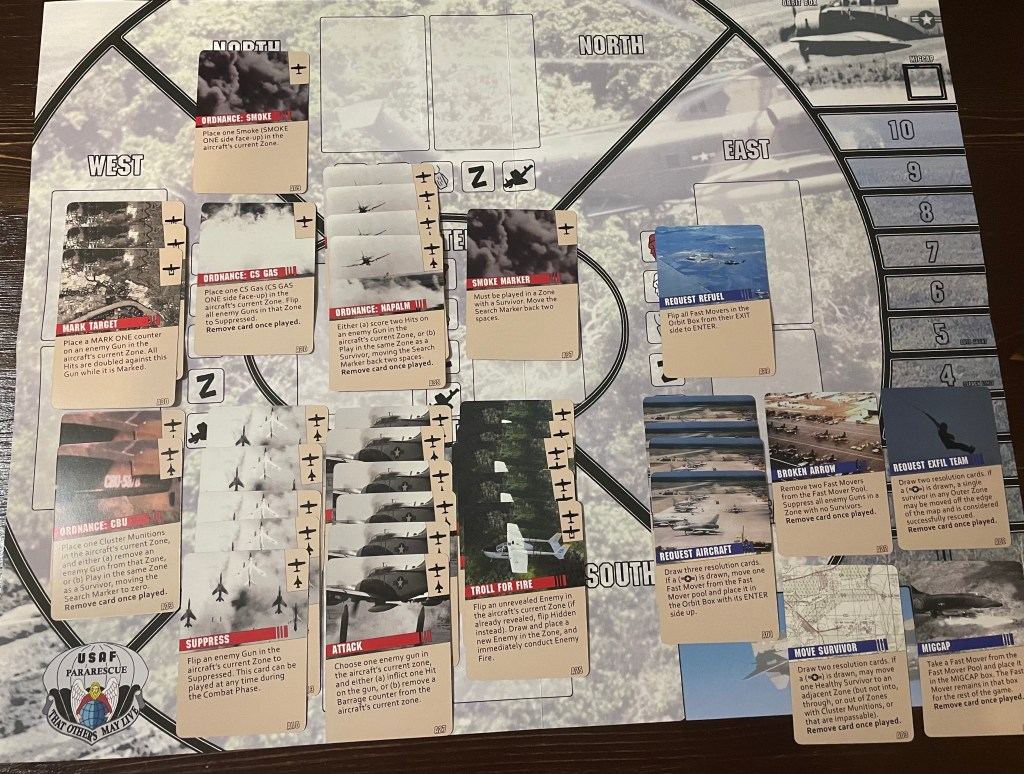
Another point I need to make about these Action Cards is that the cards when played do not have to be specified by the player as to which of the actions on the cards are being used. Sometimes, the cards will allow a Suppress, the inflicting of Hits or even to remove Enemy Guns from the Mapsheet, but the specific target of these cards, meaning which Enemy Gun in the Zone it was played in, doesn’t need to be decided at this point. Also, some Action Cards can just be played in a Zone “in case” anything happens or an Enemy Gun is revealed. It doesn’t hurt to play the card that you might need in a Zone and not use than to have not played the card and now have to suffer the consequences. Just keep in mind that when Hits are being resolved on your Aircraft in the Zone, you can can discard a card from hand to eliminate 1 Hit. So don’t play all of your cards each turn. You will thank me for this advice!
The effects of the Action Cards will be implemented immediately when played unless there are other directions specified in the text of the card. These Action Cards do a lot of different things such as revealing unrevealed enemies in a Zone (Troll for Fire), moving the Search Marker back spaces on the Search Track (Smoke Marker, Ordnance: Napalm, Ordnance: CBU), score hits on an Enemy Gun (Ordnance: Napalm, Attack), Suppress Enemy Guns (Ordnance: CS Gas, Suppress) or to improve the effects of Hits on an Enemy Gun (Mark Target). The Command Cards act more as limited events as bringing additional aircraft into the Orbit Box (Request Refuel, Request Aircraft), suppress all Enemy Guns in a specific Zone (Broken Arrow), move a Survivor closer to aircraft (Move Survivor) or get a Survivor off the map (Request Exfil Team).
I always like to take a look at the number of cards contained in a game and then how many of each different type there are. The more of one type of card present in the deck tells me that type of card is more important than others and will also be a card that you see more often in the deck and should be prioritizing over others. So what stands out to me when I look at the statistics shown above? It is obvious that Suppress, Attack and Troll for Fire are your workhorse cards. There are a total of 5 Suppress, 6 Attack and 5 Troll for Fire. These cards are important because they give the player the ability to deal with Enemy Guns in Zones as they pop up. The player can Suppress the Enemy Guns before they can fire, uncover Hidden Enemy Units in the Zones prior to the Helicopters coming into the Zone and then deal Hits to these Enemy Guns to get them off of the Mapsheet where they can’t do any damage. But, the other cards are also important and serve a purpose in the deck. The fewer a card appears in the Action Deck should tell you that when you do draw this card, such as Smoke Marker, Ordinance: Gas or Ordnance: CSU Gas, that if you cannot use them at that time it might be a good idea to place them into the Reserve for later use.

That wraps up our look at the Action Cards and how they are used. This game is very well done and once you work out some of the finer details of the Sequence of Play and the various steps, can be played pretty easily.
In Action Point 4, we will show a few examples of how Resolution works in the areas of taking Hits from Anti-Aircraft Guns, attempted Rescue operations, Bombing of Enemy Guns and enemy Searches for the downed Survivors.
-Grant

Interesting looking game. Thanks for the peek at it G.
Though it was a different kind of operation, it reminds me to thank the crew of the “dust off” chopper that extracted me at midnight from the Michelin Rubber Plantation near the Cambodian border 55 years ago this month. That took guts to go in there and pull me (and 13 of my fellow soldiers) out of that situation.
Hand salute men. I thank you where ever you are.
Palmer Eldritch, Dallas, Ga.
LikeLiked by 1 person
Awesome. Thanks for sharing. I think that helps us remember that these games cover actual events and actual soldiers who served bravely, some paying the ultimate sacrifice. Thank you for your service!
LikeLike