
I really like a good unique solitaire wargame. I get to learn something about a subject I know little to nothing about and also get to play a new system. Recently, I started playing a very cool themed solitaire game called That Others May Live: Combat Search and Rescue – Vietnam from Hollandspiele and while I struggled with it at first, mainly with the concepts and how I was to go about doing what I was supposed to be doing, it has finally clicked and really grown on me. That Others May Live is a solitaire card-driven wargame that tackles the subject of Combat Search and Rescue missions during the Vietnam War. The player will take on the role of a CSAR commander tasked with the rescue of downed American aircrew in North Vietnam and Laos. The game is scenario based, and you can even play the scenarios in a mini-campaign. I really want to share this game with our readers and this is a perfect way to do.
In this series of Action Points, we will take a look at the Mapsheet (game board) and discuss its simple layout and how it works for the player, we will discuss the various types of Aircraft and their movement and interactions with the Zones they enter, review the Action Cards to understand what tools the player has at their disposal, show a few examples of how Resolution works in the areas of taking hits from Anti-Aircraft Guns, attempted Rescue operations, Bombing of Enemy Guns and enemy Searches for the downed Survivors and then discuss some basic strategy concepts that helped me to understand the game.
Mapsheet
The Mapsheet is a very cool thematic part of the game that provides the information needed to not only play but does it in a way that adds to the depth of the experience and I really liked that! The Mapsheet gives the feel of being in the cockpit of an aircraft with its heads-up view of the various Zones shown as if looking through the glass of the cockpit. The background of the Zones is also very well done as it shows the jungles of Vietnam with the tree canopy and an HH-3E Jolly Green Giant Helicopter attempting to make a rescue through the canopy.

The Mapsheet also contains various tracks and other areas that the player uses during the game to keep track of pieces of information, their cards and their available Units. These include an Information Track along the right side of the Mapsheet, the Orbit Box in the upper right hand corner and the Card Reserve. We will cover these aspects a bit later in this post.
Zones
The Mapsheet builds its areas of play upon the use of 2 concentric circles including the inner circle and the outer circle which are further referred to as Zones. The inner circle lies at the center of the Mapsheet and is called the Center Zone. The sections of the outer circle are referred to as the Outer Zones, divided into the four cardinal directions of East, West, North and South. Scale wise, the radius from the center of the Mapsheet to the outer border of the Outer Zone is a bit more than 1 kilometer or 3,270 feet. In the rule book, Brad mentions that the “area of operation size was highly variable from mission to mission and depended on terrain, weather, and countless other factors”. I think that an idea of the scale is important to understand the parameters that these CSAR teams were working with and how much land they were covering in their search for their downed comrades.
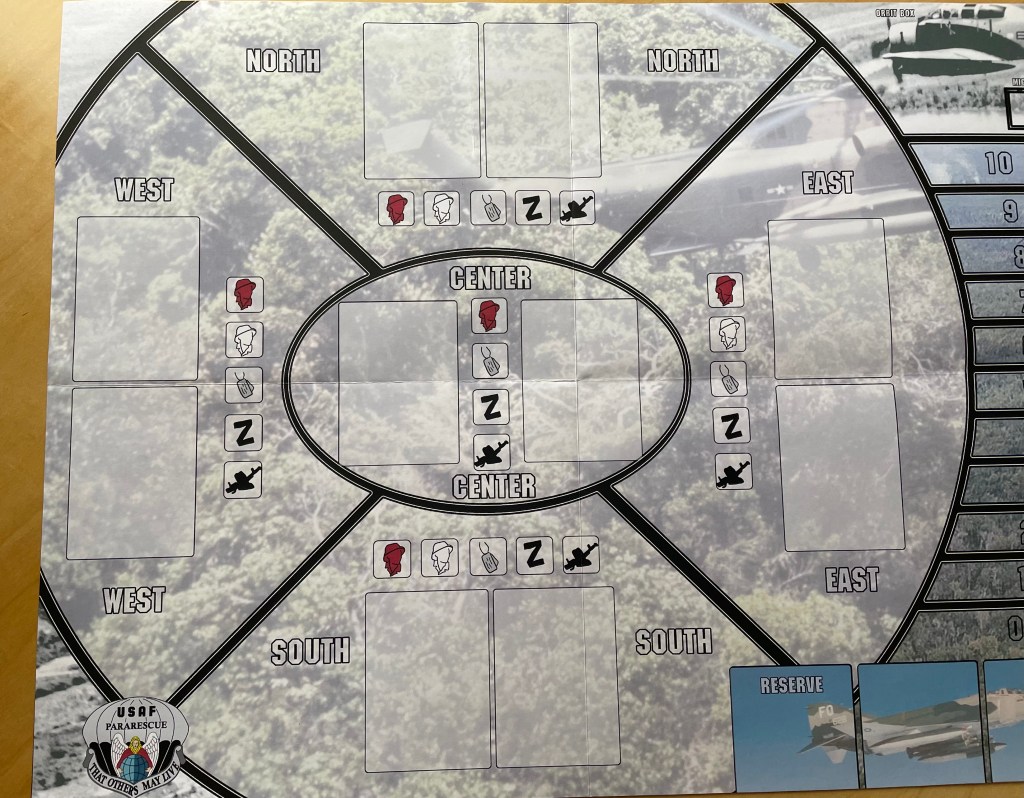
Back to the Zones, each of them has their own boxes that are intended to house Action Cards played by the player and assigned to one of their Units located in that Zone, Enemy Units and various other markers, some that contain hidden information critical to the game. Let’s take a closer look at the North Zone’s boxes.
As you can see along the bottom row of smaller boxes, we have the silhouette of an Enemy Unit Marker colored both red and white. The red Unit is a Hidden Unit Marker while the white is an Enemy Unit Marker. Typically, both of these start the scenario on their hidden side as the CSAR teams didn’t always know the makeup of enemies but only that they were present in the Zone and searching for the downed airmen. In the middle of that row is a picture of dogtags which is where the Survivor Marker is placed, either on its Injured side or its Healthy side. Next you will see the letter Z which stands for Zone Marker. This marker describes various geographical or other obstacles that the CSAR teams will have to avoid or that will effect their operations in that Zone. These include things like Coordinated Fire, which adds a +1 to the Zone Firepower Value, Entrenchment, which reduces the number of cards drawn by the player when attacking an Enemy Gun during the Bomb Damage Assessment Phase, or a Village, which means that the player can not utilize ordnance in this Zone including CS Gas, CBU’s or Napalm. Finally, at the end of the row is the Enemy Gun Holding Box where the player will place the Enemy Guns that will be drawn from their draw cup when Enemy Units and their Firepower is uncovered through the use of a Troll for Fire Action Card or as a Helo moves into the Zone. The Enemy Guns include all different types of anti-aircraft artillery including 100mm KS-19 AA cannons, 57mm S-60 AZP AA cannons and 37mm 61K AA cannons, and range from 1 to 6 total guns per counter. These These Enemy Units try their hardest to stay hidden from the Americans and use both the natural canopy and camouflaged netting as cover as well as hiding guns in villages to obscure their presence.
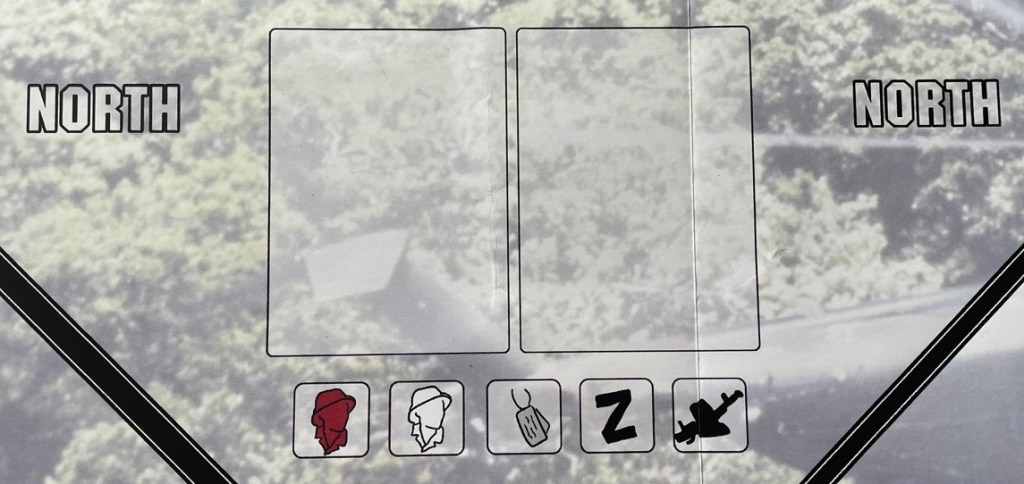
The Action Card Boxes are used when player assigns various Action Cards to their Units entering the Zones. No more than 2 such Action Cards can be played in any Zone and each must be assigned to a specific aircraft. Also, no aircraft can have 2 assigned Action Cards.
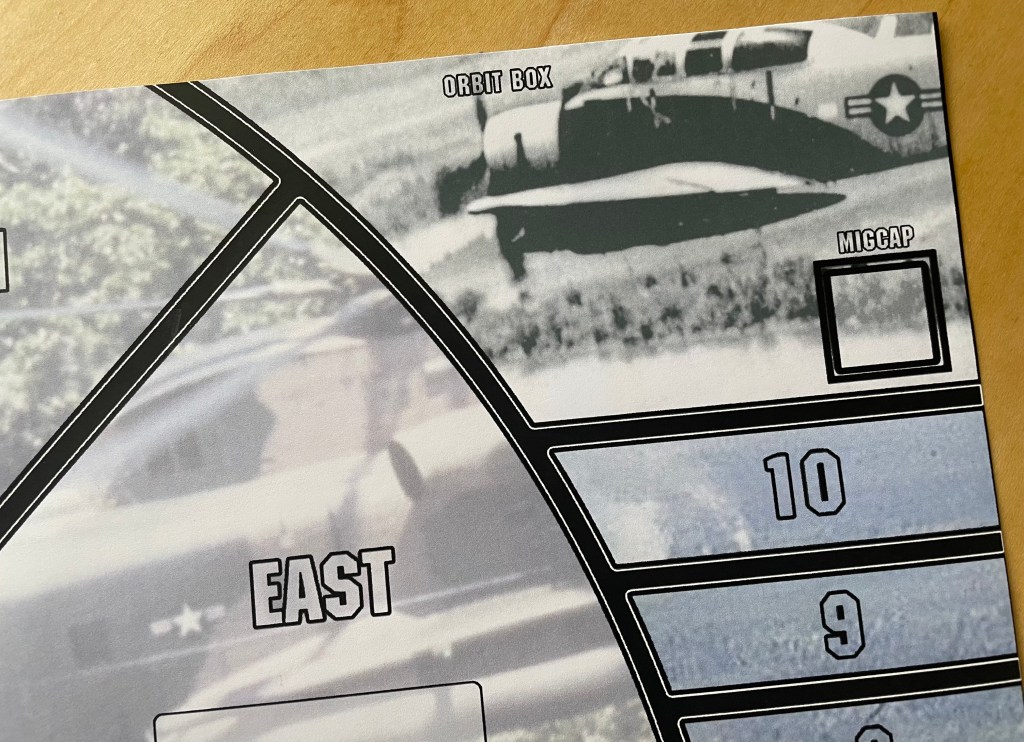
Orbit Box
The Orbit Box is located in the upper right hand corner of the Mapsheet and is considered a safe area for Aircraft to return to in order to regroup, rearm and recover from damage suffered in operations. This is not specifically an air base or compound but more of a concept of a secure area of airspace removed from the areas of operation on the Mapsheet. The player will store their available Aircraft in the Orbit Box until they are ready to be used in missions. When Aircraft are located in the Orbit Box they cannot be attacked by Enemy Guns nor can they use Action Cards. As mentioned earlier, it is a place of recovery where any Aircraft that has become Shaken can return to and be flipped to their Cool side during the Marker Adjustment Segment at the end of each Turn. There is no limit to the capacity of the Orbit Box and it can hold an unlimited number of Aircraft.
You may also notice the presence of the MIGCAP Box inside the Orbit Box. MIGCAP is a reference to combat patrol operations that specifically dealt with MiG enemy aircraft. This is a special holding place for active Fast Movers that may be moved into the Orbit Box from the Fast Mover Pool, which is located off map, so that they can be used with a Request Aircraft Action Card to attack Enemy Guns and drop ordnance.
Information Track
The Information Track is used by the player to keep track of different game functions including the current Turn, the position of the Enemy Search Marker and the Abort Marker. The Turn Marker simply tracks the current Turn. Each of the various scenarios will include a specific length of Turns ranging from 7-10. Each of these Turns represents approximately five to six minutes of time in the game. If the objectives of the scenario have not been met at the end of a specified Turn, the game ends in mission failure and a loss.

The Search Marker tracks the alertness level and capacity to search for the downed airman by the game controlled enemy. As the Search Marker is moved up, it means that the enemy is closing in on the Survivor and their chances of finding this higher as they will draw a number of Resolution Cards from the Resolution Deck to see if the Survivor is captured during each of the Enemy Search Segments at the end of each Turn. The Search Limit is set at 4 on the Information Track and can never go higher but at 4 cards the player will most likely be found. Keeping the Search Marker low is paramount to the player doing well in the game and it can be manipulated by various Action Cards. At the end of each Turn, the Search Marker will be increased by 1 to represent area being covered by searching enemy units.
The Abort Marker keeps track of how many Resolution Cards must be drawn during the Abort Check Segment at the end of each Turn to see whether the CSAR operation is aborted. If the Abort Marker reaches the Auto Abort space, which is set at 5 on the Information Track, the operation is immediately aborted and the game ends in a loss.
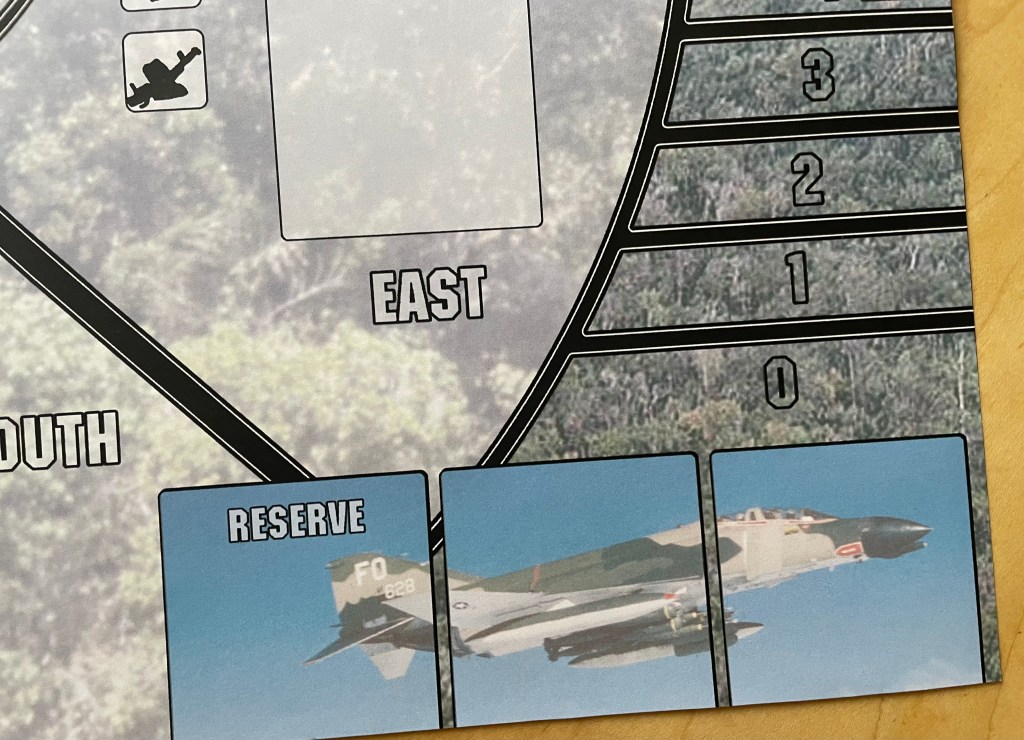
Card Reserve
Each Turn the player will draw a number of Action Cards to increase their hand size including their Card Reserve to 5 total cards. Players can assign Action Cards to the Card Reserve for use later in the game. Each Action Card that is assigned to the Reserve is placed in one of the 3 Reserve Boxes. Cards in the Reserve Box may be discarded by the player at any time and used just as they would a regular Action Card played from their hand, or retained in the Reserve from turn to turn. This is important with powerful cards that can drop ordnance, reduce the Search Marker or that can be better used at a later point when Aircraft have been moved into position on Mapsheet. Understanding when to place a card in the Reserve and when to allow it to be discarded at the end of the Turn is a fine point of the game and will require time and plays to understand its nuances.
I hope that you got a good feel for the layout of the Mapsheet and some of its parts and boxes. I really like the board and how it aids in my immersion into the concepts of the game as it is abstracted to ease play and keep the player engaged. I think that the concepts of the game are fascinating and I have truly enjoyed playing the game. I am not any good at it, and have only tasted victory once but I am enjoying the process and learning how to better use my assets, approach the target and what cards to play to be effective.
In Action Point 2, we will discuss the various types of Aircraft and their movement and interactions with the Zones they enter.
-Grant
