Over the past 7 years, we have been asked our opinion on the Enemy Action Series from Compass and its first entry Enemy Action: Ardennes. We own the game, but have yet to have a chance to play it as it simply sits on our Shelf of Shame Opportunity wasting away. Well, in early 2022, we backed the new entry in the series Enemy Action: Kharkov and while it sat on our shelf for months unplayed, nearing the end of 2022, we decided to get it out and give it a shot. And I am glad that we did, although I have some reservations about the game as it seems to me to have been designed as a solitaire game…with a 2-player mode kind of tacked on after the fact. Let me tell you why I think that in our First Impressions post covering Enemy Action: Kharkov.

We all know that John Butterfield is a genius and has designed some of our favorite solitaire wargames in games like the D-Day at Series including Omaha Beach and Tarawa from Decision Games, RAF: Battle of Britain 1940 from Decision Games as well as several 2-4 players games such as SpaceCorp 2025-2300 AD and its follow-up SpaceCorp: Ventures. The man can design a game and has a particular talent for creating an interesting and engaging solitaire system where the AI acts somewhat rationally and provides the backdrop for an entertaining and interesting experience. These games all have a fantastically integrated and reliable AI system and you can see that John has this part down.
But, not all situations are the same in history and some are better suited for these AI systems to run the besieged side, such as the aforementioned D-Day at Series. Many of these games see lots of American troops attempt huge amphibious landings on well prepared and defended beaches in the South Pacific and come up against stiff resistance from a determined defender. But as the defender, the AI just has to go through a regimented process and decide when and where it will do its attacks and movements in reaction to what the aggressor is doing. Not necessarily a situation that is suited for 2-players as decisions for the defender are limited. In my opinion, this is why certain subjects are better suited for solitaire games and I think that the situation modeled in EA: Kharkov may just best fit into that camp.
Card Activation System is Very Well Done
The game uses a card activation system where the cards are laid out as multi-use cards allowing the players to decide how they will best utilize their scarce cards to take the actions they need to in order to win the game. I usually enjoy card driven games and the cards in this one were my favorite part and are very well done. As you can see from the cards below, there is a clear top and bottom section to the layout. The top section of the card is the activation portion while the bottom part of the card gives it some flexibly as it can be discarded and used as a Combat Tactic during Combat. The 2-player game uses just 45 of the total 110 cards in the game with the Soviet player having 22 Command Cards and the German playing having 23 Command Cards. These cards are the meat of the game and are used initiate all types of actions.
Let’s take a look at the anatomy of these cards and discuss the uses and function of the different parts. Each Command Card has three distinct sections including the Formation Section, the Command Section and the Tactics Section.
First up, at the top of the card is the Formation Section with the name of the formation that the card can activate. You will notice that at the very top it shows the Higher Echelon formation such as the 4th Panzer Army, and then below that in the Command Formation that this card will specifically activate. The other important part found in the Formation Section is the Command Value (CV) in the upper left hand corner. This is shown as a value preceded by a lower case “c”, which means Command. This is a reflection of the quality of the formation leadership and the organization of the formation. The value shown here really only matters in connection with certain Combat Chits, which we will discuss later.
Next is the Command Section of the card which shows the various actions or commands that the player can take with the use of this card during their impulse. You will notice that there are multiple parts here as well that gives the player a lot of options about how these cards can be used. This was one of the aspects that I really liked and gave me quite a bit of flexibility in how I wanted to use the card. At the top of the Command Section, the player can typically deploy reserve units from a specific formation from their Reserve Box onto the board. In the example of the card on the very far right of the hand, you will see that IISS Panzer Corps reserves can be deployed to the game board. They will be placed at the entry points identified in the scenario instructions but can then use Strategic Movement to move out onto the board from the entry point. An interesting point about these Command Sections, sometimes the orders that are allowed to be given include all units of a specific Corps or Army but sometimes it might say any 3 units of X Corps or all units located in one area no more than two hexes apart. This is a difference between Primary Command Cards and Supplementary Command Cards. This varied part makes your choices more important as you have to understand what cards are in your hand and how best you can use them or how you must prepare your forces for the most effective utilization of a card in future impulses.

Sometimes though, the player will not have those units on the board or in reserve and there will be an option to activate any one unit on the board. This means that you can activate any unit from any formation and not just the formation identified on the card. While this is a nice flexible option, see this is a throwaway ability and if you are using the cards in this fashion much you are not going to be able to maneuver your forces appropriately and will not be able to progress in your goals. Some of the Commands are for later in the game as they are identified by a white number in a red box preceding the Command. This will refer to a game turn. For example, in the two cards on the right side of the hand below, you will see 2 such Commands that say 3+. This means that this Command can be used from Turn 3 onward but not before. The specifics of these Commands can be the placement of Replacement Points (RP) for a specific number of units or retreating a unit to get it out of danger or back into supply.
Finally, occasionally there are special events in the Command Section. These events typically provide a very good benefit as you would expect if you are foregoing the activation of units it has to be something really beneficial to make that sacrifice. On the green card in the hand below if the Combat Engineers event which allows the player to place Improved Position markers on up to 3 units that are not located in Cities or Towns. These Improved Positions are nice, especially for the defending Germans, as they can be discarded to cancel out a hit during combat.

The last part of the card is the Tactics Section. This part of the card has various “events” that can be played during combat. There is a lengthy list of these listed on the player aid card but they simply include a reference to a benefit that the player can receive when a Combat Chit is pulled and they have played that Tactic. For instance, if Air Power has been played and if a Combat Chit that references Air Power is pulled it will benefit either player who has played the tactic. Typically, this is an additional loss on the defender if the attacker plays the tactic or an additional loss on the attacker if the defender plays the tactic. The key with these Tactics is that you only have a limited supply of cards in your hand and when you play a tactic you are giving up the opportunity to activate the formation listed at the top of that card. You really have to be careful and plan out the use of these cards as tactics.. As the defending Germans in the game, I wasn’t going to utilize one of my formations to do any movement or attacking as they were in a good defensive position in a Town and it was surrounded by rivers and rough terrain so I felt that that moving them or even attacking was useless so I knew these cards could then be sacrificed as tactics.
The only other distinction that I want to mention is the concept of Primary versus Supplemental Command Cards. In the picture below, you can see that at the bottom of the cards is the word Primary in red. If the card doesn’t have this at the bottom, that means the cards is a Supplemental Command Card. There is a difference between these two Command Cards. Primary are better, and typically activate all units of a specific formation while the Supplemental Command Cards will only activate a couple, or have a specific limitation such as within a chosen 4 hex area. When you draw your Primary Command Cards versus your Supplemental Command Cards will determine how effective your upcoming turn will be. When you draw all Primary cards, you will have a monster of a turn as you will get to activate lots of units while if you have multiple Supplemental cards in your draw you will have to think a bit more about how to make your turn effective. I liked this aspect in the concept of command and control. As wargamers, we tend to think that we can command every single unit consistently back to back with no issues. Whereas in reality, there is confusion, misunderstanding, lack of clarity in commands, reaction to a situation, dropping morale, wounds, lack of fuel or ammunition, fear, etc. that can all lead to poor activations and control of the battlefield. I think that John hit the nail on the head with this small concept in the cards. I really enjoyed it and wish that other games would replicate this in their command and control systems.

I really liked the cards in the game. They were interesting and created some really tough decisions for me as I had to prioritize the use of these cards with what my strategy and plan was for the game. The only thing that I didn’t really like was the difference in the number of cards that each side had. The Germans had a hand of only 4 cards and had just 13 cards in their deck in the scenario we chose while the Soviets had 7 cards in hand and had 16 cards in their deck. This lead to the Germans having to pass a few times in order to not give the Soviets a free unopposed run of activations at the end of the turn. While I understand this from a situational standpoint, when you are playing a 2-player game and one side is on the defensive it can make for a fairly disengaged feeling.
Combat System is Very Unique….but Time Consuming
Boy. I really enjoyed the unique take on combat in this one. It was very different from systems I have played and different is a good thing. But it really felt like a forced system for a 2-player game but seemed specifically tailored to a solitaire experience. Attacks are declared after units move and units may attack just once per combat phase but you can have multiple units attacking a single hex from surrounding hexes.
Odds for the attack are now calculated by adding up the Combat Strength of each attacking unit and then comparing that to the Combat Strength of the defending units and then express that as a ratio. If the attacker has 9 Combat Strength and the defender has 3, the ratio will be 3:1. Pretty standard stuff for wargames. But this doesn’t lead to any modifiers or use of columns on a Combat Results Table. This ratio will only be used if referenced on a Combat Chit that is drawn. That is definitely different and I was very hesitant about it. It didn’t feel right. But I didn’t want to make that judgement immediately.
The attacker then will move to drawing Combat Chits, not rolling any dice. I repeat…NO DICE! The defender doesn’t get to draw Combat Chits but has to sit and watch what damage is being dealt out to them (or to the attacker depending on what is drawn!) There is a minimum number of Combat Chits that the attacker must drawn which is tied to the number of steps of the defending units. If the defender has 2 counters in the hex being attacked with a total of 3 steps, the attacker will have to draw 3 Combat Chits at a minimum. After these Combat Chits are drawn and inspected, and the results are known to both players, the attacker can then decide to either stop drawing Combat Chits or may decide to draw additional Combat Chits based on several factors.
Those factors are shown in the picture below but include 1 Combat Chit per attacking unit with 1 or 2 steps, 2 Combat Chits per attacking unit with 3 steps, 1 Combat Chit per tactic applied to the combat, +1 Combat Chit if the defender is out of supply, +2 Combat Chits is the defender is isolated and then there is a specific tactic that can be played by the defender called Screen that can reduce these extra Combat Chit draws by -2. The number of extra Combat Chits drawn is also dependent upon the weather conditions present and will top out at 6 extra in Light Mud. Frozen doesn’t effect Combat Chit draws and neither does Heavy Mud. But I’m the end, the attacker could be drawing anywhere from 6-12 of these Combat Chits. And that sounds awesome right? Well not necessarily as sole the results on the chits are good for the attacker but some are bad. And it’s a random draw from a cup filled with 60 of these Combat Chits. So anything can happen. Kind of like dice rolling. A bit of randomness.

So now that you understand how these Combat Chits are drawn, let’s take a look at what their makeup is and talk about the varied results and how to adjudicate them once drawn.
First, let’s check out the anatomy of one of the Combat Chits. As you can see in the below figure taken from the rulebook, each of the Combat Chits is double sided and has different results on the front and back. The effect of these Combat Chits is determined by the applicable Combat Situation which is shown at the top of the chit. A situation is given, such as City Woods (on the front of the chit) or Clear Broken (on the back of the chit). This refers to the terrain in which the combat is taking place and then corresponds to the results at the bottom. In the case of the City Woods chit, this will result in the Defender having 1 Hit subtracted from the combat total (expressed as D-1) and with the Clear Broken chit the attacker takes a Hit as well as the defender (expressed as A1 and D1). But terrain is not the only example of what awaits you on these chits. Some are combat odds based. Some are associated with supply, or being disorganized or having a defending unit next to the target or a flank attack. There are lots of results…and this is part of the problem. But more on that after we look at some examples.
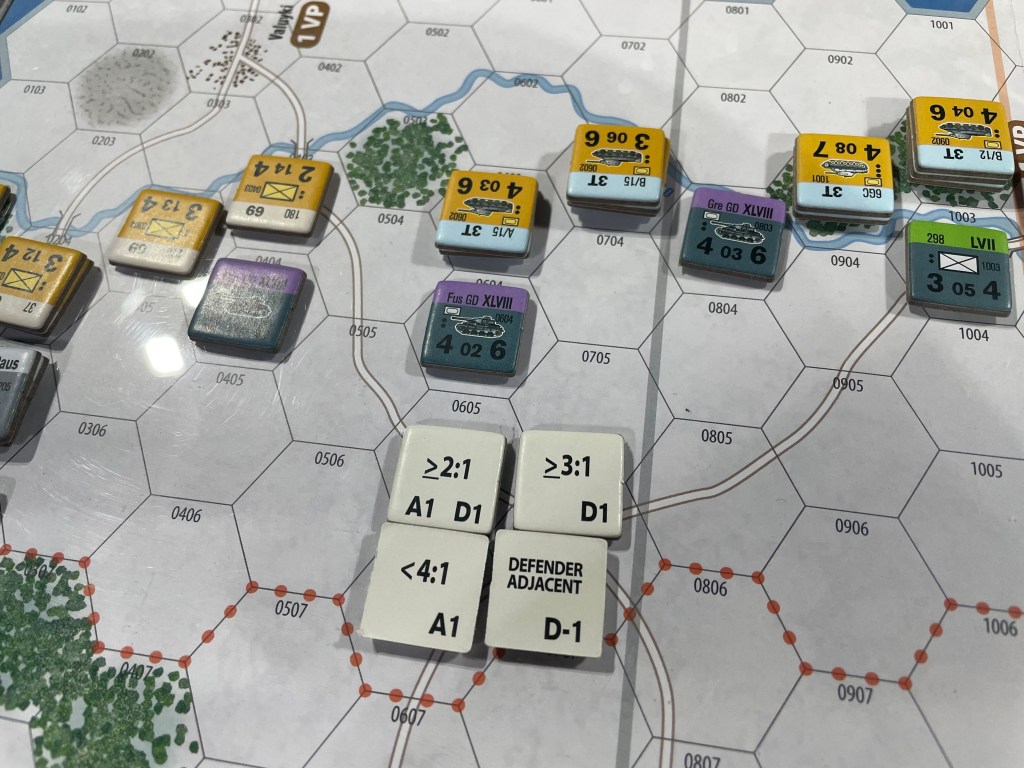
In the picture below, the Soviet attacker is attacking with a stack of 2 units against a lone German Panzer unit with 2 steps. The calculated odds ratio is just 2:1 so this is not a huge attack but is a solid attack. The attacker has to draw a minimum of 2 Combat Chits.
They draw 2 and the applicable results are that the attacker will take 2 hits (odds are 2:1 which is greater than or equal to 2:1 odds (top left chit) but less than 4:1 odds (bottom left chit) while the defender will take just 1 hit. Enough to make them retreat as you can absorb one hit by retreating one space but not enough to do much damage. So the attacker looks at these results and decides to draw an additional 2 Combat Chits even though they could have drawn an additional 5. Neither of these drawn chits apply as the combat odds are not greater than or equal to 3:1 and there is no defending unit adjacent to the target. So the combat is over and the German Panzer unit “absorbs” a loss by retreating 1 hex. This is a failed attack. All in the face of 2:1 odds, which isn’t bad, but ultimately the chit draws were not in the attackers favor and they must take 1 hit as a step reduction as the attacker on their lead armor unit and then can “absorb” the other hit by Dispersing the stack, which means they can’t attack or move until they recover at the end of the turn. This is the reality of attacking in Enemy Action: Kharkov.
Let’s take a look at a few other Combat Chit examples. In this instance, I will show you both the fronts and backs of both chits.
On the left is a good chit for the attacker as it will inflict 1 hit on the defender if they are Dispersed or Unsupplied (D1) and will also grant an A-1 that will eliminate one hit on their units in future draws. But remember, if the defender is not Dispersed or Unsupplied, then this chit is nothing for this side. On the right, if the combat odds are greater than or equal to 3:1, the defender will take a hit (D1).

On the reverse side of those Combat Chits are the following results: Defender Adjacent D-1 or less than 2:1 odds A1. Once again, is the Combat Situation is not related to these chit draws, then nothing will happen and that drawn chit is just discarded without drawing a replacement counter.

We found that this Combat Chit draw was dicey. No matter how many chits you choose to draw, and no matter what the combat odds are, you simply cannot guarantee good results. And admittedly in any game you cannot guarantee good results. You may be attacking with 6:1 odds and draw no chits that reference the odds as shown above and you will not have any benefit from having a superior attack. The only way that players can really impact the combat is in the number of Combat Chits they decide to draw. I do like that you have to draw the minimum required amount of chits first and then can look over the results and survey what you wanted to accomplish and then decide if you want to draw more. But…BUT…drawing more chits doesn’t guarantee you anything! As we were playing, we said about combat, this really feels like it was made for the solo system in order to not allow the player to game the bot by counting odds. And that is not a bad thing, if the game is being played solo. But in a competitive game it felt off. And don’t get me wrong, I hate deterministic combat. I hate that you can just have superior odds and generally guarantee good results because the CRT is then in your favor. But, good odds lead to good results. Almost every single time in a wargame. I enjoy being able to force column shifts with card play, or types of defensive stance chosen or by using off board artillery or air support. Those are some of the mechanics I enjoy in combat. But this just seemed random and not able to be controlled…at all!
The other complaint that I would have about the combat system and the drawing of lots of Combat Chits is the time sync that it is. Combats took forever to adjudicate. When you are drawing 7-12 chits, and having to inspect each of them and determine which ones happen. It took a long time and this made the game long. We played the introductory 6 turn scenario and it took us nearly 5 hours, which did include rules reading and learning, but still that was a long game. And it was really because of the combat chits drawing and the time involved. I just think that this system would be better paired with a solitaire game. Am I wrong in this?
Situation Dictates only Reaction for the Germans
One of my other areas of concern was in the competitive playability of both sides. I have always thought that the Battle of Kharkov was a big shebang, with lots of troops and was a big battle. I also feel like it occurred when the Germans were strong and the Soviets were gaining strength as they fell back and delayed as reinforcements came in. But I might have my historical facts wrong. I can admit that. But in this one, the Germans felt very underpowered. In fact, I almost feel that they should never attack early in the game but simply fall back and setup long lines of defense to slow and hamper the advancing Soviets. Or better yet, fall back and then build Improved Positions to make combat harder for the Soviets and limit losses. They simply do not have the power to stand up, or even really be competitive with the Soviets. Their number of units are not there. They do get good reinforcements in Turn 3 and Turn 4 in the scenario that we played and that did change things a bit but at that point it seemed to be too little too late as the Soviets had their way with the initial defending German units and had already put significant pressure on the Victory Point areas. It seemed to just be a matter of time and a formality that the Soviets would get what they wanted.

One other comment I would have about the German units and their relative card disadvantage mentioned earlier is that they really should attack only when it makes sense. When they have to or if there is a good opportunity to attack and do some damage. I want to share with you an example of why I think that. As you can see in the picture below, on the right flank of the Soviet advance the Germans have a good amount of Panzers that are all 4 Combat Strength units with a few Infantry that are 3 Comat Strength. They also have good terrain in rough, which reduces hits and have a nice stack of units that start in Kramatorsk which is a City hex that offers some benefits. Early in the game, I think around Turn 2, I decided to try my hand at combat. I used my two 4 Combat Strength Panzers to double up the Soviet Infantry and had 2:1 attack odds. Not terrible. Not great by any stretch of the imagination either but not 1:1, which generally means don’t attack. So I decided to give it a go. I attacked and even played an Air Power Tactic Card to improve my chances. I had to draw a minimum of 3 Combat Chits as the defending unit had 3 steps and I ultimacy ended up deciding to drew 6 chits. To make a long story short, none of those chits was good for me. In fact, every one I drew related to higher than 4:1 odds, which I didn’t have, and were simply thrown away as inapplicable to the Combat Situation. I also drew no chits that referred to attacker Air Power so that card was wasted. In the end, I had to take a loss on my lead armor unit, which reduced that unit’s Combat Strength to 2. I learned my lesson that the Combat Chits are somewhat random, admittedly the same as dice can be, but I should not have engaged in this combat. I should have bided my time, fallen back and waited for the right opportunity and fore reinforcements. It gained me nothing and simply weakened my defense. And lead to me to the realization that in this game, and in this situation, the Germans are not great….to start! They do get reserves and their numbers do increase and make them a bit more offensive. But in our chosen scenario, it was really a chance to attack.

Feels Like it Could have Been Only a Solo Experience
This leads me to a realization about Enemy Action: Kharkov. I think that the game was really designed as a solitaire game and really wasn’t meant to be played 2-player. The game is screaming that at you due to the fact that there are several Solo only Command Decks that are included, one each so that players can play either the Soviets or the Germans. Also, if you look at the counters, there are numbers on the counters that are only used for the solo game and have no applicability to the 2-player mode. Now I know that other games have things like this to allow for solo play but not many. And when a game goes to this level of effort to make sure that the game is playable solo, I always feel that should be a sign.
The situation also seems to be more geared toward a solo experience. The Germans are not built in this one to be the aggressor and are only falling back, falling back to delay the advancing Soviets. Waiting, biding their time. In other East Front games, I have played as the weaker side and found that I had to fall back and setup around key terrain features or to defend at bridges over major rivers and could funnel the attackers into a more manageable situation. But not here as the rivers are frozen and can be crossed at any point. The terrain is not really geared to provide huge advantages or limit accessibility for the Soviets.
And then the combat system. Is unique for sure and was really somewhat interesting but took too long. Drawing 10 chits, turning each over several times to decide what and if things were applicable. It just took too long per combat. And this long time, is not necessarily conducive to an enjoyable 2-player experience but is for a solo experience when there is no time limit and no opponent sitting there awaiting their turn to activate. I just really feel that this should have been a solo game and overall is a solid design with lots of interesting parts and mechanics but not my cup of tea.
As a solo game though, I would recommend this in a heart beat. Either to play as the Soviets or as the Germans because you can take your time with it. Explore the game and its strategies. Even take some actions back and try again because there is no referee there or solo police going to kick in your door with their standard issue boot.
If you are interested, you can check out our unboxing video for the game at the following link:
I want someone to tell me that I am wrong. I am sure there will be many. I am willing to consider an alternative opinion. But that is just the way it felt after a first play and experience with the system. I do want to explore the game more and play again…but I am not sure I will play it again as a 2-player game. But only as a solitaire experience.
-Grant

I appreciate this game very much – especially for solo play. Glad you guys provided your experiences!
LikeLiked by 1 person
And I am saying that it is probably better suited for solo play. Doesn’t mean its bad as a 2-player game but it just didn’t grab me like I thought it would.
LikeLiked by 1 person
Well Grant, I guess you better stick to the new age of wargames then. Such as Coins, wooden sticks and David Thompson state of siege like games.
As a matter of fact you do like games that are mostly dice throwers and that tell a story… as if these don’t rely 100% on luck.
It is PRETTY clear you never seriously played DDay at Omaha Beach nor Enemy Action Ardennes isn’t it?
Tastes differ, but some standards you don’t mess with.
John Butterfield is a UNIQUE wargame designer in that he brings SIMULATION value to most of his games, contrary to some fancy game mechanic that has absolutely NO historical simulation value and are mostly generic games of dice rolling on a micro scale.
Yes these 13 in a dozen dice rolling adventure games about stories and some State of Siege mechanics can be fun… but there is zero historical insight on a broader scale.
The fact the man created 3 versions of one historical wargame in one box is a master achievement. But just because you don’t get to throw dice in this game and John instead used a story telling chit based combat in a highly operational simulation is simply the wrong angle to make this review
Besides the chit draw has nothing to do with 2 player or solo play. Butterfield made a DDay at Dieppe game early on with dice in a S&T magazine game.
Disappointing…
I always saw there is a (rather huge) gap between the older grognards and the newer “wargamers” that came in with boardgamegeek games and this one review proves my point again.
John Butterfield simply deserves a better review than this. Ambush, RAF, the D Day series, the voyage of the SS Pandora and yes I find Enemy Action Ardennes the suppreme master piece of his career.
LikeLiked by 1 person
Thanks for your thoughts Ben. I have played lots of hex and counter wargames. That has nothing to do with this piece.
Just because I didn’t like this one as much as other games of his doesn’t mean he is not a good designer. We have EA: Ardennes but haven’t had the chance to play it yet. We hope we will in the future. I also want to play this one again to better gauge the game. This was a first impressions post.
LikeLiked by 3 people
One final comment Ben. I just reread the post and I say a lot of good things about the game in it. I loved the cards and the activation, enjoyed the interesting and unique combat system, although I thought it was a bit long and somewhat tedious, and recommended the game as a solo experience. I think as a first impressions review, I pretty much gave it good marks. I just felt it wasn’t for me. I am unsure why you are so insulting in your comments? As if I am not a good enough wargamer. Or I haven’t played enough old style wargames. Can you explain?
LikeLiked by 3 people
Ben, you are exactly what is wrong with the wargaming community, making yourself a gatekeeper to the hobby.
Instead of trying to close that so-called gap you are going on about, and focus on the positive things Grant wrote about the game, you chose to be an old grouch and attack him over the bits you disagreed with.
You even put newer “wargamers” in quotes, as if anyone who likes modern wargames aren’t a true wargamer. Only Ben and his ilk are ‘pure wargamers’ and how dare these younger up-and-comers like something different… Old man yells at cloud!
What an ego!
How about trying to be a better person and communicate your opinion with some respect? I thought it was supposed to be the ‘young kids these days’ who don’t have any manners…
LikeLiked by 1 person
Well said Dragonnox and my thoughts exactly.
LikeLiked by 1 person
Ben, I know you are expressing your point of view with great conviction, but it reads to me as someone who is deeply insecure about their own opinions. Insecurity is the only rational explanation for taking a review like this and then making all these dramatic statements about “what type of wargamer” Grant must be – simply because his subjective opinions differ from your subjective opinions.
Your value (and the value of others) seems to be so tied to your rigid definitions of that wargaming is, that it also shows just how fragile your personal connection to wargaming is – since it is so wildly threatened by someone expressing a different experience with a game than what you experienced.
It’s okay that different people have difference experiences, and like things differently. It doesn’t mean they suddenly aren’t a wargamer. You don’t hold the keys to the club Ben – take it down a notch. You might actually find yourself (and the people around you) enjoying the spaces they move in more.
LikeLiked by 1 person
Grant, WatchItPlayed’s response should be the next Player’s Aid t-shirt.
I will take five!
LikeLike
Before I criticize, I must praise. Thank you for what you and Alexander do to promote the consim side of gaming. You are doing a great job at making the hobby approachable for the n00bs.
Now…this game is about the Third Battle of Kharkov where von Manstein wanted to entice Popov and the Soviets to overextend themselves and become vulnerable to a crushing German counterattack (famously known as the “Backhand Blow” and resulting in the Soviets withdrawing and licking their wounds until Kursk in the summer of 1943). Historically, a German player withdrawing and waiting on reinforcements before launching a counterattack would make sense.
Also, check out the Designer’s Notes for EA:A and you will see this quote about how John Butterfield approached the design of this game system. “Unlike my previous design for both solo and two players, RAF, I determined to design EA:A as a successful two player game before designing for solo play”. I personally have not had a chance to play EA:K as a two player game (yet), but have played EA:A two player several times (including 16 December 2022) and it shines in that format. I would anticipate that EA:K would do so as well (although perhaps knowledge about the battle in question would color that experience).
For a first impression, you did a good job of grokking a sophisticated Butterfield design and explaining it to the common man. Keep up the good work!
LikeLiked by 2 people
Thanks Ed. I appreciate your feedback on the history as I think I was getting things backwards. I did find that later in the scenario I had a better chance of attacking but at that point I felt almost defeated.
We will definitely give this one another go and also have EA: Ardennes that we want to play. Thanks for reading.
LikeLiked by 2 people
I think we found John Butterfield’s personal PlayersAid account.
To be completely serious however, and far less eloquent than WatchItPlayed, Ben, the PlayersAid is an environment of welcoming and you should just get out.
LikeLike
Grant,
First of all, thank you for your write up about this game. I prefer reading about games to seeing videos about them.
What I take from your article is that this game might not be for you as a two player game, and you explained why. But you were going to give it a second or third chance. I don’t think you were trashing John Butterfield or his games.
Unfortunately social media amplifies the not so good in people (for lack of a better phrase).
Once again, thanks for all you and Alex do. I appreciate it wether or not I always agree with you.
Cheers,
Mark
LikeLiked by 1 person
Thanks Mark. We never ask anyone to always agree with us. I don’t always agree with us. That is not what we want. I just want people to understand that an opinion is everyone’s right and that if you don’t have openness in your approach to wargaming, in 20 years we may not have a hobby. I am a wargamer. I play wargames. I love wargames. I like all types of wargames and want to include people and bring as many to the fold as possible.
LikeLiked by 1 person
First impressions are exactly that, first impressions. Sometimes conclusions can be drawn that after repeated play will be found to be incorrect.
A few counterpoints:
I was involved in playtesting both this game as well as its predecessor, EA:A. In both cases the 2P game was designed and developed FIRST, before either solo module was started. So it was not designed as primarily a solo design.
One important distinction between Primary and Supplemental cards : The former are drawn EVERY turn. So players will always have the opportunity to activate every formation each turn. The Supplemental cards however go into the draw deck of all Supplemental cards and only a defined number are drawn each turn. So it’s unknown ( by both players in fact since you don’t draw all your cards at turn start ) which Supplemental cards will be available.
As for the Germans feeling “disengaged” this is no different than say a Barbarossa game where the Russian defenders will have “less to do” than the attacking Germans. But in this game as the game progresses and the Germans get reinforcements they too will be attacking.
As for combats taking “forever” to adjudicate, once you get some experience we’ve found they go pretty quick – players at a glance can separate drawn chits into a “relevant” vs “not relevant” pile then sum them up once the chits are drawn.
As for the Soviets being able to have their way….I’d say play balance wise its probably slightly pro German if anything. The Sudden Death VP checks starting on Turn 4 force the Soviets to be VERY aggressive. Esp if they don’t capturer Kharkov they will really have to stick their necks out – and give the Germans opportunity to counterattack.
LikeLiked by 2 people
One important point is that Supplemental cards will never appear on consecutive turns. When you play a Supplemental card, it is not shuffled back into the deck until after a one turn cool down period.
LikeLiked by 1 person
You are correct. I didn’t intend to give a full rules review or explanation but wanted to make the distinction between Primary and Supplementary. I actually really liked this aspect of the game as it felt right.
LikeLike
Ed and Martin S. have already made a number of important points. I’ll just add that it’s not John Butterfield who designed D-Day at Iwo Jima and D-Day at Saipan. Why is that important? Because those two games were ambitious attempts to use the system that failed miserably, and associating John Butterfield with them would be a grave insult to him.
LikeLiked by 1 person
I understand your point but he designed the series which is a good series that I admire a lot and have played. I have been very disappointed with Joe Youst’s attempt on Iwo Jima and played a few times only to give up. Still stands that the system, designed by John Butterfield, is a solo system.
LikeLike
Fair enough, but the way you’ve phrased it makes it sound like he designed all those games, don’t you think?
“…John Butterfield is a genius and has designed some of our favorite solitaire wargames in games like the D-Day at Series including Omaha Beach, Tarawa, Iwo Jima and recently Saipan.”
LikeLike
I have edited that portion of the post. Are you John Butterfield?
LikeLike
Ha ha, that’s hilarious! According to what I know about him, he does not go undercover to comment or correct people. I’m sure he doesn’t care what people say about him on various forums. I’ve seen him on BGG, Consimworld and Facebook responding to questions about his games, but that’s about it.
LikeLiked by 1 person
This entire thread is disappointing. Grant expresses a extremely mild negative opinion about a small component game which he is otherwise really keen on, and the entire internet jumps on his back. What is the matter with people? You can’t let someone offer an opinion different from yours without running to your keyboard to start complaining and slinging insults? No wonder there are almost no critical reviews in wargaming – those offering an opinion different from the masses face being tarred and feathered and driven out of town. Honestly, the next time you see someone saying something you don’t agree with, just let it go ffs!
LikeLiked by 1 person
..meant to say “…a small component of a game which he is otherwise keen on…”
LikeLike
I always thought the Enemy Action series was primarily a solo system, with a 2-player game thrown-in. When Enemy Action: Ardennes was released quality solo wargames were not as available as now.
The Combat System sounds really interesting to me (and I would expect the designer ensured that results were usually appropriate), but if there are a large number of combats each turn, I can see how that could slow things down.
LikeLiked by 1 person
Some of the comments here make me cringe, chiefly Ben’s comment. The Players Aid is one of my favorite board games Youtube channels + website. Grant and Alexander do a terrific job, they’re insightful and entertaining – and they are promoting various games and the overall hobby. Sometimes you agree with them, sometimes you don’t – that is completely fine, what’s wrong with that? Acting like the owner of dogmatic truth (Ben) isn’t OK, just shows narrow mindedness. I’ve also played Kharkov 2-player and wasn’t impressed by it.
LikeLike
Great review
LikeLiked by 1 person