Old School Tactical from Flying Pig Games is a tactical combat system that focuses on World War II to date. The game focused on the simulation of small unit combined arms engagements where historical units, weapons, armor and vehicles will duke it out on a beautifully crafted board full of hexes. During a turn, players will go back and forth using an Impulse Point System to activate units to either Move, Assault Move or Fire. The players will play through a predetermined amount of rounds and at the end, victory points and casualty points will determine which side is the victor.
The first volume in the series was Old School Tactical Volume 1 Eastern Front 1941/1942 and focused on battles between the Russians and Germans. Old School Tactical Volume 2 West Front 1944/1945 was a follow-up effort and focused on the titanic struggle in Europe following the D-Day landings in 1944 with battles between the Americans and Germans. Now the most recent volume in the series is Old School Tactical Volume 3 Pacific 1942/1945 and includes battles between the Japanese and their Special Naval Landing Force and the American Marine Corps.
In this series of Action Points we will NOT be touching on the base rules of the game but you can learn about the Impulse Point Activation System by reading our review on OST Volume 1 here: https://theplayersaid.com/2017/01/25/what-does-old-school-mean-a-review-of-old-school-tactical-vol-1-from-flying-pig-games/
I also wrote a series of Action Points covering OST Volume 2 and the Airborne Expansion that you can read to get more information on that amazing addition to the series.
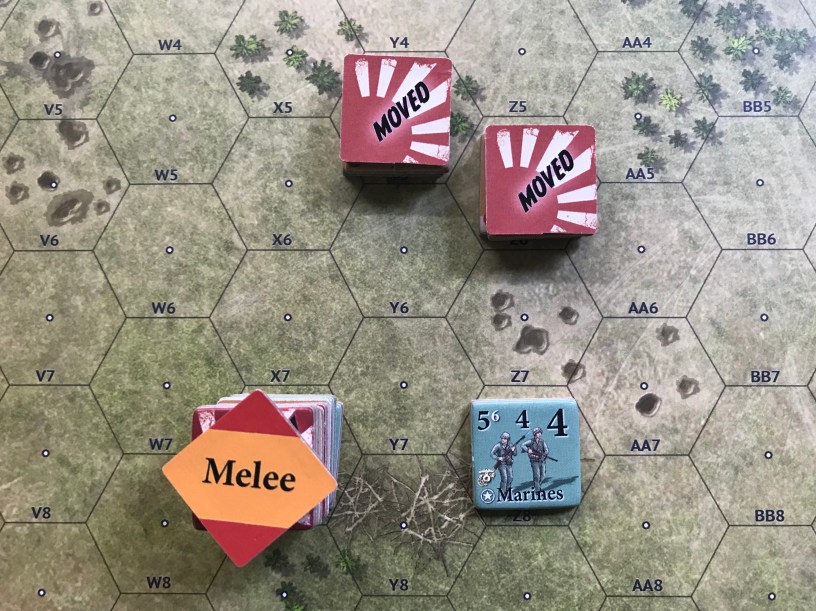
Action Point 1 – various types of combat, including Fire Attacks, Fire Groups and my personal favorite, Melee.
Action Point 2 – take a look at the Impulse Point System that drives the action in the game as well as some of the more interesting aspects of the Old School Tactical: Airborne Expansion and the Airborne Units and Aircraft Loadouts, Flight Paths and Paradrops.
In Action Point 1, we examined some of the new terrain, weapons and vehicles presented that are unique to the Pacific Theater of combat. In this Action Point, we will take a look at the new playable faction the Japanese, examining their new units including the Tank Killer and Sapper, and dive into the very powerful Banzai Attack.
Japanese Units
Japanese soldiers during World War II were feared by their enemies as they were seen as fanatics who believed in their Emperor as divine and to whom they owed their life and were willing to lay it down. The Japanese armed forces followed a code of honor called Bushido which took after the ancient ways of the Samurai and reinforced this blind devotion and obedience to their leaders. No matter the order, the Japanese soldier generally obeyed and would often run headlong into enemy fire as death in battle was seen as glorious and surrender was not an option. This devotion is used as a basis for the rules governing the Japanese player in Old School Tactical Volume 3.
The first point that I want to highlight is that Japanese Units will not Shake or Break when fired upon. They can only take casualties in battle. This is a very interesting and thematic choice by the designer. The Japanese Units have no Gut Check Number. Instead of the usual 5, 6 or 7, the Japanese Units simply have their Gut Check Number identified as an ( X ). This means that any combat result of Shaken or Broken on the Infantry Combat Table or the Vehicle Combat Table is ignored. There is an exception to this general rule though as if a Japanese Unit uses Intensive Fire it will become Shaken and suffers the normal consequences of that condition including only half Move and half Fire. The Shaken Unit will however automatically rally during the Free Rally phase of the next turn. Japanese Units must still stop in place when they take any casualties from enemy Opportunity Fire, with the exception of as they are moving during a Banzai Attack.

One of their greatest advantages, particularly when paired with their Banzai Attack, is that Japanese Units in Melee receive a +1 die roll modifier. This can make a huge difference on how effective they are in Melee and is a condition due to their training in close combat and their penchant for charges.
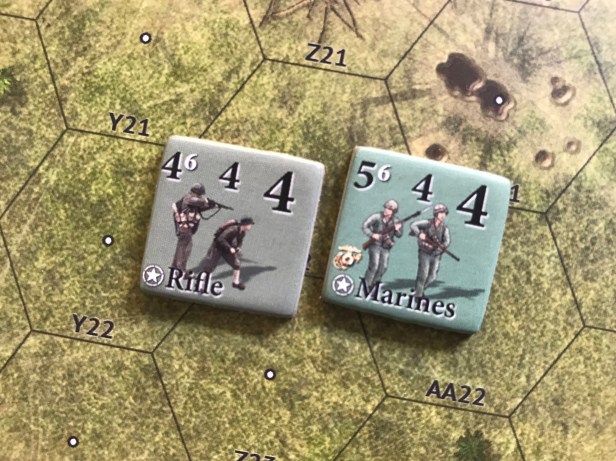
The Japanese are tough and will create new challenges and require new tactics by the US Army and Marines in order to defeat them. I love the fact that their lack of a Gut Check Number forces the Americans to look at utilizing more Fire Groups than single attacks. It is very difficult to get the Firepower number required to get X and C results on the ICT consistently against the Japanese by doing single fire. The answer is to use more Fire Groups. The Marines, who we will cover in the next post in this series, do have a higher Firepower than the normal Rifle Unit. The Marines 5 FP is not all that much higher than the Rifle but it does make a big difference and when used in conjunction with Group Fire can make your attacks that much more lethal.
New Units
Now that we have taken a look at the general disposition and makeup of the Japanese Units in the game, let’s take a look at a few of the new Unit types that create new tactics and opportunities.
There are several very interesting and unique Units available to the Japanese including the Tank Killer, Sapper, Special Naval Landing Force and several different types of tanks including the Chi-Ha, Ha-Go and Te-Ke. Let’s take a look at these Units to see how they work on the battlefield.
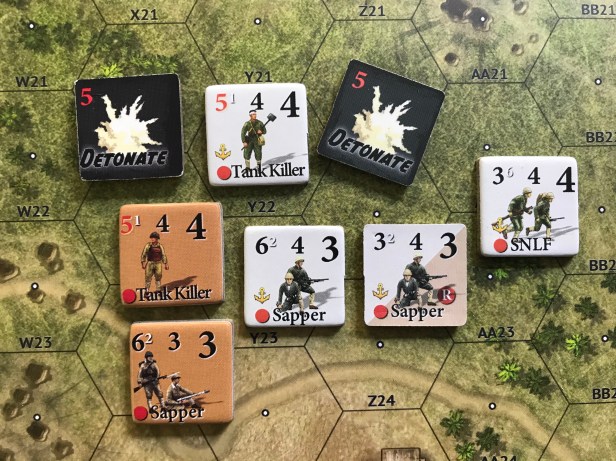
Tank Killer
The Tank Killer Unit is basically a human bomb as a Japanese soldier was loaded with explosives to act as a suicide bomber to take out American tanks. These Units are represented by single person counters.

The Tank Killer Unit is considered a Suicide Unit which destroys itself in the attack and will not count as a Casualty Point. The Tank Killer moves normally, but their attack is carried out automatically when the Unit moves adjacent to an enemy vehicle. The Tank Killer counter is flipped to its Detonate side and the attack is resolved on the Vehicle Combat Table. The Firepower used in the attack is an unmodified 5 and the attack is resolved against armor facing the attack. The Tank Killer Unit has no attack value against non-vehicle Units.
As the Tank Killer advances on its target it can be attacked with Opportunity Fire, including in the final hex before it will ultimately detonate. If the Tank Killer is considered hidden due to the rules of a specific scenario and an enemy vehicle moves adjacent to the Tank Killer, the Japanese player may reveal and attack as an
Opportunity Fire action. In this case, the Tank Killer may not be attacked prior to the detonation, which is a big benefit. Another aspect about being hidden is that the Tank Killer Unit does not have to reveal itself when moved onto by enemy foot Units, but is automatically activated by a vehicle moving into the hex. The Tank Killer cannot stack with any other Units due to its nature and mission as a suicide attack.
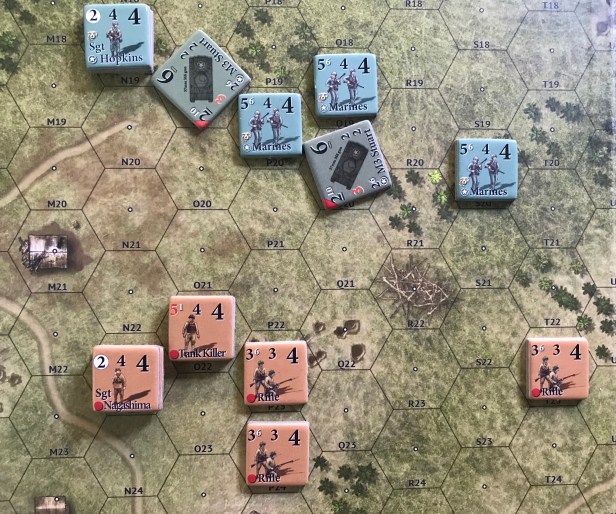
Let’s take a quick look at how the Tank Killer Unit moves and attacks. In the picture below, the Japanese defense is being attacked by a Marine Squad with two M3 Stuart Tanks leading the charge out of the Palms. The Tank Killer is not hidden but is in a hex with Fox Holes which offer a Cover Bonus of +1. On their first Impulse, the Japanese player decides to move with the Tank Killer to attack the M3 Stuart Tank located in hex Q20. The reason the Japanese player will do this risky action is that they don’t want the Marines to focus fire on the Tank Killer killing it and wasting its powerful attack. Remember, the Tank Killer cannot attack other units, only vehicles.
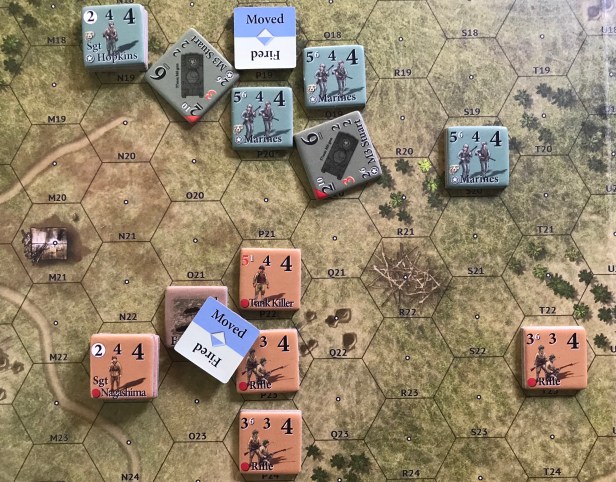
The Tank Killer uses an Impulse Point to activate and moves out of the Fox Hole towards the Tank. When the Tank Killer Unit enters hex P22, the Marines located in hex P20 announces an Opportunity Fire and rolls. The Tank Killer is in Open terrain and has a Defense Value of 4 and the firing Marines Unit has a Firepower of 5. This means the attack will be on the +1 column on the Infantry Combat Table. 2D6 are rolled resulting in a 7 which equates to a Broken result. The Tank Killer ignores the result due to the fact that it has no Gut Check and can continue it’s move forward.

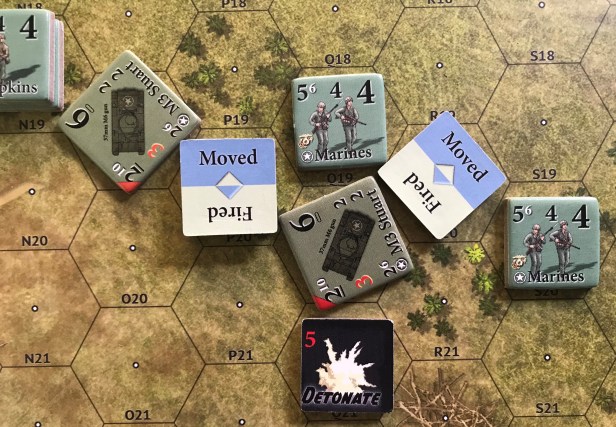
As soon as the Tank Killer Unit enters hex Q22 where it can detonate and attack the adjacent M3 Stuart Tank, the tank decides to take a desperate shot at the Tank Killer to kill it before it blows. The Tank Killer is in Open terrain and has a has a Defense Value of 4 and the firing M3 Stuart has a Firepower of 2 so will be attacking on the -2 column on the Vehicle Combat Table. 2D6 are rolled and results in a 9 which is Broken but as you know the Tank Killer simply shrugs that off as it has no Gut Check Value and can now detonate. The counter is flipped and the attack will be at a 5 Firepower.
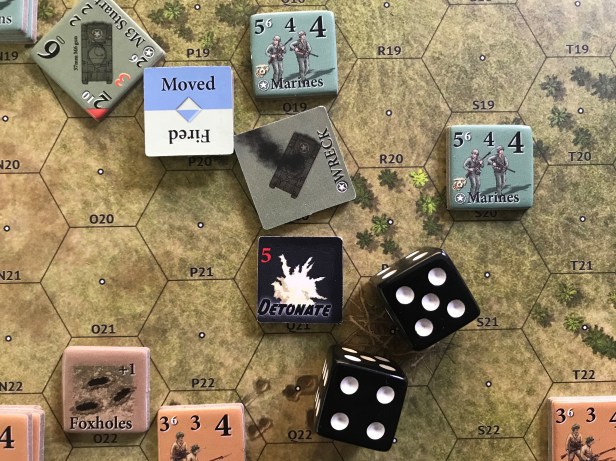
The Stuart is in Open terrain and it’s Front Defense is only a 2 so the attack will be on the +3 column of the Vehicle Combat Table. 2D6 are rolled resulting in a 9 which is Destroyed and the tank is reduced to a smoking wreck.
Tank Killer Units can be very powerful, not only because they can shrug off Broken and Shaken results and keep moving, but because they can bring a very powerful attack against enemy tanks at will. I nave not seen more than 2 or 3 of these Units in the OoB for any scenarios but they are great fun and really can be a pain to the American player.
Sapper
Sappers act as Engineers for the Japanese and have a few special rules and abilities. The Sapper has a Firepower of 6 with only a 2 Range so they are meant for closeup fighting in buildings, trenches, caves and the like and can carry Flamethrowers and use smoke to obscure their movements. They also move slightly slower than a Rifle Unit with a 3 versus a 4.

They also gain a +1 in Melee so you will want to plan how to rush them into heavily fortified positions to engage in up close and personal combat. They also can detect and remove mines. When they enter a hex with a hidden mine, the mine doesn’t explode and they simply can remove them.
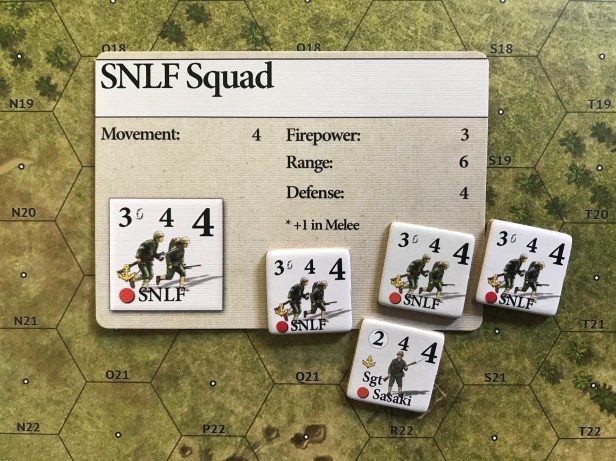
Special Naval Landing Force
The Special Naval Landing Force are very solid Units for the Japanese and also are well trained in hand to hand combat as they gain a +1 in Melee. Their Firepower of a 3 is the same as the Rifle Units so you won’t lose any power when using them but their Defense Value of 4 is better so they can be used to advance a bit more quickly and without the need for as much cover.
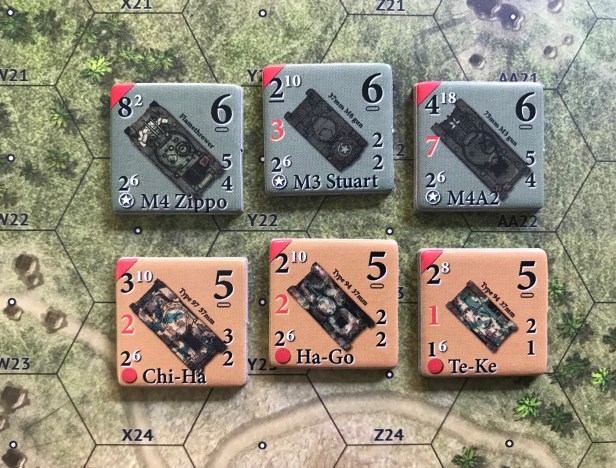
Tanks – Chi-Ha, Chi-Go and Te-Ke
As you can see from the pictures below, the Japanese do not have great tanks. They used tanks to support infantry movements but they were not as effective as the American M4A2 and the M4 Zippo. The Chi- Ha is the best of the bunch with a solid Firepower of 3 against soft targets but only a 2 against armored Units. It also had a good front Defense Value of 3 as compared to only a 2 for the Ha-Go and the Te-Ke. Tanks are best used as support and can be ridden by infantry to take advantage of the 5 movement value they have.
Now that we have looked at the different Units that the Japanese have access to, let’s take a look at their most powerful tool in the Banzai Attack.
Banzai Attack
Many times in the Pacific Theater of World War II, Japanese soldiers would charge the enemy in fanatical and often suicidal charges. This was mainly a result of the types of battles that were very defensive in nature such as defending beach invasions in such places as Saipan, Iwo Jima and Tarawa. The Japanese would get to the point where they felt they couldn’t hold out any longer and instead of surrendering they would charge.
Sometimes it occurred with a large group of soldiers whipped into a frenzy by their officers and often with smaller groups of men fighting for an honorable end to their war.

The Banzai Attack can only be taken by the Japanese player and an option available to the Japanese player. A Banzai attack must be declared by the Japanese player on their first Impulse of any turn so this is a very tough decision. If they don’t declare it this turn, they can do so at the beginning of each such round and attempt to cut down the advancing Americans in an attempt to weaken them before launching this surprise attack. Once the Banzai Attack is activated, it will remain in effect until the end of the scenario or until all units who were involved in the attack have been destroyed. Only one such Banzai Attack may be activated in a scenario so this is something that should be thought through before initiating.
The player chooses which Leader is activating the Banzai attack and which Units are participating. Each of these Units will be marked with a Banzai counter. Eligible units are not required to participate in the attack and can instead stay behind or pursue other objectives. The choice of which Leader to activate the Banzai Attack is critical as the only Units can be activated will be located within the Leader’s command range. But keep in mind that other Leaders in this initially activated Leader’s command range can also join in and add their command range to the Banzai Attack. This kind of becomes a chain reaction and can make this action pretty massive if Units are appropriately spaced.
Crewed weapons may join in but have to drop their weapon counters and will be replaced with a reduced Rifle squad. Prohibited from the Banzai Attack are vehicles, Tank Killers and Snipers. A Banzai Attack will costs 2 Impulse Points per turn to use the Banzai charge regardless of the number of units involved so it is very efficient and can be used to devastating effect if the scenario provides enough Units to offer a follow up normal assault or usual fire attacks.
A Banzai Attack has its own rules but is a fairly free flowing movement of Japanese units closing with the enemy and entering into Melee. Think about the Banzai Charge as a normal movement action but that is also merged with an Assault move. All units in the Banzai charge will follow these mechanics.
Unit can move up to its full allotment of Movement points, and then as part of the same action Assault move into an enemy occupied hex. This is like gaining an additional +1 movement. Normal terrain costs apply to movement. Once the Japanese Units Assault move into the enemy hex a Melee marker is placed immediately. Additional Units can move into a hex with a Melee marker already placed but must follow stacking limits. Melee hexes are locked out after all units in Banzai attack have acted so this means that you cannot fire into that hex. Melees then are resolved normally during the Melee
phase. The only real limitation to a Banzai Attack is that activated Units must try to close with the nearest enemy. If that hex has reached its stacking limitations, it must close with the next nearest enemy unit. If targets are equally distant, the Japanese player gets to choose which to attack.
If an activated Unit has moved as part of a Banzai Attack but was unable to enter a hex with an enemy Unit and is not in Melee, the Units’s Banzai counter is flipped to its Moved side to remind players that unit has already acted this round. Here is where the free flow of the attack is evident. Units can move in a stack when starting and ending in the same hex. Units starting in a stack may separate and move independently.
As activated Units approach the enemy, they may be attacked with Opportunity Fire normally over the course of their movement, but they do not have to stop when taking casualties. This is different from shrugging off Broken and Shaken but when a C result happens, which is Casualties, the Japanese Unit will be flipped over to it’s reduced side but doesn’t have to stop moving as is normally the case. This can be very powerful and make Opportunity Fire less effective.
Lone Japanese Leaders can Assault move into an enemy hex and join the Melee but they are less effective as their Firepower and Defense Value is only a 1. After all units in the Banzai Attack have acted, the turn continues normally with the opposing players next Impulse. Activated Units in the Banzai Attack which are not currently engaged in Melee may be attacked normally during the rest of the turn. On subsequent turns, the Banzai Attack will continue on the Japanese player’s first Impulse. This will mean that Units that didn’t get into Melee can now move into and engage in another Melee or can continue to move across the battlefield toward other opposing Units.
Let’s take a look at a quick example of a Banzai Attack.
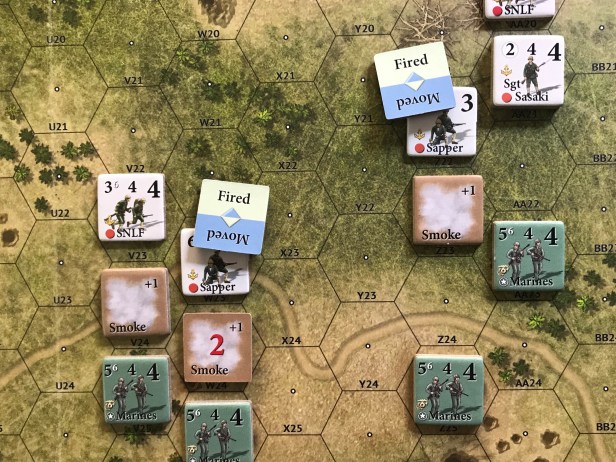
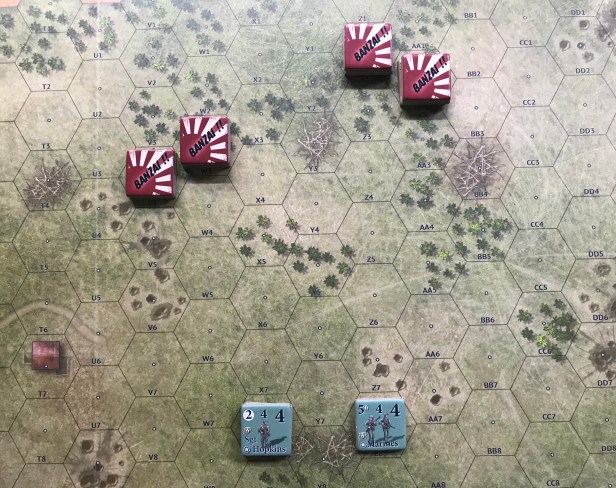
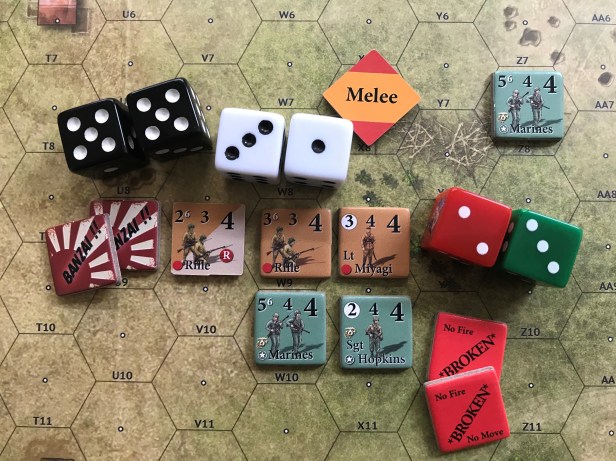
Lt. Miyagi will lead the Banzai Attack and activates using his 3 command range to reach the Rifle Unit to his right and also Sgt. Miyake who will in turn activate the Rifle Unit to his left. Remember that you have to choose a Leader to initiate the Banzai Attack and can use their command range to reach other Leaders who can also activate Units.
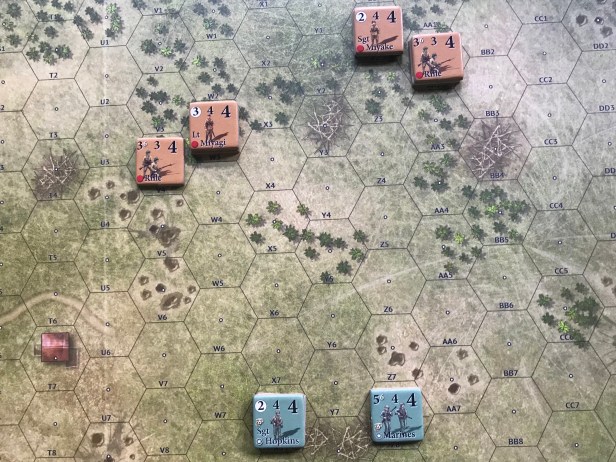
One the Banzai Attack is declared the player will place the special Banzai markers on top of each Unit that is participating in the attack. In this case, all Japanese Units on the board will be participating in the attack. Now we look at movement. Remember that the Unit must use it’s movement to get into the hex adjacent to the target whey it can then perform an Assault Move to move the final one hex into melee. This final Assault Move ignores terrain movement cost as well and each Assault Move simply is one hex.
Lt. Miyagi activates the Rifle Unit near his hex and it moves its full movement value of 4 spaces to get next to the Marines Unit with attached Leader Sgt. Hopkins holed up in the Palm Debris terrain. As soon as the moving Rifle Unit gets into the adjacent hex to the Marine it takes an Opportunity Fire and hits with a Casualty result which will cause the Rifle Unit to flip over to its reduced side.
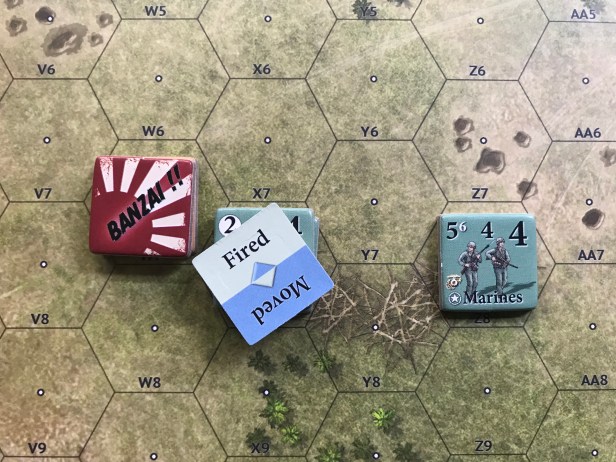
Normally, this would cause the Rifle Unit to stop it’s movement, also preventing the Unit from taking an Assault Move and normally all Units must be in good order which means no reductions, Shaken or Broken markers to engage in Melee. But, when taking a Banzai Attack the Unit ignores these rules and can continue moving, perform an Assault Move and engage in Melee.
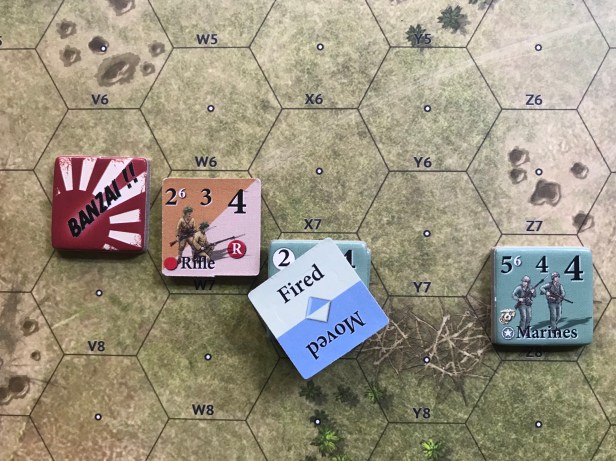
The Rifle Unit is a bit worse for wear but makes it into Melee with the Marines. It is reduced and will offer one less Firepower than it would have had it not been hit in the Opportunity Fire. Lt. Miyagi now moves the same route that the Rifle Unit took to also Assault Move and enter Melee with the the Marine Unit. The Marine Unit has already performed their Opportunity Fire so they cannot take another shot at Lt. Miyagi. This hex is now filled with the number of Japanese Units that can participate in this Melee. The stacking limit is 2 Units, 1 Support weapon and up to 2 Leaders. So no further Units can move into this hex.
Sgt. Miyake now moves as far as he can which is 4 hexes but cannot get adjacent to the Marines Unit on the right. The Rifle Unit activated by Sgt. Miyake also moves it’s full movement and has to stop shy of the adjacent hex to enter Melee with the Marine. That is ok as they can activate next round and continue with their Banzai Attack. My guess is that the American player will want to either retreat or might try to bring a Fire Attack on the approaching Japanese. The Japanese activation is now complete and the round will continue allowing each player to spend their Impulse Points but the Units engaged in Melee cannot move, attack or be attacked at this point.
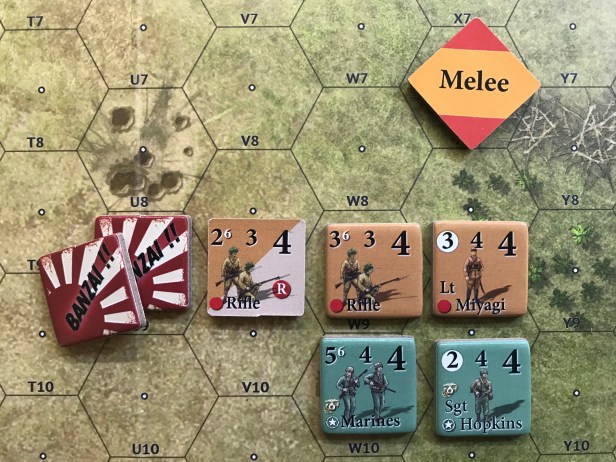
We add up the Defense Value and Total Firepower for each side so that we know what column each individual attack will be on. Terrain modifiers are ignored so there is no benefit to the Marines in the Palm Debris. The Japanese have a total Defense Value of 7 and a Total Firepower of 8 (the Japanese Rifle Units gain +1 in Melee due to their zeal and training in hand to hand combat). The Leaders will add only 1 Firepower and 1 Defense but will add a +1 to each of the Unit’s rolls in Melee. The Marines have a total Defense Value of 5 and a Total Firepower of 7.
Each Unit will now attack the enemy using their Total Defense and Total Firepower numbers plus any modifications for Leaders to their die rolls. Remember that attacks in Melee are simultaneous and that means that results are applied after all rolls are made. Let’s do the Japanese first. Their Total Firepower of 8 minus the Defense Value of 5 for the Americans will mean they will each roll on the +3 column of the Infantry Combat Table. The reduced Rifle Unit takes an attack and rolls a 10 which will be modified to an 11 and after consulting the ICT the result is Destroyed. The other Rifle Unit attacks rolling a 4 modified up to a 5 which means Broken result and the Leader also gets a roll and rolls 5 which is not modified as his Leader Bonus doesn’t effect its own attacks which is another Broken result.
The Marines now attack and have a Total Firepower of 7 minus the Defense Value of 7 so they will attack on the 0 column of the ICT, which is not good. They won’t have a good result on the Japanese (remember they ignore Shaken and Broken) until they roll an 8+. The first roll is an 11 modified to a 12 due to the Leader bonus which means one Japanese Unit will be destroyed following that attack with a 6 which is a Shaken result which will be ignored.

The Japanese then choose to lose their reduced Rifle Unit and the Americans choose to lose their Marine Unit. Because the Americans only have one Unit left that has a Broken counter they must now retreat to an adjacent hex.
If there were good order Units remaining in the hex on both sides, the Melee could have continued to another turn and additional Units up to the stacking limit could move in to participate in the Melee.

As you can see, Melee is brutal and can end in all Units involved being killed if rolls are high enough. The Banzai Attack is very powerful and allows the Japanese to cover a lot of ground quickly and enter into Melee with under powered Units. Add this in with their inherent +1 in Melee and Banzai is a great tool. Use it wisely and you will force the Marines to rely on Group Fire Attacks and Off Board Artillery to defeat you. I hope that you can see the value of the Japanese and are excited about the opportunity to play them. They are an interesting faction and I have played 3 scenarios now with them and done fairly well.
In Action Point 3, we will take a look at the United States Marines and what makes them some of the most elite fighting men of the war.
-Grant

Hi Grant. Amazing write-up. Thanks so much. I’ve just played the first scenario ‘Raiders’. With stacking limits, I’ve found that the Marines just filled up the hexes with 2 units plus the extras, and there was no way the Japanese could engage in melee and not beak stacking limits. I’m wondering what the rationale was with this rule. With Combat Commander, you can over stack for melee. Frustrating!
Dave
LikeLike
But remember in Combat Commander if you are overstacked after the melee is over you have to eliminate units that are overstacked.
LikeLike
That’s very true Grant, though I believe in CC:Mediterranean you can split your squad into two teams and reduce one to come within stacking limits. I’d still love to know your thoughts on OST in relation to initiating melee. With the Japanese rifle units having lower FP, you’d need to spend a time blazing away in the hope of taking out one Marina squad so that you can engage in melee with the remaining one. I really want to love OST but am still stuck on this. CC rocks as THE best tactical board game IMHO. Played CC:E scenarios nine last night and it was a nail biter. Left us buzzing!
LikeLiked by 1 person
I also love CC and it is by far my favorite tactical game. As for your comment about the two Marines stacked together. In order to take them out you will have to sacrifice units to reduce them and then finish them off. They are Marines after all.
LikeLike