
Fortress Europa: Designer Signature Edition from Compass Games is a remastering of an original wargaming classic designed by John Edwards. This is a 2-player hex and counter wargame that recreates the Allied campaign in Western Europe from D-Day to March 1945. This new edition of Fortress Europa features a super-sized play area consisting of two 43″ x 34″ maps, three sheets of counters, five player aids and five Order of Battle and Appearance cards.
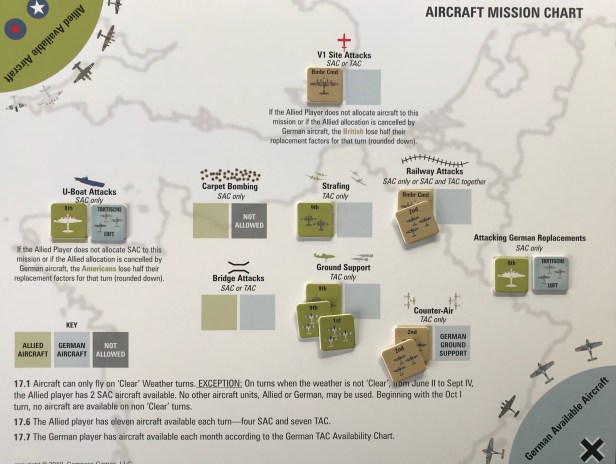
In Action Point 1, we looked at the all important Invasions by the Allied player, including how the Germans setup their units and their special Hidden units. In Action Point 2, we examined the different specialized units including Paratroopers, Rangers, Commandoes, French Partisans, Volkssturm and Mulberries. In this Action Point, we will take a look at the very interesting and well done abstraction called the Aircraft Mission Chart and how air power is used.
Air Allocation Phase
Each round, each side receives a certain amount of air assets that they can allocate during the Air Allocation Phase. This abstraction is a very clean and interesting way to represent the various air power that each side had and how they could use those assets to perform different missions to either hinder the enemy or assist in combat. The Allied player allocates their aircraft on the Aircraft Mission Chart first followed by the German player allocating their aircraft on the Aircraft Mission Chart. The Allied player removes any of his aircraft cancelled by German aircraft, removing the cancelling German aircraft at the same time. And by cancelling it means that one aircraft in a location will cancel an enemy aircraft in the same location. The German player has less assets than the Allies and must be wise about their use. Their number is limited on a monthly basis and each month has at least 2 turns throughout the game so they will not have a large number of assets to do with what they will. They must be smart about their placements and should look for ways to negatively effect the Allies plans. We will discuss this a bit further later on as we get into the various types of aircraft missions.

There are two types of aircraft included in the game grouped into one of two categories. The first category is called Strategic Bombers, and includes the British Bomber Command and US 8th Air Force, and are referred to as SAC throughout the rules. The second category is the Tactical Bombers and are hereafter called TAC. This TAC category includes all of the available air assets for the Germans. The Allied player has eleven aircraft available each turn including four SAC and seven TAC. The Germans refer to the German TAC Availability Chart to determine their number of aircraft for the month.

It is also important to remember that aircraft can only fly on Clear weather turns. The Weather Determination Phase precedes the Air Allocation Phase and is simply a roll of a die and then consult the Weather Chart. There is an exception to this rule though for the Allies. On turns when the weather is not Clear, from June II to September IV, the Allied player has only 2 SAC aircraft available. No other aircraft units, Allied or German may be used. Beginning with the October I turn, no aircraft are available on non-Clear turns.
SAC have unlimited range and may attack anywhere on the map. Allied TAC may operate anywhere on the map, attack any hex on or adjacent to the Mediterranean coast, but must be used within 8 hexes of any Allied headquarters. This means that during the first Invasion round that aircraft cannot be used as there are no HQ’s located on the board yet that can be used.
German TAC may operate within Germany or within 8 hexes of any German HQ;s. This applies only to German aircraft flying in support of German combat on the Ground Support Mission of the Aircraft Mission Chart. German aircraft may cancel Allied aircraft on the Aircraft Mission Chart regardless of range.
As I mentioned earlier, the number of aircraft available per turn is determined by the German TAC Availability Chart. The first number shown each month is the total number of aircraft available for the entire month. The second number is the maximum number of aircraft that can be used in one turn during the month. Remember, that each month typically has four turns in it. For example, June has a June I, June II, June III and June IV as the scale for time is 1 turn equals one month of time. German aircraft used offensively can only be used for Ground Support Missions. Each month, available German aircraft should be placed in the Available column on the German TAC Availability Chart. When used, the aircraft are moved to the used column. Aircraft not available for that month should be kept off-board. German TAC cannot be accumulated from month to month so you have to commit those assets; use them or lose them.

The high water mark of the Luftwaffe in the game is realized during August 1944, January 1945 and February 1945, where you can see on the above picture of the German TAC Availability Chart, as they will have a total of 10 aircraft available those months. The restrictions on the maximum usage for a single turn is also more liberal in December 1944, January and February 1945 as the Germans can use up to 7 or 9 aircraft respectively in a single turn. This is really the only chance that the Germans have the ability to make hay and really get the Allies on their back foot and this coincides with the historical Battle of the Bulge.
I am not an expert on the history of World War II, but do know that the Allies generally controlled the skies and had many more assets to bring to bear on the fight than the Germans. As German pilots were lost, they simply couldn’t train new ones quick enough to meet the Allies. The other element limiting the Luftwaffe was the fact that the Allied strategic bombing campaign was very effective and limited the ability of the German war machine to manufacture new aircraft to replace those that were lost.
Aircraft Mission Procedure
I know that we covered this above but I wanted to show an example of how it works using the Aircraft Mission Chart and placing the various aircraft. The Allied player first allocates his aircraft units on the Aircraft Mission Chart using each unit during each Clear weather turn.

In the picture above you will notice that the Allied player is focused on attacking German Replacements, Railway Attacks, U-Boat Attacks, Strafing, V1 Site Attacks, Ground Support and Counter-Air. Each of these missions is chosen with a goal in mind of taking away something from the Germans, protecting the Allies ability to gain reinforcements, limiting German movement and Ground Support.
The German player then follows by allocating any aircraft they choose to use this turn on the Aircraft Mission Chart, within the limits of the turn. This is difficult for the German player as they will never really have enough aircraft to change things much but need to look for opportunities to spoil the plans of the Allies. I show you what I mean in a minute.
Each German aircraft cancels one Allied unit from the same mission. This will result in each side removing any units that are countered. If the Allied player has placed two different types of aircraft in a single space, they will get to decide which of their aircraft units are removed (SAC or TAC). Each Allied aircraft assigned to the Counter-Air Mission cancels one German aircraft from the same mission (this being the German Ground
Support Mission) if there are any German aircraft so assigned and both countered and countering aircraft being removed.
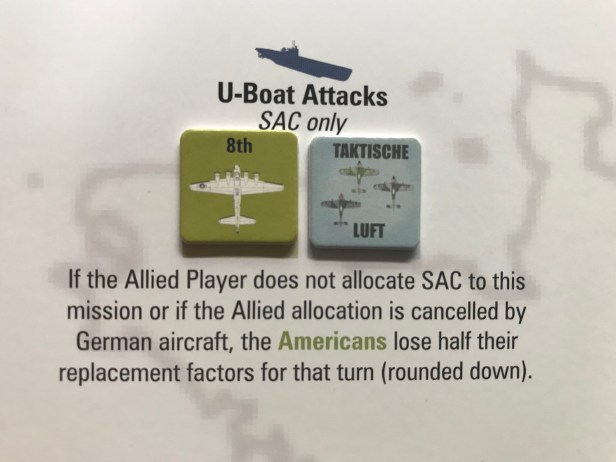
With this in mind, the German player decides to place only 2 aircraft during this turn because they saw opportunities to mess with the Allied plans. The German player placed in the Attacking German Replacements box and then the U-Boat Attacks.
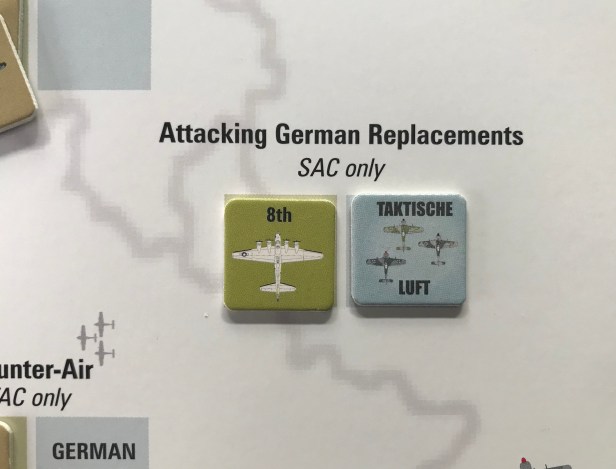
Each of these boxes will be cancelled and the Allies will not be able to carry out their plans as anticipated. So this is what it boils down to…an exercise in playing the spoiler for most of the process. I am not saying that this is bad, because I actually really liked this very interesting part of the design.
Now that you have seen the process of how these aircraft are placed onto the Aircraft Mission Chart, let’s take a look at each of the different types of Aircraft Missions.
Types of Aircraft Missions
Strafing—TAC only – One of my favorite missions because one of the things you are trying to prevent is the German’s best units being able to freely move up and support their units on the beaches to repel Invasions. The answer to this is Strafing.
Every German unit that moves over three hexes (including rail movement, but excluding paradrop or airlift) and is at any time in TAC range during the first move impulse is subject to Strafing. The die must be rolled for each unit attempting to move over three hexes. If the result is greater than the number of strafing aircraft the unit moves normally. If the die roll is equal to or less than the number of strafing aircraft, the unit takes one step loss and ends its movement in the third hex it entered, or the first hex in TAC range over three hexes it entered, whichever came first.
Ground Support—TAC only – The most useful of all of the mission types, Ground Support is where you use your air assets to gain advantage in combat.
During the first combat impulse, before the die is rolled for each separate combat resolution, aircraft may be assigned to Ground Support for that combat. Ground Support is placed prior to revealing hidden German units, so in effect, the Allied player must anticipate the possibility of additional German units being revealed. No more than three aircraft can support the same combat. Each aircraft can only be used once. Any TAC aircraft unit can support a combat involving units of any nationality. Each aircraft assigned to a combat raises the odds by one column. Unused German aircraft assigned to Ground Support are considered lost and may not be accumulated.
Railway Attacks—SAC only or SAC and TAC together – Very similar to Strafing, this mission is used to prevent the Germans from supporting the front with their best units.
Each aircraft unit reduces the German rail movement capacity by two.
Bridge Attacks—SAC or TAC – Along the same vein as Railway Attacks and Strafing, this mission prevents the Germans from moving freely.
Before conducting movement during the Allied first move impulse, each aircraft is placed on a river and all bridges over that section of the river are destroyed for that complete turn. This affects both Allied and German movement and the aircraft
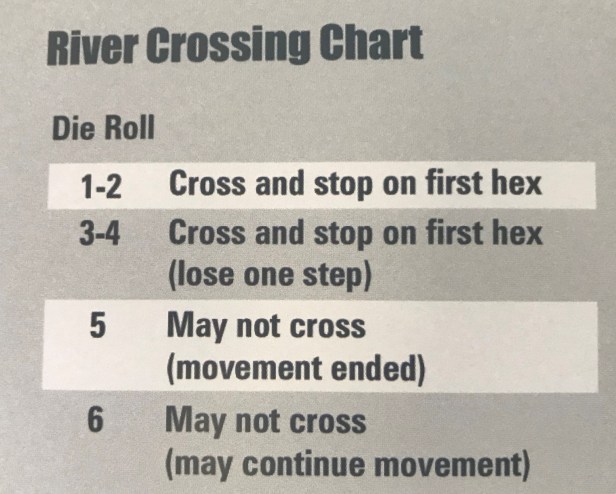
counter is not removed until after the game turn is completed. A section of a river is any stretch of river between two river junctions or between one river junction and the sea or the end of the river. If the aircraft is TAC, all such river hexes must be within TAC range. This causes no rail movement to be allowed across sections of rivers attacked. During the first move impulse, all non-armored units must stop on the first hex across the river and on the second move impulse they may cross rivers without restriction. During both move
impulses, armored units wishing to cross attacked rivers must stop on the hex before crossing the river and roll on the River Crossing Chart. An armored unit that failed a river crossing attempt but may continue movement can attempt to cross
a different river hexside.
Attacking German Replacements—SAC only – Reducing the number and quality of units that the German can obtain through reinforcements is a huge benefit to the Allied player. I like this action especially since armor units are susceptible to this attack.
Each aircraft placed in this box reduces the German replacement rate by one, with armored replacements being the first factors lost.
U-Boat Attack—SAC only – This is one that I hate as the Allied player cannot take this one too lightly. In the example above, you can see that the Allies only placed one aircraft in this box and made it easy for the Germans to spoil this for them.
Regardless of the weather die roll, if the Allied player does not allocate SAC to this mission or if the Allied allocation is cancelled by German aircraft, the Americans lose half their replacement factors for that turn (rounding the remaining factors
down). Armored replacements are the first factors lost. When all six U-Boat bases have been captured, SAC no longer has to be allocated to this mission and no replacements are lost.
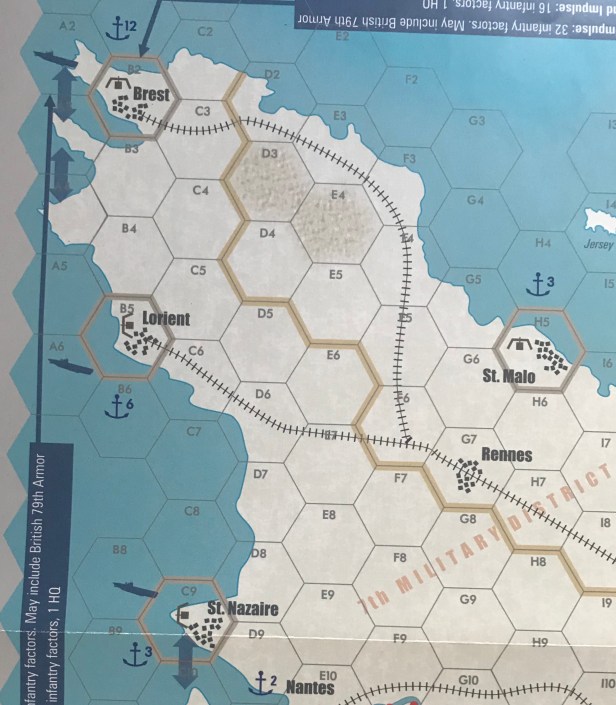
The following picture shows the location of 3 of the U-Boat bases that are located on the west coast of France. Not pictured are two more U-Boat bases located near La Rochelle and once base along the coast of the Mediterranean Sea near Toulon.
V1 Site Attack—SAC or TAC – Similar to the U-Boat Attacks, I hate the V1 Site Attack as the Allied player cannot take this one too lightly. In the example above, you can see that the Allies only placed one aircraft in this box and had the Germans had a few more aircraft to use would have meant that the British would have lost some of their reinforcements.
Regardless of the weather die roll, if the Allied player does not allocate aircraft to this mission or if the Allied allocation is cancelled by German aircraft, the British lose half of their replacement factors for that turn (rounding the remaining factors down). Armored replacements are the first factors lost. When all six V1 sites have been captured, aircraft no longer have to be allocated to this mission and no replacements are lost.
The following picture shows the location of V1 Sites located on the coast of Normandy facing England.

Counter-Air Mission—TAC only – This mission is critical for the Allies and can really cause difficulties for the Germans in finding favorable odds during their combats.
Each Allied aircraft cancels one German aircraft from its Ground Support Mission (if the German allocates any aircraft to this mission). If the German player does not allocate any aircraft to Ground Support, Allied aircraft on Counter-Air are lost for that turn; they may not switch missions.
Carpet Bombing—SAC only – An important part of the plan for the Allied is that of Carpet Bombing as it simply adds to the combat rolls, not increasing or changing the odds. This can be a life saver as it really guarantees no truly bad results on Allied rolls during combat.
Carpet Bombing can only be used once per month so make sure to choose wisely. German aircraft may not cancel Carpet Bombing Missions. Carpet Bombing may not be used during an Invasion turn and also may not be used in conjunction with the Ground Support Mission but may be used in conjunction with a paradrop. Any SAC aircraft units may be used for this type of mission involving units of any nationality. Effect: The Allied player may add two to the combat die roll in any one attack at odds of 2-1 or lower during the first combat impulse. A Carpet Bombing marker is provided to help designate the hex where this aircraft mission occurs.
I actually really like this implementation of air power. Rather than simply having a handful of assets to place when and where you think they can best be used, this Aircraft Mission Chart requires some thought and planning about how to use your limited air assets. I also really like that there are some missions that can be used to slow the movement of the Germans (Strafing, Bridge Attacks and Railway Attacks), some missions that reduce reinforcements for both sides (Attacking German Replacements, U-Boat Attacks and V1 Site Attacks) and missions that provide combat bonuses (Carpet Bombing, Ground Support). These different aspects are each useful and serve a purpose that can aid in strategy development and create a narrative of an operational decision exercise that can be very tense and interesting. It will take you some time to get comfortable with the process and strategy though. The first game we played, I felt like I was just willy nilly placing these cool looking aircraft counters without much thought but as soon as I saw the results or consequences of these decisions, I quickly started to think more about my placement. Some will not like this mechanic but I promise you it is a solid design choice that captures the decisions of both the Allies and Axis as they fought over the control of Western Europe during World War II.
In Action Point 4, which is the final entry in this series, we will take a look at a few examples of Combat, some of which will include the use of aircraft examined in this Action Point.
In case you are interested, Alexander wrote a brief review of the game about a month or so ago and you can read that at the following link: https://theplayersaid.com/2020/03/12/they-fight-to-end-conquest-a-review-of-fortress-europa-dse-from-compass-games/
-Grant
