
Fortress Europa: Designer Signature Edition from Compass Games is a remastering of an original wargaming classic designed by John Edwards. This is a 2-player hex and counter wargame that recreates the Allied campaign in Western Europe from D-Day to March 1945. This new edition of Fortress Europa features a super-sized play area consisting of two 43″ x 34″ maps, three sheets of counters, five player aids and five Order of Battle and Appearance cards.
In Action Point 1, we looked at the all important Invasions by the Allied player, including how the Germans setup their units and their special Hidden units. In Action Point 2, we examined the different specialized units including Paratroopers, Rangers, Commandoes, French Partisans, Volkssturm and Mulberries. In Action Point 3, we examined the very interesting and well done abstraction called the Aircraft Mission Chart and how air power is used. In this Action Point, which is the final entry in the series, we will take a look at a few examples of Combat, some of which will include the use of aircraft.
Combat is a big part of the game and there are many different and varied types of engagements including Invasion, Ground Support by TAC, Carpet Bombing, attacks into Mountain Terrain amongst others. In this final post, we will cover these different types and then show an example for each.
Attack Supported by Ground Support Aircraft
During the first combat impulse, before the die is rolled for each separate combat resolution, available aircraft may be assigned to Ground Support for that combat. Ground Support aircraft are placed prior to revealing Hidden German Units. This creates some nice tension and requires the Allied player to truly think about what he is trying to accomplish with this attack and what he can ultimately live with in case a Hidden Unit is revealed. No more than three aircraft can support the same combat and each aircraft can only be used once. Each aircraft assigned to a combat raises the odds by one column.
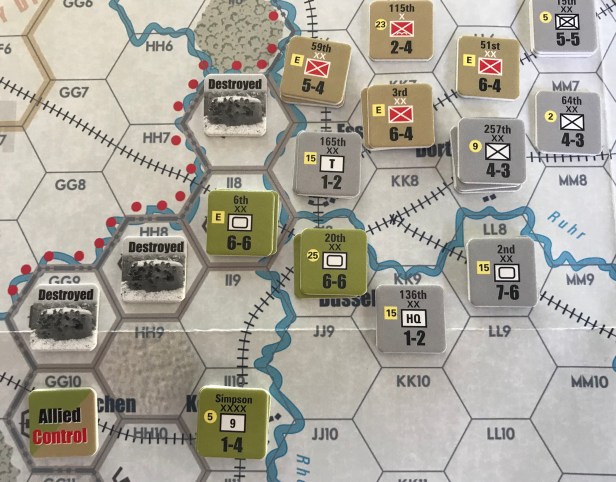
In the following example, we will look at a few aspects of Combat including attacking across rivers, armor defending in a City Hex, as well as the use of aircraft. In the picture below, you will see that the Americans will be attacking across the river with two separate stacks against two German Units stacked in a City Hex with a Volkssturm Unit that appeared as the Allies moved within three hexes of this city located in Germany.
The American stack starting in hex II8 contains the 6th Armor and 104th Infantry while the stack starting in hex II9 contains the 3rd Infantry and the 20th Armor. Their total combined combat factors are 25. They intend to attack across the river into hex JJ8 against the 331st Infantry and 2nd Armor along with the 2-2 Volkssturm Unit.
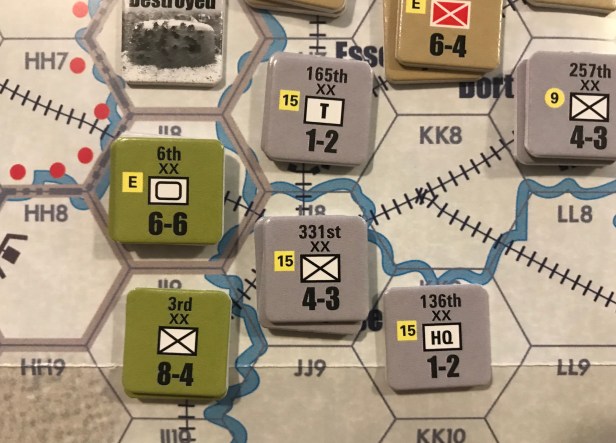
Because the American units are attacking across a river, albeit via a railroad bridge, they are at a disadvantage and the combat factors for the defending Germans will be doubled. If one of the American stacks was not attacking across the river, but instead were attacking from say hex JJ9, the Germans would not receive this doubling advantage. For me, this is an issue and it actually is fairly common throughout the wargaming world. I feel that any units attacking across a river will be less effective and there should be some type of an advantage, or disadvantage, assigned to the attacking units. This is not the case though in Fortress Europa and as long as one stack is not attacking across a river, the advantage will not be gained by the defending Germans.
Let’s total up the combat factors for the defending German Units. Unfortunately, an Armor Unit defending in a City Hex will have its combat factors halved. Therefore, the 2nd Panzer will have their CF reduced in half from 7 to 3.5 and then will round up to 4 combat factors. The Infantry Unit and Volkssturm Unit will add in their total CF of 6 and the final base combat factors will be 10 (6 + 4). These numbers will then be doubled because they are defending against an across the river attack. Their final modified CF will be a respectable 20.
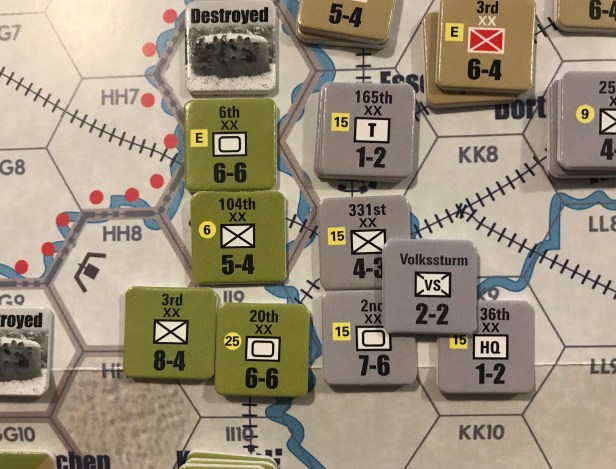
Next, the Allied player will declare whether or not they are utilizing their available TAC aircraft to offer Ground Support. This is done before any German Hidden Units are revealed (in this case there are not Hidden Units to reveal). The TAC aircraft can only be used within 8 hexes of an Allied HQ unit. In this example, the TAC will use the Simpson HQ unit located in hex II10. These TAC are very important in this attack as I will explain.
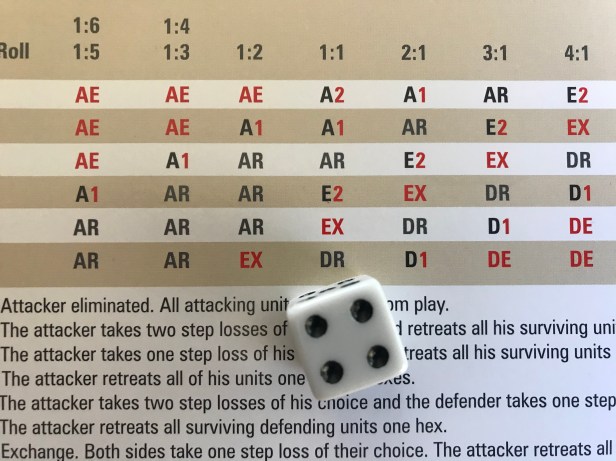
Currently, the total CF for the American attack is 25 while the defending German total CF is 20. This is one of those 1:1 odds attacks that are never really good for the attacker. It is risky at best and really is an attack that shouldn’t be undertaken. But, because the Allied player has two available TAC, the attack can become effective. Each of the TAC used in this combat will shift the column on the CRT to the right once. With two TAC units, there will be two shifts to the right and the combat will use the 3:1 odds column on the CRT.

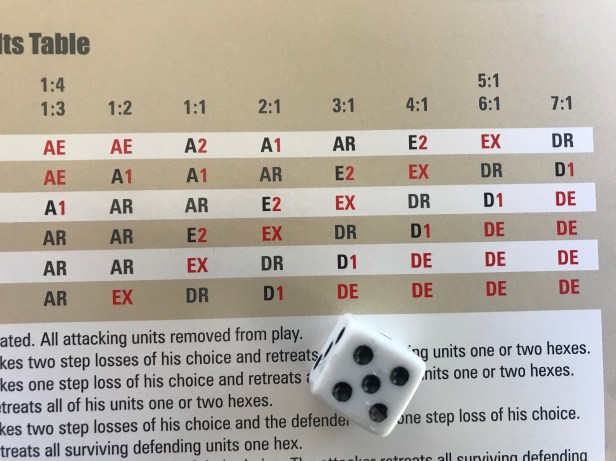
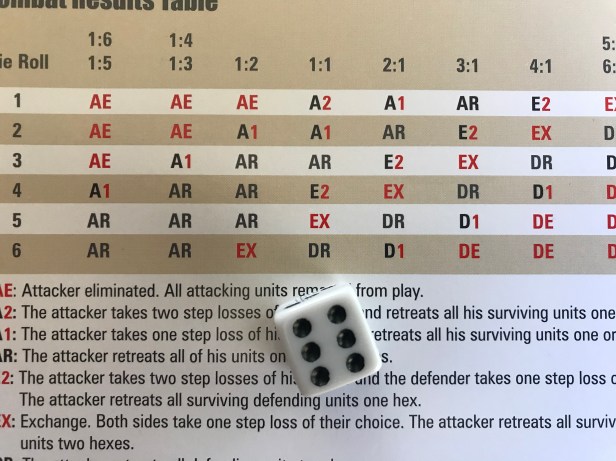
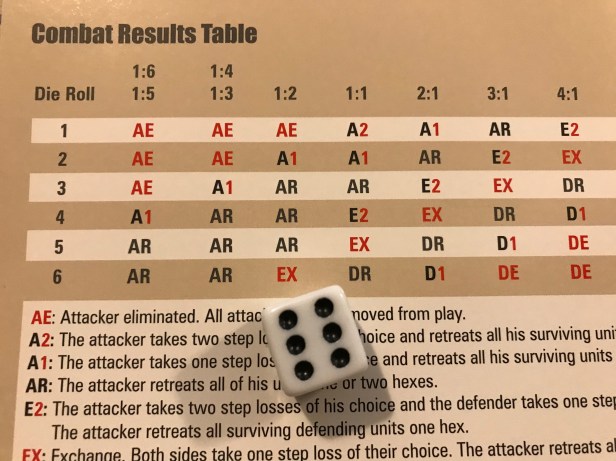
A singled 6-sided die is rolled and results in a 5. We then consult the 3:1 odds column as shown in the picture below. The result is a D1 which means that the Defender will take one reduction and then the attacker gets to retreat the units 2 hexes. If the Americans had not used the TAC aircraft to get the two favorable column shifts, the rolled 5 would have resulted in an EX result or Exchange where each side would have had to lose one step and the attacker would have had to retreat two hexes back toward the hex where the attack originated from.
With the results, the German player decides to take the reduction on the 2-2 Volkssturm Unit eliminating it from play and then retreats the remaining units through hex KK9 to hex LL8. This sets up another across the river attack by the Americans if they plan to use the rail line to move ahead and continue the attack in a later combat impulse.
One thing that I noticed was that the CRT is very unkind to the attacker on the lower odds. Anything under 3:1 requires a very good roll for any kind of acceptable result, usually requiring a 5 or 6. As the odds increase in your favor though, the attacker has a significant advantage as a roll of 4+ results in a D1 or Defender Eliminated (DE) result on the 4:1, 5:1/6:1 or 7:1 columns. Word to the wise, make your attacks count and remember that the Allies have significantly more and better units coming onto the board each round so sometimes you simply have to take a chance for force the German player to retreat and being whittling down their more powerful units.
Carpet Bombing
Another type of attack that involves aircraft is Carpet Bombing. Once per month, the Carpet Bombing attack can be utilized but may not be used in conjunction with the Ground Support Mission. The Allied player may add two to the combat die roll in any one attack at odds of 2-1 or lower during the first combat impulse. A Carpet Bombing marker is provided to help designate the hex where this aircraft mission occurs.
In the below picture, the British stack located in hex LL6 is planning to attack the German stack located in hex MM6. This is a perfect attack to use the Carpet Bombing in as the final attack odds will be less than 2-1.
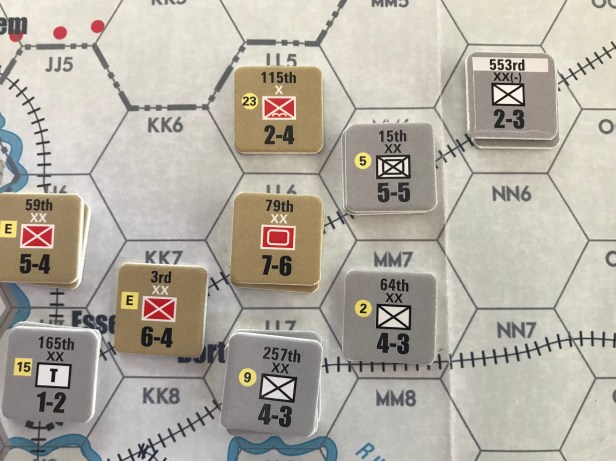
The British stack includes the 79th Armor with 7 CF and the 51st Infantry with 6 CF for a total of 13 CF. The German stack contains the 219th Infantry with 3 CF and the 15th Panzer Grenadier with 5 CF for a total of 8 CF. This attack will be on the 1:1 column.
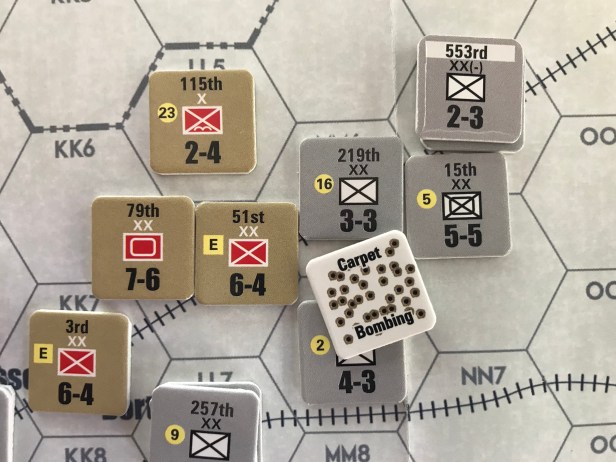
The Carpet Bombing counter is placed in the hex where the operation will be called in and we then roll a single d6 which results in a 4.
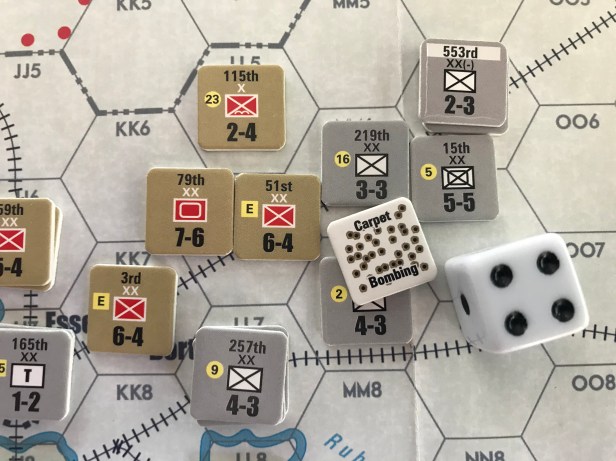
In consulting the CRT on the 1:1 column, we see that a roll of a 4 is very bad and will result in an E2 which means the attacker will lose two steps and the defender will lose only one step. The attacker will then be forced to retreat two steps. Yikes. Not good but remember this is a Carpet Bombing so there is a modifier to the roll that we forgot.
The attacker will get to add +2 to their d6 roll which will result in a 6. This is a good outcome as it is a DR and the attacker gets to retreat the remaining defender units two hexes.
The attacker will retreat the German units through hex NN5 to hex OO5. This sets up an attack next combat impulse against a weakened German stack in hex NN5 and allows the British to make progress toward the next German city hex.

Alpine Defense
This is an interesting example of combat that will not happen often. In an Alpine Hex, which is a specific type of mountain hex found in only about 40 different hexes on the map, any units may attack into or out of such terrain. But, only a Mountain Unit can defend in such a hex and gain the significant combat factor doubling that happens.
In the example below, the American 8th and 9th Infantry are attacking into an Alpine Hex that contains two different German units, the 242nd Infantry and the 6th SS. When an attack enters an Alpine Hex, any units can attack into or out of that hex but only specific units can mount a defense and receive the full advantage of the terrain. In this example, the 6th SS will double their combat factors in defense and will end with a 10. The 242nd cannot add to this defense, which is a shame for the German player as their total defense could be a minimum of a 13 if they were able to add in those 3 combat factors from the Infantry unit.
The other important element of the example is the American Airborne units were paradropped this turn and will ultimately attack the 9th Panzer unit located in hex S33. As they have just landed, they will not exert a Zone of Control into any of the hexes around them, namely not into hex S32.
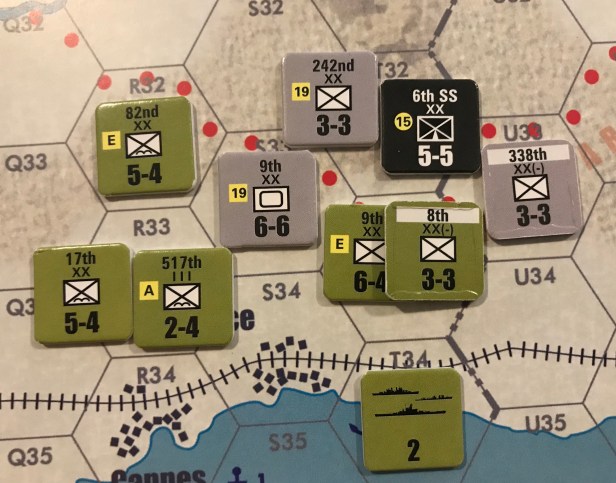
The Americans will have a total of 11 combat factors for this example. 6 CF from the 9th Infantry plus 3 CF from the reduced 8th Infantry and then an additional +2 CF’s from the Naval Unit that is located in hex T34 which is a shore hex. The Naval Unit can support attacks with a range of 2 hexes so their fire can reach hex T32. We then compare the total combat factors and have 11-10, which will use the 1:1 column on the CRT.
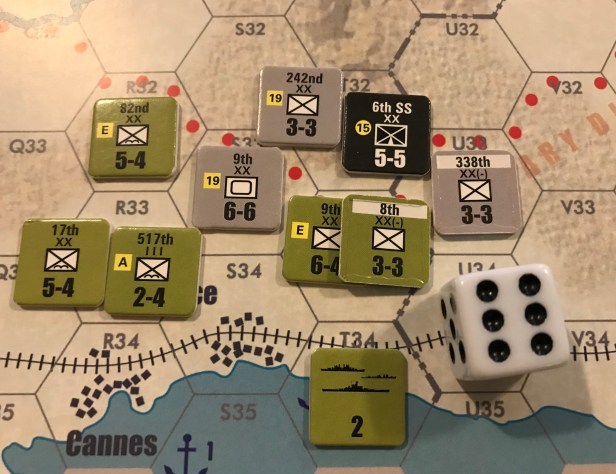
The American player rolls a d6 and gets a result of 6. We find the result on the appropriate row in the 1:1 column and find a result of DR, which means that the attacker can retreat each of the defending units two hexes.
The American player decides to split up the two German units and sends them in different directions. The 242nd Infantry cannot retreat into an Alpine Hex so it must retreat through hex S32 in front of the Airborne unit, which is allowed here because the Airborne units just landed this turn and do not exert a Zone of Control. The 242nd Infantry ends its retreat in hex S31 which is a mountain hex. The 6th SS is retreated to the east through hex U32 and comes to rest in hex V31 which is a clear hex that will offer the unit no added defense bonus if attacked again. To finish the attack, the American attackers occupy the vacated hex but are now spent as units can only attack once each Combat Impulse.
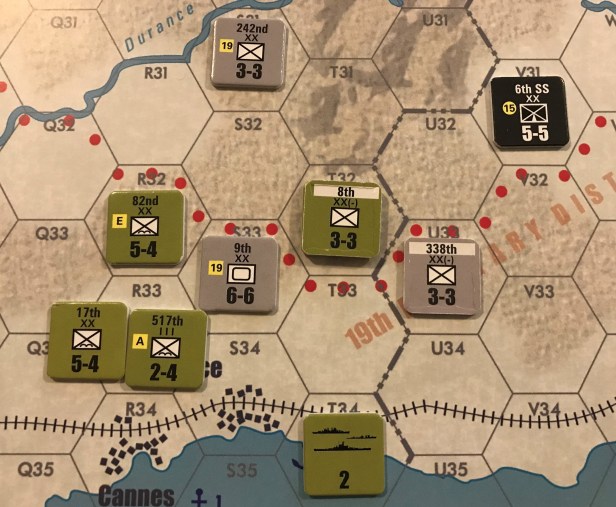
While this attack didn’t lead to any reductions of the defending German units, they have been separated and displaced to a less than advantageous position. These units will have to try to maneuver to occupy a better defensive position to hold out until the rest of the German units in the area can react to this Invasion of Cannes on the Mediterranean Sea Coast.
I hope that you have found this series of Action Points helpful in understanding the basic systems of Fortress Europa. I consider this game an excellent simulation that is very interesting to play as there are lots of neat systems, such as the Aircraft Mission chart, and many varied aspects of the Allied campaign across Western Europe. We didn’t cover it very much but there is an entire scenario devoted to the infamous Battle of the Bulge and the Germans get a chance to take it to the Allies for a few turns as they have good units held in reserve that are now ready to be released. I really think this game is a classic and is really best enjoyed with the full campaign from D-Day to the Bulge and the crossing of the Rhine. Thanks for following our journey.
-Grant
