
Castle Itter is a solitaire design with 2-player competitive or cooperative options that sees the SS units activated by cards and then advance on the Defender’s positions inside the castle along various tracks. The defender must simply last till the deck expires and move units around the board to various positions and eliminate units before they enter the castle.
In Action Point 1, we looked at the game board focusing on the locations, combat positions and assault tracks for the SS. In Action Point 2, we examined the SS Card Deck and how the cards drive the assault and work against the player. In Action Point 3, we looked at the various Defender Units, some of their Defender Actions and their Special Actions/Attributes. In this final Action Point, we will discus some points of strategy regarding deployment of your Defender Units on the board, actions that you should be taking and a general overview of my thoughts on how best to defend the castle.
Putting the Right People in the Right Places – Deploying Units onto the Game Board
Now that you have a good understanding of how the different Defender Units in the game work and their Special Actions/Attributes, I think it is time to look at how to best deploy these Units onto the board and also give some other strategy insights I have picked up over nearly a dozen plays.
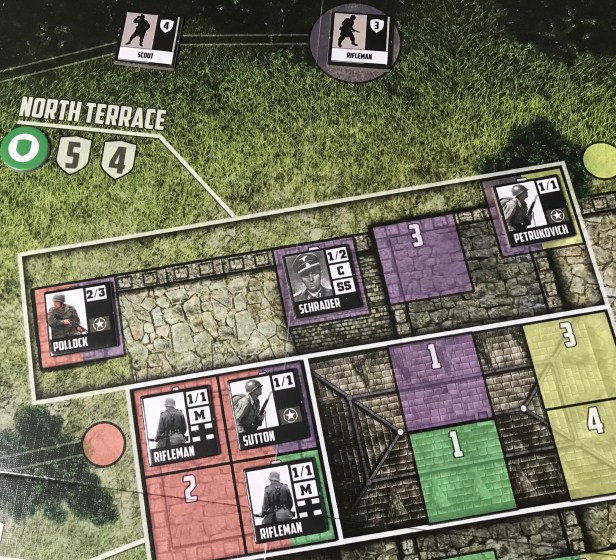
My first suggestion regarding deployment is to focus on getting the Tank Crew Counters into their positions in the Gatehouse and Besotten Jenny as quickly as possible. You will notice from the game board at setup that there is a Rifleman SS Counter placed in each of the 12 major circles on the assault tracks and they are at least 4-5 turns away from entering the castle and overrunning your defenses so there is time. I recommend that for the 1st turn you focus on getting at least 2 Tank Crew Counters placed in the Besotten Jenny, one to load the ammo for the large 76MM Cannon and the other to then fire it as a Suppress Action to gather those 6 suppress tokens.

I would also recommend deploying Pollock with his 2 Attack Value and 3 Suppress Value into a dual Red/Purple or Purple/Yellow combat position in the North Terrace and also using his Suppress Value to generate 3 suppress tokens to be used to keep SS Counters off the board. With two placements remaining in the 1st turn I would also place one of the Commanders in this Location as well in order to keep Pollock fresh and able to fire and suppress. With the final placement in the first round, I like to look at the most commonly rolled numbers on 2d6, which seem to be 5-9 and place a Rifleman in a space that can take a pot shot at one of the SS Counters in this spot. You have a 66.6% chance of hitting and to start with one of those spaces clear is always a bonus.
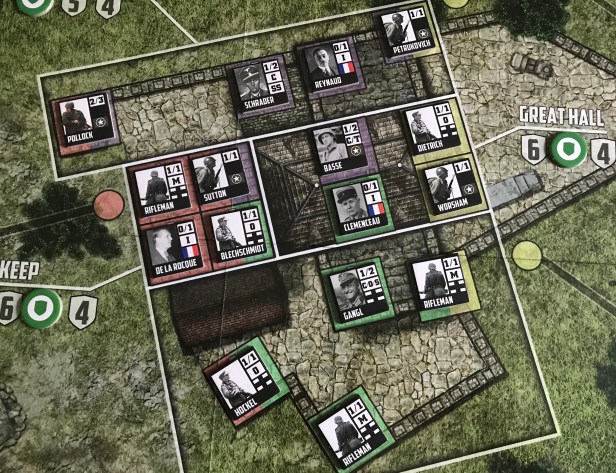
In future rounds, you will need to spread out your limited Commanders by placing one in each of the major Locations (North Terrace, Great Hall, South Terrace and Besotten Jenny) so that you can keep troops fresh to attack the SS Counters. You will also want to place the Low Morale Rifleman Units with the Wehrmacht Officer Counters as much as possible in order to keep them from breaking when another Unit is destroyed. There is nothing quite so bad as seeing a few Low Morale Rifleman break because another Unit is killed in their same Location. It can kind of be like a line of dominoes falling if you are not careful!
Suppress Early and Often
I know that I have mentioned this already but it cannot be overstated. Keeping the enemy off of the map by suppressing the SS Counters as they are being placed can be just as good as killing them on the assault tracks. In fact, it is much more efficient as you are not using an immediate action to suppress but shooting at an SS Counter takes an Action and will keep your troops exhausted needing to be Recovered.
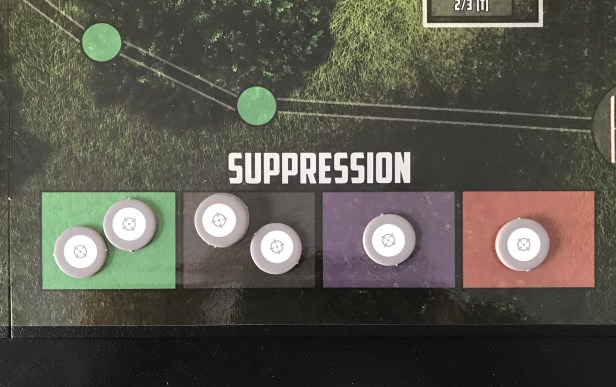
Getting the suppress tokens is your first step in using this powerful ability and you must obtain (and maintain) a good mix of the different colors. Remember the distribution of the various large colored circles where the SS Counters will spawn; there being only two red circles numbered 3 and 4, two purple circles numbered 5 and 6, four black circles numbered 7, 8, 9 and 10 and three green circles numbered 2, 11 and 12. There are the most black circles so that should tell you that you will see those circles being used to spawn SS Counters more often and only two red and purple circles. But you must also remember the most common distribution of 2d6 are the numbers 5-9 and you should place more suppress tokens into purple than you do red.

You must also diversity your investment into the different colors and having all of one color is never a good idea as they are simply not as useful. I recommend playing the odds here and placing the most tokens into black, the 2nd most into green (as the green numbers will come up more often than others), and then split your token distribution between red and purple fairly evenly. This planning and strategy is all well and good but remember that you will be rolling dice and that the results are unpredictable at best and will be mixed.
One final comment on what SS Units to suppress over others. Your most dangerous SS Units are the ones that have the most ability to hurt your defenses and kill your Defender Units. These are without a doubt the Mortar and Machine Gunner Units. They will not put pressure on the assault tracks, as they don’t move when placed and don’t force other Units to move, but they have the most ability to do damage to you when the dreaded Suppressive Fire Disrupt Defenders SS Cards are pulled from the deck. Suppressive Fire Cards can be managed by keeping the Machine Gunner and Mortar Counters off the board by suppressing them when they are placed or attacking them during your action phase.
I next worry about the Scout and Sturm Units as they are harder to hit with their Defensive Values of 4 and 5. Just don’t let the SS Counters run rampant on the assault track and you should be fine.
Attack Rifleman…Mostly
I know that I just mentioned that you should focus on the Mortar and Machine Gunner Counters during Suppress Actions but during Attack Actions, I recommend you go for the easy targets which are the Rifleman. You have a better chance to hit and removing any counter is better than missing. The Rifleman has a Defense Value of 3 as compared to a 4 for Scouts and a 5 for Sturm. With a 66.6% chance of hitting on a d6 (3-6), as compared to a 50% chance of hitting a Scout (4-6) and a slim 33% chance of hitting a Sturm (5-6), the Rifleman should be your target most of the time. Remember, the units aren’t any different in how they move up the assault tracks so removing a simple Rifleman is just as good as removing a Scout or Sturm as they still open up a spot on the assault track.
If you simply must attack a higher Defense Value target, I recommend using a Unit that will provide you with the most dice as possible. Using a Tank Crew Defender Unit with the fully loaded 76MM Cannon (3d6) or a good counter like Pollock (2d6) or any unit who is in the same Location as a French Counter that offers the very valuable Inspire Attribute (+1d6) is far better than only rolling 1d6 so plan ahead if you need to take out the bigger targets, which you occasionally might as an unlucky placement of an SS Counter on a certain number would push the Attackers into the castle.

Abandon Ship
I don’t generally like to play games where you are simply trying to game the system to get more points but in Castle Itter that aspect is very thematic as you are trying to defend the castle while not losing any life. The war is almost over after all and dying on the last few days of the battle is one of the greatest tragedies imaginable. When the game is over and you are calculating your score, there are a few conditions that if met will add significant extra points to your side of the ledger.
One of those is if the Besotten Jenny Location was destroyed, but no Defenders were inside at the time, you will gain 5 VP and that number is not insignificant at all! With that end game scoring mechanic in mind, it is important to keep an eye on the Defense Value of the Besotten Jenny. Once Besotten Jenny is at 5, I try to start to evacuate but not all at once. You still want to have the presence of that big gun and those suppress tokens at your disposal to be able to keep the SS at bay. When I say start to evacuate, I will typically move the two bottom most Counters out to either the adjacent Gate House or to The Great Hall.
If you wait until the Defense Value is at 4 it really is too late as that final Panzerfaust Card can literally be drawn at any time and a good roll will end your hopes of saving those men! I say a good roll, but rolling a 4 or higher on 4d6 is not tough at all.
Mortars and MG Teams Can Tear You Up
I mentioned this above in the Attack Rifleman…Mostly section but you need to try and minimize the amount of Mortars and Machine Gunners on the board at any given time. Therefore, I recommend that you take out Mortars and Machine Gunners as soon as possible. Why? Well, if you remember from our discussion in Action Point 2, the nasty Suppressive Fire Cards can tear you in pieces! But, don’t fret, the negative results can be managed by simply keeping the Machine Gunner and Mortar Counters off the board by suppressing them when they are placed or attacking them during your Action phase. But remember they don’t move up the assault tracks so they might not be as pressing of a concern as the Rifleman Counters that are next to the walls of the castle.
As a refresher on the Suppressive Fire Cards, when revealed, you will work through each Machine Gunner and Mortar Counter on the board. You start with the Machine Gunner or Mortar Counter in the lowest numbered SS Counter placement area. They are numbered 2 through 12. Roll a single die to identify the combat position that is targeted in the same color that the Machine Gunner and Mortar Counter are located. Then roll a number of dice equal to the Disrupt Value for the Machine Gunner (2) or Mortar Counter (3) and compare this to the current Defense Value of the location. If at least one of the dice are equal to or greater than the combat position’s current Defense Value a Disruption Token is placed on top of the Defender Counter. Repeat this process for each Machine Gunner and Mortar Counter on the board. If you have allowed four or five of these Counters to happily coexist on the board with the other SS Counters because you didn’t fear them because they don’t move along the assault tracks, you will now pay that price and it will hurt. Remember that a Disruption Token doesn’t kill your unit, two are required for that to happen, but you will have to use your precious limited Actions to remove them so that those Units can do something. This will mean fewer Actions used to Attack SS Counters and few Suppress Actions to keep them off the board and you will find yourself simply overrun. Do yourself a favor and keep the Mortars and Machine Gunners under control!

We Got To Get Out of This Place…If It’s the Last Thing We Ever Do
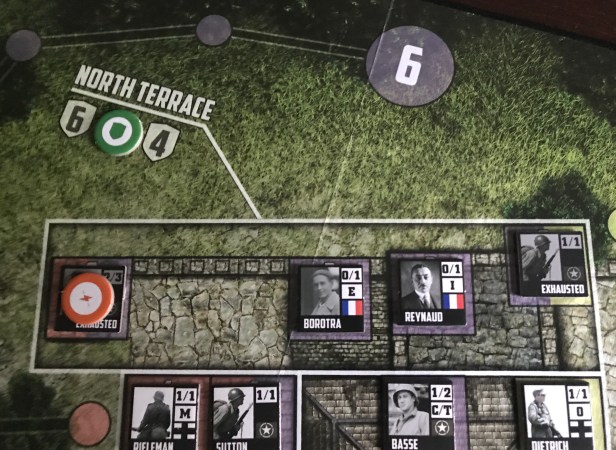
The goal of the game is simply to last until the SS Deck runs out of Cards. That is all you really have to do. But this is easier said than done as the cards take their toll on your defenses and whittle down your Defending Units over the course of the game. But, there is a way to end the game a bit earlier than normal and that is through the Escape of the Borotra Counter. I recommend that you get this accomplished as early as possible but you won’t be able to get it done for at least 6-7 turns as you have to place all of your initial 20 counters on the board before you can start moving the French prisoners out of the Cellar Location and onto the board.
If you successfully Escape Borotra while the SS Deck 2 is in play, you will mix the game ending 142nd Regiment Card into the bottom 9 Cards in the SS Deck. This will mean you have the chance of ending the game up to 3 rounds early as three Cards are pulled during each SS Phase. If the Escape happens during the SS Deck 3, you will mix the 142nd Regiment Card into the bottom 6 Cards in the SS Deck possibly ending the game up to 2 rounds early and if the Escape happens during the SS Deck 4, you will mix the 142nd Regiment Card into the bottom 4 Cards in the SS Deck possibly ending the game up to 1 round early. Ending the game early is a huge advantage and can make the difference in surviving or not. You should try to focus on getting this accomplished as quickly as possible but not to the detriment of your defense. I usually try to focus on the North Terrace or South Terrace as these two Locations have the fewest assault track spaces associated with them and are therefore theoretically easier to control and keep vacant, which is a requirement of the Escape attempt.
Inspire Your Troops to Greatness
The more dice you are rolling, the better the chances that you will hit your target. That is the philosophy with the use of the French Counters that have the Inspire Attribute as they will provide an additional die to any Defender in the same location that is taking the Attack Action. The Inspire Attribute also provides an extra Suppression token to any Defender in the same location that is taking the Suppress Action. There are four such Counters and you will want to spread them throughout Locations to improve hit probability on attacks and to provide extra Suppress tokens. Their ability works for all Units in the same Location so you will just need to reserve them a spot, move them in, get them Recovered as their ability only works when they are fresh (not exhausted as it is hard to give a rousing speech when you are doubled over with a stitch in your side) and don’t have a Disrupted Token.

The More the Merrier
My final point of strategy deals again with end game scoring. Each Counter on the board at the conclusion of the SS Deck will score 1VP. These Counters just have to be on the board and can even be Exhausted or have a Disrupted token. They are simply there. I will say though that you don’t have enough room on the board to fit all of the Counters you are provided with, and this becomes even more problematic if the Besotten Jenny has been destroyed as that eliminates 4 combat positions that can hold Defenders. Another bonus of the end game scoring is if French Defenders are in the Cellar at game’s end, you will score 1VP for each of them there plus the 1VP for having survived the game and simply being deployed on the board.
So, near the end of the game, I would recommend that you work on deploying all of your counters to the game board. Obviously don’t do deployment or moving of Counters around the board instead of killing Nazis as they advance up the assault tracks. This will lose you the game so you have to have a balanced approach. But, remember that points will determine the overall outcome so you have to think about this aspect, even if you don’t want to.
I hope that you have enjoyed this series of Action Point posts as we have examined this very interesting and fun to play solitaire wargame. If you have followed the blog, you know that we love David Thompson’s designs and that I have played Pavlov’s House (the other released volume in DVG’s Valiant Defense Series) a number of times. Both of these games share some of the same rules and concepts and both deal well with their covered subject. Between the two, I really prefer Pavlov’s House for its complexity and focus on three different aspects of the assault by the Wehrmacht, namely the Operational elements of the Volga River crossing with supplies, protection of the Red Army Command Post, establishing lines of communication and fighting off the Stuka dive bombers, the Strategic elements of the Wehrmacht troops pushing through the city toward the fortified apartment building known as Pavlov’s House and then the distribution and reaction needed by the Defender Counters inside the building at the tactical level as they have to fight off the attackers and raid nearby German Strongpoints.
But Castle Itter deals with a very different and much more focused type of siege than the previous volume. It has some very interesting aspects, such as the Escape attempt of Borotra and the planning necessary to execute it and the use of the different types of units in the defense of the castle such as the Tank Crews, the Wehrmacht Officers and Rifleman. It is a very well done, faster playing game that brings much of the same enjoyment just on a different scale. I look forward to the future volumes in this series as I know that David is working on Soldiers in Postmen’s Uniforms which covers the defense of a post office in the Free City of Danzig on the first day of World War II.

A final plug for you to read the interview we published with the designer David Thompson on the blog during the Kickstarter campaign: https://www.google.com/amp/s/theplayersaid.com/2018/11/05/interview-with-david-thompson-designer-of-castle-itter-the-strangest-battle-of-world-war-ii-from-dan-verssen-games-coming-soon-to-kickstarter/amp/
-Grant

Great post- makes for a fascinating sounding game.
Cheers,
Pete.
LikeLiked by 1 person
Thanks. It is a pretty nifty game. Deep enough to be interesting and have a bit of tension but simple enough to be easily learnable.
LikeLiked by 1 person