Castle Itter is a solitaire design with 2-player competitive or cooperative options that sees the SS units activated by cards and then advance on the Defender’s positions inside the castle along various tracks. The defender must simply last till the deck expires and move units around the board to various positions and eliminate units before they enter the castle.
In Action Point 1, we looked at the game board focusing on the locations, combat positions and assault tracks for the SS. In Action Point 2, we examined the SS Card Deck and how the cards drive the assault and work against the player. In this Action Point, we will take a look at the various Defender Units, some of their Defender Actions and their Special Actions/Attributes.
Defender Units
There are several different types of Defender Units in the game, each with a different Special Ability/Attribute. During each turn, the player gets to take five Actions with their units. During the first few turns the player will have to place all 20 of their Defender Units onto the board into various combat positions before they can begin moving the Units out of The Cellar and onto the board. The Units in The Cellar are French prisoners that provide a leadership bonus to Defender Units and also take certain Special Actions such as Boratra’s Escape Action which will shorten the game improving the chances that the Defenders will hold out and win the game.

When any Action is taken with a Defender Unit the player will place an Action Token on that Unit to remind them that this unit has taken their one allowed Action for this turn and cannot take another Action until they are refreshed.
There are several basic Actions that will exhaust a Defender Unit when they are taken and include Attack, Suppress, Move to a new Location and a few Special Actions. We will take a look at a few of these basic Actions in this post followed by a look at the Special Actions.
Attack
If you remember in our first Action Point we discussed some key concepts that are important to remember when taking an Attack. Namely the concept of Line of Sight which means an Attacking Unit is located in a combat position of the same color as it’s intended target. A Defender Unit located in a Green combat position cannot Attack an SS Unit located in a Red Circle.
Once you have checked this concept of Line of Sight you will declare which Defender Unit that is taking the Attack Action and also the SS Unit it is firing at. In the picture below we are taking the Attack Action with the Rifleman Defender Unit located in the South Terrace in the furthest left combat position which is both Red and Green. The target is declared as the SS Rifleman Unit located in the large Green Circle. The Rifleman Defender Unit can target a Unit in either a Red or Green Circle as the combat position is colored both Red and Green.
The Attacking Unit simply rolls 1d6 as it’s Attack Value (the first number in the upper right hand corner of the counter) is a 1 and is trying to roll equal to or greater than the target’s Defense Value which is the number shown on the SS counter in a shield.
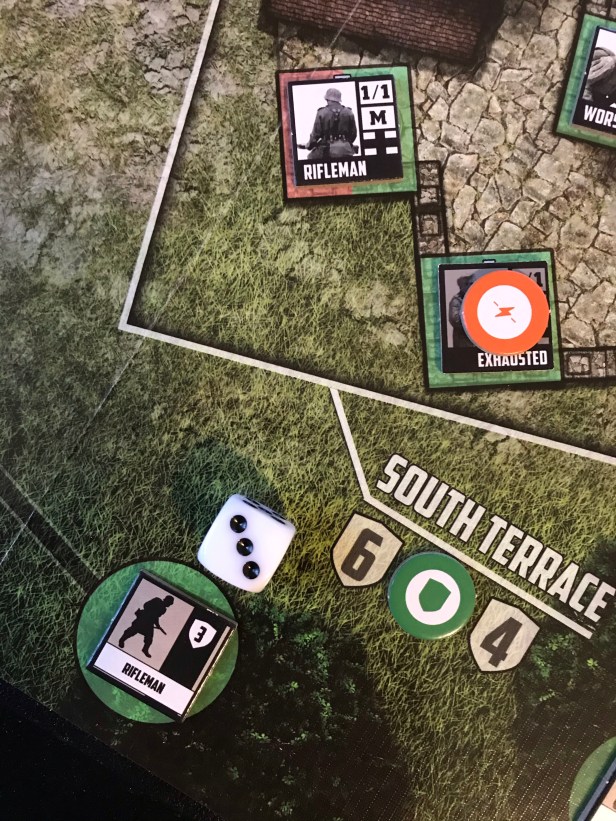
The roll is a 3 and is successful as it is equal to or greater then the target Unit’s Defense Value of 3. This successful Attack removes the SS Rifleman counter to the supply and the player then must Exhaust the attacking Unit by turning it’s counter over to the Exhausted side.
Suppress
When the Suppress Action is taken the player simply Exhausts a Defender Unit and then adds a number of suppression tokens equal to it’s Suppress Value to the suppress space on the game board that matches the color of the combat position where the Defender is located.
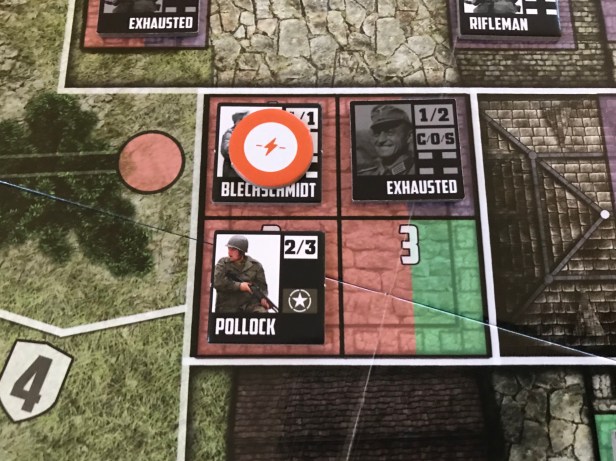
In the above picture, Pollock takes a Suppress Action by Exhausting the Unit counter and then placing 3 suppress tokens into the Red colored suppress space. Pollocks’ Suppress Value is shown on the counter in the upper right hand corner to the right of and after the back slash. Pollock has a Suppress Value of 3. If a Unit is located in a multi-colored combat position they can split their suppress tokens between either of the two matching suppress spaces.

These suppress tokens are then used later to Suppress an SS Unit that is being placed on the game board. To use the suppress tokens to attempt to Supress an SS Unit doesn’t require the use of an Action by the Unit and the player simply chooses the number of suppress tokens they will use, rolls a d6 for each expended suppress token and succeeds in keeping the SS Unit off the board if at least one of the results is equal to or greater than the target Unit’s Defense Value.

Move within a Location
Defender Units can move from one combat position in a Location to another combat position in the same Location as a free Action and can even switch positions with another Defender Unit. The important thing to remember is that only 1 Defender Unit can occupy a position at a time.

In our example picture above, Tanker Seiner wants to move to the 4 -6 combat position located in the Gatehouse because he wants to fire the M1919A4 Browning machine gun at an SS unit on an assault track. Because he is not Exhausted nor has a Disrupted token and because the Defender Rifleman Unit in the target position is also neither Exhausted nor has a Disrupted token this Action can be completed. The Units simply switch combat positions.
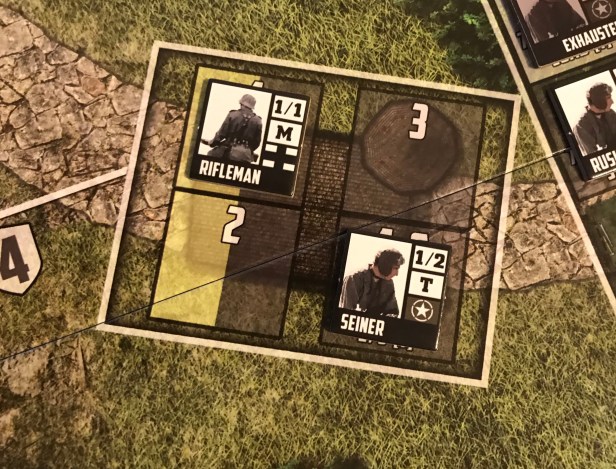
Tanker Seiner can now take another Action as the Move within a Location was a Free Action. He finds a target and begins the process of an Attack on an SS Unit.
Move to a New Location
By using an Action and Exhausting the Unit any Unit may move from one Location to another Location on the board. The rule of only one Unit per combat position still applies though. The position the Unit moves to doesn’t have to be adjacent but it will Exhaust the Unit.
Now let’s take a look at a few of the Special Actions and Attributes available.
Special Actions/Attributes
Special Actions are tied to specific Units that have various Special Action designations in the form of a capital letter in brackets on the Unit counters.
Command [C]
When a Defender uses the Command Special Action it can give three free immediate Recover Actions to Defender Units located in the same Location. This Recover Action will un-exhaust (flip the target Unit from it’s Exhausted or grayed out side to its ready side) or remove a Disrupt token from the Unit.

Command is a very important Action, probably the most important Action in your arsenal, and you must have your Units with the Command Special Action strategically spread out throughout the differing Locations in the castle in order to be able to maintain a consistent fire upon the advancing SS Units and to keep the Defender Units from being killed as you have to keep up with removing the Disrupt tokens. The Command Special Action cannot be used to Recover another Unit with the Command Special Action so you need to spread them out and carefully plan its use.
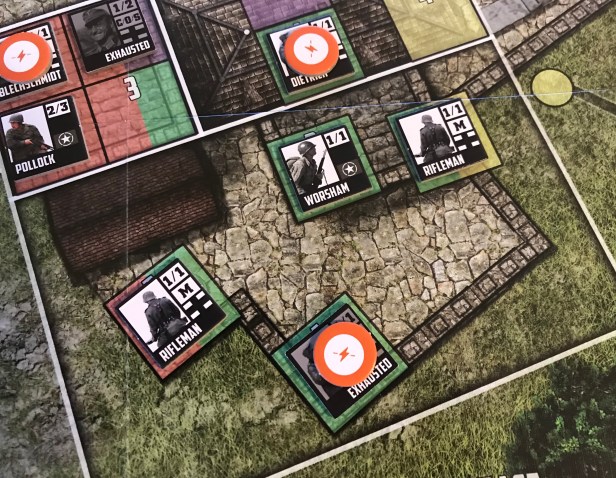
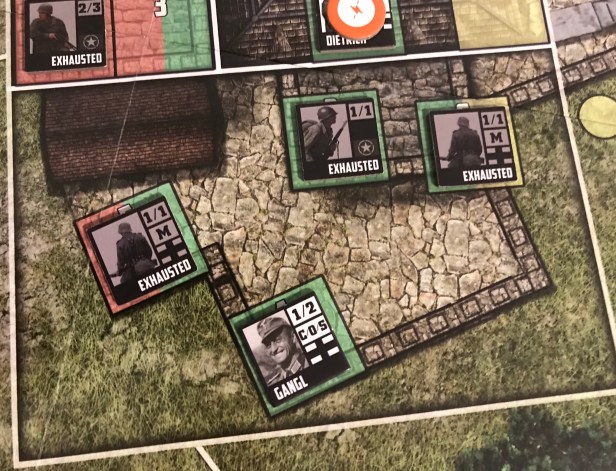
In the below picture you will see that the Command Special Action is on the Gangl Unit and he is currently located in the South Terrace with 3 other Defender Units who are all Exhausted. The Location boundaries are determined by the thick white lines outlining the area but don’t be confused by the colored combat positions because not all of the Green combat positions are in the same Location (they simply have the ability to Attack the same color on the SS Assault Tracks).
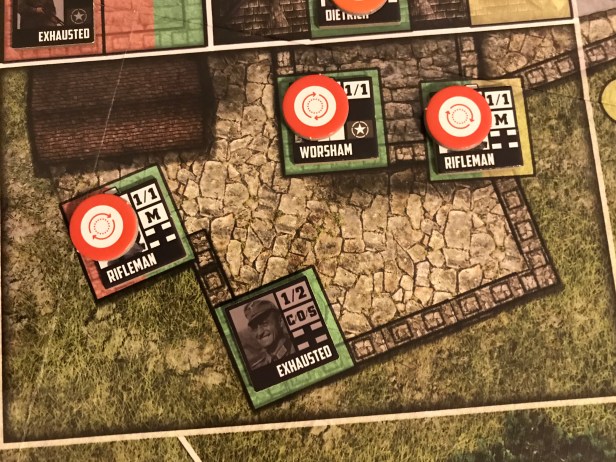
Gangl uses his Command Special Ability by Exhausting his own counter and then Recovering the 2 Rifleman and Worsham. Unfortunately, these Recovered Units are not able to take Actions this turn and will have an Action Marker placed on top of their counters to remind the player they cannot act this round. At the end of the turn, they will remove the markers and can take Actions as normal.
Escape [E]

The only Defender Unit that can take the Escape Special Action is Borotra. In order to take this Action, Borotra must begin his Action in a combat position that has no SS Counters in the corresponding colors on the SS assault tracks. The Escape Action cannot be taken from The Cellar or Great Hall but can be taken from the South or North Terrace, The Keep, Gate House or Besotten Jenny. Borotra must begin his turn in the appropriate location and cannot be Exhausted. Once these requirements are met you simply remove the Borotra Counter from the game.
So why do you try to do this Escape attempt? Because Borotra’s Escape brought reinforcements to the Castle to aid the Defenders in holding off the SS. When the Escape happens, you will shuffle the special 142nd Infantry Regiment into the SS Deck as follows:
- If in Deck 2 when the Escape occurs, mix the 142nd Infantry Regiment card into the bottom 9 cards of the SS deck.
- If in Deck 3 when the Escape occurs, mix the 142nd Infantry Regiment card into the bottom 6 cards of the SS deck.
- If in Deck 4 when the Escape occurs, mix the 142nd Infantry Regiment card into the bottom 4 cards of the SS deck.
As you can see, if you can get the Escape completed early you can knock off a possible full 3 rounds as you are drawing 3 SS cards each round. This means you dont have to survive longer and near the end the game gets really hairy as the Deck 4 cards are brutal, placing up to 3 Rifleman Counters or 2 Sturm Counters. Even if you accomplish this Action late, it will knock at least 1 turn off.
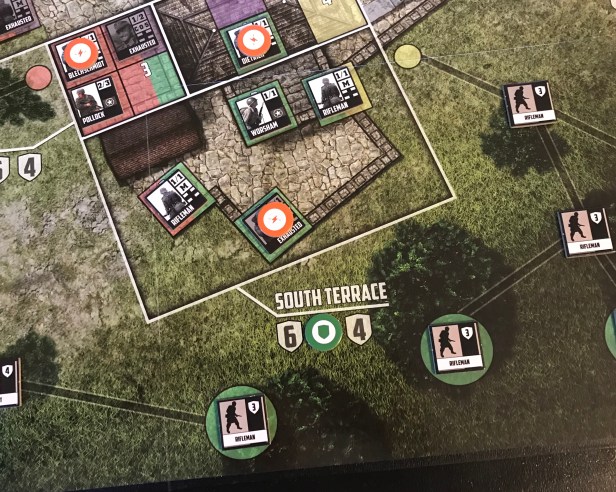
In the below picture you can see all of the 6 Green colored SS positions. They include the large initial placement circles numbered 2, 11 and 12 as well as three smaller circles to the right. Borotra is located in a Green combat position in the South Terrace and will attempt to Escape from there at the beginning of his turn. You will also notice that there are SS Counters located in the Green circles that correspond to the South Terrace and this is the first requirement for Borotra to make his Escape attempt. The second requirement is that he is not Exhausted. This is quite tricky as you will have to take at least 2 turns to meet all of the conditions of the requirements for the Escape as the other Units in the Location will have to pick off the SS Counters and Borotra must have moved to this Location or been Recovered from the previous turn.
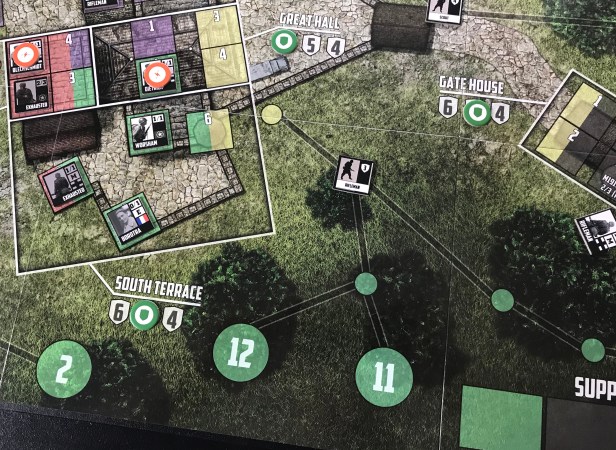
Once accomplished, the 142nd Infantry Regiment card, which ends the game immediately when drawn from the SS deck, is shuffled in based on the above mentioned schedule.

Inspire [I]

Four of the French prisoner Defender Units have the Inspire Attribute. These Attributes are not considered Actions but are always in effect while they are in play and meet their conditions. A Defender Unit with the Inspire Attribute provides an additional die to any Defender in the same location that is taking the Attack Action, but this is not all. It is like a 2 for 1 thing as the Defender Unit with the Inspire Attribute also provides an extra Suppression token to any Defender in the same location that is taking the Suppress Action. To grant these special benefits, the Defender Unit with the Inspire Attribute cannot be Exhausted nor can they have a Disrupted token.

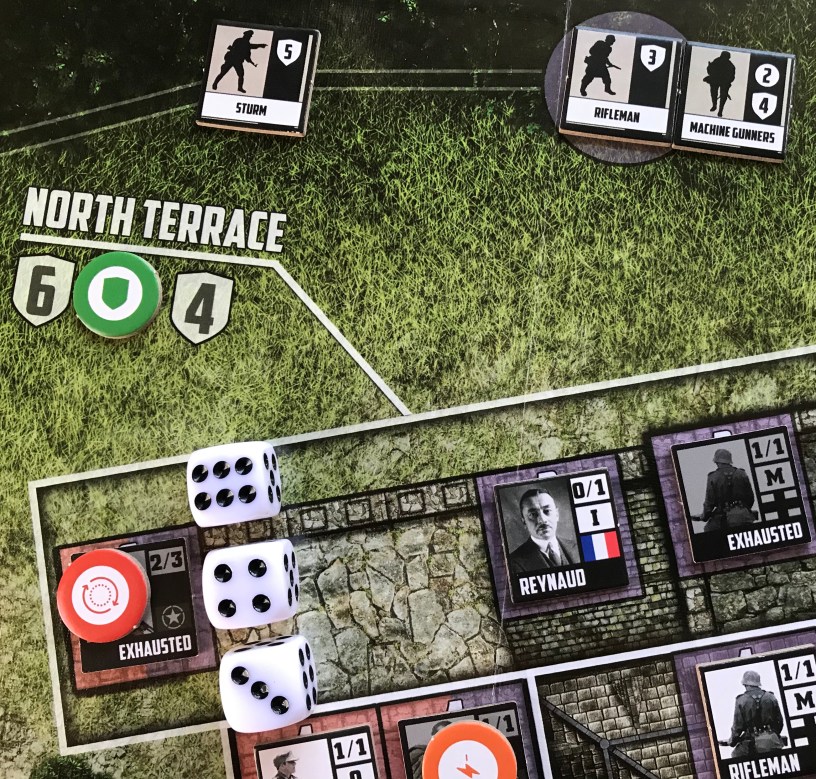
In the picture above, the Pollock Defender Unit decides to Attack the Sturm SS Unit from the North Terrace. Pollock has Line of Sight as they are located in a dual Red/Purple combat position and will be rolling 2d6 for their Attack Value plus an additional 1d6 for the Inspire Attribute bonus offered by Reynaud who is located in the same North Terrace Location. The extra dice helped as Pollock needed to roll a 5 or higher on the dice to hit and remove the Sturm SS Counter.
Low Morale [M]

The five Rifleman Defender Units all have the Low Morale Attribute. This one is not a benefit but more of a detriment and if you don’t pay attention to it or plan, you will find that you are losing your forces at an alarming rate. Any time a Defender
Unit that is in the same location as a Defender Unit with the Low Morale attribute becomes a
casualty, the Defender with the Low Morale attribute will also removed from the game
board and treated as a casualty. Don’t worry thought as there is a way to prevent this from happening.
Wehrmacht Officer [O]

Five of the Defender Units have the Wehrmacht Officer Attribute. When a Defender Unit with the
Wehrmacht Officer Attribute is in the same Location as a Rifleman Unit with the Low Morale
[M] attribute, you will get to ignore the effects of the Low Morale attribute. Pretty simple but a lifesaver and you must try to spread these Officers out to keep your Rifleman from breaking. This is one of the key strategies that we will discuss in our upcoming last Action Point.
Reinforcements [R]

Three of the Defender Units have the Reinforcements Attribute. These three Defenders
should be kept separate from the other Defenders at the beginning of the game as they are not allowed to used used until later when
the SS Card entitled “Reinforcements” is revealed. Once the card is revealed, the three Defenders with the Reinforcements Attribute are placed in the Defenders supply and are available to be placed on the board in various combat positions to fill holes as you lose Units and the SS Counters begin to build and put the pressure on.
Sacrifice [S]

One Attribute that I have not used that often in the game is the Sacrifice Attribute. Only one of the Defender Units (Gangl) has the Sacrifice Attribute. If Gangl is in the same Location as a French Defender Unit with the Inspire Attribute, and the French Defender Unit would become a casualty for any reason, you can remove Gangl from the game instead and ignore the effect on the French Defender. Why exactly would you sacrifice one of your Units that has the Command Special Ability to save a French Unit? Well, it comes down to scoring. At the end of the game you will receive 3 Victory Points for each French Unit that is on the board and not located in The Cellar. Gangl will only score 1 VP at the end so if you can save a French Unit you will gain a +2 net VP.
Tank Crew [T]

Six of the Defender Units have the Tank Crew Attribute. These Defender Units can make use
of the five special combat positions on the game board marked with [T]. Four of the
combat positions are located in the Besotten Jenny Location, and the fifth one is in the Gate
House Location.
If you remember all the way back to our Action Point 1, you will remember that those positions have better Attack Value and better Suppress Value than the individual Tank Crew Units. Notice the Tank Crew Counter to the right (Rushford) where his Attack Value is a 1 and his Suppress Value is a 2. If Rushford is located in one of the special combat positions in the Gatehouse or Besotten Jenny, his values can become 2/3, 2/4 or 3/6. Use your Tank Crew Units to pour on the fire to Suppress the oncoming SS Counters.

The proper and efficient use of your Unit Actions and Attributes each turn is the crux of the game and you will get better with their use through trial and error. You cannot afford to waste your Actions and have to use the synergistic compliments of the different Units and their Attributes to ensure their Actions succeed.
In Action Point 4, the final entry in this series, we will take a look at some basic strategies and suggestions for your success through my experience with the game.
If you are interested we published an interview with the designer David Thompson on the blog during the Kickstarter campaign and you can read that at the following link: https://www.google.com/amp/s/theplayersaid.com/2018/11/05/interview-with-david-thompson-designer-of-castle-itter-the-strangest-battle-of-world-war-ii-from-dan-verssen-games-coming-soon-to-kickstarter/amp/
-Grant

Thanks so much for sharing this, Grant. And your pictures are GORGEOUS. 🙂
LikeLiked by 1 person