
Welcome to the latest installment of our Empire of the Sun introductory series. I’m hoping that this series can continue to be of value to newer [and even more experienced] players as they wrestle with the rule book. If this is your first landing with the series you can take a look at the first installment about the workings of Zones of Influence. For a more general look at the game I wrote an introductory review about one of GMT’s iconic juggernauts.
Empire of the Sun is a Card Driven Game [CDG] which has become an increasingly popular wargame format. CDGs can take the edge off daunting hex and chit games by adding card play, which feels like a more euro style mechanic. For me personally it’s through CDGs that I really got into wargaming, with titles such as Labyrinth: The War on Terror, Twilight Struggle, Wilderness War and recently 13 Days (Twilight Struggles baby brother). EotS uses a different take on the CDG format (a creation of Mark Herman, FYI) so we’ll be taking a closer look at the anatomy of a card, the differences from other CDGs and their various functions in Empire of the Sun.


Some obvious differences from other CDGs is that each player has their own deck of 84 cards that is fixed and only they can draw from [Ed – the box lists 86 Japenese cards but two of those are used only in the special ‘turn 1 variant’ and are never mixed into the deck]. What this means is that you won’t have a hand clogged up with enemy events, etc. that you’re freaking out trying to not play to your own disadvantage.

In this way Empire of the Sun feels very different, from the card management persepective at least. There’s not that damage mitigation aspect where you’ll be handing over things to the enemy just to squeak out a small offensive. But there is a form of tension in the cards that are dealt to you, because if you draw a hand of very few military events early, it can really change the type of strategy you have to employ in order to expand as the Japanese, or respond as the US (early on). So, let’s take a look at the card draw system and what the cards can do for us.
Initial Strategy Card Draw
This is something that comes up every time I play this game, and I’ve been asked about it by others, so I know it’s a point to hit on for us newer players! Most other games say draw X cards, and you do so, simple as that. Empire of the Sun has a more fluid drawing system, that reflects the state of the war and the resources available to you as military commander. So, the rules regarding drawing your hand are contained in section 12.0 Strategic Warfare of the rulebook. That’s right, your hand draw is 26 pages into a 52 page rulebook. That’s why you couldn’t find it! And don’t worry, you weren’t the only one.

So what is Stategic Warfare? Strategic Warfare represents the control and capacity to distribute and utilize resources for the war effort, this is reflected in the amount of cards available in the players’ hands. The Japanese player starts turn 2 (The normal campaign starting point in Jan 1942) with a hand draw of 7 cards. Before these cards are drawn, the Allied player makes a submarine attack die roll. The Allied player subtracts the game turn from the die roll, if the result is zero or less then the Japanese draw is reduced by one card. In all 1942 turns there is a +1 torpedo listed on the game turn track, this is a modifier to the Strategic Warfare roll just mentioned. It represents dud torpedoes used in the early Pacific campaign and basically ensures that the Japanese player will start with a strong number of cards. The Allied player starts turn 2 (the first turn of 1942) with 5 cards and two ‘passes’ which you will use during the course of the turn to strategically choose when to pass, instead of getting backloaded with huge offensives you cannot react to at the end of the turn when the Japanese player has more cards in the end. The American hand increses by one card per turn to a max of 7 cards, however will be reduced during the game due to the national surender of India, China, or Australia, as well as getting bogged down in the War in Europe. In mid 1944, the late game, US long range bombing units can potentially reduce the Japanese draw size too, but that’s a topic for a later article. Suffice it to say the bombers carry out bombing raids on Japanese Home Island industry from forward airbases, and this translates into less industrial strength or a smaller hand for the Japanese to work with.
Anatomy of a Card
Looking at the cards there will be a certain level of familiarity with other Herman-style CDGs; an Ops value in the top left hand corner, a title, an image and some kind of event or special action description. But there’s also a lot more to these cards that can sometimes be tricky to get the hang of. To start with, each card can be used in one of two general ways: As an Event Card, or as an Offensives Card. Employing the card as an Event invokes the majority of the text on the card and allows special rules breaking effects that are the historical backbone of the game. Using a card as just an Offensives Card means that you are in effect ignoring the special capabilites of the card and using it as more of a generic Operations value to do whatever it is you want to do within the regular confines of the game system.

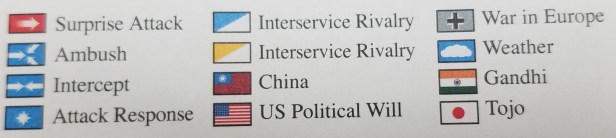
Empire of the Sun contains four different types of cards in each deck. Black military events, green resource cards, yellow political cards, and blue reaction cards [depicted above in Figure 1]. We’ll cover the functionality and purpose of each type individually later, but let’s take a look at what’s printed on each card, and what everything means.

Figure 2 shows a pretty standard Military card, with a few red annotations. The coloured bar at the top varies based on the card type, and the number in the top right hand corner is just a numerical assignment that each card in the game has, for ease of reference in errata, etc.
(1) in the top left hand corner is the OC value. Every card has a value listed from 1-3, and represents a few things. If using the card for the event only, the number is used as a multiplier for a units movement allowance. An example of this is that naval units moving normally have a base move of 5 hexes. If they are being activated using a 3 OC value card they can therefore move 15 hexes (5 x 3 = 15).If using the card as just a generic Offensives card, and ignoring the event, then the previous movement modifier still applies, however the OC value also dictates the base number of units that can be activated in that offensive. As a side note you also add the HQs efficiency rating to this in order to calculate the total number of units that can be activated, so it is possible to conduct offensives with more than 3 units!
(2) & (3) are two different intelligence ratings. (2) is the intelligence rating when using the card as an Offensives card. (3) is the intelligence rating if using the Event on the card. These numbers are very important to consider when making more ‘risky’ attacks, because the higher these values are, the easier it is for the opposing player to roll under them and change the intelligence level and be able to pull in more defenders. Remember, lower numbers are preferable, but you’ll find that the much bigger and more powerful military cards have high intelligence values, because it’s really hard to sneak up on someone with a fleet of aircraft carriers!
(4) When using the card for the listed Event, the cards often come with activation stipulations. These tell you which HQs can be used to conduct that specific event, sometimes the cards say ‘any’ but mostly these parts keep a somewhat historical feel to the events being played. Often you won’t be doing the exact same thing that the card event did historically but you’ll feel like this is your version of this particular battle, which is a really great aspect of the game.
And finally (5) is the logistics value, used when playing the Event. The logistics value dictates the base number of units that can be activated by play of this Event. So for Western Force Conquest of Sumatra, the Japanese player can activate 5 units. In addition to this you can activate units equal to the logistics value of the HQ that was used to conduct the offensive. So it’s possible to get 7 or 8 units into an offensive tearing across the Pacific which always feels great.
Other parts of the card are the awesome artwork, top notch as always, and then special rules or effects of the event which, again, are only activated by using the card for the event.
Types of Cards
The different types of Strategy Cards in Empire of the Sun all fulfill very different aspects of the game, but each can be integral to the success or failure of your campaign. So here’s a brief look at what the different cards do and some of their functions.

Military Cards (black) are the crux of your capacity to wage effective war in the Pacific. Mark Herman did a great job of adapting each historical event so that the restrictions on the HQ activation and what you could do with the activated units means that the offensives you conduct with those cards will often look, or feel like, or exactly represent the depicted battle. This is a really nice touch, and amazing that in such an open ended game this kind of historical (I wont say accuracy) but leaning is a feat of design.

Political Cards (yellow) usually represent people or important, non combat events that affect either the war effort indirectly, or the national status of one or more countries on the board. Each deck has a few War in Europe cards, which have a sliding scale of their effectiveness during the game for each side. Japanese ones have a stronger negative effect earlier in the war, and don’t do very much later in the game. Conversely US ones don’t do a lot in the early war but are much stronger at rectifying that track later in the war. The War in Europe dictates if Allied reinforcements are ‘delayed’ [diverted to the European Theater of Operations], it can also reduce the Allied card draw, as well as affecting the Political Will track if things get really bogged down in Europe. The other cards are ususally famous people, like Chiang Kai-shek, or Ghandi who alter the status of different countries and their political stability – either bringing them closer to national surrender or strengthening their infrastructures.

Resource Cards (green) contain valuable replacements and reinforcements amongst other things. Empire of the Sun is a model for the war in the Pacific and as such the US navy juggernaut pumps out more and better vessels throughout the game. On the other hand the Japanese player will find reinforcements and replacement points very hard to come by, as their strategic resources are starved during the collapse of the empire. With that in mind, these cards are unbelievably valuable for the Japanese player, and can extend the longevity for those elite prewar units. Drawing these cards later in the game when there’s a lot of depletion across the board can really bolster key positions. You will almost never want to use these for anything other than the event (especially playing as Japan, the US has a bit more freedom with these cards due to their reinforcement numbers and replacement points).

Reaction Cards (blue) are played when your opponent is conducting offensives, or is the phasing player. They are used to interrupt offensives, or as above, to change the intelligence levels, or to hamper the enemy in other ways. Some reaction cards are full counter attack offensives that allow you to bring units into combat and outflank the enemy. As a rule, Reaction Cards used as reaction event cards allow you to draw a strategy card to replace it, so you don’t end up with a card deficit. Knowing this is very important, because that should tell you that using them as Reaction Cards for the events is very important. Generally they have lower OC values, so they do you little good as Offensives Cards, so use them, even if they seem under powered, or almost a waste, because it’s basically a free action in between your own offensives turns, that allows you to refill your hand with potentially stronger cards.
Future Offensives Cards
This special rule enables you to hold a card over until a later portion of the game, as well as potentially stealing the initiative. You can play a card face down as your action, and then on a subsequent turn you can use that card for whatever it is. A simple sacrifice of cards now for cards later. If a player who does not hold the initiative (fewer cards in initial card draw) wishes to go first they can do so only by playing their card that was saved from an earlier turn specifically as an Event Card Offensive, so hopefully you saved a good one to catch the enemy off balance.

This is mostly important when you have have a great card, that you cannot or at least cannot most effectively utilize. For example, a military event that activates an HQ to perform a huge offensive, that is currently out of supply. I can save that card and spend some time getting that HQ back into supply in order to use that card later.

Miscellaneous Strategy Card tips

A couple of other points when considering your strategy cards in Empire of the Sun: There’s a set of icons underneath the OC value of most cards, although some do not have it. These icons don’t perform an in-game function, but are used as an easy reference for the kind of event that the card is. Figure 5 is a key for those icons that can also be found in the rulebook.
With the decks as big as they are it’s rare that you’ll get through them and have to reshuffle. So with that in mind, don’t waste Events by using them as Offensive Cards, ignoring the event, thinking that it’ll come up later, because in reality they won’t. Many of the events say to ‘remove from play if used as an event’, which you should really be doing as much as possible – especially for military events (the war won’t fight itself). That being said, there will be times enough where you will have a tough hand and you’ll need to use some events as generic Offensives in order to fulfill your goals, but once a card is out of your hand, you can almost guarantee you’ll never see it again.
Example Japanese Opening Hand
So let’s take a look at an opening hand for the Japanese. The onus is on them to ‘do something’, to go out and conquer resources. For new players this can seem daunting because there’s a lot you can do, and there’s a lot you need to do by 1943 in order to have a chance in the game. I know during my first play I looked at my cards and the board and thought to myself “what am I even looking at?”

The Japanese player draws the 7 cards found in Figure 6 above, to start their first turn of 1942 with. Overall a decent hand, that has some good military events, and also allows the Japanese to start making headway in other aspects of the game. Initially, we need to take stock of those 3 big Military cards. The East Force card is perfect for turn 2, because it allows not only a big Event Offensive, but drops paratroops into the Dutch East Indies (DEI) in order to eliminate a Dutch unit and capture one of those all important resource spaces. Operation KA is a good strong Event that allows many units to activate, but actively hinders US aircraft carriers, so we’ll look to capitalize on that and draw the US carriers into combat to try and damage them. Naval Battle of Guadalcanal has some very specific situational contingencies that may not always be able to be utilized, but having a base 5 logistics value with the Event means we’ll be able to put together quite the offensive.

Taking a look at the other cards we’ll play the War in Europe card now, as it is at it’s most effective (it being 1942) moving the marker down 2 spaces (Figure 7). It’ll now be harder for the US to get their reinforcements immediately as many will be diverted to fighting against Hitler’s reich on the Western Front.
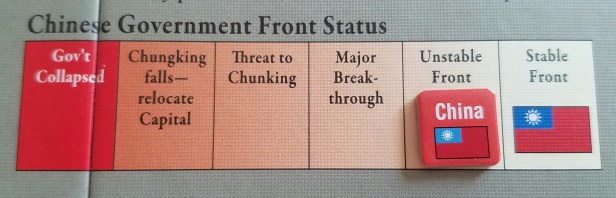
The Chang Kai-shek political card could be used for a small offensive, but we’ll try and make headway in taking down China. If we can get China into a bad situation by destabilizing their government then they will surrender, and in doing so reduce the US hand size by 1 in subsequent rounds. That’s going to take time, but we’ll start chipping away early in 1942 to try and get that done later in the game. Take a look at Figure 8, to see the China track.
In our starting hand we also have the Bridge on River Kwai event. Now this is one that we’re going to have to consider carefully. This event is extremely helpful in capturing Rangoon and securing a stronghold in the China Burma India (CBI) Theater. Due to the terrain through the jungles and brush it is very slow going with ground troops in the area, so opening up this railway will make the attacks more potent and sustainable. In order for the card text to be fulfilled however we’ll need to move troops into, and secure hexes 2108 and 2109 (Figure 9). To do this we’ll have to commit one of our other cards as an Offensives Card in order to do that.

Taking a look at what we have in our hand it might be pertinent to use the ‘Naval Battle of Guadalcanal’ (Figure 6) in order to not use either of the other two (in my opnion) more useful military cards. Using the card as an EC in order to bring a lot of units to bear near Rangoon, or using it as an OC to be more stealthy [only an OC:3 Intelligence value] and bring fewer units, we can try to secure those two hexes and employ the Bridge over the River Kwai event, to secure our path to that highly valuable resource hex.
Lastly we have that Reaction card, which will help us to counter any big offensives the Allied player initiates, we’ll intercept it, and then redraw a new card, giving us even more flexibility and things to play around with.
Okay, so that was a lot, but we got through it! Hopefully we’re all a bit more informed about how the Strategy cards in Empire of the Sun work, as well as their individual nuances. The cards can seem daunting when you have a new hand of 7, because they contain a lot of information and often have many exceptions to the written rules printed on them. But through careful thought, and most importantly a well laid out plan, you will be able to effectively use your cards to further your war efforts. If you enjoyed this entry, then watch out for the next in the series coming soon. You can always check out the Zones of Influence post as well as the brief introduction for this game if you want to learn more in the mean time!
-Alexander

Alexander,
Thank you so much for this series!
I have accidentally discovered, by working through Washington’s War and Fire In The Lake, that Herman is an extraordinary designer. After having read that Empire of the Sun is his magnum opus, I began looking into it…i’m not going to lie, the rules density scared me right off. So, for me, this is the perfect way to organically grow into learning the game. thank you so much for this.
Question driven by the Tactics Zones post: it would appear, to my inexperienced eye, that you spend an awful lot of time just counting hexes to establish distance from HQ, again and again, each turn for each chit. that seems like…a lot of work. does this bog things down?
thanks again, love this series!
LikeLiked by 1 person
Hi there! Thanks so much for reading. You seem to be in a very similar boat as me, in that the rules were very daunting at first! I plowed through them to get the just, and then started to play very slowly just to see the rules in action.
As to your question, the short answer is yes. You do spend a fair bit of time tracing hexes for supply and command, and counting out the ZOIs. Sadly there’s not really a way around this, but I can attest that the more you play the easier it comes to you. You’ll start to just intuitively know which units project ZOIs and you’ll “see” them in your minds eye. Another thing to consider is playing around in the vassal module, because you can toggle ZOIs on and off, which makes counting the hexes that much easier, so when you play the board game version that’ll be more comfortable.
LikeLike
excellent, thanks!
LikeLike
Actually the Vassal module comes to the rescue. If you right click the HQ unit and click SHOW AREA, it will show you how far the range of that HQ is….how neat is that? No more counting hexes. Also, you can toggle ZOIs on and off so you can see where your…and the enemy’s ….ZOI are.
LikeLike
Thanks for undertaking these tutorials on EoTS. I have owned it for quite a while now, but have yet to play a full game due to the initial overwhelming factor. I have to learn it and then try to teach others how to play if I am not going to play solo. Exciting stuff, thanks.
LikeLiked by 1 person
Ive always been too scared and intimidated by Empire of the Sun but your article definitely helps!
LikeLiked by 1 person