GMT’s Empire of the Sun is one of those games that always generates a lot of discussion. The game’s reputation is one of having a really steep learning curve, but being ultimately rewarding for those willing to put in the effort. The investment that has to go into learning such a game can often seem daunting and at times off putting for the uninitiated. I know when I sat down to read the rules book that I was quite intimidated just by the sheer size. So I’m going to try and put down some of the key concepts into easy, consumable pieces with lots of pictures to try and help those on the cusp of getting into the game feel a bit more confident and comfortable whilst playing this beast.
I can personally attest to the greatness of this game (you can read my introductory review to the game here). The sheer scale and open-endedness is something that elevates this game above so many others. Empire of the Sun is said to be Mark Herman’s masterpiece, and a masterpiece it surely is, but there’s some other games of his that you should check out if you’re feeling intimidated. No designer just pumps out the mechanics for a game like this over a weekend, rather there’s been years of experience brewing and culminating in this design. So, if you’re worried EotS is too much for you, go out and buy France 1944 – The Allied Crusade In Europe. It’s an older deign by Mark Herman but includes some very important mechanics that are built upon in EotS: Zones of Control, and the HQ activation system. Another game to check out is We The People, Mark Herman’s first Card Driven Game, where he birthed that system that has become so popular. You can become familiar with these mechanics in these less complex games, so that there will be some familiarity with them when you finally tackle Empire of the Sun, in which Herman culminated and refined these systems.
So, today’s discussion will be about the rules and concepts regarding Zones of Influence [hereafter referred to as ZOIs] because this is something that both makes the game and breaks the game [when you forget them]. New players often have a hard time with ZOIs because they are abstract and not marked on the board, you just have to know they’re there and visualize them. If it’s a real struggle for you, I recommend the Vassal Module because you can toggle them off and on as you learn and play around with them on there: a great tool.
What Is a Zone of Influence?
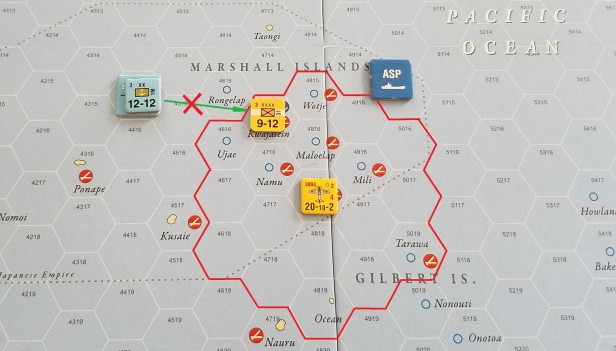
ZOIs are an area surrounding aircraft and aircraft carrier units that represents these units’ capacity to patrol and intercept enemies within their normal operating limits. In Empire of the Sun each and every air and carrier unit projects a 2-hex ZOI that has a number of game effects, some of which we’ll discuss here. Figure 1 below shows a few units on the board with their ZOIs marked. Again, that’s the hardest part of ZOIs is remembering and constantly looking for them and measuring them. I keep my air units and carriers on top of stacks so I don’t have to root through them in order to see if a stack even projects a ZOI.
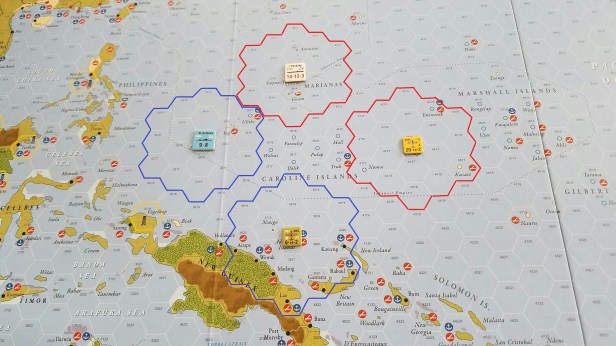
From Figure 1, the carrier Shokaku will move from hex 3813 down to hex 4019. As the carrier moves the ZOI moves with it, constantly being in effect. It does not turn off during the move and then activate again once finished moving. [NOTE – This is the case for strategic movement. During strategic movement aircraft and carriers do not project ZOIs, this represents a sacrifice of patrols and caution for the pragmatism of speed.] Having completed it’s move the Shokaku finds it’s ZOI overlapping with the ZOI of the allied air forces stationed at Admiralty Island (hex 3820). So what happens when opposing ZOIs overlap? For every hex in which opposing ZOIs overlap these hexes are ‘neutralized’ in terms of ZOIs.
The green area in Figure 2 shows the hexes in which the ZOIs are neutralized. This means that for almost all game purposes the ZOIs don’t cause negative impacts for the opposing player in those spaces. An example of which can be that now the shaded hexes can be used by units conducting strategic movement in subsequent move phases (but more about that later). This represents both sides running sorties and standing off from open conflict and therefore neither one side has air superiority.
How Can ZOIs be Utilized?
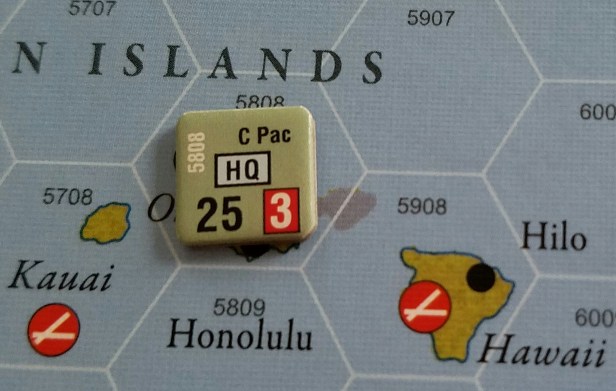
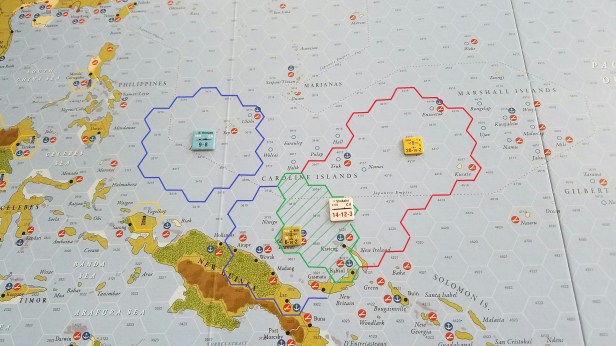
So why are ZOIs even in the game? What functions do they perform? What can I as a player do with them? There’s a lot of other questions surrounding ZOIs, especially for newer players, because ZOIs are so integral and have unique and manifold functions in Empire of the Sun. Now we’re going to take a look at activation paths. For a unit to be activated, by the play of a card it needs to be within the command range of the activating HQ. In this example, the activating HQ is the Allied Central Pacific HQ located in Oahu, hex 5808 (Figure 3). C Pac. has a command range of 25, printed in the bottom right hand corner of the chit. This signifies that for a unit to be activated by C Pac. it must be able to count no more than 25 unobstructed hexes between itself and the HQ. This trace does not have to be a straight line, and more often than not you’ll find yourself tracing around enemy un-neutalized ZOIs.
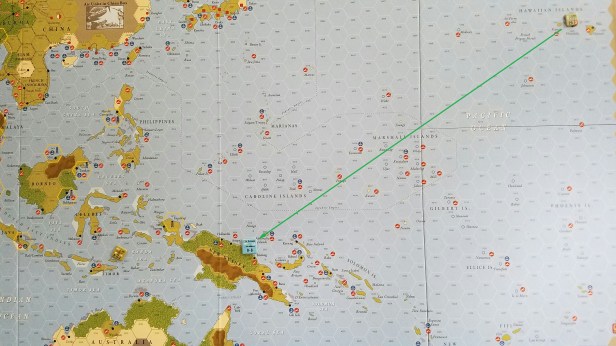
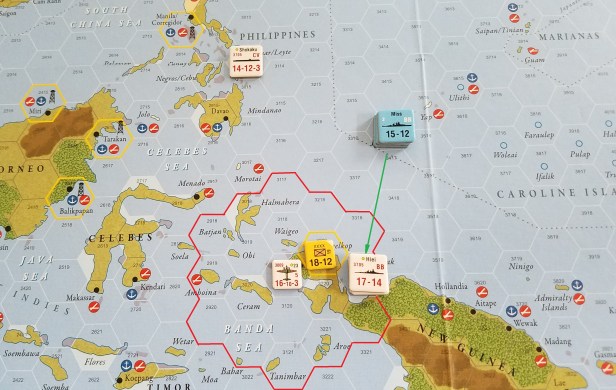
In Figure 4 The New Orleans, an American cruiser, is stationed on the coast of New Guinea in hex 3720. The New Orleans is 23 hexes away from Central Pacific HQ, which is within the command range and therefore is eligible to be activated and also is in full supply.
With careful positioning the Japanese player moves some units to try and catch the New Orleans out of supply and to prevent it from being activated. Each of the carrier and aircraft units project ZOIs (Figure 5), through which activation paths cannot be traced if they would be traced through an ‘all water’ hexside. From a quick glance at that map, that’s a majority of the play space, so positioning is very important in Empire of the Sun. With some astute moves you can cut off enemies, or force them into fighting battles that are on your terms.
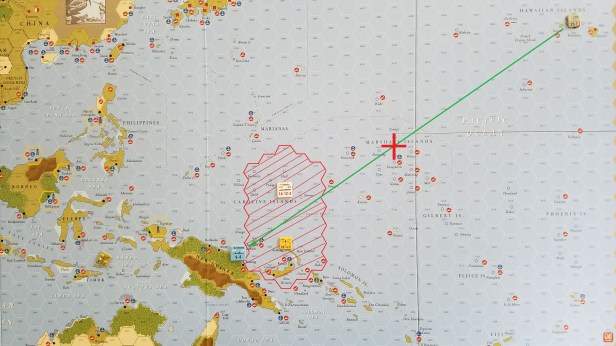
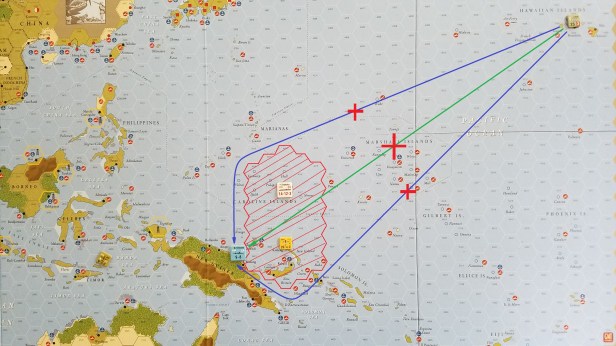
Because the ZOIs of the Japanese units project across hexes with all water hexsides, activation cannot be traced through these hexes, shown in Figure 5 [This simulates that Japanese units are jamming communications and intercepting orders]. The Allied player would have to trace an activation path circumventing the Japanese ZOIs in order to be able to activate the New Orleans. Unfortunately for the Allies, Figure 6 shows that the Japanese player was very astute in their placement as tracing around either side of the ZOIs creates an activation path that is longer than 25 hexes. This puts the Cruiser ‘out of range’ for purposes of being activated by C. Pac. HQ. Furthermore The New Orleans is now Out of Supply, which has other game effects including being potentially susceptible to attrition.
Zones of Influence represent the brand new type of warfare that was forged in the Pacific Theatre of operations. Never before had air naval combat been conducted on such large scales. Being able to master placement of ZOIs to block supply and activation paths, as well as neutralizing key enemy ZOIs that would hurt your strategies is something that is very rewarding in Empire of the Sun. With so many of the units on the map projecting ZOIs that board quickly can become a maze of enemy units to try and navigate effectively.
Rules to Remember – Other ZOI Implications
Zones of Influence have a number of other game effects, that are more simple to illustrate and understand, but that are often forgotten and overlooked. There’s a lot of rules to remember whilst playing this game, and these few are ones that new players are susceptible to passing over (which can have major implications for the balance and flow of a game).
Firstly, any un-neautralized enemy Zone of Influence will block a ground unit from amphibious assault. Figure 7 shows the US 1M marine division attempting to land at Kwajalein (hex 4715). This is an illegal move, because Kwajalein is under an un-neutralized Japanese Zone of Influence. This rule forces historically representative combat, in that you as a player have to conduct air/naval combat before landing troops, else your marines would be shot to pieces in their landing crafts by enemy Zeros.
Secondly, when conducting an offensive, if any activated units move into or out of an enemy ZOI then the enemy [referred to as the ‘reaction player’] will receive a +2 die roll modifier when attempting to change the intelligence level of the offensive. NOTE – This modifier is incurred even if the ZOI has been neautralized! This signifies enemy reconnaissance in these areas, even if they are contested with opposing ZOIs, it’s hard to sneak a battle ship through a dog fight! Figure 8 illustrates this, the allied stack containing the Mississippi moves to attack hex 3319 (Biak) because the stack moves into the ZOI of the Japanese 23rd Air Flotilla the Japanese player will receive a +2 modifier to the intelligence changing die roll.
Thirdly, units using Strategic movement may never enter enemy ZOIs. Units using strategic movement also do not project a ZOI whilst using strategic movement. This is the only case where this happens, units using regular movement have their ZOI constantly moving with them, affecting all hexes eligible as it moves.
And lastly, enemy ZOIs do not block command range, when determining the maintenance of reduced units for purposes of attrition. This seemingly odd exception to the rules represents High Command’s desire to keep reduced units from being lost to attrition and the daring supply missions that were conducted through hot waters to keep soldiers alive
So hopefully we’ve all learned something about Zones of Influence and that we can be a bit more comfortable at least with that aspect of the game. I know I’ve reinforced my personal knowledge of how things work just by writing this. If you have any questions feel free to ask away and I’ll do my best to answer them (eventually at least). Watch out for more of these entries in the series on our blog as we tackle other rules and concepts from Empire of the Sun.
-Alexander

Bravo! Fantastic! Wonderful! A small nitpick: in Figure 1 and 2 you have the allied cruiser CA New Orleans projecting a ZOI…. that’s not correct. I assume a carrier is underneath that counter 🙂
LikeLike
Haha, thanks for the spot, one of the older versions of that image slipped through the cracks! I’ll remedy over the w/e.
LikeLike
Thanks for these articles. They’ve inspired me to finally learn this game.
I have some questions about ZOI, supply, and strategy. If you’ll indulge, this imgur link (http://imgur.com/a/diyIU) will take you to the situation facing the Allies (using Erasmus) just prior to their first offensive at the start of Turn 2. The Japanese have just finished their first offensive using the VADM Kondo card (47) to successfully make the attacks depicted in Mark Herman’s 2008 “Japanese Opening Theory and Practice” article leaving the board in its current state.
Erasmus suggests the Allied player should evacuate the Phillipines if possible, else evacuate Singapore, else create ABDA.
My questions/thought process:
1. SW Pac HQ (2813) is OOS due to ZOI from Japanese air in 2812, right? No Phillipines evacuation, then.
2. Malaya HQ (2015) is in supply, though, right? The Japanese carrier ZOIs from the previous offensive moved away during PBM.
3. Assuming it is, Erasmus wants the Allies to evacuate the 8th Aus Div (2015) to Kendari (2719). This won’t work as Japanese air units have cut off that particular path starting at 2318, right?
4. More specifically: the Dutch air unit (in supply from Malaya HQ) neutralizes the ZOI at hexes 2118 and 2218, but can no longer do so southeast of that. Have I described the overall ZOI situation there correctly?
5. Is there any way for the Allied Erasmus player to evacuate the 8th Aus Div to Kendari (or anywhere else useful)?
Hopefully this isn’t too much info for one post, but I’d love to know if I’m on the right track, even generally speaking.
LikeLike
1] SW Pac is indeed OOS
2] Malaya is indeed in supply
3] Correct
3] Yes you have.
5] From what I can see on the board there you’ve placed your Japanese units very well. The Erasmus is limited in what it can due to the nature of it’s AI. The only thing I could think of, from what I can see, is that the Allies should have The Exeter up near India, that maybe could make it’s way down and use strategic transport to pull the units away, but that’d require an investment of cards and time. There’s probably more optimal things that the Allies ‘would’ do [leave them to make a concerted defense whilst waiting for Indian units to divert Japanese forces northwards], but again it’s a bot and cannot account for everything. And the reality is, historically Malaysia fell, so it’s not really surprising that the allies are in such a bad position.
But yes, the ZOI understanding is on point, and you’ve manipulated them well to a) keep SW Pac out of supply, and therefore those units subdued, and b) to keep Malaysia boxed in and with very limited options.
LikeLike
Thanks for the response! I’m vacillating between pulling the Australians into the CBI area or sending them to Tjilatjap to be a speedbump. If the AI does nothing else, I guess it helps illustrate the thought process of a competent opponent.
LikeLike
Hey bud,
Entering a ZOI during an offensive gives the reacting player a – 2 to their intelligence roll.
LikeLike
Alexander, thanks for these articles! You’re saving the game for me. I’ve been struggling with the rules, videos and player aids but this feels like the missing puzzle piece!
LikeLike