Over the past couple years, we have played a few venerated and respected series games from Multi-Man Publishing for the first time that frankly I had initially turned my nose up at for various reasons. These reasons were not really anything important or truly about the design or mechanics but included things like price, graphic design, style and somewhat because of the complexity and reputation of complexity of those systems. These series included first the Standard Combat Series (SCS) with our first game being Rostov ’41 and now the Battalion Combat Series (BCS) in a brand new game called Arracourt. I must admit here that I am actually embarrassed that I hadn’t played those series and readily admit that I just discounted and dismissed them out of hand. I am ready to make my restitution here though and admit my mistake.
First off, let’s talk about the Battalion Combat Series and what it is known for and how it goes about modeling conflicts. BCS is a system designed to model combat at the grand tactical scale from late World War I to the present day. The system has five published games including Last Blitzkrieg: Wacht am Rhein The Battle of the Bulge (2016), Baptism By Fire: The Battle of Kasserine (2017), Brazen Chariots: Battles for Tobruk, 1941 (2019), Panzers Last Stand: Battles for Budapest, 1945 (2021) and Arracourt (2022) and was created to in some ways fill the gap that existed between the operational and the tactical. In my limited experience, the system truly feels much like a smaller scale game, as it deals with various support units and stacking limits are enforced to just a few combat units. The system is fairly crunchy, meaning there are lots of DRM’s and combat modifiers, and attempts to model accurately combat and the importance of both supply on the one hand and command and control on the other. The hallmark of the system is that the games in the series are very playable. I am no expert but this system is made for the gamer while some of the others from MMP, such as OCS, appear to be more for the accurate modeling of warfare on an operational scale. Still playable, but maybe only after the gamer has gained experience with other systems to draw upon that knowledge to assist in digesting the more complex nuances. In this post, I would like to cover some of the basics of the system and deal with things like the way it handles supply, combat, combined arms, activation and air power. Overall, I was really impressed with BCS and enjoyed playing Arracourt very much. While we only played a 4-turn introductory scenario (The Battle of Arracourt), I learned a lot about the system from that play and after just a few turns, I felt comfortable in trying to do what the system was expecting me to do, which was not how I thought this would play and was thinking it would be a bit more of a slog.
Scale and Feeling of the Game
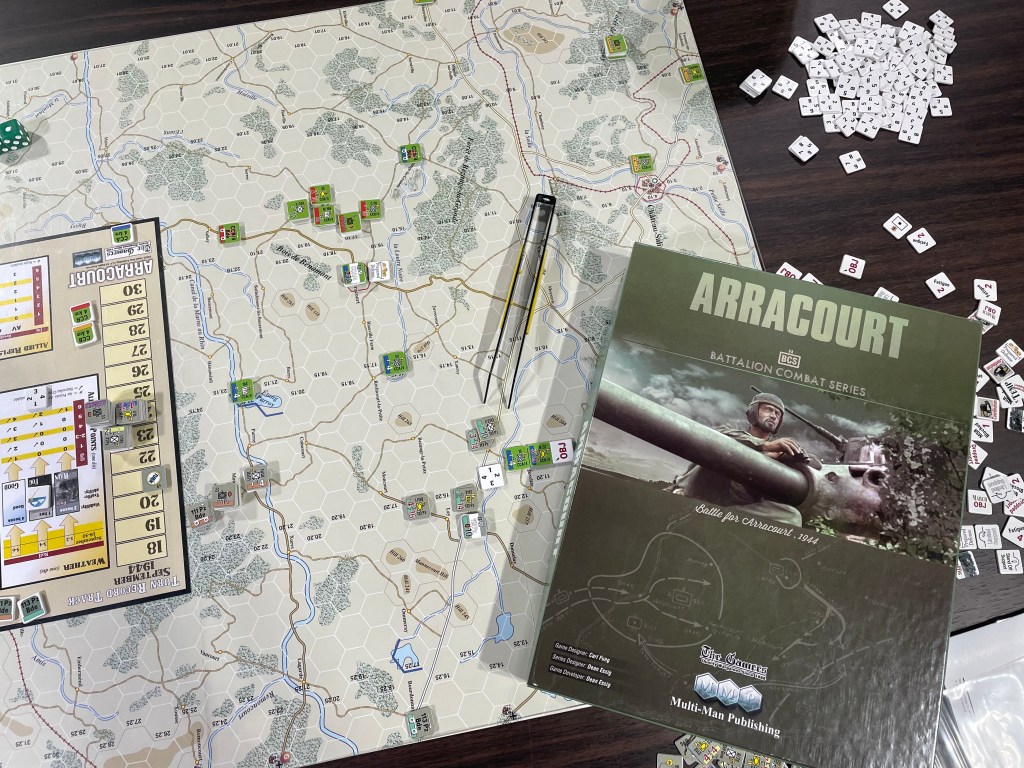
Arracourt is very straightforward even for someone who is a beginner and has no experience with the BCS system like me. The game comes with just one map and most of the scenarios included use only a specific portion of that map. This leads me to believe that Arracourt will serve as a very good entry point and starter kit to the series. Players can cut their teeth on this one while getting comfortable with the rules and system before they attempt one of the larger games in the series. I also feel that the game requires somewhat of a paradigm shift before playing. What I mean by that is really two fold.
First, I really feel that usually these big hex and counter wargames are set in their combat methods, namely focused on odds based Combat Results Tables and counting up combat factors to get the perfect odds, and require a bit of calculation. But BCS doesn’t use a traditional CRT (more on this a bit later) but breaks the combat down into more of a collection of DRM’s based on many factors.
Second, the game also has very low counter density, with the scenario we played having about 30 counters per side on the map at any given time, and stacking limits are just 2 combat units with other counters also allowed such as support units or HQ’s. There are not enough counters here to create the long contiguous line or wall of units that are typical in some of the larger systems, which lends this one to a bit more maneuvering of units to get into good position while using terrain to attempt to isolate and cut off units from supply or to prevent the enemy from doing the same to your units. This created somewhat of a back and forth dance for us that kept my focus and attention and was really quite entertaining. Supply is important to the system but not as focused on it as say the Operational Combat Series (OCS). The players must manage their HQ’s and their combat trains to keep their units in full supply and this becomes somewhat of a different type of dance that sees players cautiously keeping their units in a loose perimeter to prevent a freak breakthrough or run around to get to the back of the formations to take out supply sources and cut off units. I really liked the scale and feeling of this BCS system and had a very good time in trying to learn and understand it and also trying to figure out the best strategies to engage.
Really Interesting Counters
The counters included in BCS Arracourt are dual sided but the back side is not to show a reduced unit as is normal with these wargames. The front side is the unit’s move side while the back side is its deployed side. Each of these stances is very important and must be used by each player to get the most out of their units and to take it to their opponent.
Let’s take a closer look at a few examples of counters involved in the game. First off you will notice that the counters are pretty standard using NATO symbols to identify units type with various number listed on the top of the counter to include their Battalion, as well as whether they are a two step unit and have breakdown units that are held off map. The units have a colored band shown at the bottom of the counters that identify them as units of a certain formation which will be activated when their activation marker is chosen by the player. The 3 numbers printed on the bottom of the counter include from left to right Combat Factors, Action Rating and then Movement, which consists of three different values and two different types. The Red value shown on the armor and mechanized units to the left is the TAC (Tactical) movement, which is significantly better than other movements. White value movement (not shown in the picture below) represents leg unit movement and Black movement is truck movement. Truck movement can get 1/4 movement on primary roads so they can be used to get units up to the front quickly to react and fill holes or vulnerable spots on the front.

Another very important numeric value shown on the counters is their Action Rating, which is shown under the NATO symbol above the combat and movement values. This value represents such items as the unit’s leadership, training, morale, and other soft qualities. On some counters the Action Rating doesn’t change when the unit is flipped for movement or deployment. This value is compared against enemy units in combat and provides a DRM if the attacker is superior to the defender’s value. This rating is very important and we learned quickly to make sure our good units were leading our most important attacks. One other point of note, armor units typically have their Engagement Range increased when they flip from Movement to Deployed. This is a very specific armor on armor combat bonus. You will notice that the unit in the middle has a white arrow point upward. This is known as as an Attack symbol which identifies the units who bear it as the lead Attack-Capable unit. Only Attack Capable units can be the lead unit in a regular attack.
One other important aspect of the counters is the concept of a Combat Train, which is each of the Combat Commands’ mobile supply source that stretches back to the identified main supply source. In Arracourt, there are three Combat Commands of the US 4th Armored Division. These Combat Train counters are represented by an individual formation counter that has wheels shown on the bottom and then lists the Combat Command number. In our example below, you can see that this is Combat Command A’s (CCA) Combat Train. The placement of these Combat Trains is a very interesting and somewhat precarious part of the design that we really enjoyed. Each Combat Command can only place their Combat Trains in or adjacent to hexes of the various yellow highlighted roads shown on the map. Their resulting Main Supply Route or MSR must then follow along the highlighted road back to one of the two US Supply Sources shown on the map and identified in the specific scenario setup. No other pathways are available, either through lesser roads or paths or cross country, for the three 4th Armored Combat Commands. This requirement though is not as rigid for the Germans as they didn’t have the issues with supply that Patton’s command had as they raced across the French countryside to push the Germans back. In the Designer Notes, I read where this aspect was included because the Combat Commands of the 4th Armored Division start the game in the enemy’s backyard, with their logistics chain in a very tenuous situation, and they must protect it until reinforcements can arrive to secure the overall Allied position.

Overall, these counters were top notch and were really well designed to make them not only functional but a bit of an aesthetic upgrade over previous efforts from MMP as they used vibrant colors and a complimentary pallet to create a nice visual impression of the game.
The Concept of a “Blob” and What the Heck it Means?
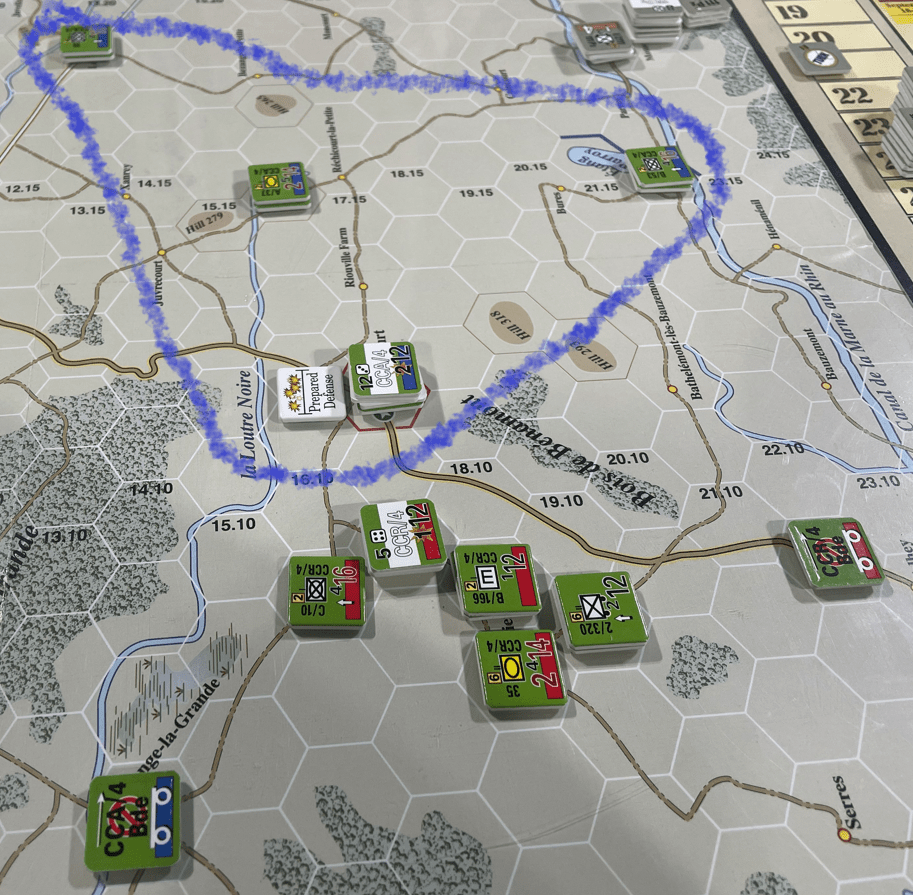
When we were setting up and covering the basics of the game, Alexander began explaining the concept of a Blob. When I first heard him read this I was really confused and asked him what he had just said. Block? Blog? What? He came back and said, you know…a Blob. Well, that was his best explanation as a Blob in the game is really just a weird way to refer to a unit’s area of unrestricted action in which it can operate normally as if in perfect command range of its Headquarters unit while also not coming into contact with friendly units from other formations. You know… a Blob! Each formation will have this Blob eyeballed around each of the units involved and will have this defined area of operations outlined, which is nothing more than an imaginary amorphous figure “drawn” in the mind of the player to identify how far apart each of the active units in a formation are. This imaginary area can be violated by other friendly formations, but this will cause a reduced efficiency to the entering unit when two or more formations become mixed in this way.
Let me show you a picture that I think perfectly shows this concept of a Blob. You can see the CCA4 units shown in roughly a triangular grouping with the HQ located on the bottom of the picture. Notice that the CCA4 Combat Train unit is not included in the Blob. This Blob doesn’t include any units from the CCR4 formation, which has a red formation band at the bottom of its unit counter. This perimeter needs to be kept free of other friendly units in order to have unfettered and unrestricted flow of communication and commands.
So what happens when formations become mixed by moving into another formation’s Blob? When mixed, the Formation will have a Coordination marker applied to each formation’s HQ. This Coordination marker then gives a negative DRM to that formation’s activation and SNAFU rolls (we haven’t discussed the SNAFU roll yet). This means that when trying to activate a second time after taking their initial action, they will get a -2 DRM for SNAFU. This mixing makes them less able to communicate with each other and causes confusion limiting their effectiveness in combat by not being able to coordinate actions because of mixed signals. We really liked this concept. It feels right that units at this scale moving into the same field of fire or area of operation would cause issues. I could see the commander looking out of his turret on the top of the tank and seeing movement off to his right from one of these mixed units from another formation and maybe getting confused about where his men are, how they should move to take advantage of the terrain and situation and even possibly causing confusion about that mixed unit being an enemy unit infiltrating their lines. This was a very cool concept and we enjoyed the Blobs very much!
Fatigue and Its Effects
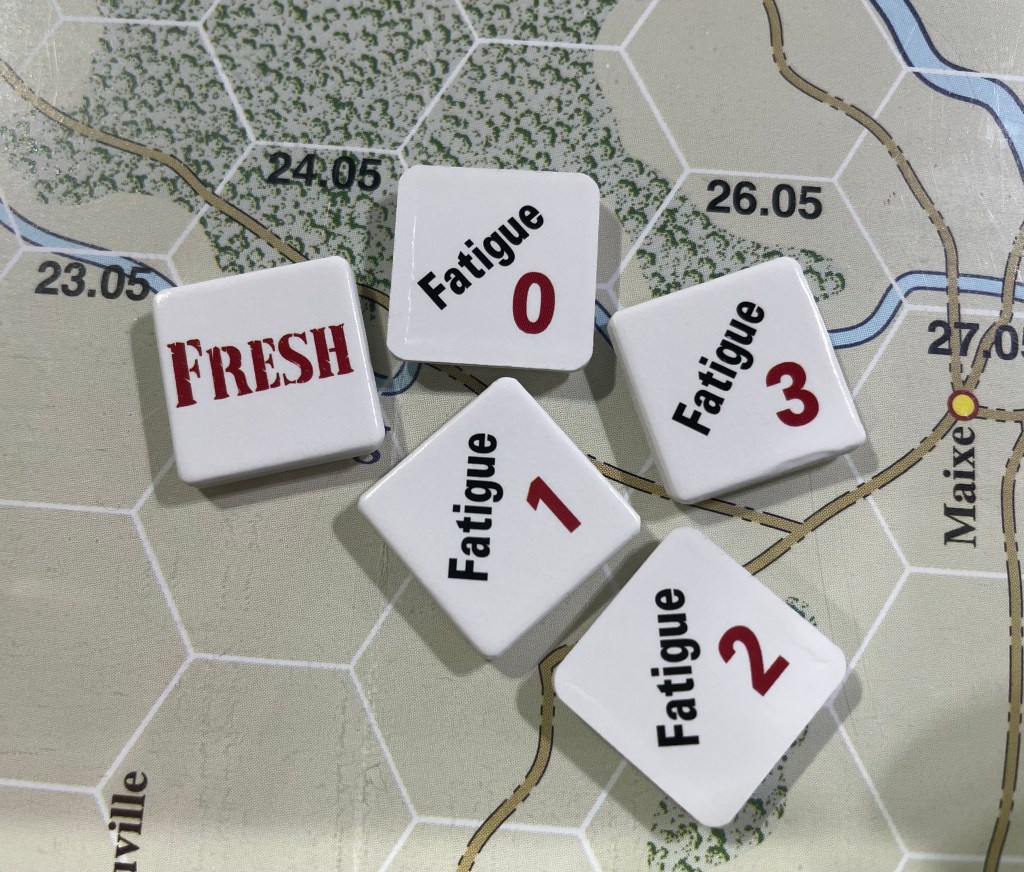
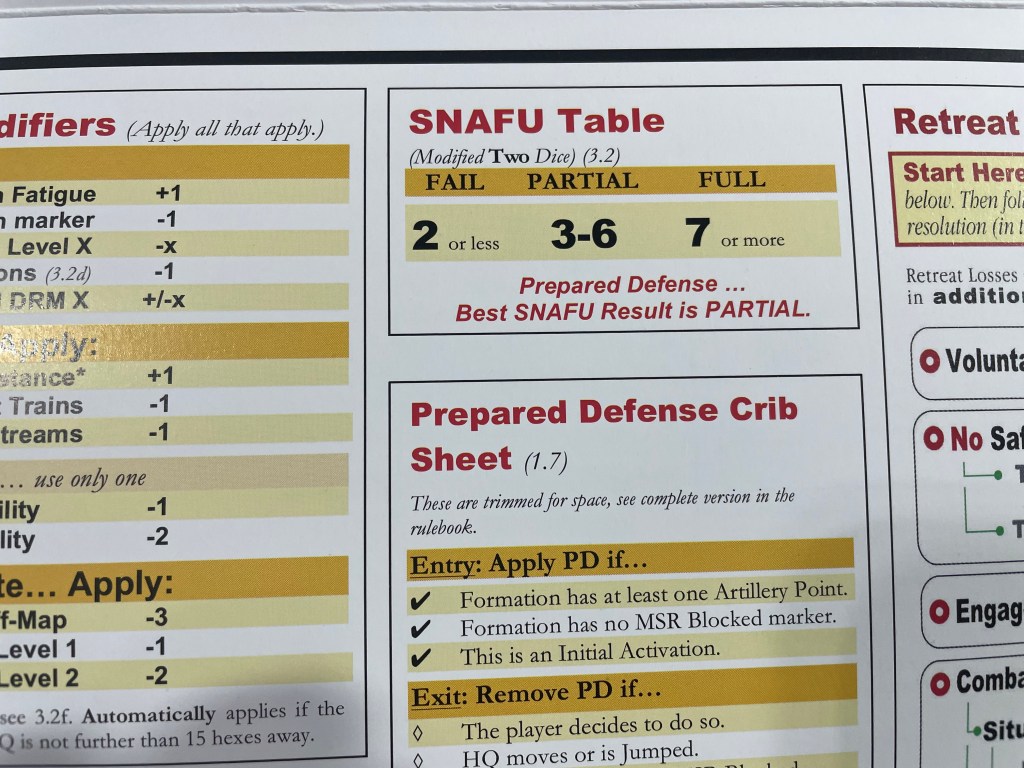
The really interesting thing about activation in the game was this concept of Fatigue. A formation will track its Fatigue Level with a set of numbered Fatigue markers. The Fatigue level will progress from Fresh through various Fatigue Levels including 0 (which is not considered Fresh), 1, 2, 3 and 4. Fatigue 0 is considered normal (but remember that this is not considered Fresh as Fresh is better than normal) while Fatigue 4 is considered to be exhausted. These Fatigue levels will affect the players SNAFU rolls and will equate to a negative DRM equal to its level. For example, Fatigue 2 is a -2 DRM. Fresh Fatigue gives a +1 DRM but don’t expect much help here as combat and even movement can wear your soldiers down effecting their coordination and cohesion resulting in the addition of a higher number Fatigue marker which will cause a much more difficult time in activating. This Fatigue is tracked by keeping the appropriate Fatigue level marker with the HQ counter so you know where you stand.
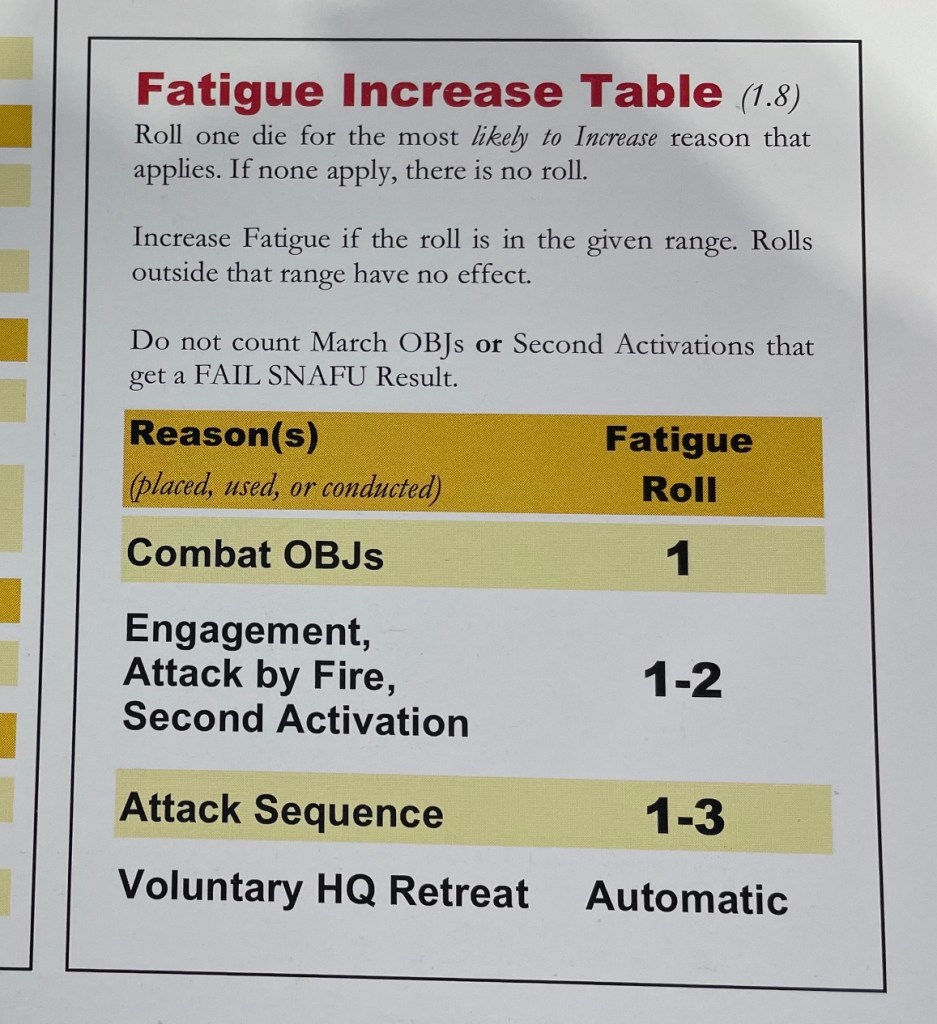
The way to increase Fatigue is interesting as it takes a roll of the die only when certain actions are taken. Each of these actions that can cause Fatigue to increase include placing an Objective Marker (which is like choosing what you are going to attack, barrage or to take control of Victory hexes), conducting any type of engagements or fire attacks, executing a second activation or a full or partial SNAFU. Basically, everything that a formation can do can cause Fatigue. You get to roll a die and consult the Fatigue Increase Table and this table is based upon what type of action you just took as to how likely it is that the result will cause additional Fatigue counters to be added to your HQ. I really liked this part of the system as it just felt really interesting and was a very unique way of handling this concept of battle weariness and effectiveness. As we know, as soldiers fight, they get wounded, run low on ammo, get tired and ultimately become combat ineffective and all commanders must monitor this and make sure that their forces are not pushed beyond their capability. When Fatigue gets too bad, the formation can simply commit to conducting a Fatigue Recovery action when it is activated. No roll needed. The player just reduces the fatigue number down one spot toward Fresh.
SNAFU Roll
What the heck is a SNAFU roll? I know I have mentioned it a couple of times but it really is a very bothersome but interesting part of this design. The expression SNAFU is a reference to a common sentiment and saying amongst enlisted men…situation normal all ***ed up. And in this game, this is an apt description of the situation as players will have to make a SNAFU roll when they activate to see how ready they are. The SNAFU roll reflects supply and other logistical concerns, which can include transportation, routing, march traffic control, and simple friction. A die roll on the SNAFU Table plus the application of a number of DRM’s listed below generates one of three SNAFU results including Full, Partial, or Fail. These define what can and cannot be done during the formations activation. The player will refer to the SNAFU Table Modifiers and get their total and then roll 2d6 hoping for a result that provides them with maximum activations.

The higher the rolled result the better as anything 7+ will result in full activation. Partial activation is a result of 3-6 and 2 or less is a fail which means the formation cannot activate this round. This doesn’t happen often on the initial activation for a formation but definitely becomes a factor on the 2nd activation roll after combat has been initiated and losses taken.
As mentioned, I like the SNAFU roll, although it can be really tough to not activate when you are so near to an objective or to being able to attack and destroy a stingy defender who has been holding out. I really love when a system does this kind of thing as it brings home to me the concept of command and control and how important it is in combat. An unobstructed line of communication, good supply routes and cohesive units lead to good results in combat and this SNAFU roll reinforces that element in this simulation.
Low Counter Density Leads to Maneuver
I know that a lot of you really love the dense and involved hex and counter games and love your stacks of units lined up in neat lines stretching across the board forming the front. I am not in that group and would much prefer a tight and low counter density game because of the reasons of playability. See my fingers are like small smoked sausage links and I have the finger dexterity of an elephant so playing around stacks of 4-10 counters really makes me nervous ad invariably I will lose grip on my tweezers or just brush up against a stack and cause pandemonium. For me, I really liked the lower counter density of Arracourt. I don’t know if each game in the series is like this but this was a very welcome situation for me as we were trying to learn and digest this new system. It just felt like the right amount of counters and markers to keep me engaged and interested while removing the problem of toppling large stacks.
The other benefit that I saw from this lower counter density was the concept of trying to scrape too little butter over a large piece of bread. There just never seemed to be enough counters at my disposal to truly cover the battlefield from all avenues of approach and angles and I really found myself searching the terrain and crossroads to select the perfect spots to intercept advancing German units as they moved on the victory hexes that I was tasked with defending. It really caused me to study the board and situation to find the weak or vulnerable parts of my defensive plan and look for ways to improve or back up those weaker areas with reserves or a second line of defense.
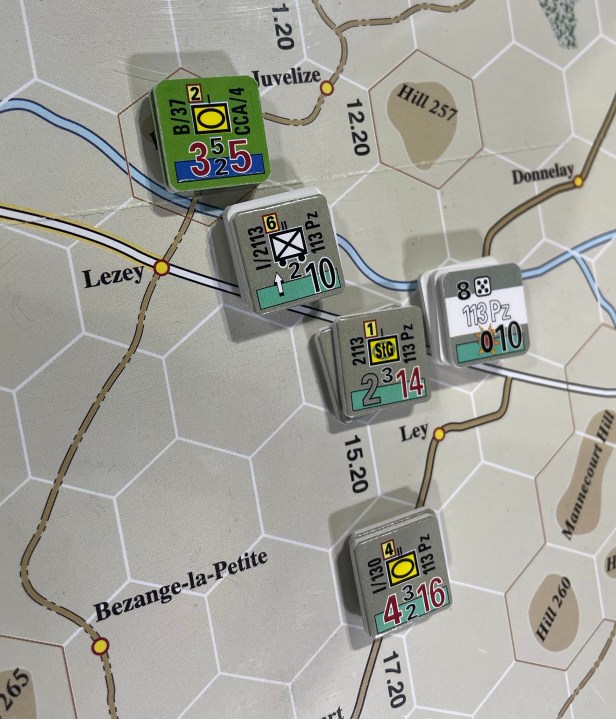
For example, in the picture to the right, I only had one good order armored unit in this sector and was being rushed by the 113th Panzer as they barreled down a major road toward Lezey. I studied that approach before activating my units and decided to place my unit on top of a hill hex where they would gain an advantage over the approaching enemies. Now, if you remember my discussion earlier about the Action Rating, you can see that I am better than the lead Panzer unit that has an Action Rating of 2 but the concept I am trying to explain here is the decision space that comes about because of lower counter density. I really enjoyed this exercise and learned a lot of lessons from our first play that I hope to apply in future plays of this game or in other games in the system as we recently purchased Baptism By Fire: The Battle of Kasserine and Brazen Chariots: Battles for Tobruk, 1941.
Nice Chrome with Bazooka Charlie
We all love chrome in our wargames. This chrome usually comes in the form of special units or significant leaders who had an important role in the historical battle. Well, Arracourt includes one of these heroes in the form of Bazooka Charlie. Lt. Col. Charles “Bazooka Charlie” Carpenter was an army observation pilot who armed his L-4H Grasshopper light observation aircraft with six bazookas. I cannot imagine how he was able to fly with those bazookas strapped to his wings, but he was credited with destroying several panzers flying over the Arracourt battlefield. He is represented in the game with a special Air Point available to the Allied player depending on the Allied Air Point Table. Bazooka Charlie has about the same game effect as other Allied Air Points in the game but he can only barrage enemy AV units and cannot suppress for any Attack. Just a really nice addition to the game that didn’t break anything, or give the Allies a huge advantage but added some historical interest from the battle that made me learn something that I didn’t already know.
There are a lot of additional parts of this game and series that I didn’t get to cover in this piece, but I wanted to give you my first impressions and identify the parts of the design that really spoke to me. This game was a real wargame. An enjoyable wargame at that. A game that used lots of familiar concepts, along with some that were new, such as the dreaded SNAFU roll, but created a game that was very playable yet meaty enough to fulfill my hunger for a good old fashioned hex and counter game. The combat was not odds based so that was also very different and it was really refreshing to be able to play a system that I feel wasn’t simply a clone of other successful systems out there but that attempted to try some new things and do them in a unique and interesting way.
Finally, I admit that me turning my nose up at some of these venerated and well established systems was not justified and I publicly proclaim here that I am through judging a wargame by its cover. There is still a lot to learn about this Battalion Combat Series and I hope to play other games in the system to compare and contrast them to share with you.
-Grant

Thanks Grant. I own Arracourt, Brazen Chariots and Panzers Last Stand, but have yet to get them to the table (too many games, too little time etc.). But I have read the rules and watched Tabletops Edge’s great Last Blitzkrieg playthrough and I can’t wait to finally get stuck into BCS. I think it is one of the most innovative hex and counter wargame designs for years. Reading books about the North Africa campaign you really get a sense of what happens when combat trains (B echelon they called them) got in the way or jumped by the enemy. Nearly all other games also just ignore mixing formations, which really caused chaos in the real world. Truly a great wargame design.
LikeLiked by 1 person
We will be playing more BCS along with SCS and our first ever OCS title (Smolensk) someday!
LikeLike
Thanks Grant! Great to see your coverage of what is quickly becoming my favorite wargame system. I too love the scale and the low counter density, and all of the innovation that’s gone into providing just the right amount of abstraction while preserving interesting decisions and emphasizing playability and fun. I hope you get to play (and cover) more BCS!
LikeLiked by 1 person
Thanks for reading Rich. More BCS to come in our near future!
LikeLike
Very good intro – needed this before deciding on games from MMP sale!
LikeLiked by 1 person
My favorite system now.
LikeLiked by 1 person
It is very good. Very different for sure but really playable.
LikeLike