Recently, Worthington Publishing released 3 games in their Great Sieges Series, one 2nd Printing (1759 Siege of Quebec) and two new games (414 BC Siege of Syracuse and 1565 Siege of Malta). Volume 2 in the series 414 BC Siege of Syracuse deals with the Athenian siege of the City of Syracuse in Sicily from 414-413 BC and is a 1-2 player game that is pretty interesting, with simple rules, a very unique order and counter order system that plays in about 30-45 minutes. To date, I have only payed the game solo so this Action Point will really take a look at this mode as opposed to the 2-player version that we have yet to play.
In Action Point 1, we covered the Map examining the different positions where troops and ships are placed and walls and counter walls may be built and their spatial relationship. In this Action Point, we will take a look at the available Orders for the Athenian player and how they are used.
Orders
In 414 BC Siege of Syracuse, in the solitaire game the player will take the role of the besieging Athenians and will attempt to destroy the morale of the defending Syracusans or build a wall blocking off the city from the outside world while also blockading the city from the sea in order to gain victory. To achieve this, the player has to use 1 of 7 Orders each turn to lay the groundwork for a successful siege and accomplish what they are trying to do. These Orders are listed in a very nice Field Orders Book (the Syracuse player for the 2-player game has an identical Field Orders Book) that doubles as a player aid with each of these Orders numbered. Let’s take a look at one of these Orders in order to give you an understanding of how they operate.
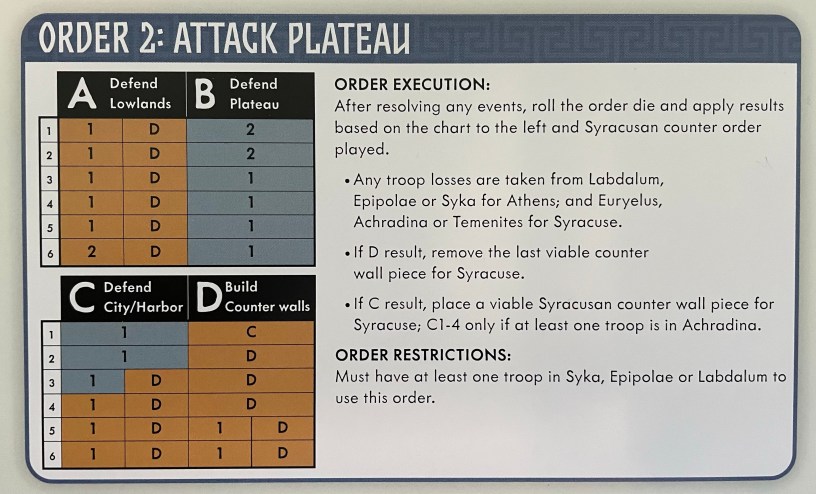
Below is a picture of Order 2: Attack Plateau. As you can see the below the title of the Order are 4 separate columns listed A-D with a title listed next to the letter. These columns are consulted based upon what Enemy Counter Order was played from the Counter Order Deck that turn. The player first chooses their Order and then reveals the next Enemy Counter Order Card to find out what event is going to happen and then refers to the bottom portion of that card to find the Counter Order letter. The player then simply refers to that column on the Order, rolls a die, making sure to add in any negative or positive DRM’s from events or from having troops in certain locations, and executes the determined result. This process is really simple and might seem somewhat random but it actually all works together really well. We will cover the Counter Order Cards in our next Action Point so I don’t want to go into too much detail here other than to share with you how these Orders work.

The other thing that is important to note on the Order is the Order Execution and the Order Restrictions sections. The Order Execution instructions usually instruct the player from what location on the Map they will take any of their own troop losses or Syracusan troop losses from and also any special results. In the Attack Plateau Order above, the letter C or D have a tie to the destruction of counter walls by the player or the inconvenient construction of counter walls by the Syracusan bot. The Order Restrictions simply state the requirements for this Order to be taken. Usually this refers to the availability of at least 1 troop block in a specific location or locations or a pre-requisite being completed such as having an undamaged ship to move or having completed the Lowland Wall prior to attempting to build the Plateau Wall.
Order Types
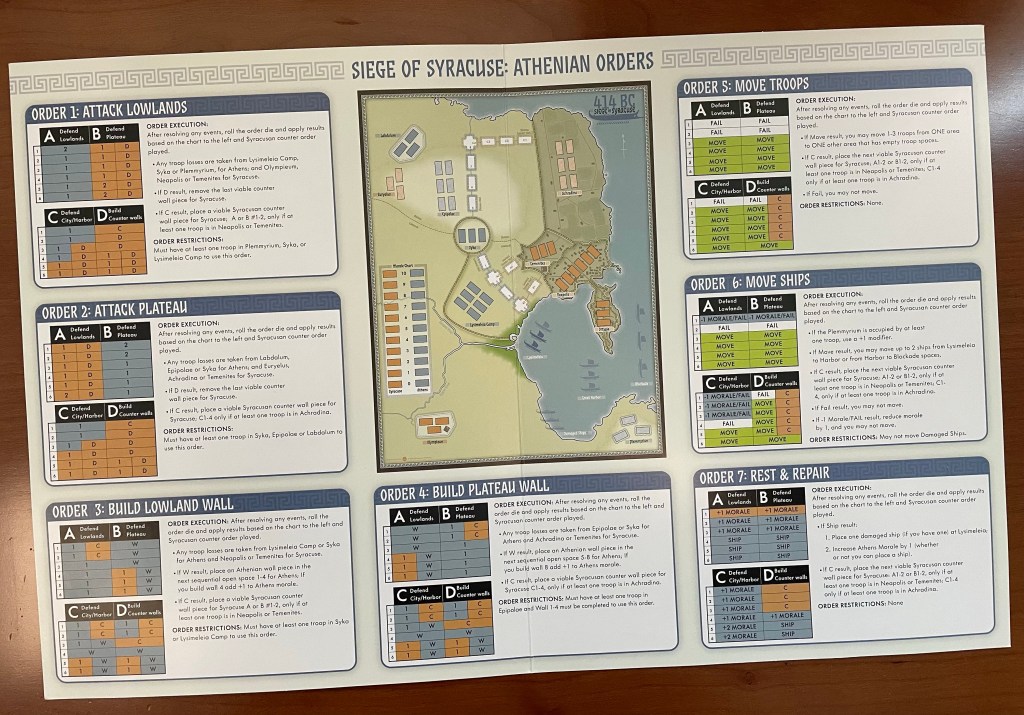
I would classify the Orders into 4 distinct categories or types. The first type is Attack, where the player sends out troops to harass and inflict casualties or Morale loss on the enemy. The second type is Build, where the player will attempt to build walls in an effort to finish the circumvallation wall around the city of Syracuse. These Build Orders can also inflict casualties and Morale loss on the enemy if the Counter Order chosen doesn’t match well and the die roll is favorable. The third type is Move, where the player will attempt to move their troops and ships around the map to get into position for various actions. The fourth and final type is a Rest & Repair Order, but it is really only used sparingly when things are going poorly for the player and they have lost lots of Morale or had several ships damaged. If you are using this Order often you will be losing and most likely the die is already cast as you just don’t have many opportunities for Orders.
Each of the types has a certain number of available Orders. There are 2 Attack Orders, one being to Attack the Lowlands and the other the Plateau areas of the board. There are also 2 Build Orders, the Lowland Wall and the Plateau Wall. There are 2 Move Orders, one moving troops and one ships. There is only the 1 Rest & Repair Order.
Let’s take a closer look at one Order of each of these types. First up, will be Attack.
Order 1: Attack Lowlands
Previously I already showed you Order 2: Attack Plateau so now let’s take a look at Attack Lowlands, which functions in the same way but is simply a different location on the Map.
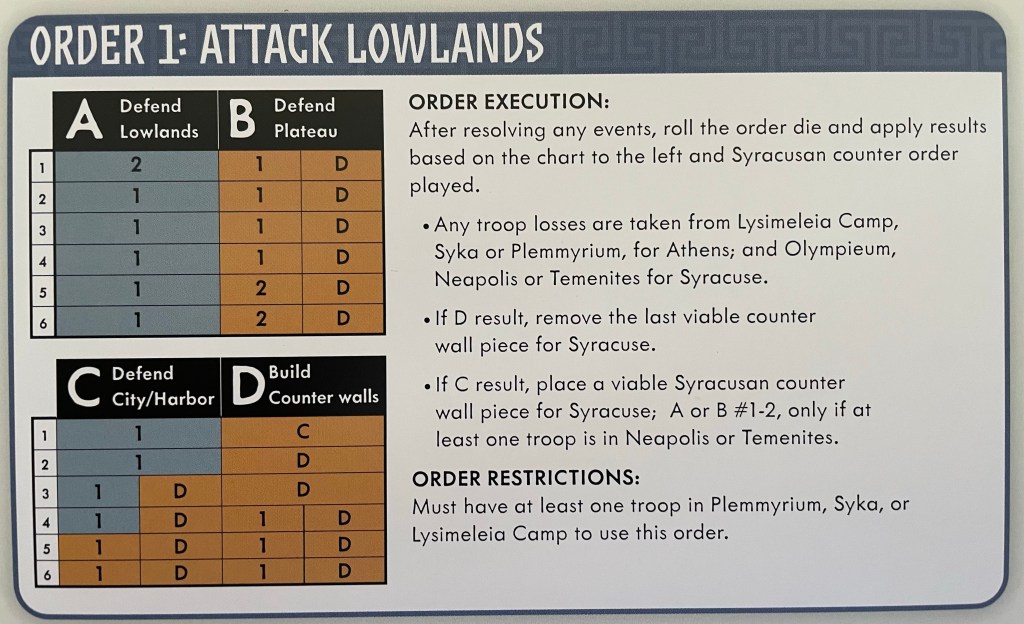
These 2 Attack Orders are ones that you will use often if you are going for a Morale win by driving the Syracusan Morale to 0 on the Morale Chart. This is a very viable strategy and I think can be a bit easier than trying to build the walls and set up the blockade. But, if you are attempting to build the full circumvallation wall around the city you will have counter walls built by the Syracuse bot and you will have to destroy them in order to continue progress on building your wall. Remember from the Last Action Point, when certain key spaces that intersect in the wall construction areas of the Map have had a Syracuse counter wall built, these spaces being A2, B2 or C4, the Athenian player may not build walls beyond those intersections until that counter wall is destroyed through the use of an Attack Order. So you will use these Attack Orders no matter which of the strategies you choose to chase.
Next up, let’s look at Build.
Order 3: Build Lowland Wall
There is nothing really fancy about any of these Orders but I really like the Build Orders as it really gives me a tangible goal that truly feels thematically like a siege. As the Athenians, I am trying to build and protect this wall so that I can starve the city of Syracuse into submission. And the Syracuse bot will not take this lying down as they will fight to build those counter walls to stop you in your tracks.
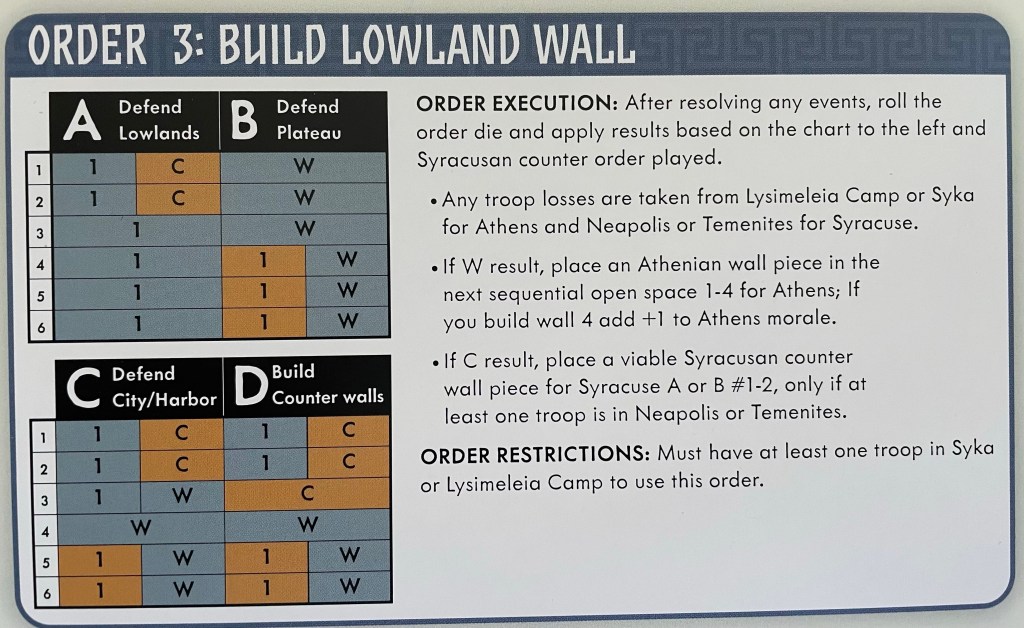
The Lowland Wall must be built first in order to start construction on the Plateau Wall so the player will always focus their initial efforts here. If you remember back to my 1st Action Point, we discussed the Athenians plan with this wall and the construction of various forts, including the Syka fort located in the middle of the map, that would anchor and allow this wall to be constructed. Therefore, in order to Build either of these walls the players must have at least 1 troop in the Syka or Lysimeleia Camp location to use these Orders.
Now let’s look at an imporant set of Orders that acts as the grease by which the seige machine moves in the Move Orders.
Order 5: Move Troops
As the Athenians, you will lose troops throughout the seige as you roll poorly or the solitaire bot chooses a Counter Order that doesn’t work well for you. It is simply a matter of fact! You also don’t have a glut of available spare troops so losing them is a big deal. But, when you lose them you will have to fill the holes so that you can continue to take the Orders that you need to. Remember, for most Orders you have to have at least 1 troop in certain locations. In order to Build Lowland Wall, you must have at least 1 troop in the Syka or Lysimeleia Camp location. In order to Build Plateau Wall, you must have at least 1 troop in the Epipolae location and you must have completed the Lowland Wall. What if you have no troop in Epipolae? Well, you cannot take the Build Plateau Wall Order then, you have to instead take the Move Troops Order to move at least 1 troop from another location to Epipolae. Pretty simple. But managing these troops and making sure you have resources where needed is important and this is the role of Move Troops.
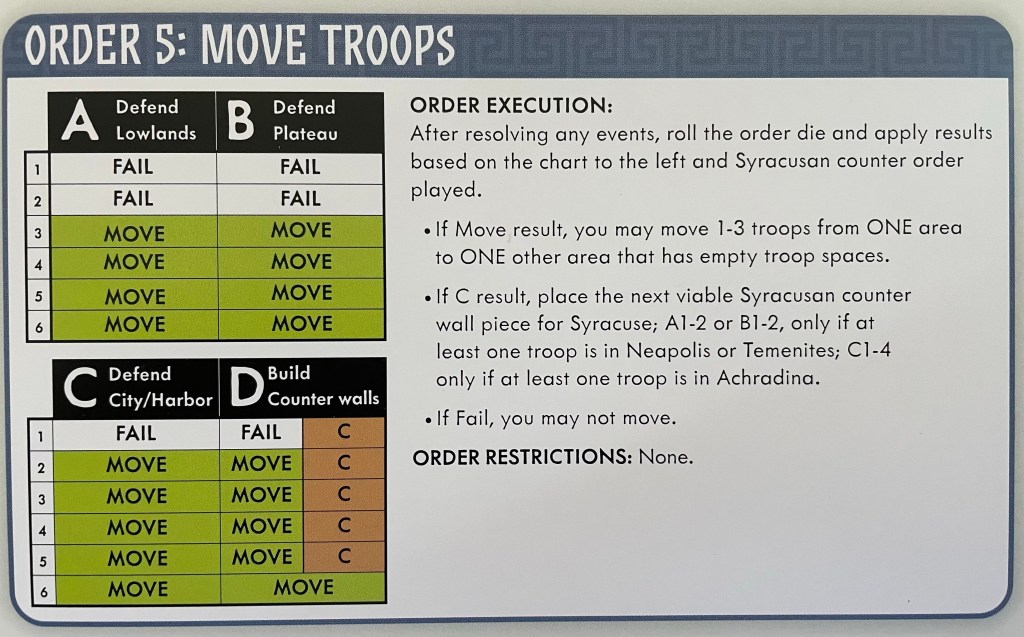
One difference in the results of the Move Troops or Move Ships Order is that you either Fail, which means you are not allowed to Move those troops or ships, or you roll a Move result which allows you to move troops or ships. You never lose any troops or Morale when you take this order. More often than not, you will be successful at Move as only on a roll of 1 (on the Defend City/Harbor or Build Counter Walls column) or a roll of 1-2 (on the Defend Lowlands or Defend Plateau column) is the Order a failure. But you will notice that is the solo bot has chosen Build Counter Walls, they will succeed in placing a counter wall on any roll but a 6. I like this as it is very thematic and shows how the focus on one Order, allows for another Order to be move effective. It is hard to stop your enemy from building a counter wall if your troops are busy moving and not fighting.
The final Order we will take a look at is one that can be a lifesaver but that is a two edged sword as if you have to resort to spending a scarce Order on it you are probably not doing very well. This is the Rest & Repair Order.
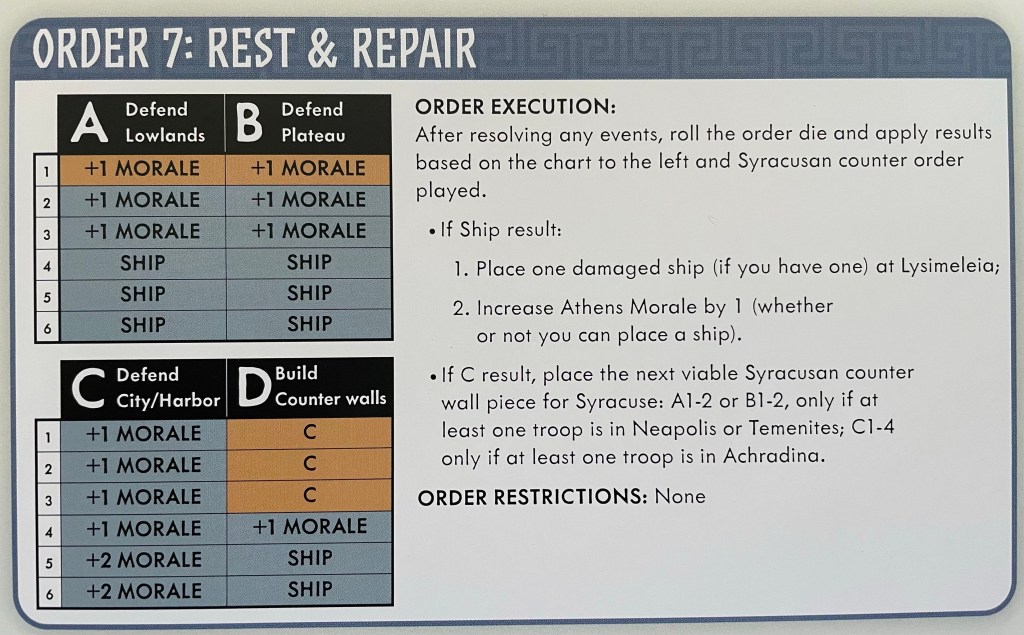
Order 7: Rest & Repair
The Rest & Repair Order has two purposes. One is to regain Morale if the player’s Morale is falling dangerously low. Remember, the Athenian automatically loses if their Morale ever drops to 0 on the Morale Chart. The second purpose is to repair a ship that has been damaged in the Great Harbor to allow it to be moved from the Damaged Ships location and placed back at the Lysimeleia to be sallied forth again to attempt to get into position to install the blockade.
The Order system in Siege of Syracuse is really pretty interesting and works very well for what the game is, namely a light solitaire wargame. The player always has access to their 7 available orders and can take them over and over again in any order that they choose. This is markedly different from the way Orders were handled in 1565 Siege of Malta as those Orders could be used once and were then lost to the player until they reset them by playing the final 7th order or using one of their scarce resources in their Aggressive Commander Actions that resets those Orders and makes them all available to the player. I really liked the ability to use and do whatever I wanted to. I know that there are some things that have to be done and are best done in a certain order, such as moving troops to the Plemmyriun because when troops occupy this section of the map, the Athenian player will gain a bonus to the Move Ships Order as this area could offer support to those movements. But freedom in this design gives it more of an open and sandbox type feel than others in the series and I really liked that. It also makes it a much simpler and less tactically deep game but not in a bad way. Just in the execution and not requiring such deep planning and thought about the order you takes these Orders in.
In Action Point 3, we will examine the Counter Order Deck for the Syracusan defenders and their structure and how they determine the column used for the die roll as well as the Athenian Leader cards that are included in the deck.
-Grant

I wonder if this “open” selection method (no need to refresh actions used) can be applied to Malta as well. What do you think?
Also, do you think Malta is missing a similar “rest” action?
LikeLike