
A few years ago, we did our first interview with a new designer named Kris Van Beurden covering the very interesting game called Europe in Turmoil: Prelude to The Great War from Compass Games. As you might know, as a part of our Guns of August Event, we got to play Europe in Turmoil and it was as good as I thought it might be when I did that interview.
You can check out our review at the following link:
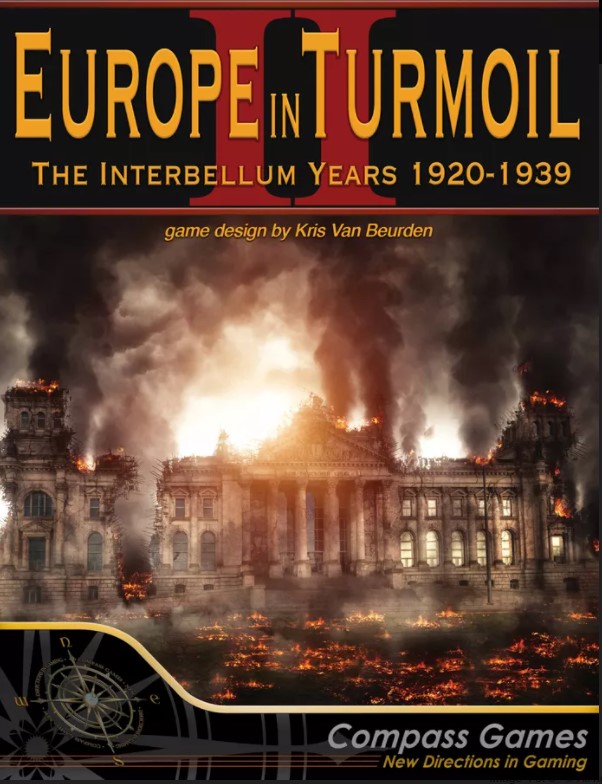
We then did an interview covering his next game called Barbarians at the Gates: The Decline and Fall of the Western Roman Empire 337 – 476 from Compass Games and it also looks really good. Recently, I saw where he was working on a follow-up effort to Europe in Turmoil called Europe in Turmoil II: The Interbellum Years 1920-1939 and reached out to Kris with some questions and he was more than willing to oblige me and here we are today.
*Please keep in mind that the artwork and layout of the component pictures used in this interview are not yet finalized and are only for playtest purposes at this point. Also, as this game is still in development, components and card details may still change prior to publication.
Grant: Why have you decided to take your Europe in Turmoil design into the Interbellum Years?
Kris: When I designed Europe in Turmoil I, it was more a question of when rather than if I was going to take it to the Interbellum Years. If Twilight Struggle is the history of the World after WWII and Europe in Turmoil I was the history of Europe (as much of the world as mattered before WWI) prior to WWI, then this is the game that bridges the gap between both.
Grant: What is the difference in the focus of this design as compared to Europe in Turmoil: Prelude to The Great War?
Kris: In all previous games in this series (and I guess in most games) there is one common dictum: Victory Points are good, and you can go to any length to get them. No extremum is too far to get VP’s.
In Europe in Turmoil II, this is not true anymore. There are reasons to not score points, or to delay scoring points, or to remain as close as possible to the 0 (or even on the opponent’s side of the VP track).
Grant: What elements from the history did you need to include in the design?
Kris: Important for me was to include the rise of Fascism and Nazism, the aloofness/isolation of the Soviet Union, the Civil War in Spain, the difference between Weimar Germany and Nazi Germany, disarmament and re-armament, the limitation of arms for Germany after Versailles, and the League of Nations (both its existence and its lack of resources and impact).
Grant: What sources did you consult and what one must read source would you recommend to anyone wanting to know more?
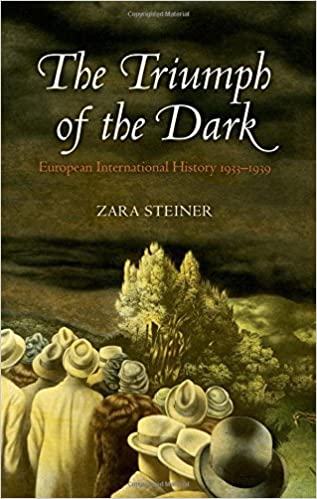
Kris: The one must-read source is undoubtedly The Lights That Failed and Triumph of the Dark by Zara Steiner (the first one pre-1933, the second one post-1933). Also there is A Shattered Peace: Versailles 1919 and the Price We Pay Today (by David Andelman) for a view on Europe post-1920. Furthermore I read The Origins of the Second World War in Europe by P.M.H. Bell and Years of Weimar and the Third Reich by David Evans and Jane Jenkins.
For German (re-)armament and industrial cooperation with Nazism, there is no better source than The Wages of Destruction by Adam Tooze. His The Deluge was excellent too, as an exploration of this time period.
A very good book on the Italian military during the Interbellum was Mussolini and his Generals (by John Gooch). Similarly for the German Army and Albert Seaton’s The German Army 1933-1945.
For the Spanish Civil War I used Homage to Catalonia by George Orwell and The Spanish Civil War by Hugh Thomas.
Grant: The system used in the game is inspired by Twilight Struggle. How do you believe those mechanics fit into this period of history? What are the two competing sides and how did you go about classifying their view and approach in the game play?
Kris: Here we come to maybe the first “special” part about Europe in Turmoil II. It was conceived as a three-player game, between the fascists, the communists, and the moderates. While this was a rewarding exercise, I couldn’t completely get it to work, so rather than trying to make the game work as a contest between fascists and communists, I made it a game between the centre-right and centre-left, both moderates. The politicians who made the fateful choices in these years, in my opinion, are not the Stalins or the Hitlers. The real “players”, with decisions (do I stay moderate or do I reach out and make a pact with the devil) were the Von Papens, the Caballero’s, the Blums, the Chamberlains. And this is also who you represent in the game. Do you go along with race-laws, suppression of political opposition, press censorship, etc., do you accept such extremist behaviour just to hang onto power? Or do you decide to remain “pure”, at the risk of losing power?
In mechanical terms, one player is called the Left Wing player (with a communist extremist wing), while their opponent is called the Right Wing player (with a fascist extremist wing).
Grant: Why did you decide to remove the Stability and Mobilisation decks?
Kris: When designing a game, there is only so much complexity budget you can work with. As I added Moderation and Extremism as two sides of one very important coin, I had to cut something. As the Interbellum was far less of a class struggle than the Belle Époque, I removed the socio-economic icons (and with it the Stability deck).
In my opinion, WWII is a much less “complex” war to judge than WWI. Without the Soviet Union and the United States, it is not a World War but a war mainly limited to continental Europe, and once the Soviet Union and the United States became involved, Germany had no chance to win. As such, the game always considers WWII to be “won” by Germany if the United States do not intervene (when German Moderation remains sufficiently high), and “lost” by Germany if the United States do intervene against a rogue state performing war crimes and crimes against humanity. This meant that no Mobilisation deck was necessary, as WWII is not gamed.
Grant: What is the role of the new Extremist Marker and what does it represent from history?
Kris: Everywhere in Europe, paramilitary organisations (often composed of disillusioned WWI veterans) were created, fought each other in street battles, put pressure on voters and impacted elections, and eventually would turn into fighting units during WWII. On some occasions, they represent armed forces such as those involved in the Spanish Civil War.
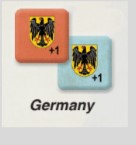
Mechanically, Extremist Markers (limited to fifteen per side) are markers that are placed in spaces (usually limited to one per side per space) and give a +1 to your Support Checks in its own space and adjacent spaces. Good placement of these is key (for in multiples they can really defend an area or attack it), and as they only enter play during setup or via event play / Rearmament advances, not via OP’s, managing your extremists well is very important.
Grant: What has replaced the Naval Arms Race in the game? How is it different? What is the purpose of the 7 different Rearmament Tracks on the board?
Kris: Rather than having a single race, with both players racing against each other, EIT2 contains seven different “races”, but these are not even races per se, as each track only has a single marker. On each track, both players move the same marker (and gain the effects of each box moved into when they moved the marker), and both players can advance on each of the seven tracks. Obviously, some boxes (and even some tracks) are more favourable to one of the players, but even then occasionally movement on such a track or to such a box can be worthwhile.
Each track represents the rearmament of one great nation (one per scoring region, and an additional one for the Soviet Union). Once a marker reaches the end of its track, it cannot be moved anymore and increases Tension by 1 (bringing the start of WWII closer).
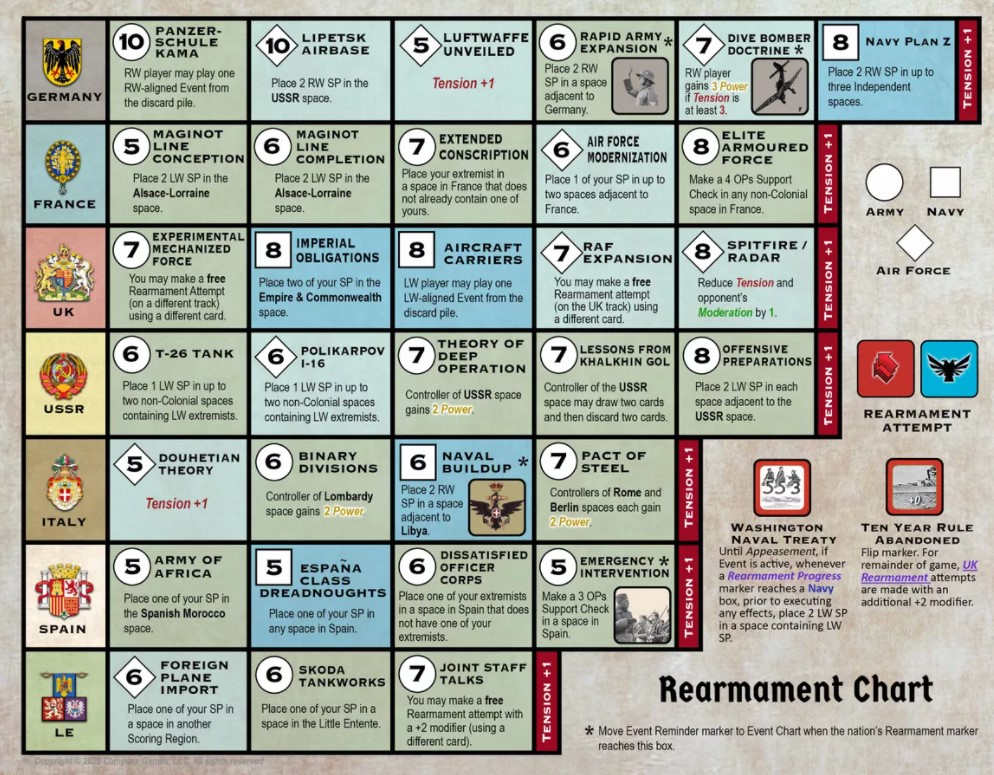
Grant: How does a Rearmament attempt work mechanically? What does this represent from history?
Kris: Mechanically, it is still the same race mechanic, as in “discard a card from hand without triggering its event, make a roll adding the card’s OP’s value, and attempt to reach the progress value in the next progress box (on the chosen track). Both players attempt to progress the same marker on each track, but the marker can flip from a pro-Left Wing +1 to a pro-Right Wing +1, making it easier for that side to progress on that track.
Historically, after The Great War, the defeated nations were forced to disarm and forbidden to rearm, while the victorious nations disarmed voluntarily (both under pressure by pacifists and out of budgetary considerations). While most of the great powers still performed some (clandestine or otherwise) experiments (such as the British Tank Division or Weimar Germany’s Panzerschule Kama), rearmament on a massive scale only occurred when, following the failure of the Geneva Disarmament Conference, Nazi Germany openly defied the Versailles Treaty limitations on its army and air force.
Each rearmament attempt represents an increase in military budget, experimentation with different doctrines, etc.
Grant: What is the concept of Moderation? How does this concept affect players and how do they manage it? What is the effect of low Moderation?
Kris: Thematically, Moderation refers to the levels of extremism either wing has reached. Some examples of cards that lower Moderation are seeking the aid of Joseph Stalin, Winston Churchill (focusing on his opposition to Gandhi and Dominion status for India), accepting the wide-ranging limitations following the Reichstag Fire, or simply tolerating Kristallnacht. On the other hand, conciliatory gestures such as seeking the approval of Pope Pius XI or limiting extremist excesses in the early Weimar Republic by its first president Friedrich Ebert increase one’s Moderation level.
Mechanically, there are a couple of effects that Moderation has on a player. The first one is easy – at the end of the game, the player with lowest Moderation is penalised in Final Scoring (note that, if Final Scoring does not occur, there is no penalty for low moderation … a player who can achieve automatic victory can do so without taking Moderation into account).
Secondly, once a player’s Moderation reaches zero, Tension increases by one.
Thirdly, if during gameplay, a player’s VP total increases to above their Moderation (which starts at 12 for the Right Wing and 10 for the Left Wing), that player’s OP’s received for whatever reason (except Rearmament) are reduced by 1 to a minimum of 1, until their Moderation increases again (or their VP goes down once more). That player is under a permanent Red Purge!
Grant: How did you divide up Europe on the game map to best represent the political reality during the Interbellum period?
Kris: The game map is divided into six scoring regions and a large number of independent spaces.
These six scoring regions are
- France and Germany (perennial enemies, with Germany still bitter about the harsh terms of the Versailles Peace Treaty and France apprehensive about German irredentism)
- Italy (unhappy about the mutilated victory, as at Versailles Italy did not receive everything it was promised under the Treaty of London)
- Spain (going from monarchy to republic to civil war)
- United Kingdom (less stable than in the Belle Époque, with fascist sympathisers in high circles)
- The Little Entente (a grouping of lesser states spawned from the disbandment of the Austro-Hungarian Empire, aimed by France at containing German Expansionism, and composed of Yugoslavia, Czechoslovakia, and Romania)
The Soviet Union is not a scoring region. Even though the Russian Civil War (between the whites and reds) is still going on at the start of the game, the Soviet Union is supposed to be communist through-and-through, and I did not deem it necessary to split it up in spaces which could be differently aligned.
While the French colonies in Northern Africa were independent spaces in Europe in Turmoil, in Europe in Turmoil II, based on their larger integration in Metropolitan France (which can be seen in the Free French in Africa, and the large contingents of Northern African troops in the French army of the 1940’s) they became part of that Scoring Region.
For more detail on the political map of Europe in Turmoil II, I refer the reader to my Europe in Turmoil II designer blog on BoardGameGeek at the following link: https://boardgamegeek.com/blogpost/112421/who-are-you-article-1-designer-journal

Grant: What is the anatomy of each space on the board and what do the various numbers, icons, colors and boxes represent?
Kris: Spaces on the map have several elements.
The name is self-explanatory. Behind the name can be a red-to-blue gradient, indicating the space is a battleground. Each space is colored in its Scoring Region’s colour (yellow for independents).
Each space is “topped” with a cockade (blank for an independent space) identifying its Scoring Region. On either side of this cockade are two boxes (one red, one blue) for extremist markers. Additional work was put in identifying to which scoring region each space belongs as there are several exclaves in the game (spaces which belong to a scoring region but are not connected to the remainder of the scoring region, e.g. Gibraltar).

The spaces themselves contain 2 boxes, one for Left Wing support and one for Right Wing support (which may contain setup instructions for support and/or extremists). Additionally, each space contains its stability, a number indicating how independent or stable the space is.
Below the Space can be a band identifying the space as a battleground, a colonial space or a colonial battleground space.
Grant: How are these boxes manipulated by the players and how does the space’s influence change?
Kris: Spaces can contain both extremists and support. There is no need for either to be there for the other to be there. Support is usually placed via OP’s but can be placed via Events or Rearmament progress. Once a space contains a number of support from either side equal to the space’s stability number plus the other side’s support, they control that space. Extremists are placed only during setup, via some Events or Rearmament progress boxes, and finally via very successful Support Checks.
Grant: What are Battleground Spaces and why are they more important than regular spaces?
Kris: Battleground Spaces are spaces that – for one reason or another – are focal points of conflict in a scoring region. It is possible they are capitals (e.g. Berlin, Paris, Rome), important minorities (e.g. Sudetenland), contested colonial possessions (e.g. Spanish Morocco, Algeria, Libya), or heavily militarised, industrialised or strategic locations (Lombardy, Alsace-Lorraine, Rhineland).
Whenever a Scoring Region is scored (as its Scoring Card is being played), players need to check whether they are present in or dominating/controlling that scoring region. The way to do so is to see if they control more battleground spaces than their opponent (in the case of domination) or control all of the battleground spaces in that scoring region (in the case of control) – in addition to some other rules.
Additionally, each Battleground gives another 1 Power (VP) to its controller whenever its region is scored.
Grant: How are these spaces manipulated by the players and how does the space’s influence change?
Kris: Spaces can contain both extremists and support. There is no need for either to be there for the other to be there. Support is usually placed via OP’s but can be placed via Events or Rearmament progress. Once a space contains a number of support from either side equal to the space’s stability number plus the other side’s support, they control that space. Extremists are placed only during setup, via some Events or Rearmament progress boxes, and finally via very successful Support Checks.
Grant: What are the Strategy Cards and how many are there? How did you determine that number? Mathematical formula with standard deviation or just trial and error?
Kris: There are 110 strategy cards (which is the typical 55 x 2 decks).
They are the main tool players have to gain power. Every turn players draw up to eight cards each (nine starting turn 5), and it is with these events and OP’s that players attempt to control Europe. The cards are divided over three decks, the Roaring Twenties, the Great Depression, and Appeasement. Starting turn 5, the Great Depression cards are added to the deck. Starting turn 7, so are the Appeasement cards.
In a game like this, my approach is to use Trial and Error. I made a first deck of 110 cards, but about half of those didn’t survive testing (thematically, mechanically, or both). The rate of cards being removed from play (versus discarded) and the rate of card draw versus reshuffling versus deck addition affect deck composition and is something I can only assess by testing, testing, testing.
Twilight Struggle, 1989, and Europe in Turmoil all used the same 3-3-4 turn sequence (3 turns of early war, 3 turns of mid war and 4 turns of late war). Europe in Turmoil II: Interbellum does not, opting for a 4 turn Roaring Twenties era, 2 turns Great Depression and 4 turns Appeasement. This heavily affected the way the decks had to be composed with regards to Scoring Cards, reshuffles, card requirements, etc.
Grant: What happens when an Event Card is played that has an opposition ideology? What stress does this create for players?
Kris: Like in all the PolSim games based on the amazing Twilight Struggle mechanics, you can play a neutral card or a card aligned with your ideology for Event OR OP’s, but a card aligned with the opposing ideology only for Event + OP’s, with the event aiding your opponent.
The stress this creates obviously is that you don’t want events aiding your opponent, and hand management / dealing with your opponent’s events in your hand is a very important skill in Europe in Turmoil II.
(As an aside, this was the main mechanic of the three-player version I alluded to higher in this article. The third, Moderate, player had no cards associated with them, but played aligned with Fascist if VP was on the Communist side and aligned with Communist if VP was on the Fascist side, and won if VP ended the game close to the zero. This concept somewhat survived in the Moderation mechanics, where OP’s are reduced once Moderation is exceeded).
Grant: Can you share a few examples of each card and show us a good quality image and explain its use?

Kris: The French Scoring card. First thing that pops out is the big red “May Not Be Held” at the bottom. Not playing a Scoring Card when you have it in your hand costs you the game in Europe in Turmoil II. Secondly, you can see the Cockade that also appears in all the French spaces on the board. Thirdly, the card belongs to the Roaring Twenties deck, and is applicable to both sides (Red/Blue gradient). Finally, this is card #001.
Each scoring card gives a Support Check to the player who plays it (with variable OP’s depending on the value of the Scoring Region). Gone are the days that having a lot of Scoring Cards in your hand is a liability – these cards actually give you something! With this many free Support Checks lying around, good extremist management (both your opponent’s and yours) is very important.
One more distinction between Europe in Turmoil II and its predecessors is the amount of points you get for presence, domination, and control. Whereas in previous games this was usually linear (e.g. 2, 4, 6 for respectively presence, domination, and control), in Europe in Turmoil II this goes exponentially. Neither Fascists nor Communists wanted to share power but instead worked to achieve a one-Party state. As such, merely benign “present” in a scoring region isn’t worth much, and control is worth a ton. In Europe in Turmoil, France would score 3-6-9. The points for domination stayed the same, but presence went down and control went up a lot.
You also get additional points for battlegrounds and adjacent independent spaces you control. Behind brackets is the amount of such spaces. Due to some event play (Canonization of Joan of Arc and Guarantee to Poland) these values can change, as can be seen on the French Scoring card.
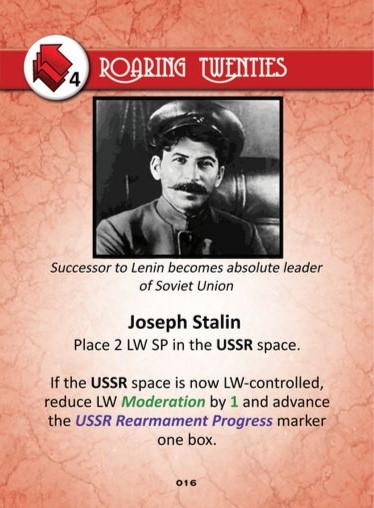
Joseph Stalin. This is our first OP’s card to show. It has 4 Operation Points, as you can see in the upper left hand corner in the circle, and the three red arrows (plus the entirely red band behind Roaring Twenties, and the red background) indicate it is aligned with the Left Wing player.
When played for the card’s printed event, the Joseph Stalin card will place Left Wing (LW) Support (SP) in the USSR space. If that space is then controlled by the LW player, their Moderation will go down (which is a bad thing – working with the communist Soviet Union at the time isn’t really accepted in Interbellum Europe) but in exchange they get one advance on the USSR rearmament track. So there is a tough choice with the paly of the this card depending on what situation the player finds themselves in at the time.
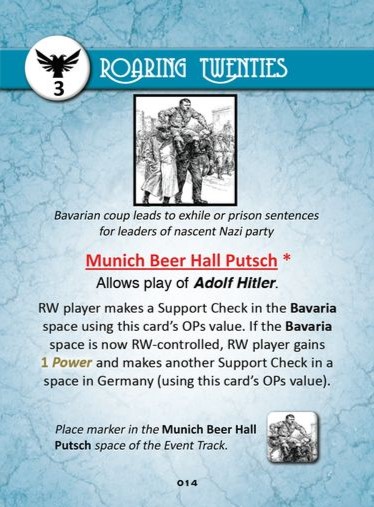
The Munich Beer Hall Putsch has a few new things on the card that we can see. Its title is underlined, which indicates it has a lasting effect that goes beyond just when the card is played. The title is also in red, which means it is a prerequisite for another card (in this case, the card text clarifies that it is necessary for future play of the Adolf Hitler card). Finally, the title is also followed by an asterisk (*) which indicates it is removed from the game after being played for the event. The blue band, blue background, and black eagle indicate the card is Right Wing (RW) aligned.
Playing the card, next to allowing the play of Adolf Hitler, also gives the RW player a Support Check in Bavaria, and potential to gain Power and another Support Check anywhere in Germany.
Finally, one can see a marker placement on the Event track, which will clarify the Hitler card is playable now.
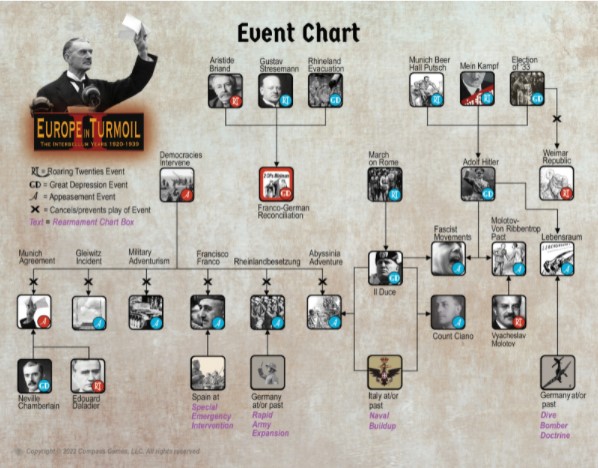
The game has a player aid where all Event markers can be placed that allow play of another card OR that prevent play of other cards. On this chart, we can see that there are three cards allowing the future play of Adolf Hitler, being the aforementioned Munich Beer Hall Putsch, Mein Kampf, or Election of ‘33. The blue RT in the event box of the first two cards indicate they are RW aligned cards belonging to the initial Roaring Twenties deck, while the GD in Election of ‘33 and the Adolf Hitler card indicate they belong to the second, Great Depression, deck. Election of ‘33 also prevents play of Weimar Republic (a LW aligned card from the Roaring Twenties deck).
Grant: What is the Sequence of Play?
Kris: The Sequence of Play in Europe in Turmoil II is pretty straightforward: Draw cards, play cards (one at a time, until first seven and once the Great Depression begins eight cards per player have been played), check for player having held Scoring cards, and then go to the next turn. The game is really very simple in its structure but has complexity in how best to play the cards that have been dealt.
Grant: The focus of the struggle is a tug of war style back and forth use of cards to influence spaces. What other ways can spaces be influenced other than direct placement of SP’s?
Kris: Direct placement of SP’s (whether via OP’s, via Events, or via Rearmament) is the main way of influencing spaces, but it is the “fair” way, where the cost and the reward are more or less in line.
The alternative are Support Checks. Whether gained via OP’s (one per OP’s card played, more in line with Twilight Struggle’s coups than Europe in Turmoil’s Support Checks), Rearmament, or Events, a Support Check is always executed in the same way: roll a die, add the number of adjacent spaces and extremists you control, subtract the number of adjacent spaces and extremists controlled by opponent, and compare that with the space’s stability multiplied by 2. If higher, remove opponent’s support and extremists from the space (or if high enough, add your support and at most one extremist). As this is influenced by your extremists, you can easily see how a space surrounded by your extremists is very vulnerable to a support check (and defended against opponent’s support checks). Placing extremists in support of each other is a very important thing to do! Thematically they represent the war of ideas (often fought out in the streets between paramilitary organisations such as the Sturmabteilung or the Rotfrontkämpferbund) occurring between the extreme right and left of the political spectrum.
Grant: What is the concept of Tension and War Breaking Out? How do players manage this aspect? What happens when war breaks out? What is a Sanction Marker and what effects do they have?
Kris: In Europe in Turmoil, you did not know when the war was going to break out, what would cause it, and even if war would break out. This is not the case in Europe in Turmoil II. Following the Versailles Treaty, I believe the Second World War was inevitable. The only question remaining in Europe in Turmoil II is “when and how does it begin”.
Normally, WWII will begin in Final Scoring after turn 10. This represents the invasion of Poland in 1939. However, there is a possibility of war breaking out sooner. During the game, Tension is tracked. Once Tension increases to a certain level, each Tension increase will allow for a single roll of the die (with a modifier if Tension increases even further – the first time war breaks out on a 6+, and each Tension increase lowers this by one). When war breaks out, the phasing player gets a sanction marker and final scoring occurs immediately (without further executing the strategy card or action round that caused the Tension to increase). There are no Crisis checks in Europe in Turmoil II; the only time a die is rolled to see if War Breaks Out is during a Tension increase.
Tension can increase in three ways – through event play, through a player reaching zero Moderation, and through rearmament. Several rearmament boxes increase Tension, and whenever a Rearmament track is fully finished (which is quite ahistorical in the case of most) Tension increases by 1 also.
Sanction markers can be gained in three ways – through event play, through starting the Second World War, and finally through having the lowest moderation at the beginning of final scoring (gaining a sanction marker for each point of moderation that player is below their opponent). Sanction markers only do something during final scoring, being a 2 VP loss per Sanction marker. In fact, Sanctions indicate how much the rest of the world (especially the United States) disapproves of a side’s behaviour. The game expects Final Scoring to represent the Second World War between Germany and its irredentist allies versus the rest of Europe. If the Right Wing ends with more sanctions than the Left Wing, the United States intervene and cause the second World War to occur more or less historically. Otherwise, they do not intervene.
Grant: What Automatic Victory conditions exist and how likely are they?
Kris: There are two automatic victory conditions, but only one is a real game option (the other one is merely the penalty for holding a scoring card). It is the standard automatic victory condition of gaining 20 VP. However, in this game, with its high scoring potential for control over scoring regions, its many independents, and the many strategy events (especially in the Appeasement era) that give VP, this is perfectly attainable. In fact, the game is geared towards players having high VP, due to the penalty a player gets when VP is higher than their moderation. Players can really choose to go all-out for VP (at the cost of Moderation and subsequently OP’s), or can choose to remain low on VP (preferably still higher than opponent) and be moderate. Of course, the strategy event play as it is, sometimes the opponent can decide for them to perform actions that lower their Moderation …
Grant: What different scenarios are included?
Kris: The regular scenario begins in turn 1 and lasts until the outbreak of WWII or Final Scoring in turn 10. Next to that, a scenario beginning in turn 5 at the start of the Great Depression and a scenario beginning in turn 7 at the start of Appeasement are also provided.
Grant: What are you most pleased with the design? What are some of the parts that were most difficult to get right? What has been the experience of your playtesters?
Kris: Due to the Corona virus outbreak (which in fact was the reason this game even exists at this moment – I was working on a four player game when COVID first was a thing, but due to the absence of playtesting I switched to a 2 player game instead), this is the first game I ever made where a lot of the testing was done online via VASSAL.
While those online playtesters helped a lot with the main design, their foremost aid in this game was in determining the victory conditions. Due to the way Moderation, VP, etc. interact, there have been many scenarios for victory conditions on the table (to which I will one day dedicate a blog post, as it would be a very lengthy answer indeed for this interview). Suffice to say, determining victory is an important thing, and it were my online playtesters who helped me determine the best victory conditions this game could have.
What I am really pleased with is how both sides have potential to play very extreme or very moderate games and still have potential to win, without a clear advantageous strategy. Sacrificing Moderation or retaining it is never a clear decision, but has to be carefully weighted to match the current situation.
Grant: What other designs are you working on?
Kris: That is always the big question, isn’t it?
Currently I am finalising the design of Sparta! Struggle for Greece. People who read the design notes for Europe in Turmoil: Prelude to the Great War will know that I first dabbled with a Peloponnesian War design prior to switching to the Belle Époque. This time around, I got that design ironed out, and it will be coming to Kickstarter soon.
Also coming to Kickstarter soon is Barbarians at the Gates: The Decline and Fall of the Western Roman Empire, for which there was an article earlier on The Player’s Aid and for which I am currently making some additional, this time ahistorical, scenarios.
Next to that, my most “ready” design (as in: currently undergoing playtesting) is a CDG about the Battle of the Bulge, currently codenamed 1944: Herbstnebel. It uses a point-to-point map, with unit scale at Division/Regiment level and a Timescale of 18 turns, each lasting 2 days.
Finally, the games I am still designing are Enfants de la Patrie (a four player diplomatic game about the French Revolution), STAVKA (a Barbarossa game all about reserves management), World in Turmoil (a PolSim about the period 1830-1890 and a direct predecessor of Europe in Turmoil), and Ulm to Austerlitz (an operational block game about the 1805 campaign in Bavaria and Austria).
As always Kris thank you for your time and for your excellent work on this outstanding looking CDG on a very intriguing subject. I am very interested in this one and can’t wait to play it.
Keep an eye out for the pre-order announcement for Europe in Turmoil II: The Interbellum Years 1920-1939 on the Compass Games website.
-Grant
