
After we talked with Kris Van Beurden about his then 2nd design Europe in Turmoil: Prelude to the Great War from Compass Games, we gained a new respect for this new designer and when I saw an announcement for his next game called Barbarians at the Gates: The Decline and Fall of the Western Roman Empire 337-476 I knew that we had to talk with him about the design.
*Please keep in mind that the artwork and layout of the component pictures used in this interview are not yet finalized and are only for playtest purposes at this point. Also, as this game is still in development, components and card details may still change prior to publication.
Grant: What lessons did you learn from your experience with designing Europe in Turmoil?
Kris: While I think Europe in Turmoil turned out quite good, I did have a bit of “Tunnel Vision” on certain cards/aspects where (hindsight being 20/20) I should have listened more to certain playtesters (I am thinking about the Admiral Tirpitz card for example). While I always listen to my team of playtesters, for Barbarians at the Gates I listened extra good.
Grant: What historical period does your new design Barbarians at the Gates cover?
Kris: Barbarians at the Gates is about the later days of the Western Roman Empire and the Barbarian Migrations that caused or at least accelerated their downfall.
Initially, I planned to have the game last from the ascension of Valentinian I (in 364 AD) to the deposition of the last Western Roman Emperor, Romulus Augustulus (in 476 AD). I chose Valentinian I as a starting point, as he was the last emperor to conduct offensive campaigns across the Rhine (allowing the Roman player some time to be the attacker, too), and because his rule coincided with the arrival of many of the Barbarian tribes involved in the game and with the disaster of his younger brother and Eastern Roman Emperor, Valens at Adrianople (378 AD).
While planning the scale of time and researching the period, I decided that the mechanic I was planning on using to represent the many usurpations that occurred during this period could actually be used to add a “prelude” to the game, to cover the civil war and strife between the sons and successors of Constantine the Great (337-361).
As such, the time period covered is from the death of Constantine the Great (337 AD) to the deposition of the last Western Roman Emperor by Odoacer in 476 AD.
Grant: What interested you in doing a game on this period and subject?
Kris: As a Western European myself (hailing from Belgium), the Fall of the Western Roman Empire is a topic heavily discussed in our History classes (where the focus on Western Europe tends to turn this into the Fall of the Roman Empire, disregarding the Byzantine Empire that remained until 1453 and the fall of Constantinople to sultan Mehmed II).
Additionally, while there are a lot of board games on Rome’s Rise and Empire building, there don’t exist many games on the fall of its Western half.
Grant: Speaking of other designs on the subject, what other published designs did you use as inspiration?
 Kris: As a card-driven game set in the ancient world, it is easy to notice similarities to Hannibal: Rome vs Carthage. However, the design started (and I believe remained) closer to Sword of Rome from GMT Games, itself obviously influenced by Hannibal. The Raid mechanic was inspired by a similar game action found in Wilderness War.
Grant: What design goals did you have for the game? What did you feel was important to include from the history in the design?
Kris: What seemed important to me was that it was NOT just a game of Barbarians versus Rome. Many Barbarian tribes were actually invited to settle in the Roman Empire in exchange for military service, while at the same time the Romans were often divided against each other, with (military) governors of the provinces marching against Rome (or its current Emperor) in order to usurp and ascend to the Purple.
It felt important to me that at moments, the Barbarian tribes on the border would be ignored by the Roman player (being busy with instrife), thus allowing them to pierce the borders and settle inside the Empire.
While it may sound like that would make a better three, four or more player game, it did sound possible to me to have on the one hand (for the Roman player) those Romans loyal to the current Emperor and the tribes allied and assisting these Romans, and on the other hand (for the Barbarian player) Romans attempting to usurp the Emperor while also controlling the Barbarians opposing the Empire. Obviously some “corners” were cut to make a better game, such as multiple Usurpers actually helping each other (rather than fighting amongst themselves as well) and Barbarian tribes (even those that historically fought amongst themselves) marching next to each other (until allying with the Loyalist player).
As Barbarians and Usurpers are actually not aligned but still played by the same player, a good action for the Barbarian player is often to draw Usurper Romans from the border (to allow the Barbarian tribes to enter the Empire more easily). While seemingly a “gamey” action, this actually represents the Usurper drawing all his forces together to challenge the ruling Emperor!
Grant: What are the two sides force makeup?
Kris: The Roman player has two distinct powers under his control:
- Loyalist Romans (occasionally assisted by Byzantine Romans) representing the heart of the Roman Empire, centered around the Emperor.
- Allied Barbarian Tribes (with each Tribe being a sub-power of its own). Small Note here: One of the choices made to increase playability (while reducing historicity and simulation value somewhat) was to have Barbarian Tribes only represented by leaders and Tribal Markers, with the same Barbarian CU shared by all Barbarian tribes (i.e. a Barbarian CU dropped off by a stack led by a Tervingi leader could later that same turn be picked up by a stack led by a Ostrogoth leader, “turning” into an Ostrogoth over the duration of a decade).
The Barbarian player also has two distinct powers under their control:
- Usurper Romans, representing those military or political leaders rebelling against the central authority and challenging the Emperor for the Purple.
- Migratory Barbarian Tribes (once again with each Tribe being a sub-power of its own but sharing the same counter mix of CU).
Grant: What historical Barbarian tribes are represented?
Kris: At the start of the game, there are some Picti, Alemanni and Mauri present, respectively in Caledonia (Scotland), Germania (Germany) and Mauretania (Morocco/Algeria).
During the game, more Barbarian Tribes arrive, in three distinct “waves”:
- The First Wave contains the Franks, Vandals, Jutes, Burgundians and Tervingi
- The Second Wave contains the Angles, Saxons, Ostro- and Visigoths while also allowing the Roman player to gain Briton support and for Bagaudae (peasant insurgents) to rise up against Rome (represented by a Migratory Barbarian tribe in the game)
- The Third Wave contains the Huns, Alans and Gepids
Grant: As you have mentioned, each side is kind of playing a double role with controlling both Romans, albeit some are Usurper Romans, and Barbarians. What challenges does this situation present to players?
Kris: There are different challenges for each player.
With each additional Allied Tribe, the Roman player has reduced options (hand size is somewhat linked to the amount of Allied Tribes), so there is some trade-off between settling tribes or not. Additionally, Allied territory is off-limits for Loyalist leaders, which may severely impact the communications of the Roman Empire.
The Barbarian player sometimes has to decide between moving Usurper forces out of the way of the invading Barbarians, or sacrificing his own Usurpers (by fighting them with his own Barbarians) in order to not waste actions on moving the Usurpers.
While these are distinct powers with distinct rules, they still basically contribute to their owning player’s victory conditions in the same way. It is not as if there is a particular victory condition assigned to the Usurper Power and a different one to the Migratory Barbarian power; the game mechanics simply give them different ways of achieving the Barbarian player’s goals.
Grant: How do players gain control of the different tribes? How can this control be lost?
Kris: This is rather easy: most tribes enter the game through the play of their INVASION strategy card, controlled by the Barbarian player (the Briton, Mauri and Bagaudae are the exceptions to this rule). The only way for the Roman player to gain control over tribes is through the play of one of the “Rome Offers Settlement” strategy cards. Subsequently, this Roman control can be lost again through revolt or leadership changes (again, instigated by strategy card play).
The Briton tribe enters the game already Allied to the Roman player via the play of the “Eagles Leave Britain” strategy card.

The Mauri tribe begins the game already on the side of the Barbarian player.
The Bagaudae tribe enters the game controlled by the Barbarian player upon successful play of the Bagaudae Uprising strategy card.
Grant: Why did a Point-to-Point map make the most sense for the game?
Kris: The Roman Highways have always fascinated me, in that they still form the backbone (or at least the skeleton) of many current roads in Western Europe.

When I saw the above map during my initial research for this game, I immediately saw a Point to Point map there. Point-to-Point allowed me to channel the invasions into certain historical routes, while also supporting “interior lines” to allow the Roman player to quickly move reserves from one side of the Empire to the other.
Grant: What interesting strategy conundrums does this form of map provide for the players?
Kris: For the Roman player,
- The interior lines discussed above
- There are some clear choke points where fortifications can really slow down or even stop the Barbarian migrations. Fortifying (or even just garrisoning) takes time (or disperses field armies), and it is really up to the Roman player to determine how he wishes to stop the Barbarians at the Gates!
For the Barbarian player, the main strategic implication of the Point-to-Point map is to find ways of utilizing his tribes to threaten multiple places along the border, forcing the Roman player to divide his attention.
Grant: What different types of map spaces are there and what advantage or disadvantage do they offer?

Kris: There are in total four types of map spaces:
- Walled Cities (with Provincial Capitals as subcategory)
- Cultivated Spaces
- Border Spaces (the “limes”)
- Transit Spaces
Walled Cities are fortified and require sieges to change control. As fortifications, they also impact movement. Each province contains a single Provincial Capital, and these are always Walled Cities.
Cultivated Spaces are unfortified and represent the productive countryside on the interior of the Empire (e.g. the latifundia or country estates of Italy).
Border Spaces are unfortified and represent more heavily fortified and less extensively farmed or otherwise exploited border regions (e.g. Hadrian’s Wall in England or the stretches of the border along the Rhine and Danube).
Transit Spaces are large, wild areas in Germany (across the Rhine and Danube) which are uninhabited. In game terms, these are added to increase the distance to be crossed by Barbarian leaders prior to arriving in the Empire proper (to contrast with the interior lines of the Roman player).
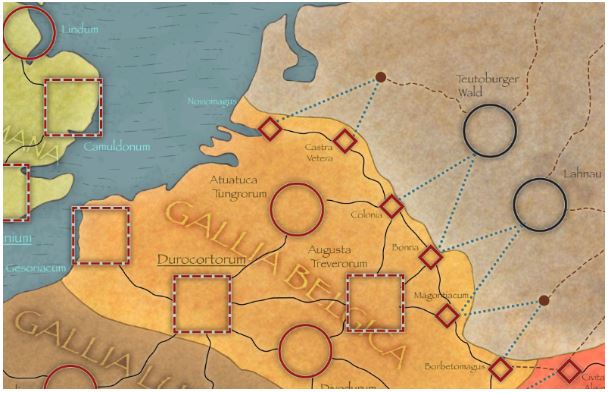
In above image, the following can be discerned:
- The Walled Cities of Gesoriacum, Durocortorum (underlined, hence a Provincial Capital) and Augusta Treverorum
- The Cultivated spaces of Atuatuca Tungrorum and Divodurum (and Teutoburger wald + Lahnau in Germania)
- The Border spaces of Noviomagus, Castra Vetera, Colonia, Bonna, Mogontiacum and Borbetomagus
- Two transit spaces in Germania
The provincial borders (and provincial color) of Gallia Belgica can be seen, as well as (partially) those of Britannia Romana, Gallia Lugdunensis and Italia Annonaria.
Most connections on this map are Highway connections. Rough connections can be seen between the spaces in Germania proper, while the connections between Transit spaces (and Germanic cultivated spaces) and the border spaces are riverine connections.
Grant: Control of provinces is important. What defines control of a province and what is the benefit?
Kris: To control a province, a player must control the Provincial Capital AND a majority of the spaces in the province. It is important to realise that this is for a player, not a power (i.e. a player can control a Provincial Capital with one of his power and the necessary spaces in the province with his other power).
 While provinces can be Roman controlled, Barbarian controlled or uncontrolled, the distinction between the latter two is not very important. Provincial control is only used for Victory Point determination, where only Roman (lack of) control over provinces is determined.
On the map, a Provincial control chart is added where control over the provinces can be tracked.
Grant: There are also different connection types shown on the map. What are these types and what is their benefit?
Kris: The regular connection between spaces is the Highway (black line). It takes a leader only one Action Point to move between spaces via a Highway, and Roman powers (i.e. Loyalist, Usurper and Byzantine) have advantages for interception, avoid battle and battle resolution when moving along Highways.
Some connections within the Empire and most connections in the “barbarian” world are Rough connections (dashed brown lines). It takes two Action Points to move via Rough connections.
Connections between spaces on different banks of the Rhine and Danube rivers are River connections (dashed blue lines). It takes two Action Points to move via River connections, and additionally there are interception, avoid battle, battle resolution and battle retreat penalties for moving via River connections.
Finally, there are two Strait connections on the map, one in between Italy and Sicily (between Mesanna and Rhegium) and one between Spain and Northern Africa (between Mons Calpe and Tingis). Strait connections take three Action Points and give similar penalties to River connections.
Grant: What is the anatomy of a counter?
Kris: Not counting different denominations (e.g. counting a 1 CU Loyalist the same as a 2 CU Loyalist), there are three different Combat Units.
- Loyalist/Usurper CU (with a certain number of Loyalist CU on the front side and the same number of Usurper CU on the reverse)
- Barbarian/Allied CU (with a certain number of Barbarian CU on the front and the same number of Allied CU on the reverse)
- Byzantine CU (with a certain number of Byzantine CU on the front, and a different number of Byzantine CU on the reverse) – Byzantine CU never change sides but are always controlled by the Roman player.
Grant: What is unique about Leaders and how are they important to the game?
Kris: As in most CDG’s (especially Ancient ones), the Leaders form the main way of interacting with the board and the opposing player’s controlled territory.
As opposed to CU, Leaders have multiple stats.
- Strategy Rating (which determines how many Action Points a leader will receive when activated)
- Tactical Rating (which determines the leader’s ability in battle and bonus on interception/avoid battle)
Additionally, Loyalist/Usurper leaders can be marked as Emperors.
Each Loyalist leader has his Usurper equivalent printed on the reverse of the marker.
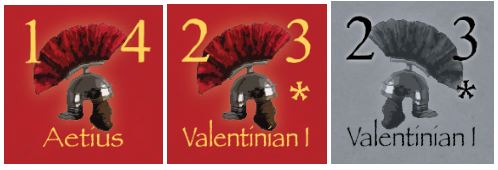
Above are several of the Roman leader markers. Aetius has a strategy rating of 1 (the lower the better) and a tactical rating of 4 (the higher the better).
Notice how Valentinian I has an “asterisk” on his counter – this indicates he is an “Emperor” leader.
The second (grey rather than red) Valentinian I counter is his Usurper equivalent. Notice that, as Emperors cannot be targeted by an Usurper Emperor event, Valentinian I’s usurper equivalent can only be in play after a Successful Usurpation action by the Roman player.
Certain Barbarian leaders have a successor as leader of their tribe printed on the reverse of their marker (e.g. Gunderic/Genseric), where other Barbarian leaders cannot be replaced by a successor (e.g. Hengist).

Grant: How many cards are there and does each side have their own unique deck?
Kris: The game contains 110 cards, 55 Roman and 55 Barbarian cards.
Each player has his own unique deck, with cards being added via a certain schedule:
- Prelude cards are only used in turns A and B
- Core cards are always part of a player’s deck
- First Wave cards are added at the beginning of turn 1
- Second wave cards are added at the beginning of turn 3
- Third wave cards are added at the beginning of turn 6
Grant: Can you show us some examples of cards and explain how they can be used?
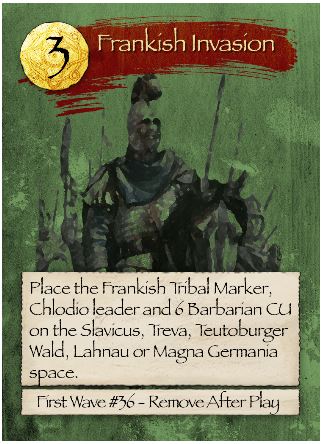
Kris: Frankish Invasion is an Invasion card from the Barbarian player’s deck. All invasion cards are marked with red colouring behind the name, while all Barbarian player cards have a green background.
This card will add the Frankish Tribe with its leader Chlodio, and six of the generic Barbarian power CU. They can be entered on a series of spaces in Germania. Alternatively, it can be played for 3 OPs.
The card belongs to the First Wave and will be removed from play if used for its strategic event (not if used for OPs).
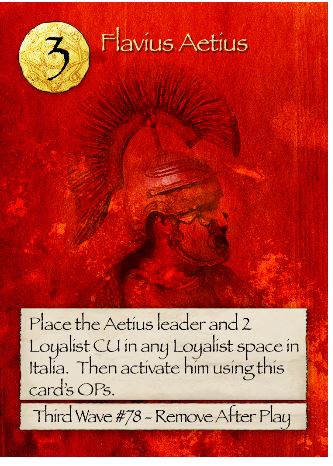
Flavius Aetius is a generic card from the Roman player’s deck. All Roman player cards have a red background.
This card will add the Aetius leader with two Loyalist CU in Italia (general name for the provinces of Italia Annonaria and Italia Suburbicaria), after which he will be activated as if a 3 OPs card was played for that effect. Alternatively, it can be played for 3 OPs.
The card belongs to the Third Wave and will be removed from play if used for its strategic event (not if used for OPs).

Legionary Discipline is a Battle card from the Roman player’s deck. All battle cards are marked with black colouring behind the name.
This card will give the Roman player a +3 DRM during any battle in which he has Combat Superiority (i.e. have Loyalist CU participating). Alternatively, it can be played for 2 OPs.
The card belongs to the First Wave and will be removed from play if used for its strategic event (not if used for OPs).

Ambush is a Response card from the Barbarian player’s deck. All Response cards are marked with blue colouring behind the name.
This card can only be played for its strategic event if Loyalist CU are moving along a rough connection, to eliminate 2 moving CU. Alternatively, it can be played for 2 OPs.
The card belongs to the Core deck and as such will always be available.
Grant: How many cards are drawn by each player? What is the concept of the Tribal Reserve for the Roman player?
Kris: Players draw seven cards at the beginning of each turn. As there is no method to keep cards between turns, both players will each turn have the same amount of cards and options.
However, the first card(s) drawn by the Roman player go into the Tribal Reserve. This is a special pile of cards (which may not be inspected by either player) which can be used for a limited set of actions. For each Allied tribe the Roman player controls, one card is placed in the Tribal Reserve instead of in his hand (to a maximum of three cards).
As the Roman player reduces his territory by granting lands to allied tribes, he will also reduce his capacity to use or grow the Roman armies, leaving some of the initiative and responsibility of defending the Empire in the hands of his allies.
Cards in the Tribal Reserve can be used as OPs (but only for activating Allied leaders, forced marching Allied CU or placing allied Reinforcements) or to allow (for one impulse only) the Loyalist power to move through Allied controlled spaces.
Grant: What are the different type of Events?
Kris: Each player’s deck is composed of “generic” events, “battle” events and “response” events. Additionally, the Barbarian player’s deck also contains “invasion” events.
Like in many CDG’s, all events can be played for their Operation Points (OP’s). Additionally, Generic events can be played during a player’s impulse for its strategy card text. Battle events can be played during battles (one per side). Response events can be played during the opposing player’s impulse (when the right situation exists). Finally, Invasions are generic events, only for the Barbarian player, which allow new Barbarian tribes to enter the game.
Grant: What is the Sequence of Play?
Kris: A turn begins with the card draw phase, in which both players draw seven cards (with up to three cards from the Roman player added to the Tribal Reserve instead of his hand).
Subsequently is the Strategy Phase in which players alternate taking an impulse. During an impulse, the active player will play a strategy card (or pass, if they somehow have fewer cards in hand than their opponent) and either use its strategic event or use its Operation Points value.
Once both players have played out all their cards, play proceeds to the Attrition phase (in which CU present in spaces controlled by another power – including those belonging to the same player – may be eliminated based on a roll on the Attrition table), the Control phase (in which unfortified spaces occupied by CU from a different power than their control switch control and besieged fortified spaces may undergo a “free” siege attempt), the Migration phase (in which Migratory Tribal Markers must make “free” migration moves), the Victory phase (in which the Automatic Victory conditions are checked, the Roman player wins or loses points based on Provincial control and the game ends if this is the final turn of the selected scenario) and finally the reinforcement phase (in which each power receives reinforcements, leaders displaced from the board are returned to play and the turn marker is advanced to the next turn).
Grant: What actions can Operation value be used to take?
Kris: As mentioned above, cards played during a player’s impulse which are not used for the strategy card text are used for their Operation Points value. This can be used for the following purposes:
- Activating a leader
- Forced Marches
- Raiding
- Reinforcement
- Migration
- Successful Usurpation
Activating a leader depends on their strategy rating (the lower the strategy rating, the better). When a leader activates, he receives a number of Action Points which can be used for movement (1 over highway, 2 over rough or river connections, 3 over strait or for naval movement), continuation after battle, changing control over unfortified spaces and sieges of fortified spaces.

As you can see, a 2 Initiative rating leader can be activated with a 1 OP’s card (unusual for CDG’s); however he will only receive 2 AP, as opposed to the 4 AP the leader would receive if activated with a 2 OP’s card (or the 5 AP if activated with a 3 OP’s card).
CU normally move with activated leaders, but there are two other modes of movement:
- Forced marches are only for Loyalist, Byzantine, Usurper and Allied CU which allow CU to move without leaders, but only through friendly territory
- Raids are only for Barbarian CU, which allow CU to move without leaders and change control over unfortified spaces
Reinforcement can only be done via 3 OP’s card play and provide reinforcements similar to the Reinforcement phase.
Migration allows Migratory Barbarian tribal markers to migrate similar to the Migration phase.
Finally, successful Usurpation can be done only by the Roman player with a card of any number of OP’s and switches control over the Usurper faction and control over the Loyalist faction (i.e. all former Usurper markers count as Loyalist and vice versa).
Grant: How is combat handled?
Kris: I will not go into too much detail with respect to Avoidance of Battle, Interception and Refusing battle and go straight to battle resolution.
When an Activated leader has successfully moved to a space containing enemy CU which did not evade etc., a battle is initiated.
First, each player (starting with the Active player) has the chance to play a single Battle card.
Subsequently, each player determines their DRM’s and makes a D6 roll, checking the modified roll result on the CRT, which expresses as a result of the number of enemy CU killed in battle.
The Higher number wins the battle (even if no CU left), with ties determined first by participation of Roman CU (Roman CU always winning ties) and then in favor of the attacker (if both sides didn’t have Roman CU) or the defender (if both sides were composed of Roman CU). The loser has to retreat from the battle (either to their space of origin if the attacker or to any adjacent space if the defender). The winner, action points permitting, can continue movement.
Grant: What was your goal with the CRT and creating its results?
Kris: Combat is determined with a single D6, however the results range from <1 to 10. This means DRM’s can have a huge effect on battles; it is not unusual for a player to have a +4 DRM on their battle roll.
It was my design goal to have the Barbarian powers “fight well” through numbers (i.e. roll on a higher column of the CRT) while the Roman powers would “fight well” thanks to higher DRM’s (through better leaders, combat superiority, etc.).
Grant: What role do the Castra and Colonia markers play?
Kris: Castra (fortified camps) and Colonia (garrison city) markers are types of fortifications. While the other type of fortification (Walled City) is inherently present on the game board, these fortification markers can be built in any cultivated or border space (with Colonia markers being an upgrade of a Castra marker). Fortification markers stop movement (requiring siege) and migrations. One of the main goals of the Roman player is to plant as many fortifications as possible along the way of the Barbarian player’s migrations.
Grant: How does a siege commence and how does it play out?
Kris: A siege commences automatically when a leader moves into a fortification (marker or walled city) controlled by an enemy power.
Such a leader needs to make (during this impulse or subsequent impulses) siege attempts (at 2 Action Points per attempt) to gain siege points. Siege points eliminate garrison CU (max 1 per Castra, 2 per Colonia or Walled City), reduce a Colonia to a Castra or outright win the siege (when no garrison or Colonia remains).
Grant: The Migration Phase is mostly for the Barbarian player. How does this affect them?
Kris: Each barbarian tribe has a Tribal Marker associated with it, which is in fact the large population mass of the tribe (i.e. everybody who is NOT a warrior in the raiding parties or war party).
As one of the main causes of these large migrations was the push from other tribes further east, it is mandatory for Tribal Markers to migrate at least one space during this phase. In this manner, all tribes (with the exception of those already settled in the Roman Empire) will every turn inexorably move towards Rome!
When a Tribal Marker migrates, it can take along any number of CU stacked with them, and this can often be a cheaper way of moving than moving with a Leader. However, Migrations are not allowed into spaces containing fortification markers or enemy CU. In this way, the “border” first needs to be pierced before the unarmed populace can join the warriors.
Grant: What is the Plunder Track and how does Raiding work?
Kris: Another cause of the migrations was the rich plunder available in the Roman Empire. Both small-scale Raiding Parties and larger Armies can amass plunder in this game, mostly by
- Killing Roman CU
- Gaining control over Roman cultivated spaces or walled cities
- Raiding walled cities
Every ten plunder amassed reduces Roman Victory Points by 1.
Grant: What are the victory conditions?
Kris: The game contains 7 scenarios, each with different start and end turns and potentially different victory conditions. However, the main victory condition is the following:
Each turn, the Roman player will gain 1 point for each province he controls over 7, and loses 1 point for each province short of 7. If the Roman player’s VP are ever 0 or lower during a Victory phase (or if the Loyalist faction is ever at 0 CU or 0 controlled Provincial Capitals during a Victory phase), he loses and the Barbarian player wins.
The Western Roman Empire will likely fall (or be close to failing) during a game of Barbarians at the Gates. The VP situation at the end of each scenario answers the question: What next? Do the Barbarians destroy all remains of civilization for a European dark age, or do some vestiges remain for a European Renaissance?
Grant: What are you most proud of with the design?
Kris: Actually, something not really touched about earlier in this interview – the role of the Usurper versus the Loyalist power.
There are no Usurper CU or leaders on the board at the beginning of most scenarios. However, through play of the Usurper Emperor strategic event, Loyalist leaders can turn into Usurper leaders, taking the province they are currently residing in to join the Usurper power.

In this fashion, the Loyalist player has to decide whether he will group CU under a single leader (in order to face the Barbarian challenges at the Gates) in which case he risks that leader to Usurp, or to disperse his troops never allowing a single leader to amass too many CU but on the other hand also never having a true “striking force” (except under an Emperor leader, which obviously cannot Usurp).
Likewise, the Barbarian player will, once he has an Usurper leader on the board, try to group all Usurper CU with this leader (in order to keep this force strong and in order to allow his Barbarian CU, leader and tribes to march unopposed into the Empire). What I am proud of here is that I found a mechanic / game situation where the Barbarian player is incentivized to do what an Usurper would historically have done – empty the border garrisons and march on Rome.
Obviously, these cards are extremely strong and a situation can occur in which most of the Romans still on the board are Usurper leaders and CU, and the Loyalist power is only a rump state. It is for these situations that the “Successful Usurpation” action exists – if the Barbarian player “exaggerates” or over performs with his Usurper power, the Roman player can simply “steal” these achievements by swapping the Loyalist power for the Usurper power, in effect having the Usurpation succeed and the formerly Usurper leader becoming the true Emperor!
Both for Usurpations and for Migratory barbarians allying with Rome, it was important to have a good and fast, ergonomic way of getting this effect on the gameboard. For this reason, every Loyalist counter was printed with his Usurper equivalent on the back (fortifications, CU, leaders, walled cities) and every Barbarian Tribal Marker or CU has its allied equivalent on the back. Switching control is as easy as flipping the counter(s). Fast and fun!
Grant: What other games are you working on?
Kris: Several months ago I would have told you: too many games to mention. At that time I was really overloaded with designs without focusing on any. Since then, I decided to focus on a single design: a four player game currently called “Enfants de la Patrie”, which is a diplomatic game on the French Revolution (approximately 1791-1797).
Other games I was working on but which are currently on hold are a Corps-level Block game on Napoleon’s 1805 Ulm and Austerlitz campaign, Europe in Turmoil II: the Interbellum and a so far unnamed Battle of the Bulge Operational-level CDG (all two-player games).
I wouldn’t want to end this interview without thanking Compass Games for wanting to publish Barbarians at the Gates, and Shayne Logan for all the beautiful artwork in the above interview.


As always Kris thank you for your time and for your excellent work on this outstanding looking CDG on a very intriguing subject. I am very interested in this one and can’t wait to play it.
If you are interested in Barbarians at the Gates: The Decline and Fall of the Western Roman Empire 337-476, you can pre-order a copy for $52.00 on the Compass Games website at the following link: https://www.compassgames.com/barbarians-at-the-gates.html
-Grant

In case Kris is reading this:
I dislike CDG where the following conditions are true:
1. both sides “play all their cards until they are out” and turn over.
2. Battle cards are NOT replaced by a redraw.
Often cards are hoarded because having another action in the turn is so important. I highly urge all battle cards (except the very powerful ones) get a “redraw another card at the end of the battle” verbiage.
Another fun alternative is a “If you win the battle, you get to redraw a card to replenish your hand”, that makes it more of a gamble, which is appropriate for an ancient battle…
LikeLike
I recognize your remark. Instead of doing this, I only made relevant battle cards. I don”t think there is a Combat Card in Barbarians at the Gates that isn’t at least frequently played for its effect (obviously it would be a problem if each and every combat card would be played for its effect – there should always be a little decision tree on BC or OPs).
LikeLike