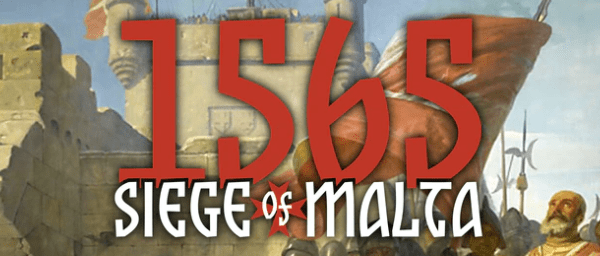
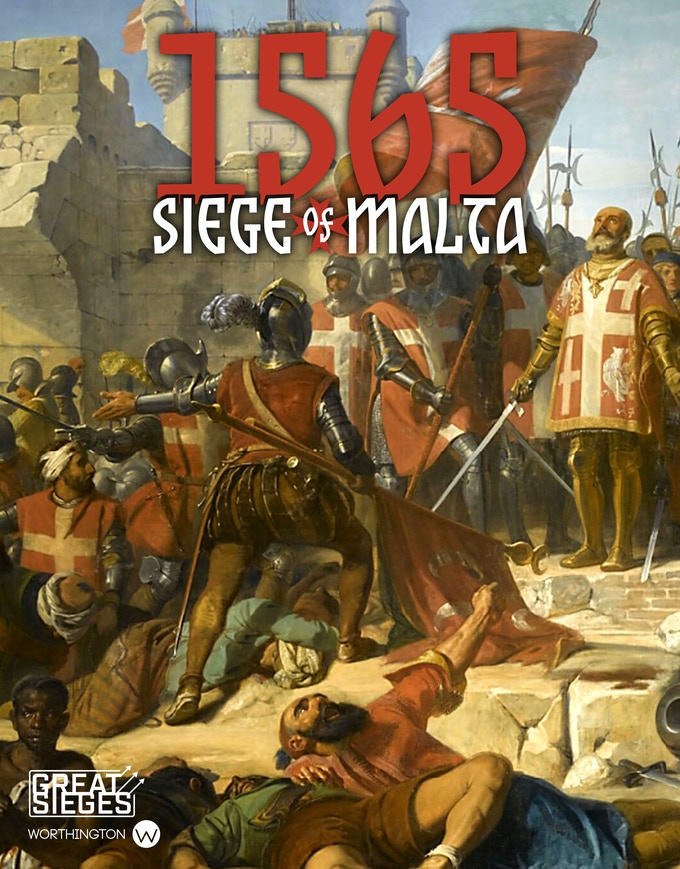
We became acquainted with Maurice Suckling with his game Freeman’s Farm 1777 from Worthington Publishing in 2019 and really enjoyed the mechanics of that game and how they all came together to create an interactive and interesting look at the Battle of Saratoga in the American Revolution. Since that time, Maurice has designed several games that have went onto successful Kickstarter campaigns including Hidden Strike: American Revolution and Chancellorsville 1863. He is back at it again with a new game in the Great Sieges Series from Worthington Publishing called 1565 Siege of Malta.
If you are interested in 1565 Siege of Malta, you can order a copy from the Kickstarter page at the following link: https://www.kickstarter.com/projects/1456271622/869475414?ref=4p0kto&token=ae1a813f
*The pictures of cards, components and the map used in this interview are not finalized (although they look pretty amazing) and may change prior to final development and publication.
Grant: Welcome back Maurice. I know that you have been busy, with 2020 seeing you design 2 games that went to Kickstarter including Hidden Strike: American Revolution and Chancellorsville 1863. What is your new upcoming design 1565 Siege of Malta about?
Maurice: Hello Grant, thanks for having me back!
The Great Siege, as it’s also known, saw the tide of Ottoman Turk westward expansion break against the wall of Christian defense on the small but highly strategically significant archipelago of Malta in the Western Mediterranean. The Ottoman Turk invasion force was huge. The armada was almost three times the size of the vaunted Spanish Armada defeated by the English (and the weather) in 1588. It was supported by around 40,000 troops. Malta was defended by around 500 Knights of St. John and 5-6,000 other soldiers, including civilians. The Turks failed to capture all of the important fortresses. Had they captured all of them, the most likely outcome would have been sustained Turk expansion into Europe – into Sicily, Italy, Spain, perhaps France. It’s an astoundingly pivotal moment in world history.
Grant: What from the history of this battle did you want to make sure and model in the design?
Maurice: Firstly I just wanted to direct peoples’ attention to it. That was my first goal. Anyone who has visited Malta with an interest in history will likely have been swept away by seeing the sights of the Great Siege. I wanted more people to be aware of what happened and for a game to be a gateway into that.
Choice and dynamism are major elements to model. For the attackers there are a range of options. There were three fortresses – St.Elmo, and then one on Birgu, and one on Senglea – all around Grand Harbour (that’s the spelling used on Malta), as well as the inland city of Mdina. All were appealing targets for different reasons. For the defenders it wasn’t just a static siege. Troops were constantly shuttled to fortresses under pressure – the advantage of internal lines of communication and the continued control of Grand Harbour for much of the siege. So this is a dynamic siege – as so many are when you look closer at them – with both sides having a variety of feasible strategies.
On top of that, it was important for players to understand the Turks were working against a timer. They had to wrap up the siege before the seasonal winds turned against them and trapped them on Malta – or survive the winter there without fresh supplies. Malta did not provide an invading army of the Turk force’s size with the resources it needed to sustain itself for long. This is something the Great Sieges System inherently makes extremely easy to model because it’s hard-baked into the system.
Grant: I understand the design is based on the mechanics of 1759 Siege of Quebec from Worthington Publishing. What is different in the approach of Siege of Malta?
Maurice: Absolutely – yes – it’s the same basic system from Quebec underpinning this game too. The subject matter takes us to some different places and calls for some other elements to feature in the design. But, in brief, I’ll say there are really three headline ways in which the system itself is different.
We have Special Events in Malta, which are additional icons on the solo enemy deck cards. These do a range of different things depending on the relevant side, but they might bring the reinforcements from Sicily closer, or remove the Turk’s siege tower. This subsystem is a way for the game to have the cards carry a third piece of information, in addition to what I call the Event – some narrative-element with some systemic output – and the counter order – which I’ll come back to and explain in a bit.
Malta also has some limited ‘resources’, logged on tracks on the board, keeping track of Turk ammunition, and of various re-roll and modifier abilities.
Malta also has limitations on command orders that Quebec didn’t have. Instead of being able to choose any order you want (if you have troops in the right locations), Malta has you limited by the need to refresh orders to make them open to you. Essentially you need to play all other orders first before any order refreshes and you have a full palette of options again.
Grant: What was your reasoning for this kind of change in mechanics? What type of issues does this create for the players?
Maurice: In the 2-player game I don’t think this change is as necessary. But I think I would playtest it and perhaps implement it all the same.
But, regardless, an excellent question! Didn’t I just talk about choice and here I am removing it! Here’s the thing, as all game designers know, too much choice – especially in certain areas – isn’t necessarily a good thing. It can engender laziness, befuddlement, and disengagement, giving us disappointed players. So, sometimes, to increase engagement you need to remove choice and refocus it in different areas, to refocus the player’s attention where you really want it. This is an essentially mechanics-driven consideration. But it’s not hard to derive some thematic justification for such a decision. Without any restrictions on players in this part of the game they’re free to reissue the order every turn. This implies these troops could be almost indefinitely tasked. If we associate the limitations not with notions of game design principles or player psychology, but with the idea that troops need rest then narratively this design tweak feels organic and like it was always potentially inherent within the system.
What this limitation does is it forces players to be thoughtful about their order selections, giving them a more difficult decision to make on their turn, but they also get more out of their play experience – they will get a wider variety of outcomes from each turn.
In addition, this limitation is now tied to another subsystem within the game – Aggressive Commander actions. These are limited occasions where players can roll a die to attempt to inflict additional damage on the enemy (or suffer additional losses representing audacity backfiring). You will likely have spotted that the limited resources I briefly mentioned are really an extension of this Aggressive Commander concept already in the system. But, additionally, players now have more reason to use these Aggressive Commander actions and have another aspect to weigh up in doing so, because these actions also refresh all order options in the turn on which they’re used – so if you can’t wait for them to refresh then you can decide to force the issue.
Grant: What types of challenges are there in designing a new game in an established system?
Maurice: Actually, that’s part of the reason I wanted to do this. I wanted to find out the answer to that question myself. Broadly, there’s figuring out what’s central to the system and can’t be touched without breaking its essence, what you can bend, and what you can break and replace with something else. Implementing limitations on orders is a good example of bending a preexisting part of the system. I didn’t change the orders system, so much as kept it largely in place but flipped that part of the system on its head.
But, a more detailed answer to that is likely to differ depending on the subject matter with which you’re working. To give you an example with Malta, there were, numerically, far fewer defenders than there were attackers. This is usually the case in sieges. But here this was especially pronounced over 6:1 in the attacker’s favor. This has implications on game balance and details of combat losses which need to be different from Quebec (which established the system), where there was closer to parity in numbers. The attacking Turks still need to be able to remove the Knights’ defending pieces off the board or it won’t feel satisfying to play. But if too many are removed too quickly that will also feel unsatisfying. So resolving this is a matter of fine adjustments reducing morale alone as well as removing pieces + morale. In this case history helps us out. The Knights – the Knights of St. John, were also known as the Hospitallers – developing their prowess from practices encountered while crusading in the Levant (history is full of ironies). Although primitive by modern standards, their understanding of medicine was such that they were able to get some wounded troops back into action. So this affords us a justification for a mechanic that can return removed pieces to the board and to restore morale, helping with game balance, narrative, historical flavor, and the play experience as a whole.
Grant: What rules or mechanics in the Great Sieges Series did you have concern about but couldn’t necessarily modify?
Maurice: Part of the appeal of the Great Sieges Series to me is how accessible it is. In just a few minutes you’re up and running with the rules, which are incredibly straightforward – the game can be taught in mere minutes. Further, in under an hour – comfortably under an hour once you’ve learnt the game – you’re completing a game and being whisked away in a board game-sized time machine to all manner of times and places in history. One of the issues that designing a Great Sieges game threw up for me was that the solo enemy, the ‘AI’, isn’t very responsive. The deck is shuffled and it has what it has for you, and it will do things that cause you to react to it, but there’s not much in the system design that will give the appearance of reacting to what you are doing as a player to it. This is a big reason why the Special Events system came into being – to give a greater sense of this responsiveness. Through the design process I became aware that an AI deck that was even more responsive would either overburden the Special Events system – when I first of all wanted to see how a wider audience responded to it, given that it was new to the series – or it would require an entirely new kind of design that would likely jeopardize the accessibility of the series. I didn’t want to generate flowcharts for a bot, or anything of that kind, or risk that accessibility which was at the heart of the Great Sieges Series. That isn’t to say this is a direction that might not be considered in the future, but with the series just getting started it didn’t seem like the right course of action right now. None of this was pressure coming from Mike and Grant (the original designers of the system and the publishers) – it was just my own feelings about it.
Grant: What sources did you consult to get the details about the Siege of Malta? What one source would you consider a must read?
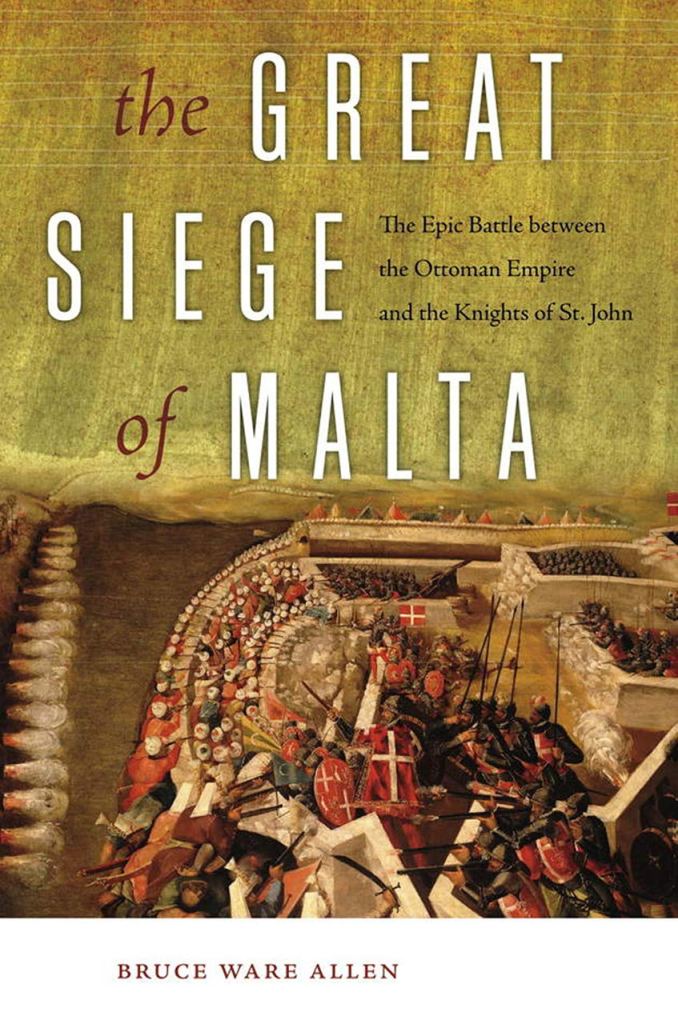
Maurice: I reviewed several different sources but here are a list of the major ones. Allen, B. W. The Great Siege of Malta: The Epic Battle Between the Ottoman Empire and the Knights of St. John. USA: ForeEdge, 2015.
Bradford, E. The Great Siege of Malta 1565: Clash of Cultures: Christian Knights Defend Western Civilization Against the Moslem Tide. New York: Open Road Media, 2014.
Pickles, T. Malta 1565: Last Battle of the Crusades. London: Osprey, 1998.
Tim Pickles’ book is great for a short read and is richly illustrated, as you’d expect from Osprey. Bruce Allen’s book is the one to read for a deeper level of detail.
Grant: I understand the game is designed as a solitaire experience but that a 2-player game was considered? Why did the 2-player game not make it into the release?
Maurice: This is really due to lack of playtesting of this mode. These days most of my prototypes make it onto Tabletop Simulator, but this one didn’t, and that restricted my ability to get a wider group of people to play it. So I was just less certain about that version of the game. It doubtless functions as it is. I just can’t vouch for the balancing. In any case, I feel as if the system may be better suited to solitaire play overall. I’m happy to be proved wrong about that.
Grant: How does the solitaire opponent make its decisions? What are the strengths of the solitaire opponent?
Maurice: The solitaire opponent comes in the form of blocks on the board, and a single deck of cards. The number of cards in this deck makes the game easier or harder. The shuffle in this deck dictates the sequence of Events, causing different things to happen in a different chronology, and it dictates the counter orders your opponent issues. The effectiveness of these counter orders depends on how they intersect with your own orders, selected blind, without reference to each other.
The Special Events also cause different outcomes at different times and give the AI a form of very lightly modeled responsiveness.
In general the strength of the Knights is their resilience. It’s hard to get them to lose pieces, and even when they do they sometimes come back into play – patched up by medics and sent back to the front lines. The strength of the Turks is their numbers. and their array of attacking options.
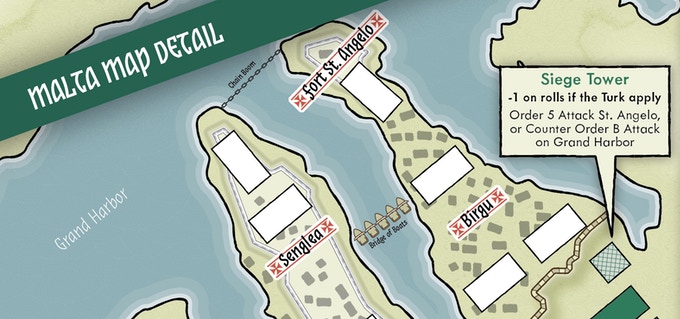
More specifically, the Knights have reinforcements which might arrive in time from Sicily and so be a problem. They also have a means of destroying the Turk’s siege tower. The islands of Malta were not heavily wooded, so this was a weapon that was not easily or quickly made, but it has the potential to be incredibly effective. In history the Knights disabled it before it could do them too much harm. They chopped a hole in their own walls and placed a cannon in the breach and shot down the siege tower.
The Turks have a way of reinforcing their troops in the approaches to the fortresses from the camp at The Marsa, and to take positions such as Gallows Point. The Turks also have a simple AI that drives their fleet into Marsa Creek to increase pressure on Grand Harbour.
Grant: What units are in the game?
Maurice: In terms of physical representation we have white rectangle blocks, which are the troops of the Knights/defenders of Malta and the reinforcements that come from Sicily. We also have red rectangle blocks, which are the troops of the Turks, and red rectangle blocks with a bow to suggest a ship, which represent the ships of the Turks. We also have a single red cube which represents the siege tower. All other unit types are subsumed with specific cards and the system as a whole.
Grant: What makes a unit elite and how do they differ in combat?
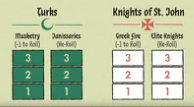
Maurice: Elite units are represented by tracks not by their own unique pieces and they permit you to re-roll one roll a turn. This ability can be used in any combat roll, but only once a turn.
Grant: How are Elite Units limited? What was your reason for this decision?
Maurice: You only have 3 re-rolls per game. You keep on top of this with the on-board track.
This is a light wargame, highly abstracted, but it is still attempting two things many games concerned with history attempt: to portray some essence of the history, even if many details are abstracted out, whilst also attempting to be interesting to play. From my reading there are instances where certain ‘elite’ troops featured in the siege with noteworthy outcomes, either causing almost catastrophic breaches, in the case of the Janissaries, or blocking them up, in the case of what I’ve simply called Elite Knights – concentrated detachments of Knights of St. John. In the case of the Janissaries, these troops weren’t constantly in action, they were held back for particular offensives. In the case of the ‘Elite Knights’, there were particular occasions when they were gathered into counter attacking groups. The respective commanders exercised choice in when to use these resources. Without giving the player the ability to leverage the powerful reserves of the Janissaries, or the potential for the Knights to muster squads on specific occasions the system was missing some of the essence of the siege. Further, this cedes into the second thing I was attempting – and to give the player some interesting decisions.
Grant: How does the use of gunpowder for musketry or Greek Fire on Fire Ships help each side’s odds of success?
Maurice: If the Turks use a ‘musketry resource’ this gives them a +1 modifier on a roll. This is a light way of modeling the presence of muskets and presenting the player with a choice of when to apply it.
The Knights have a mirror resource which is mechanically the same but called Greek Fire, to narratively reflect the use of this deadly substance – something like an early form of flamethrower, which has been in use since the 7th century.
Grant: What special options are available for the Turks to bombard the Maltese forts?
Maurice: Bombard is one of the seven orders available to the Turks. The Turks have a limited supply of ammunition for this order. If the ammunition is already expended they suffer a disadvantageous modifier in this attack.
Grant: How do the Turks use their siege tower?
Maurice: As the player you expend one Aggressive Commander action, and issue order 5, Assault St. Angelo. It then gives you an advantageous modifier on future die rolls with this order for the rest of the game. But the AI deck has a Special Event that can destroy it, and the siege tower cannot be constructed twice.
As the AI deck the Turks may create the siege tower with the same effects. As the Knights you need to destroy the siege tower, by issuing one Aggressive Commander action.
Grant: What role do naval units for the Turks play in the siege?
Maurice: In late June (the siege began in earnest May 24th) the Turks dismantled ships in their deep water harbor at Marsaxlokk and dragged them 5 miles inland to Marsa Creek. Once there, the Turk fleet could apply more pressure on Grand Harbour, restricting the Knights’ ability to shuttle troops between the three fortresses. You can think of it as the noose tightening around the Knights.
But the Knights did have some means to respond. They sent fire ships into the Turkish fleet – which was too big to be destroyed by these measures, but it was an effective means to sow disruption and to delay the Turks.
Grant: How are cards used in the design?
Maurice: There are two decks:
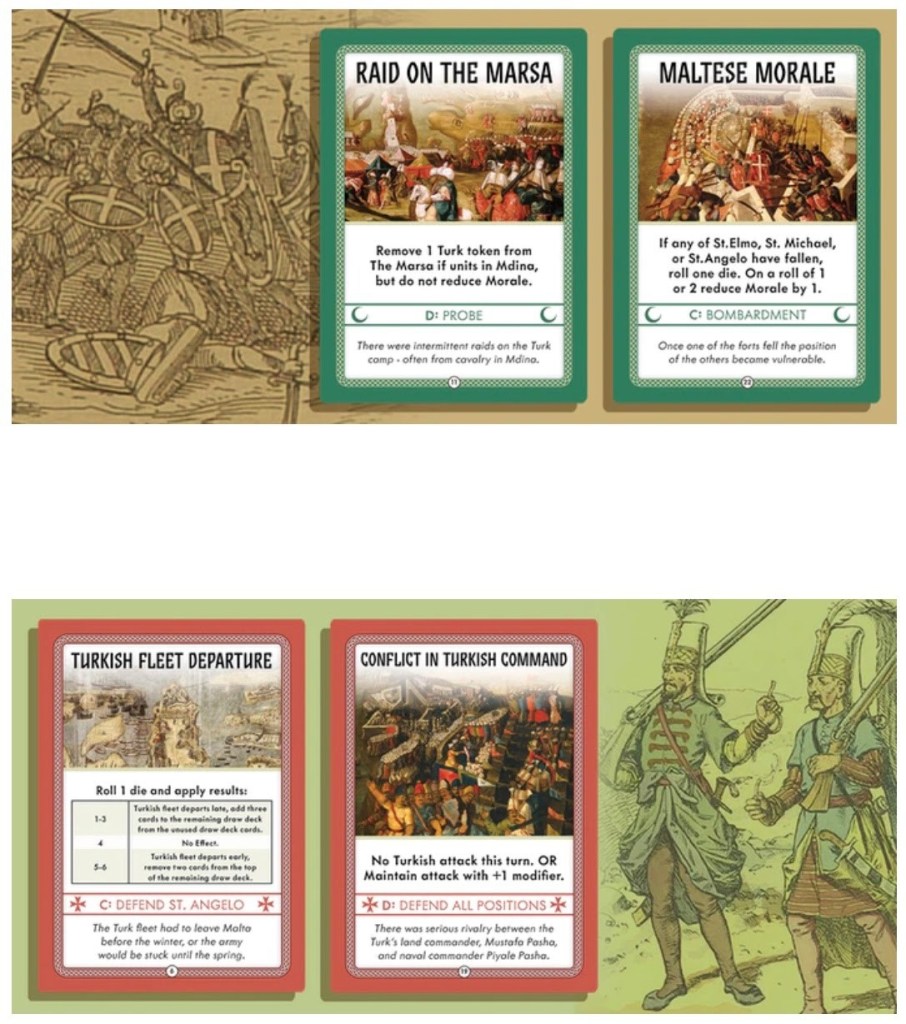
Enemy deck. This controls the AI enemy. Each card has at least two elements, an Event, and a Counter Order. Some cards also have s Special Event.
Events are things that happened in the siege and capture some of the narrative flavor of the campaign – things like raids, desertion, decapitated heads being used as cannonballs, water being poisoned, mutinies, conflict inside the Turk command structure, snipers, sentries missing from their posts, and the death of Dragut.
Counter Orders show the main response of the enemy army in the current turn – essentially where their focus is.
Special Events control things like the movement of enemy troops on Malta, reinforcements from Sicily, the movement of the Turkish fleet, the movement of Maltese fire ships, and the Knights’ countering a Turk siege tower
Order Deck. This is the deck the player controls. Each turn you choose your order from this selection, and decide if you also want to expend one of your Aggressive Commander options (and for the Knights, one of your Defiant Speeches). You then flip over the top card of the enemy deck and correlate their counter order with your order to show you which column to roll a die on. Some intersections are good for you, and some are not, representing the idea that if the enemy predicts your move it will more likely be more bloody for you, than if you have selected an order that their counter order does not anticipate.
Grant: What different options for Commands are available to a player?
Maurice: The Turks have seven order options. (They also have four Aggressive Commander actions.)
Attack St. Elmo.
Attack Grand Harbour.
Attack Mdina.
Bombard St. Angelo.
Attack St. Angelo.
Move Troops.
Move One Ship.
The Knights have seven order options. (They also have two Aggressive Commander actions, and two Defiant Speeches actions. The Defiant Speeches are potential boosts to morale, but could backfire.)
Sortie.
Cavalry Raid.
Hold.
Defend St. Elmo.
Defend Grand Harbour.
Launch Reinforcements. (Not available unless reinforcements have arrived from Sicily.)
Move Troops.
In each case, in order to utilize an order you will need troops in a corresponding area. Although too small to read properly, the image below should give you some idea of how this all looks overall.
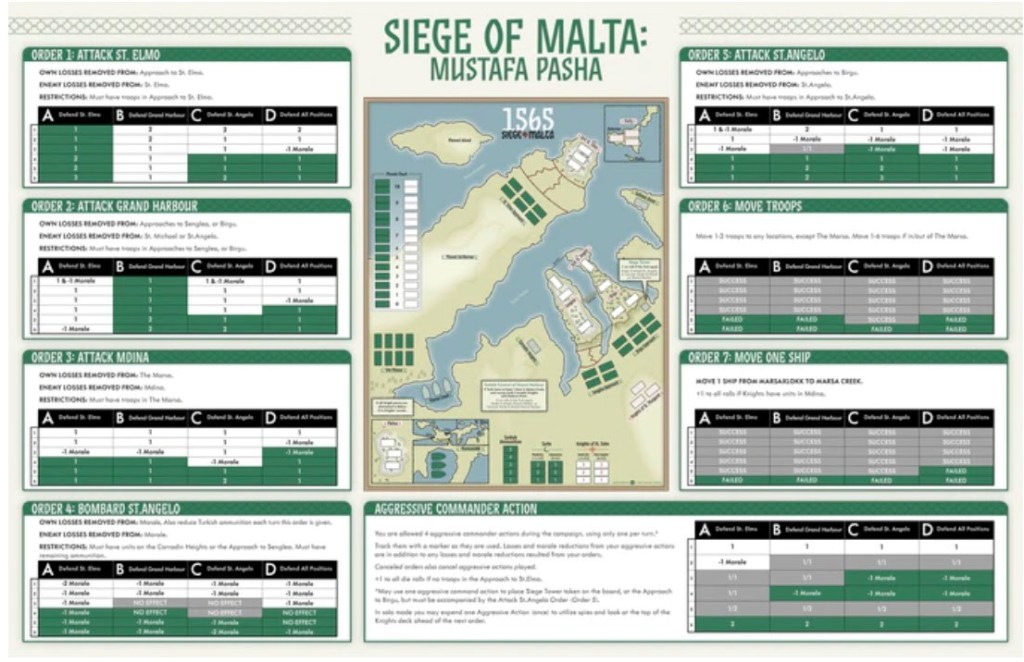
Grant: How are these Commands carried out and what are the outcomes?
Maurice: So it’s really as simple as check you have the troops on the board you need to issue an order, then issue it – place a block on the selected order card. Then flip over the top of the enemy AI deck. Look on the card of the order you issued and find the column that corresponds with the enemy counter order. Roll a die, read the result, implement the effect. The effects range from advantageous to you – the enemy must remove one or two blocks and then reduce its army morale the corresponding amount, or just reduce its morale – to disadvantageous to you – you must remove blocks and morale, or just reduce morale. Some results may mean both sides suffer losses, or neither does.
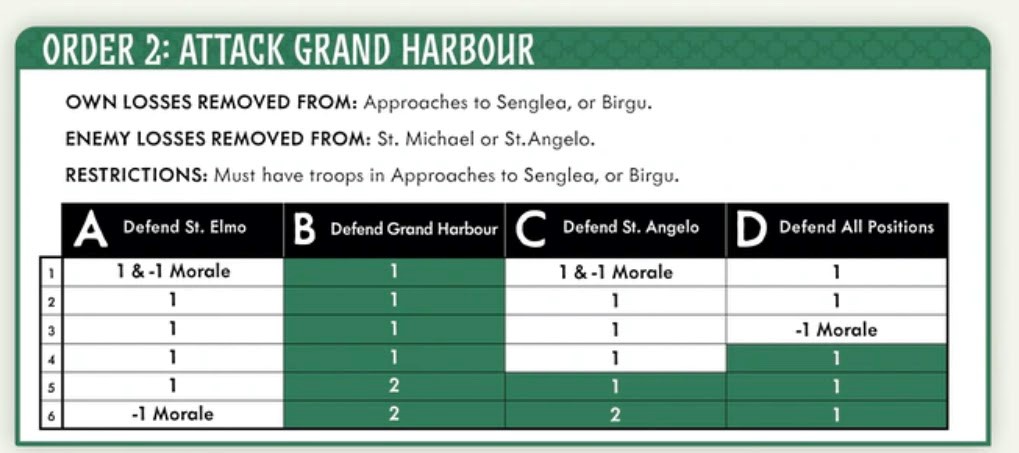
So, if, for example you’re the Turks and you choose order 2: Attack Grand Harbour you will probably cause serious damage to the Knights if they are concentrating on Defending St. Elmo (column A). However, if they are focusing on defending Grand Harbour all the news is going to be bad for you.
Grant: Can you show us a few examples of the cards and explain how they are used?
Maurice: Below are a few examples of the cards in the Enemy decks. The top portion shows you the Event. The text in the box preceded by a letter A-D shows you a Counter Order. The explanations above should hopefully explain how things work – but let me know if they don’t.
Grant: What does the Game Board look like and what areas are highlighted?
Maurice: Here you can see the three fortresses, the city of Mdina, where the Turkish fleet initially harbors, and strategic choke points like Gallows Point and Corradin Heights. You can also see the reinforcements assembling in Sicily (if they actually arrive). You can see the areas where troops are placed – and the huge disparity in troops. 22 Turk blocks, and 3 for the fleet, to 10 blocks for the Knights. The game abstracts the much larger numerical Turk advantage in this form, for playability and balance. You can also see the various tracks, including the Morale Chart.

Grant: How did you determine the location of the various troops on the board?
Maurice: These came directly from my sources. Tim Pickles’ Osprey book was especially helpful as it provided some graphical layouts of the troops which were very easy to then transfer to the game board.
Grant: How is victory achieved by both sides?
Maurice: The game ends when one side or the other has zero morale. That side has lost. If both sides reach zero at the same time the Knights are the winner. They have outlasted the siege – albeit barely.
The enemy AI deck represents the passage of time during the campaign. At the end of the turn when the last card is played, the game also ends. The Turkish Fleet departs to avoid the seasonal storms in the Mediterranean. If the Turks have not won the game at this point, then it is a victory for the Knights of Malta. They have outlasted the siege.
The game also ends automatically if Senglea, Birgu, and St. Elmo are all vacant of Knights’ troops at any point. The Turks have shattered the defenses of Malta and captured the fortresses.
Grant: What strategies should govern the Maltese defender and also the Turkish besieger?
Maurice: For the Turks, the Knights are tough to break down. You need to try to focus on some key areas and avoid having your attacks be too dispersed, and all along time is ticking away.
For the Knights you want to be rid of the siege tower if it appears, so probably save an Aggressive Commander action for that. You want to stop the Turkish fleet from getting into Marsa Creek – if they get there, as well as Corradin Heights and Gallows Point you’ll be choked to death. You have very little manpower to go around, but try to keep at least two blocks in each fortress at any time. Keep raiding from Mdina. Pray for reinforcements.
Grant: What type of play experience does the game create for the player for each side?
Maurice: The Turks will be anxious about time slipping away. They have plenty of resources, but with the press of time these can soon be squandered, so they should feel powerful, yet aware of the clock ticking.
The Knights will be glad for each turn ending, and will be anxious about how many cards are left in the Turk deck – which is how long they will maintain the siege. They will hope reinforcements come.
But, beyond that, I hope for whichever side you play as, it will be fast to learn, fast to play, fun experience, fraught with some difficult choices, disappointing die rolls, happy die rolls, and much apprehension as you turn over the top of the enemy deck and hope you get the result you need…
Grant: What are you most pleased with about the design?
Maurice: I think what I’m most pleased with is delivering on the overall scope of the siege, with its many elements – such as huge disparity of numbers, multiple fortresses, the city of Mdina, the Turk navy, numerous notable narrative elements briefly hinted at earlier – whilst also retaining the system’s accessibility as a light rapid learn, rapid play light wargame.
Grant: What was the most difficult challenge you had to overcome and how was it solved?
Maurice: The system entails revealing just one card a turn – so there were a number of challenges that came with that system. How to build to the arrival of reinforcements, rather than them just arriving perhaps much too soon with the play of one card? How to give each side more responsiveness to get reinforcements to problem areas? How to give the AI Knights the ability to resist the siege tower? The solution was the use of Special Event icons. It’s really a simple solution, multiplying the functionality of the cards without complex conditional elements to track in order to implement. I suspect I could have pushed this harder. But my instincts are to see how players respond en masse before trying to do too much all at once with these kind of system tweaks.
Grant: What other games are you currently working on?
Maurice: Let me see…
I’m working on a co-op game about the diplomatic crisis that caused World War I, and another, smaller game, in the same system about the 1911 Agadir Crisis that might have caused the war, but didn’t. These are both far along and I hope to have more news on them later this year.
I’m also working on a game about the Cold War, using the Hidden Strike System, which is currently in its first round of playtesting. Hidden Strike: American Revolution will be shipping in a few weeks, and then we’ll start to discover if there’s actually a market for this kind of light co-op/possible traitor wargame.
I have a design on the Second Boer War in the works.
I’ve started talking to Riccardo Masini and Sergio Schiavi about a game on the Battle of Volturno (1860) using the Battle Formations System from my Chancellorsville 1863.
I’m experimenting with a semi-co-op multiplayer game about the 1783 Peace of Paris.
I’m working with Daniel Burt, a longtime friend in the U.K. on a game about Roman Britain which has spun out of the first CONSIM Game Jam last year. But this is now really developing into a whole new system and I think breaking some new ground on modeling rebellions, which is pretty exciting.
I also have a prototype which I’m working with Daniel on that’s set in the Wild West and that’s currently getting some redesign attention.
Oh, and I’m mentoring the jolly excellent Alison Collins who’s one of the participants in the Zenobia Awards and she’s developing a game about Machu Picchu, which is really a game about how historians ‘do history’.
Thanks again for your time in answering our questions Maurice and for your great attention to detail and how you explain your design thoughts. This type of explanation is very interesting to players, especially of historical simulations, as they want to know the details and how you are accounting for the history. These details make for a much richer and rewarding play experience and also show that you have thought long and hard about how to model things to replicate that history. Excellent work as always! I very much look forward to playing this game and cannot wait to check out all of your “work-in-progress” games as well.
If you are interested in 1565 Siege of Malta, you can order a copy from the Kickstarter page at the following link: https://www.kickstarter.com/projects/1456271622/869475414?ref=4p0kto&token=ae1a813f
-Grant
