
In case you didn’t know, David Thompson has been putting out some really good and entertaining wargames over the past couple of years. One of his finest has been the 2019 hit Undaunted: Normandy which is a card based small squad tactical game that uses deckbuilidng and a modular board with scenarios to tell the story of the 30th Infantry Division as they marched across Europe following their landing on D-Day during World War II. Due to that game’s success a new expansion has been designed and released and is simply fantastic. Undaunted: North Africa adds in several new elements, including new abilities, new cards, new terrain and scenarios but most importantly vehicles.
In Action Point 1, we looked at the deck building aspect of the game, including the makeup of the deck and how you “build” it. In Action Point 2, we dove into a look at the new units in the game and their new special abilities and also looked at the biggest new addition including vehicles and new structure markers. In this Action Point, we will take a look at the major differences between North Africa and Normandy and what has changed in the system other than the new units.

Differences from Normandy
A tried and true system that does a good job of creating a tense and decision filled play experience covering the operations of small units in World War II. That is what the Undaunted Series has accomplished. So why should this be changed up and a new focus be implemented into the system? Well, wouldn’t we be upset if there were no changes to reflect the differences in this theater of war during World War II? While the equipment and soldiers haven’t changed that much, with the exception of the introduction of tanks and other vehicles, this game is not simply the same product with a new setting, new package and more stuff. This game feels very different and has a smaller scale feel from its predecessor Undaunted: Normandy.
Scale
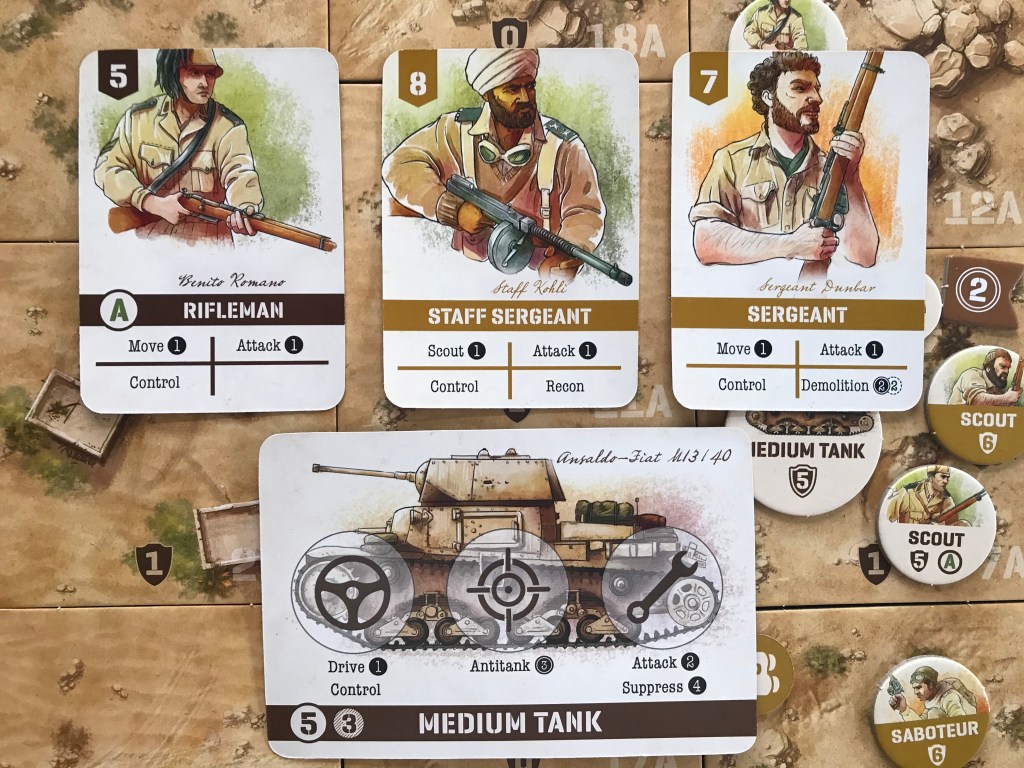
One of the major changes in the game is the scale. In North Africa, each of the combat counters that are on the board represent a single soldier, rather than a unit of soldiers. This means that each card you play is just one man. Compare this to Normandy where each of the combat counters represented different soldiers in a squad. This principle can best be illustrated by taking a look at the following two pictures.
In this first picture you will see that the Italian Rifleman has a combat counter that represents that soldier on the board and then you will see his card to the left of the counter. Each of the 4 Rifleman Cards included is a picture of the same soldier. How do we know it is the same soldier, aside from the fact that the picture is the same on all 4 cards? It is found in the name of the soldier which is Benito Romano, and the fact that it appears on all 4 cards.
Compare that to the American Rifleman Cards from Normandy shown below. The American Rifleman also has only one combat counter that represents it on the battlefield but the difference is that each of the cards are individual soldiers that make up a 5 man squad.

You will notice in the picture below, which shows a closeup of the American Rifleman Cards, that each of the cards has a unique picture as well as a unique name identifying each of these soldiers as their own person (James Allen, Paul Miller, Richard Johnson, Robert Denton and Harold Henderson). The 5 different Rifleman makeup a squad that is represented on the battlefield by the same combat counter.
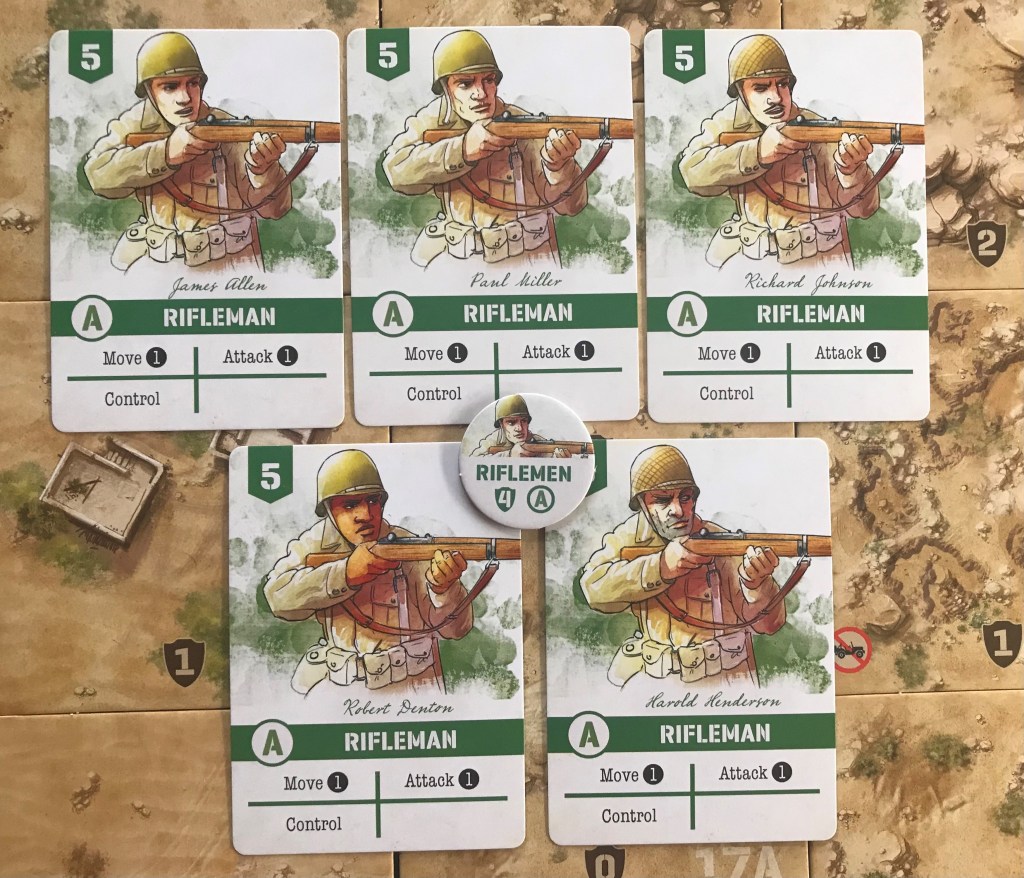
This fact doesn’t majorly change the way the game plays but it does create a more intimate experience of a small team of commandoes or individual soldiers that each bring a unique role and set of skills to play in the missions. In fact, there are only 4 cards representing each of the soldiers on your team in North Africa and this means that you cannot take as many hits as you would have been able to in Normandy with 5 soldiers represented by a combat counter. This subtly changes the way you have to play the game though and gives you less expendable assets and forces you to play a bit more cautiously…or to throw caution to the wind and just go for objectives.
Casualties
Before I get into this principle, I need to remind you how an Attack works. If a combat counter is successfully attacked the player has to go through a series of removal of cards. First, if they have that combat counter’s matching card in their hand, they must remove it from the game. If not in their hand, then from their Discard Pile. If no cards are in any of these, then the combat counter is removed from the game. This is the way it still works but there is a subtle difference in the wording of the rule that has a fairly major impact.
In North Africa, if a combat counter is removed due to a successful attack, then all cards that were remaining in the Supply are also removed and that counter is eliminated and cannot return to the battle. This is a major change from Normandy as if the combat counter was removed it could still be Bolstered and return to the battle at a later time as long as there were cards of its type remaining in the Supply.

This small change really alters the way you have to worry about casualties. In my mind, this makes it harder to make aggressive moves early in the game until you have had a chance to Bolster more cards of the type of soldiers you are using into your deck. This way if you take losses you have cards to remove and will not totally lose the unit from the game. There are also only 4 of each card so this can make you more cautious. Losing your only way of winning the game is the quickest way to defeat and you want to avoid this at all costs. Don’t beat yourself because you weren’t Bolstering your forces.
Asymmetry
One of the most glaring differences in the game from Normandy to North Africa is the differences in objectives and unit composition for each side in the various scenarios.
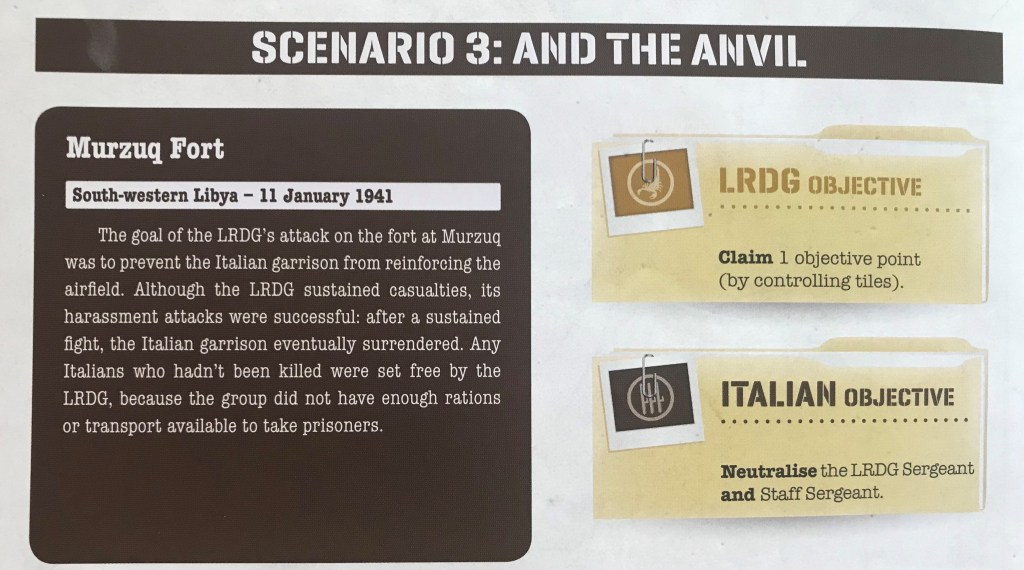
Here is a look at a few example scenarios illustrating this point. The first scenario is Scenario 3: AND THE ANVIL which shows that the Long Range Desert Group (LRDG) has to Claim 1 objective point while the Italians must Nuetralise the LRDG Sergeant and Staff Sergeant. This type of thing is normally not the way mission objectives are but shows that in North Africa they can be very different and frankly unexpected.
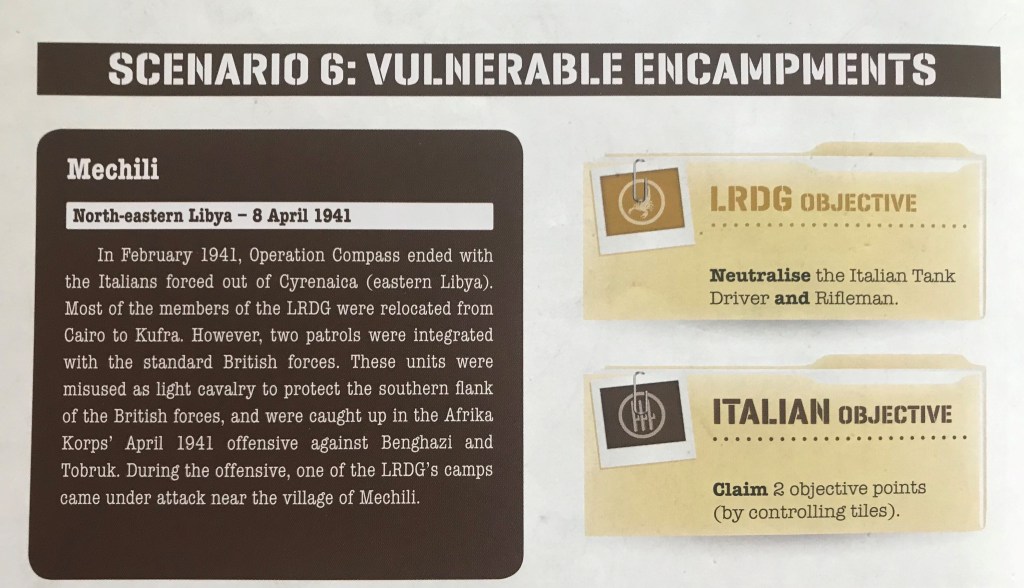
The next example is Scenario 6: VULNERABLE ENCAMPMENTS which has the LRDG attempting to Neutralise the Italian Tank Driver and Rifleman while the Italian’s Objective is to Claim 2 objective points.
Now compare this to a typical scenario in Normandy where each side is simply supposed to achieve the same thing. Scenario 4: BEHIND ENEMY LINES asks each player to secure 5 objective points. As I looked through the Scenario Book for Normandy it looks like 7 of the 12 scenarios asked for each side to secure the same number of objective points, while the remaining 5 scenarios all asked one side to secure a specific number of objective points while the other side was supposed to Pin the other side, which was defined as having no Rifleman on the board.

Now let’s take a look at unit composition for scenarios. In the below scenario from Normandy you will notice that each side not only has the same unit types of units in their Decks at the start of the game but also has the same amount of each type of unit available in their Supply for the scenario. This makes for a very balanced and competitive scenario but each side will generally use the same tactics and methods to get to their objectives.

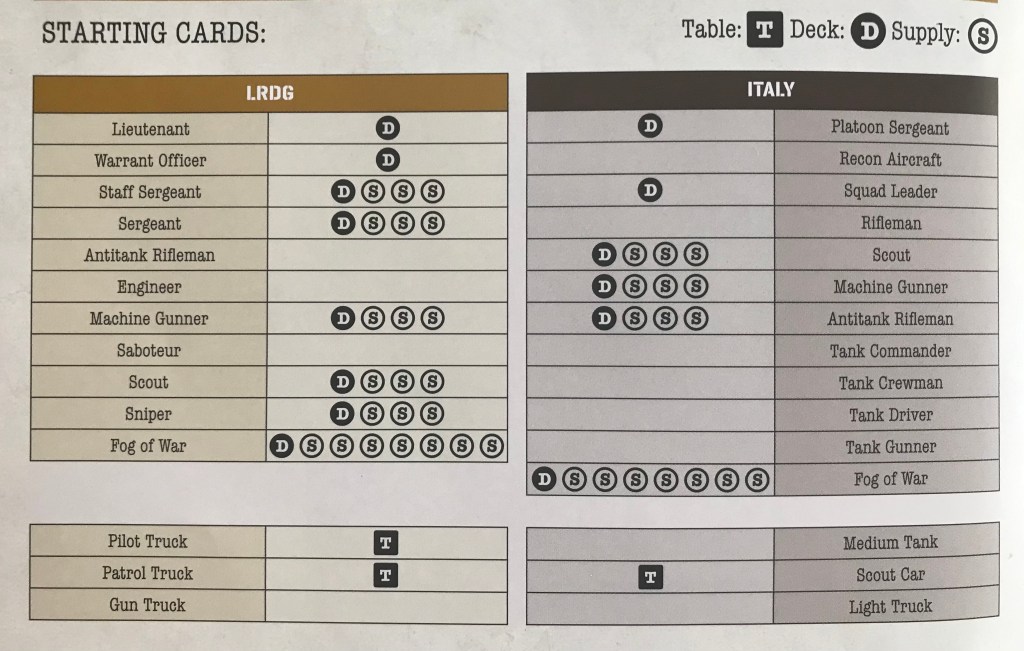
Now take a look at the below from a scenario in North Africa. Not only does each side have different Command Cards in their decks, but they also have access to different types of soldiers. One thing I will point out is that each side has at least one vehicle but only the Italians have Antitank Rifleman which an be used to take out those vehicles. The LRDG have units that can take out vehicles, like the Saboteur who must sneak up on the vehicles and perform a Saboteur Action, but no units that directly can attack a vehicle form a distance. This is one of the key differences in not only the scenarios but in each side’s types of units, which we covered in the last Action Point.
I love this aspect to the design as it creates a new tactical puzzle for the same situation for each side. Not only do they have varying and different objectives but each side has different assets to utilize in getting the job done. Players can play each side of each of the scenarios and have a wildly different experience so in many instances this game is much more replayable than Normandy.
Control
Control is an action that allows you to gain an objective and place your Control Marker on it to meet scenario objectives. This is a very important part of the game and only certain units can perform a Control Action, including the Medium Tank and Rifleman for the Italians and the Staff Sergeant and Sergeant for the LRDG.
Control is a bit different though in North Africa. Not radically different but a change was made to capture the frenetic and furious nature of the combat in this theater of World War II. In North Africa, a player can take Control of a tile that an enemy combat counter is already on if they don’t Control the tile. This is a difference as in Normandy, you would have had to eliminate an enemy counter from a tile before you could take Control. It makes sense. You cannot take Control until you have secured the tile and removed your enemies as they will continue firing on your units as they attempt to gain this Control.
But in North Africa as long as the tile is not Controlled by the enemy, the presence of an enemy unit on the tile doesn’t prevent the player from using a unit with a Control Action to take Control. This change has really placed an emphasis on acting quickly and taking Control before your opponent can. But it also reflects the asymmetry of each side and the fact that Control of objectives is not always a part of a side’s mission objectives. I really like the change and have found that it creates a bit of tension and urgency to act quickly on both sides. It has made for a much faster playing, more exciting and engaging experience than Normandy and I didn’t think that was possible but the design team made this one ever better!

The changes made to North Africa were made in order to better reflect the situation that was experienced in the North African Theater of World War II. These changes do not make this a totally different game, as many of the same rules apply as well as the use of major mechanics such as Deck Building, Hand Management and tactical strategy on the battlefield, but this one feels very different than its predecessor. To me, it is much more intimate and in your face.
The units are a bit more fragile, as there are only four cards representing them, and you have to plan your attacks a bit better as you cannot afford to lose units too early or you will become Pinned and unable to meet your objectives. The pace is quicker though, and I know that kind of flies in the face of what I just said, but when you happen to get the correct hand for the situation, and you have an opening to take advantage of those cards, you can spring into action and move 2 or 3 tiles and Control an objective in one single hand. And this was never possible in Normandy. It was more plodding and a bit predictable. This iteration is frenetic and you should never feel safe in your position. I love the changes to the rules and the new tricks you have at your disposal and look forward to how the next game in the series called Reinforcements, that should be landing on the scene next summer….maybe, will differ!
In Action Point 4, which is the conclusion to this series, we will cover some basic concepts of strategy to keep in mind about how units are best used and how to exploit their special abilities.
-Grant

My friend and I have played both versions. While there is a lot to like about North Africa, we have reached a draw on 3 of 8 games we’ve played from three different scenarios. This happens when both sides lose all four of the characters needed to win a scenario. The winner is then declared to be the one who last held initiative. It’s not a very satisfying end to a game. There are comments from others on the BGG Forum so we aren’t alone in this. Could you comment on this in your last article? That might help. For now we have set the game aside.
LikeLiked by 1 person
Hi Les. I think that this is part of the game and something that happened to us with Normandy as well. To me it reinforces the fact that you have to protect those soldiers that are key to the mission and cannot be careless with them. I also think that this highlights the need to Bolster those key soldiers as quickly as possible into your deck so that they are not as easily killed and removed from the board. We have played 4 or 5 times with North Africa and have only had one such draw happen.
Also keep in mind that with only 4 cards of each soldier in the deck, they are more fragile and will die quicker if you are not careful. Don’t give up on it yet. Just try those things I have mentioned and let me know if your experience changes. Thanks.
LikeLike
Do you feel as though the objectives are a bit out of balance as its often harder to control multiple targets where the other side simply has to demo them which removes them from play?
LikeLiked by 1 person
I have not felt that. But as I mentioned you need to know what they are trying to do as compared to what you need to do and then choose whether you attack their ability to complete their objectives or rush for yours.
LikeLike