With It or On It was simply a revelation and an utter joy to play. Not often do we say that about new gaming experiences and especially not for a fast playing wargame but this system just created such an interesting and tactical experience that I had to share it with you. With It Or On It is the first game in a new Shields & Swords Ancients Series from Hollandspiele that uses a system developed in the Shields & Swords Series that deals with medieval battles. The series is not overly crunchy, and doesn’t overdue it with different armor and weapon types, but simplifies these elements into a concept called Combat Class. The game takes the vantage point of the player as an overall commander where you control several different wings and have to play a series of Command Chits to activate them. The game is light, fast playing and the rules overhead is low but the game has some really interesting decisions regarding how to go about defeating your opponent.
In Action Point 1, we covered the basics of the system and looked at the different types of units available to the commander. In Action Point 2, we dove into the very interesting Command Phase where the player must make tough decisions about how to use their limited double sided Command Chits. In Action Point 3, we explored a bit deeper into the various Phases of the Sequence of Play giving more detail on the Skirmish Phase and Move Phase. In this Action Point, which is the final entry in this series, we will focus on understanding the Combat Phase taking a look at the Unit Type Modifier Matrix and how it works with the Combat Results Table and then take a look at a few examples.
Combat Phase
Aside from the Command Phase, the Combat Phase is my favorite part of the design. I have played several Ancients themed games and most of them use the concept of troop quality and provides advantages of certain types of units over other types. This is associated with different tactics, more heavily armored and well trained troops and takes into account the strategic concepts and limitations of the phalanx and other formations used in the Ancient world.
During a Wing’s Combat Phase, activated Fresh Units that are adjacent to the enemy must either Attack or Support an Attack. The nature of the fighting of the time was up close and personal and a well organized phalanx didn’t allow for much improvisation or maneuver in combat as there was a man at your left, your right and behind you and your sole focus was on the enemy in front of you. Multiple Attacks can be made in a single Combat Phase, but each will be announced and resolved independently and each Fresh Unit may only participate in one Attack. The other distinction in the design is that each enemy Unit may only be the target of one Attack from the active Wing. No ganging up on Targets. I actually really like some of these limiting factors as once again I believe that it captures well the limitations and operation of a phalanx. You could basically attack straight ahead or could assist your neighbor Unit with attacking their Target. No heroes here!
The acting player chooses a Fresh Unit from the acting Wing to serve as the Primary Attacker, and an enemy Unit to which it is adjacent to serve as the target of Defender. Any Fresh Units belonging to the acting Wing that are
adjacent to the Primary Unit or the Defender can serve as Support. Once again we must remember that a Fresh Unit that is adjacent to an enemy Unit must either serve as the Primary in an Attack or provide Support but cannot do both and cannot participate in more than one Attack each round. The choice about what Unit does what type of function is up to the player as long as the requirement is followed. You can also keep in mind that Horse Units may always move one square before resolving a combat they are involved in, and that this could change their adjacency to the Attacking Unit or the Target and could change whether or not they are required to Attack or Support.
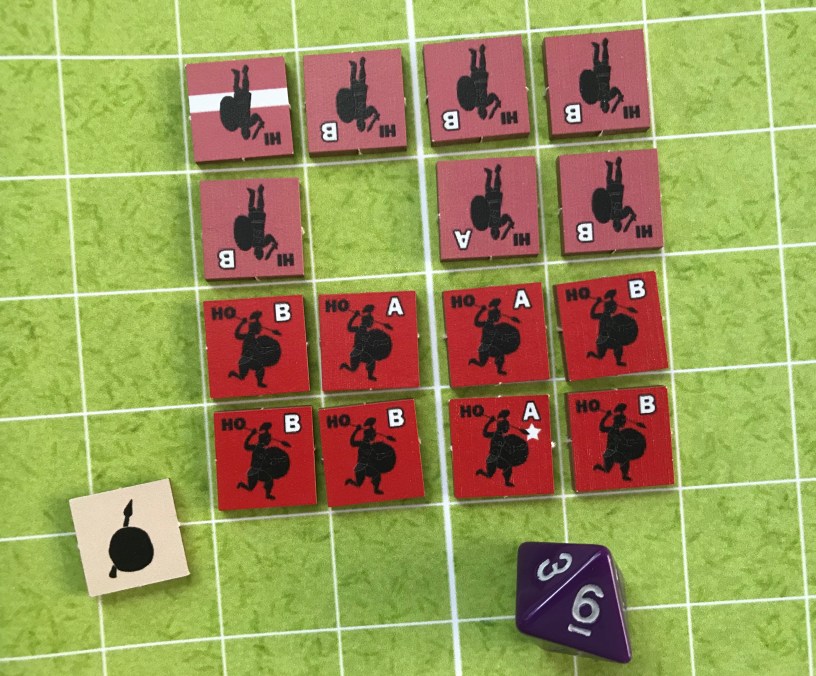
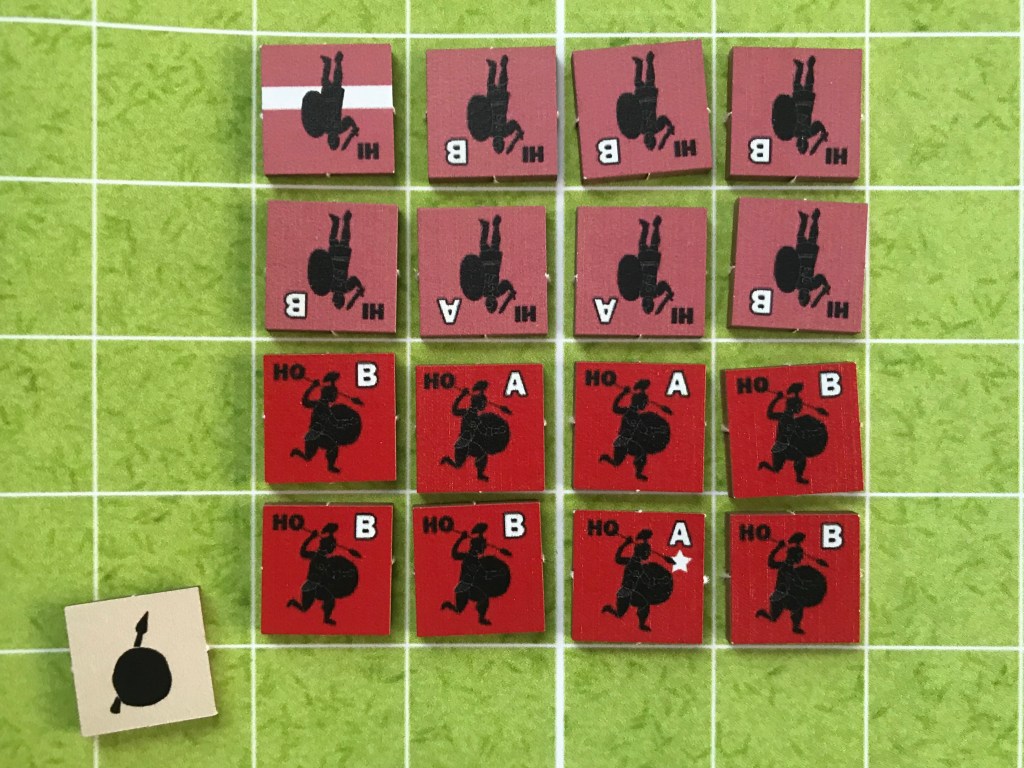
In the picture below you will see what I am trying to convey to you. The Red Wing of Hoplites have moved into position to clash with the Pink Heavy Infantry. The Hoplite formation is double depth so the Units located in the front of the formation adjacent to the Heavy Infantry can either Attack the Unit they are adjacent to or Support their comrade to their left or right. But keep in mind that the Units located in the back of the formation are adjacent to the Attacking Unit and as such cannot attack the Heavy Infantry but can lend their Support to the Unit they are adjacent to as they Attack straight ahead.
Ideally with the formation as pictured, the player would have each of the Hoplite Units in the front attack the Unit they are adjacent to in front of them and then have the Units located behind them Support the Attack. This will result in a DRM for each of these 4 Attacks and will be the best use of the Units that are available as you must remember that you cannot have two Units located in the front tag team and Attack the same defending Heavy Infantry Unit. Now let’s move onto the concept of Combat Class.
Primary’s Combat Class
Generally speaking, the primary attacking Unit’s Combat Class will be used in the combat, with one exception, and it is a big one and once again represents the theme of the phalanx. If the Primary Unit is a Hoplite, and if the owning player can demonstrate an uninterrupted chain of Fresh Hoplites in the same Wing to a Fresh Hoplite with a higher Combat Class, then the higher CC is used by the attacking Unit in a type of borrowing. The phalanx was such a tight formation and all Units were generally within ear shot of each other and could therefore operate more as a single Unit rather than a larger formation made up of individuals. If one Unit is better at tactics or certain types of attacks, then that knowledge would have been shared as the formation drilled and fought together and in many ways would have been this concept of unity of command and shared knowledge. The other thing to keep in mind is that the phalanx really was one single body with steps of strength, meaning each of the various individual Units, rather than its separate Units acting independently. Generally the strength of the entire line was made up of the individual parts working together and these tactics would even cover up or minimize any weak Units.
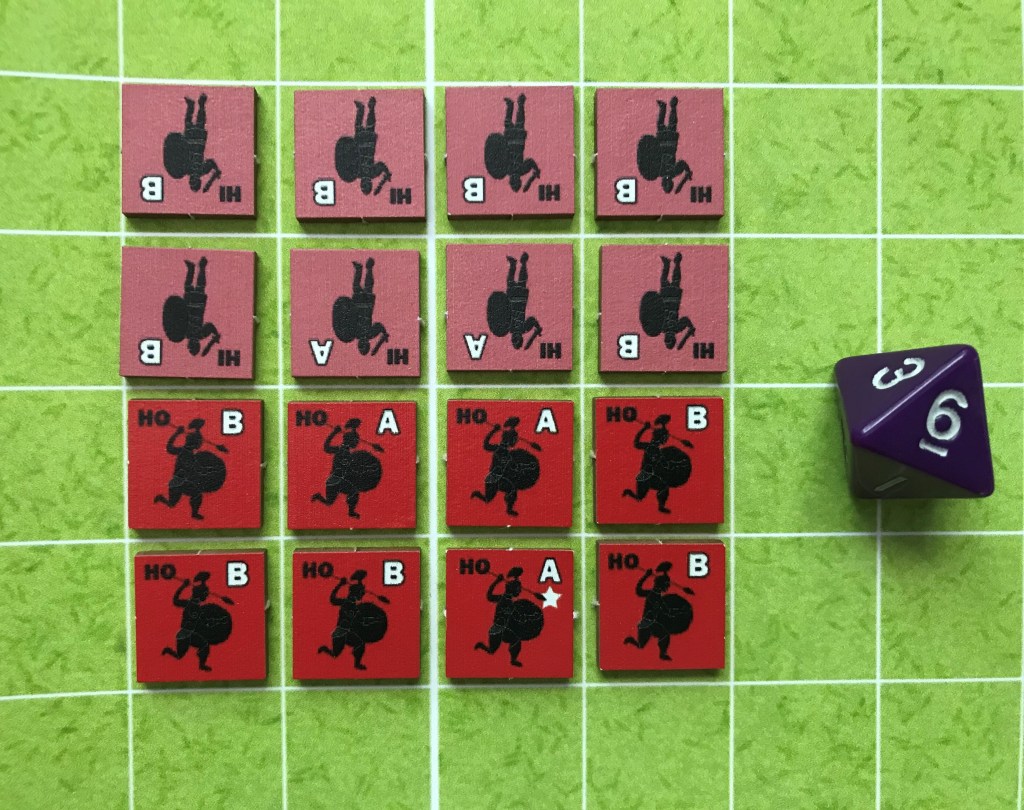
Let me give you a simple example of this concept by using the above picture again. If a Primary B Combat Class Hoplite is the attacking Unit and this B Combat Class Unit can trace a chain of Fresh Hoplites to a Fresh A Combat Class Hoplite, then that Primary Unit will borrow the A Hoplite’s Combat Class. The CC of any single Unit can be modified up or down along the lines of various elements including +1 CC if attacking an Exhausted Unit, +1 CC if a friendly Fresh Unit is also adjacent to the Defender which is considered a Flanking Bonus or -1 CC if half of the Units in the Attacker’s Wing are Exhausted/Eliminated, but this last fact does not apply to Hoplites. Each of these modifiers can be stacked into the same Attack but will max out on the high end at A+ and at the lower end at D. In the picture above, the far left B Combat Class Hoplite would borrow the A Combat Class of the Hoplite to its right, as long as that Unit if Fresh. As you can see this could be the source of a lot of different tactics that can be used by the Attacker as they could protect their better CC Units by placing them in the back while still gaining the advantage of having a superior CC in Battle as long as this chain of Fresh Units is intact.
Unit Type Modifier Matrix
Now that we have covered the basics of the Combat Phase, let’s now take a look at the heart of the matter in the Unit Type Modifier Matrix. After an Attack is announced, the Attacking player will have to compute any Dice Roll Modifiers and in order to do so must first compare the Primary Attacker’s Unit Type with that of the Defender on the Unit Type Modifier Matrix. This Unit Type Modifier Matrix takes into account the different type of Units that are engaged and factors in elements such as heavy armor, superior tactics, maneuverability, etc. to compare Units and provide one type an advantage over another type. The advantage will be expressed in the form of a Die Roll Modifier (DRM). From this modifier, subtract one for each Unit providing Support, and one if Bonus plus Combat is used, to get your final DRM. Rolling low in this game is best for Combat, which is different than the Skirmish Phase where you wanted to roll 8+.
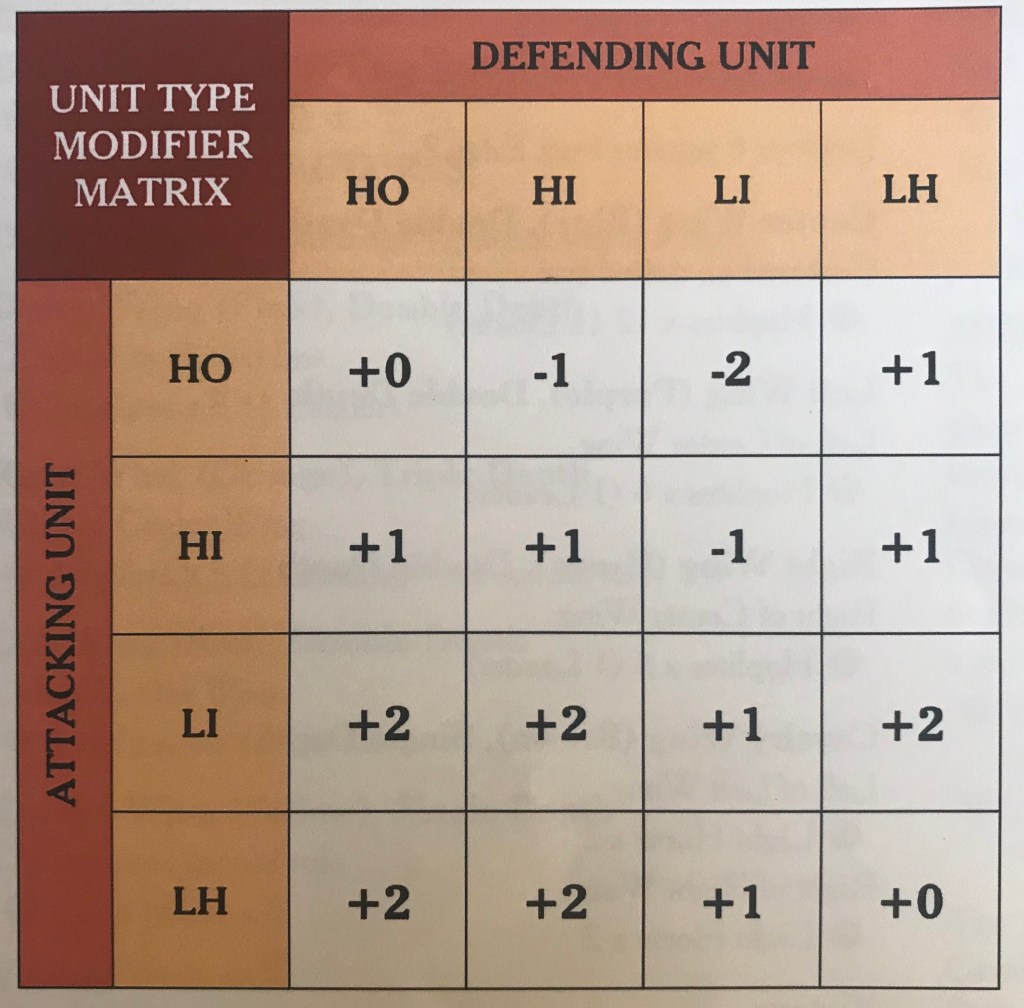
Pictured above is the Unit Type Modifier Matrix from which the Attacker will gain their main modifier. As you look at the Matrix, the Attacking Unit is listed along the left side with the Defending Unit being along the top. You simply find the Unit Type that is Attacking and cross reference that with the Defending Unit Type. For example, a Hoplite Attacking a Hoplite will result in a +0 DRM while a Hoplite Attacking a Light Infantry will result in a -2 DRM. Remember, that the player is trying to roll low on the CRT as those numbers represent the best outcome for the Attacker. One very interesting thing about the Matrix is that Hoplites, Heavy Infantry and Light Infantry have a +1 or +2 DRM when Attacking a Light Horse Unit. This reflects the maneuverability of Light Horse as they are simply harder to corral (pun intended).
Combat Results Table
Once the DRM is figured, the player then simply rolls the 8-sided die, applying the final Die Roll Modifier, and then will cross reference the modified roll with the Attacker’s modified Combat Class to arrive at the result. Results higher than 8 are treated as 8 and results lower than -2 are treated as -2. The results are fairly standard as follows:
DE: The Defender is Eliminated.
DX: The Defender is Exhausted.
AX: The Attacker is Exhausted.
EX: Both sides Exhaust one Unit with the Defender first.
AA: The Primary, and all Supporting Units in the Attack, are Exhausted.
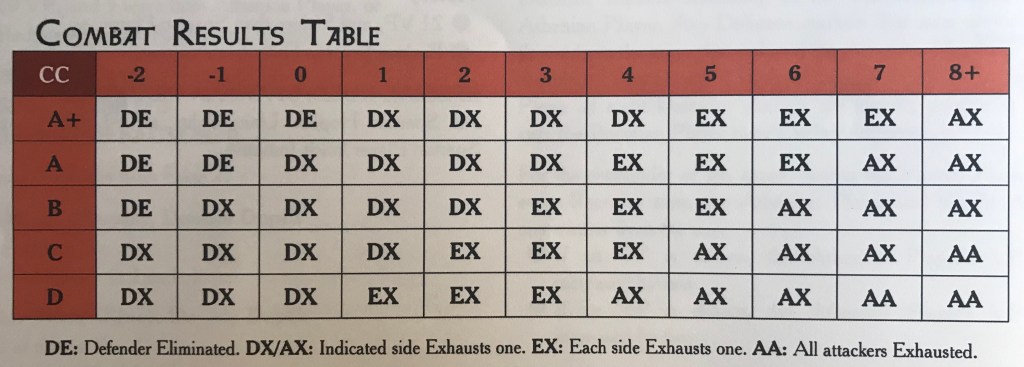
As you can see in the picture above, the Attacking Unit’s Combat Class is found along the left side of the CRT and then the player will move to the column that matches the modified die roll for the final result. The top two rows are the best but these rows represent the best of the best of Units like the Hoplite. The results are not as good as you move down the row with lots of EX results (basically an Exchange). If the Attacker rolls high the results are terrible with things like the Attacker Being Exhausted.

One other interesting concept of the Combat Results Table is what Units must take the results. When the result indicates that a side is to be Exhausted, the owning player chooses an eligible Unit to suffer the Exhaustion. The Unit chosen does vary by circumstance. If the Defender, either the defending target Unit may suffer the result, or any friendly Fresh Unit of the same Wing that is adjacent to it. If the target is already Exhausted, one of these adjacent friendly Fresh Units must be chosen to suffer the result. If no adjacent friendly Fresh Units exist, the target has no choice but suffers the result. If the Flanking Bonus was used to modify the Attack, then the target must suffer the result regardless. If the Attacker, Either the Primary Attacker may suffer the result, or any Unit that provided Support. If an AA result, the Primary and all Supporting Units are all Exhausted. Another example of the thought that was included in the design and the injection of the tactics of the phalanx. I really like the utility of being able to choose the Units that are going to take the hits, within reason as there are rules, but this makes for some very interesting choices. You always want to keep your best Combat Class Units Fresh so you will find that you take hits on your Supporting Units. This can also make for some very difficult choices with the Rout rules that we will cover shortly.
When a Fresh Unit takes a result, they are flipped to their Exhausted side. Units that are already Exhausted that suffer an Exhaustion result will be Eliminated instead, which will then trigger a Rout Check. If when flipping a Fresh Unit it is revealed to be Brittle, remember that this is two stripes on the reverse side, it is immediately Eliminated, and also triggers a Rout Check.
Whenever a player’s Unit or Leader is Eliminated as a result of Combat, it immediately triggers a simultaneous Rout Check for all Foot Units but not for Horse Units in all of that player’s Wings. Units that fail the check are Eliminated while Units that pass the check are not. Units Eliminated via a Rout Check do not themselves trigger another Rout Check, but if multiple Units are Eliminated as a result of Combat, multiple Rout Checks will be triggered.

The Rout Check is not a roll like a Rally Check but simply has to meet a few conditions to consider passing. To pass a Rout Check, a Unit must be adjacent to at least two friendly Units in the same Wing, or it must be adjacent to at least one friendly Unit in the same Wing that has already demonstrated that they are adjacent to at least one other unit that satisfies the “adjacent to two other units” condition. Does that make sense? Normally, you have to be adjacent to two other Units in the same Wing but if a Unit doesn’t meet that condition, they can then be adjacent to a single Unit that IS adjacent to two other Units. This is another very cool part of the game design and takes into effect the integrity and cohesion of the Ancient soldiers formations. In our few plays of the game, we found that most Eliminations come as a result of Rout Checks. One of the main goal of any commander on the Ancient battlefield was to destroy the cohesion of the enemy line, which would then lead to Units breaking and running from the battle. Searching the line for the right spot to launch your attack can be very important and more often that not is the key to victory.
Units that are Eliminated are removed from play and score Victory Points for the opposing player. Typically, we would simply pile the Eliminated Units off to the side of the map and keep track of the VP throughout the game.
One of the things that I really like about this game is all of the various historical elements that seem to have been included in the design, from tactics of the time, to the difference in Combat Class among the same type of units and the the difference in Unit types and their advantages found in the Unit Type Modifier Matrix. This attention to historical detail has created a very interesting and insightful design that is frankly very interesting to play. I know that the game is fairly light, and many of you were probably turned off by the basic and very plain board and the multitude of colors used for the Units, but the Command Phase and the use of the Command Chits is pure genius and makes for a very tactical game that you must consider each use of the Command Chits as there are combinations that can really put pressure on your opponent. I really look forward to future volumes in this Shields & Swords Ancients Series as I want to see how different periods are handled and what new toys and tricks that Tom Russell will provide for us to explore.
-Grant
