
In this series covering the inside details and mechanics of the introductory level wargame Brave Little Belgium from Hollandspiele, we will uncover some of the interesting elements that make this game about the German invasion of Belgium in 1914 unique. In Action Point 1, we took a look at the very well done Chit Pull System that is used to activate units. In this Action Point, we will get down to the nitty gritty and take a look at a few different types of Combat, including Combat in City Boxes, Siege Combat and Combat in Forts .
Combat in City Boxes
If during an Army’s Activation any Boxes contain Units belonging to both sides, Combat occurs. Pretty simple and straightforward definition that harkens to the game’s focus as an introductory wargame. The first key to Combat though is understanding your forces and their capabilities. If you look in the picture below at the Belgian stack that is located in Tongeren with the German 1st Army, you will immediately notice the difference in the number of (Belgians only have 3 units as compared to 8 units for the Germans) units and their quality. The 6th Belgian Army will only hit on a roll of a 5+ on a 6 side die or 33% while the IV Corps of the German 1st Army is better as it will hit on a roll of 4+ on a 6 sided die or 50%. The game is called Brave Little Belgium after all and not necessarily Strong Dominant Belgium. Belgium and the Entente will not necessarily win the game through military dominance but through deft strategic movement and simply slowing the German advance.

The other thing that is important about combat is who controls the order in which battles are conducted. This is defined as simply the Activated Units belong to the Attacker, and non-activated Units belong to the Defender. Meaning whoever’s chit was just pulled is now in control. This control really is only important because the controlling player gets to choose the order in which the battles play out. Why is this important? Well, it is only really important when there are chits in the Available Chits Box that can be played by the opponent to hinder you or played by you to win that battle you simply must win!

The rules instruct you to resolve each Combat one at a time in any order of the active player’s choosing. For each Combat, remove all involved Units to the Battle Board that is printed in the upper right hand corner of the map, and place the Combat Marker in the Box they previously occupied so that you don’t forget where the battle happened, then perform the following steps in this order:
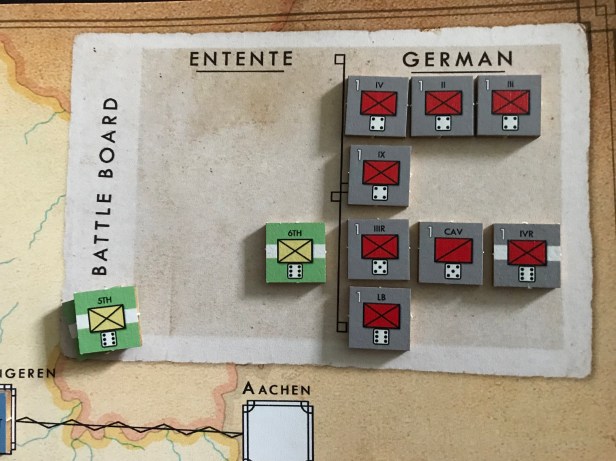
1. Group Units
This step is more used as a convenience thing as it will help you keep your units nice and tidy during the battles. Grouping your units by their to hit values keeps things clear. You will notice in the picture below that the Germans has lined up all their units that hit on a 4+ at the top, followed by their units that hit on a 5+ and lastly their units that hit on a 6. Accordingly, the Entente player has lined up their units in the same fashion. This simply keeps things straight and clean and helps players remember what they have and more importantly what number they have to roll to hit.

2. Calculate Die Roll Modifiers
If either player has a chit to play, now is the time to make that decision. As I mentioned earlier, there are two chits that modify die rolls including Zeppelins and Big Bertha. Big Bertha only makes a difference in Sieges. Zeppelins will add a +1 DRM to the German rolls for the entire turn and can be a big swing as this will allow units that normally hit on a 4+ to now score hits on a 3+ (it will also effect the other units in a similar manner). The only other modifiers have to do with the British Expeditionary Force (BEF). If all three BEF units are at full strength and stacked together when attacking, they will add a +1 DRM to their dice rolls for Combat.
3. Roll Dice
Each unit will then simultaneously roll 1d6 and compare their modified die roll to the to hit number printed on the counter (the small die below the NATO symbol for the unit). You will need a bucket of dice for this step as those German stacks are pretty large, and the Entente stacks can also add up pretty quickly. In the two pictures shown below, I roll the dice for each of the different sides based on an orderly fashion. In the first picture below, the Entente rolls their dice for their units that will hit on a 5+ (2 units; the Beligan 5th Army and 6th Army that hit on a 5+ and the their lone Cavalry unit that will hit on a 6) while the German player also rolls their units that hit on a 5+ and a 6 (4 units; 1st Army Cavalry, IIIR and IVR that hit on a 5+ and the LB unit that hits on a 6).
After rolling, the dice are compared and hits are determined. The Belgians don’t fair very well as they only score 1 hit (the 6th Army rolls a 5) while the Germans do better and score 2 hits (the LB unit rolls a 6 and the Cavalry unit rolls a 5). These hits are tracked on a die (we do this as it makes it much simpler to remember the hits) and then the remaining units will take their turns (shown in the 2nd picture below).
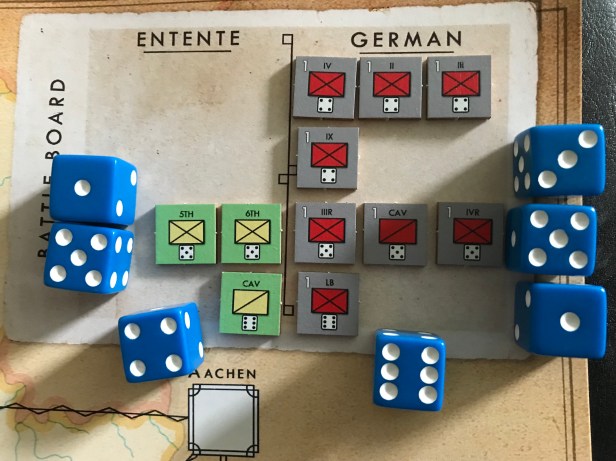

The four German units that need a 4+ to hit roll 2 hits and two misses. When added all together, the Belgians score 1 hit and the Germans score 4 hits. We now move to the Apply Losses step.
4. Apply Losses
For each hit that is scored, your opponent’s Units will suffer a step-loss. A step-loss is resolved by either flipping a full-strength two-step Unit to its reduced (striped) side, or Eliminating a reduced-strength or one-step Unit by removing it from play. The player that controls the units taking the hits get to determine how all losses are allocated for their side. In the picture below, the Entente player must absorb a total of 4 hits so they absorb 1 hit be removing the Cavalry unit (they are the weakest unit), then flipping the two remaining full-strength Infantry units for 2 more hits and removing from play the 5th Army which was reduced. This is a total of 4 hits and leaves one reduced Belgian unit remaining. The Germans have to absorb only 1 hit and flip the full-strength IVR Infantry unit to its reduced side. The battle is not yet over but all hits have been dealt with and because the German player inflicted 4 hits compared to the Entente 1 hit, the Germans are declared the victor and now we have to take care of Retreat and Advance.
5. Retreat & Advance
In Brave Little Belgium, battles last only one round. After applying losses, the side that suffered the greatest number of hits must Retreat. In the case of a tie, the Attacker Retreats. Here are the scenarios for retreat and how things happen:
Retreating Attackers must return to the Box from which they Attacked.
Retreating Defenders must move all Units away from the Box. Germans must move toward Germany, while French and British must move toward France. Belgians have no additional requirement.
If one side takes fewer hits but is completely Eliminated, the other side does not have to Retreat.
There are some interesting situations that occasionally will arise. If the only viable avenue of Retreat is occupied by the Enemy, each Retreating Unit suffers one Loss and then must move into a further Box. If that Box is also Enemy-Occupied, Eliminate the Retreating Units.
If the Retreating Unit(s) would cause a Box to become overstacked (stacking limit is eight friendly Units per space), a number of friendly Units that were in that Box must be displaced meaning Retreating one Box, according to all the rules above – until there is enough “room” for the new Units in the box that won’t be more than eight.

Combat is very interesting in this design because it is very deceptive. Combat for one side is not what it would seem. If the Belgians and the Entente forces simply force the Germans to take a few losses and consume a few game turns to destroy units in their way, they have in essence succeeded even though they didn’t “win” the battle. In our example above, I consider that the Belgians won this Combat. They forced a reduction on a German unit and survived to fight another day forcing the Germans to attack the same units again in the next round in order to move toward Antwerp or Ghent.
Siege Combat
When a German Unit or stack of Units enters a Fort Box containing a Fort Marker that has not yet been destroyed, the Fort must be besieged. The German Units are placed on the secondary Siege space, and the Combat in that Box is resolved as Siege Combat. The Fort may contain Entente units as well must must be defeated by the attacking Germans before doing damage to destroy the Fort.
The Fort is represented by a Fort marker that has steps and a Combat value and represents not only the defenses including walls, guns and embankments but also the attached garrison. when a German army attacks a Fort, the Fort will not take hits until all the Entente Units located in the Fort Box are eliminated. The only exception to this rule is if the German Event Chit Big Bertha is used as it will hit the Fort once with each attack and reduce it at the end of the Battle in which it was played.
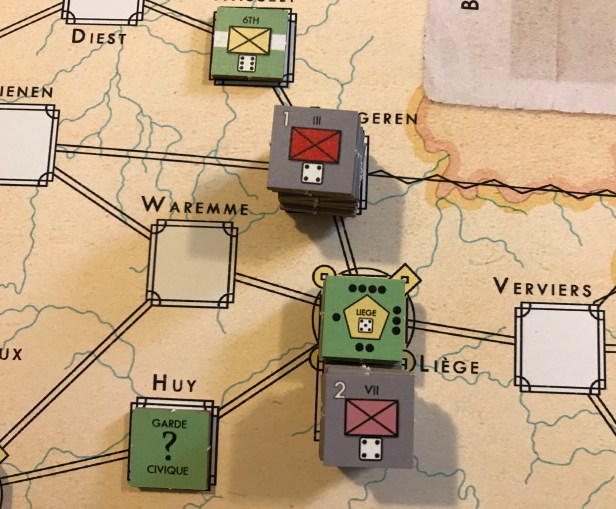
The Fort has a a combat rating of a 5 which means it will hit on each die roll of a 5+. The Fort rolls a d6 for each step it contains ranging from 1-4. Another interesting thing about Forts is that the Entente player can bring in additional units from the outside even when the Fort is under siege. You do have to remember the stacking limit of eight units though. When the Fort marker is down to its last step and takes a hit it is considered destroyed and the Fort marker is flipped over to its destroyed side. From now on, the Box is considered a City Box. In the picture above, the German 2nd Army is laying siege to the Fort located at Liege. Once the activated German Army moves into the Fort Box, they are placed in the secondary siege space and the Combat is resolved as a siege.
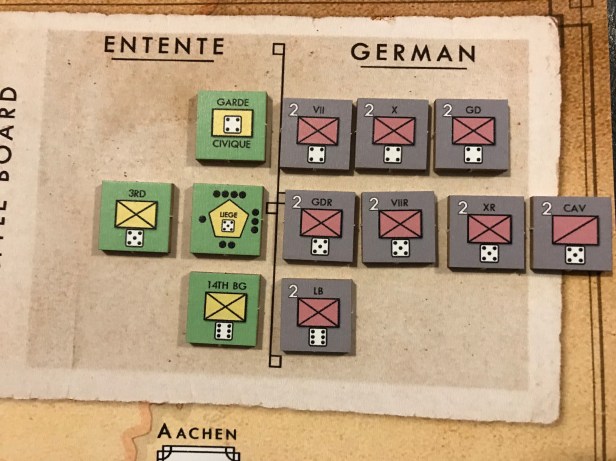
All units are removed to the battle box and combat follows the same process as above. All units are separated by combat value and each side rolls their dice at the same time tracking the overall number of hits inflicted. Remember that the Fort marker will roll a number of dice equal to its steps.
The only real difference is when an Entente Activation Chit is drawn.

When an Entente Activation Chit is drawn, the Entente player has choices about whether to activate just the Fort to attack the sieging units or to activate all units and the Fort to attack.
Combat in Forts
If the drawn Entente Activation Chit is of the same nationality as defending Units in a Fort under siege, or if the Chit matches the nationality of the Fort (Belgian for Major Forts, French for Minor Forts), then the Fort may be Activated in one of the following two ways:
Activate all Units and the Fort. All Units that would be Activated normally are Activated. All Activated Units in the Fort, and the Fort itself, are Activated for Combat only, with both the Entente and the German sides rolling dice.
Activate the Fort Alone. Instead of Activating any Units, only the Fort is Activated for Combat only. This represents the Fort’s artillery firing at the besieging forces. The Germans do not get to roll dice unless they select the “Big Bertha” Event Chit. In addition to firing back, the Germans do get the Big Bertha automatic Hit Bonus.
Note that you can also opt to simply Activate the Units in the Fort normally for Movement and Combat when their chit is drawn, but in those cases the Fort does not activate. Activated Units can leave the Fort.
Each Fort may only be Activated once per Game Turn.
This is my favorite part of the design. Choice. But you need to understand the danger with your choices. You also must remember what your end goal is. As the Germans you need to dispatch the Forts quickly. As the Entente, you are fine with the Germans taking your Fort if it takes 2-3 rounds and bogs them down. Remember, time is on the side of the Entente and is the enemy fur the Germans.
I hope you got a good understanding of the Combat system and the differences with Fort markers and Siege Combat. I really like it and feel it is a perfectly easy system to learn for new wargamers but also offers some interesting choices for more seasoned Grognards.
In Action Point 3, we will finish our look at Brave Little Belgium by taking a look at another interesting aspect of the design in the “speed bump” Garde Civique and their brave attempt to defend their country.
-Grant
