
In our first Action Point, we delved into the Chit-Pull system used to activate units. In this Action Point in our series covering At Any Cost: Metz 1870 from GMT Games, we will get to take a look at the good stuff, including Fire Combat and Assault Combat.

Fire Combat
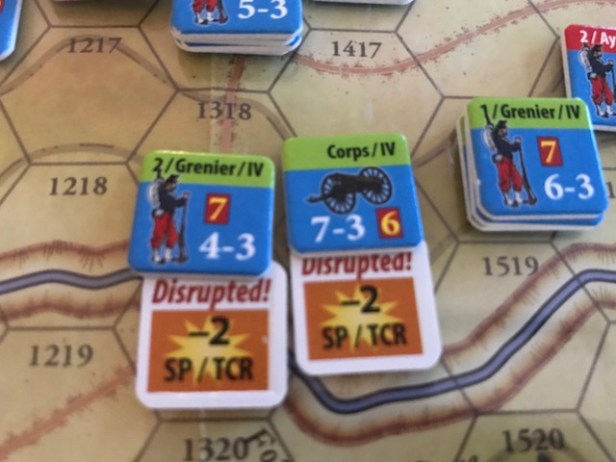
Fire Combat is very involved but is very much worth the effort as it is simply fantastic. First, units that are issuing Fire Combat must have a Line of Sight to their target. This becomes very important in the hilly forests of Metz as you can see the Prussian units hunkered up on the hill have protection from some of the French units on their right flank because of the presence of hills and trees. LOS is from hex center to hex center. If an intervening hex has degrading terrain, there will be a column shift. Elevation is also important, as once again the battlefield is very hilly.
We will now look at Fire Ranges. You simply measure the distance between the firing unit and its target hex to calculate the range. The hex that the firing unit is in doesn’t count. Once this range is figured, you will consult the Fire Combat Weapon Ranges table to see what effect this has on the attack. Effective Range offers no benefit or detraction but if Fire Combat is taken at Extended Range, the attack will be less effective and will only be 50% of the total SPs. It is important to make sure you are at least in an Effective Range but frankly any shot is good as there is always a chance of a good roll to effect the enemy units. Canister Range is for artillery and can be devastating as you will add 150% x the firing units’ SP and will add a minimum of +1. Imagine staring down the barrel of a cannon as the grapeshot comes at you? Not a pretty picture!

If there are multiple units stacked in a hex, you can add all of their SPs together to create a combined SP total. The Fire Combat procedure is simple but there are a lot of factors that you will need to make sure you add into the calculation. Once a firing hex is declared, and a target is identified, the firing player will add together their SPs and then add in the above adjustments for range, remembering to reduce the SPs of units that carry a “Shaken” or “Disrupted” marker.

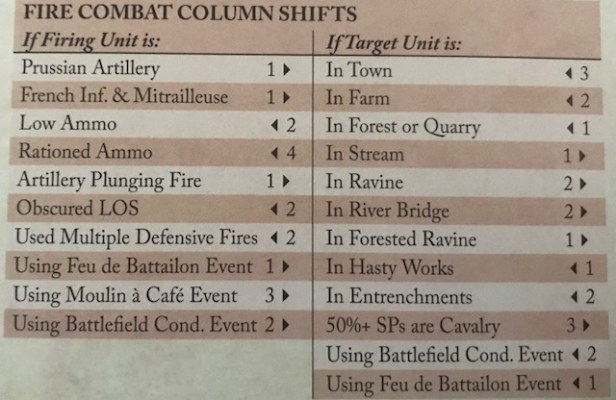
The firing player will then consult the Fire Combat Column Shifts table to increase or decrease the column that they will use for the final attack. This table includes all types of shifts that take into account the many factors present on the battlefield. For example, Prussian Artillery is better than their French counterparts, and will receive a 1 column shift, while French Infantry and their mighty Mitrailleuse machine guns are better than the Prussians, and gain a positive column shift.
After all shifts have been applied, the firing player will roll 2d10, one colored gray for the Prussians and red for the French and the other white, and consult the appropriate modified final column. The colored die roll is the “to hit” number and its value will be cross referenced on the appropriate column for the results. Save the white die as you will use this as the Morale Test roll (I know this seems odd but it is actually very interesting) if you happen to inflict any Morale Hits. The results of Fire Combat are pretty standard and involve NE (No Effect), MT (Morale Test), MT +1 – +3 (Morales Test +1 to +3), CH (Casualty Hit or reduction), CH + MT, 2 CH and 2 CH + MT. Pretty simple.

Now back to the white die. In essence, the firing player is rolling the Morale Test result for the player being attacked as a part of the Combat. The white die result is used to compare against the units TCR (Tactical Cohesion Rating). You simply take the die roll and subtract the target unit’s TCR rating (this can result in a negative number) and then consult the following results to see what happens:
MT Differential of -1 or less = no effect on the testing unit;
MT Differential of 0 to +3 = inflict one Morale Hit on the testing unit;
MT Differential of +4 or more = inflict two Morale Hits on the testing unit
A Morale Hit is simply placing a “Shaken” or “Disrupted” marker on the unit. If the unit already has a “Shaken” marker and suffers a Morale Hit, it will then get a “Disrupted” marker. If it has a “Disrupted” Marker and must take a Morale Hit, it will then take a Casualty Hit and must be reduced but will retain the “Disrupted” marker.

We really enjoyed this system and found the fact that the attacker was rolling the defenders “saving throw” or Morale Test to be very interesting. Great design that replicates the combat of the era.
Assault Combat
Assault Combat occurs during the Assault Combat step of the Sequence of Play and is always voluntary. It can be carried out by all eligible units in hexes adjacent to enemy units but remember from our first Action Point, this can only be done under an Aggressive Posture HQ. Units that have conducted a Fire Combat in an earlier part of the turn can still perform and Assault Combat. The Fire Combat prior to a planned Assault is good tactics of the era as they were trying to “soften up” their enemy.

At the start of the Assault Combat step, the player will announce their intention to Assault and will identify all units that are assaulting an adjacent hex and will place an Assault marker pointing toward the target hex. The Assaulting player must then name a Lead Assault Hex and this is the only stack that will be used to calculate the Assault Differential. You simply take the total SPs of the Lead Assault Hex and then subtract the SPs from this number in the Defending Hex. This number is called the Assault Differential and can be negative. The other units assaulting the same hex will be considered Support Assault Hexes and we will cover that shortly. You then consult the appropriate column on the Assault Combat Results Table and make sure to factor in any appropriate Column Shifts that you qualify for. See below picture of the Assault Combat Column Shifts Table for more details.

You then simply roll a 10 sided die and consult the appropriate column, after factoring in all Column Shifts as shown above. This result equates to the number of Loss Points that the Defending Hex units will incur.
Let’s say I have an Assault Differential of +2 after factoring in all appropriate Column Shifts. I roll and obtain a result of 7 which equates to a result of D2, which means the Defender will take 2 Loss Points. These Loss Points will be assigned to all of the eligible units in the hex. Loss Points can be used to Retreat all losing units one hex, to apply one Morale Hit or to apply one Casualty Hit. Morale Hits involve placing a Shaken counter on units, which gives them a -1 SP and -1 TCR. If they have a Shaken counter already, they will flip that counter over to reveal the Disrupted side which gives a -2 SP and -2 TCR and almost makes that unit combat ineffective. Casualty Hits involve reductions. One Casualty Hit will lead to the counter being flipped to its Battleworn side while if they are already flipped, they will then be required to pass a Break Test. A Break Test involves a unit rolling d10 and then comparing that roll to their TCR (Tactical Cohesion Rating). If they fail this test they will most often be forced to retreat. If the unit fails and is considered Broken, they are not removed from the game but are simply moved to the appropriate box where they will be in purgatory having to await a future Rebuilding activity where they can be made combat effective again and put right back to work on the battlefield.

So what happens to the other units that are participating as Assault Support Hexes? Under certain conditions, such as if there are 3 assaulting hexes, they will provide the Flank Attack Column Shift. This Column Shift includes 2 shifts to the right and can make a huge difference. Using the previous example, assume that I have three assaulting hexes and gained the Flank Attack Column Shift, that same roll of 7 would have added in an asterisk as a result and would have required the Defending Hex units to take at least one Casualty Loss.
Why would I ever Assault versus normal Fire Combat. Well, the simple answer if that you don’t have to do either or. If you are adjacent, your units can attack during the Fire Combat Phase and then follow that up with an Assault Combat during the Assault Combat Phase. There is no either or and you must be ready to do both in order to inflict the kind of losses and reductions and that will lead to victory. This game and its Combat system are very interesting. As we discussed in the Fire Combat phase earlier, it can be really hard to do a lot of damage as units Tactical Cohesion Rating is generally pretty good. If those same units have Shaken or Disrupted markers, this is when you will see some losses start to affect them but Assault Combat is a little easier to get the results you want with reductions and retreats to open up holes in their lines to take advantage of.
Overall, the Combat in At Any Cost is absolutely fantastic. My only concern with the whole system is that it is pretty deep and fairly complex and therefore can be time consuming to make sure you get it right. There are just a lot of things to remember in order to have a full grasp on how to best take out your enemies. The player aides are fantastic and provide all the required terrain effects, column shifts and a general outline of how each type of combat is carried out. We got comfortable with it after about 2 different attacks and from there, began to be more effective with our attacks, as we understood better how and what we needed to do.
I hope that you have enjoyed our inside look at At Any Cost through this series of Action Points. If you missed the first Action Point, we looked at the Chit-Pull System and all the fantastic chaos that it creates.
If you missed it, Alexander did a comprehensive review of the game that is well worth a read.
-Grant
