
At Any Cost: Metz 1870 is a new game from GMT Games simulating the situation west of the Metz fortress during those few days of August 1870 during the Franco-Prussian War. The game is designed to be a playable, two-player brigade-scale game that allows players to experience the unique tactical warfare matchups that characterized fighting during this period. If you haven’t done so, I would recommend you give Alexander’s review of the game before going any further so you can get an idea of what a grand experience this game truly is.
In this Action Point, we will take a look at one of the more interesting and random elements of the game, the Chit-Pull System as well as the Out of Command markers. Both of these make this game unique and bring a great deal of uncertainty to the battlefield, which I think makes for a wonderfully thematic experience.
Chit-Pull System (with Event Chits)
The action in At Any Cost is controlled by the Chit-Pull System that it uses, which is called the Blind Swords System. The Blind Swords System was originally designed by Hermann Luttmann for Duel of Eagles published by Compass Games in 2013. The system emphasizes the three “FOW’s” of military conflict: fog-of-war, friction-of-war and fortunes-of-war. The system mixes events with activation chits and does not guarantee that each unit on the board will be able to activate each turn or that each unit will only activate once. The system is designed to force players to make tough decisions with each chit pull and really is a neat system that causes some angst but keeps the game play experience fun.

The chits that are included in the mix for each scenario are very different. These chits will be made up of an activation chit for each corps involved in the scenario, along with several other types, including random events, Fortunes of War and Commander in Chief chits. I will go into a little more depth with each of the types below:
Random Events
There are three type of Random Events including those that you will play immediately, those that give you an option of playing immediately or holding onto or those that you will hold and play only when you are allowed to play it. There are too many to go through here but I will give you a sampling of some of the events.

Moulin a Cafe (French event) – This Combat receives a 3 column shift to the right. After resolving the combat, roll a die: on a roll of 1-5, the firing unit is given one Ammunition Problems hit.
Auftragstaktik (Prussian event) – All Prussian Infantry units in a chosen box can each move up to half their Movement Allowance. If any of the units are then adjacent to s French unit, they may then conduct an Assault Combat with a 2 Column shift to the right.
Fortunes of War
When the Fortunes of War chit is drawn, the non-drawing player gets to roll 1d10 and consults the following table for the outcome.
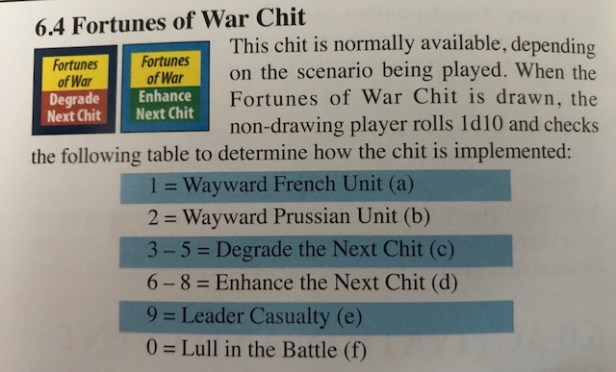
This is a chaotic chit that really adds in some interesting situations. The Wayward unit one is fun as this allows the player to move a unit of the side identified one space. If this move causes the unit to move adjacent to an enemy unit, Defensive Fire will occur. The Degrade/Enhance the Next Chit is interesting as it will be placed by the draw cup. If an event chit is drawn with the Degrade the Next Chit out, it will not go off. If an event is drawn with the Enhance the Next Chit out, the owning player of the event will get an increased benefit and be able to use a “Krupp’s Guns” (basically a free artillery fire attack with one unit) if Prussian and a “Beaten Zone” (basically a free artillery or Mitrailleuse attack with one unit) if French. There are some additional benefits and negatives associated with these outcomes, such as being forced to choose a Defensive Posture (more on this below), which is not good when you have those French units on the ropes and you just want to knock them out with an Assault! The Leader Casualty and Lull in Battle are also neat additions to the game as they create lots of problems that players will have to deal with.

Commander in Chief
Each side has one of these chits in their mix. “Prussian General Staff” for the Prussian player and “Marshal Bazaine” for the French. Each of the chits offer the same benefit when drawn, allowing the player who owns the chit to activate one single unit or a grouped division (being defined as units from same division that are located within 2 hexes of another unit from the same division). The real power in these chits is that you can activate units that are even Out of Command.

One final word on this aspect of the game. It is really cool that when you draw an activation chit for a division, the player has to choose what is referred to as Posture. The chosen Posture will set the parameters for the activated HQ and its subordinate units for activations during the turn. There are two possible Postures; Aggressive and Defensive.
Aggressive Posture means that units can move up to their full Movement, Engage enemy units, conduct Fire Combat and Assault Combat. Cavalry units under an Aggressive Posture can Charge. The only real detraction from this posture is that units cannot use the Road March and gain its advantage of additional movement.
Defensive Posture means that units can only move up to half their full Movement, use Road March, conduct Fire Combat (but not Assault Combat), Rally and build Earthworks.
Basically with either Posture, you can always conduct Movement and issue Fire Combat. You must keep this in mind as that Assault action can be very important depending on the circumstances.
Out of Command
If a unit is located outside of the Command Range of it’s HQ unit at the beginning of a turn, or isn’t located adjacent to a unit that is within range of the HQ, the unit is considered to be Out of Command. And let me tell you, you don’t want this to be the case. In an effort to illustrate and reinforce the importance of Command in At Any Cost, Hermann Luttmann added in some fairly dire consequences for being out of range. When I say dire, I am not referring to the health of a unit, or any required step reductions, but am referring to their usefulness tactically in any situation.
When a unit is determined to be Out of Command, the controlling player gets to randomly choose from these 13 little gems called “Out of Command” markers that were laid out facedown at the beginning of the game. The generic “?” side should be face up in order to hide the goodness that lies underneath!
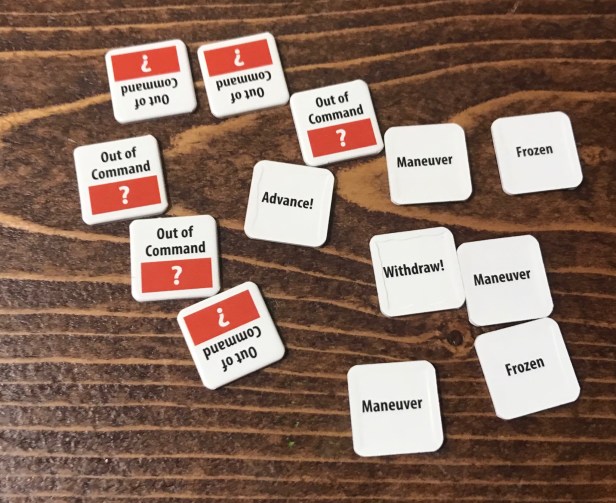
These Out of Command units will have this marker placed still “?” side up on top of them, until the Out of Command Step of the Sequence of Play that comes at the end of the Activation Phase when all other units have had a chance to activate. The player then chooses which markers to flip in any order for his OOC units but must perform all of the instructions for each of these markers. This makes for a very chaotic and uncertain outcome for the round as these OOC units can literally do anything, some things that are bad and then some that are very bad!
On the back of each of the 13 markers are listed instructions and we will very briefly go into each of these and then I would like to share a funny story from our first play illustrating how much I hate (and love) OOC markers.
Withdraw (1 marker) – If there is an enemy unit within 4 hexes of the unit when this is revealed, that unit cannot conduct any combat and must immediately retreat 2 hexes away from the nearest unit and then 2 hexes closer to its HQ. If there is an entire stack of your units, tough, you are now effectively opening a huge hole in your line. Good luck recovering!
Frozen (3 markers) – The unit may not conduct any activities. No movement, no combat, nothing! It is frozen. Either with fear or without confidence as they simply cannot get clear instruction from their HQ.
Cautious (4 markers) – If the unit is Infantry, it may do a Fire Combat but with half its normal SPs and then can move half of its normal movement. If an artillery unit, it can do a Fire Combat at half its normal SPs or may move half its normal Movement.
Maneuver (4 markers) – The unit can only move up to its full Movement rate but many not engage or perform any other activities.
Advance (1 marker) – There are two possible actions with this chit (which I really hate). If there is an enemy unit within 4 hexes, an Infantry unit can perform a normal Fire Combat but then must follow that fire up by moving as close as possible to the unit it fire upon. If a Cavalry unit, it must Charge the nearest enemy unit or if it cannot Charge, must move to engage that unit. An artillery unit must simply Fire at the nearest enemy unit. Not so bad right? Well, you might think that, until your solid line of horse is required to charge headlong into a mass of approaching enemy units!

In this first picture, you can see that my 5th Cavalry unit is Out of Command, because his HQ is located about 8 hexes to the right leading a massive counter attack on the French Cavalry. Doesn’t he look despondent? So, when I flipped the OOC marker over, it revealed the dreaded Advance!
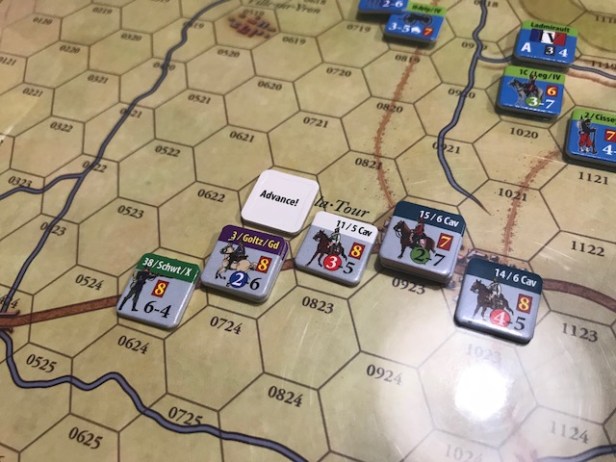
As a Cavalry unit, I was forced to Charge the nearest unit and therefore bid my compatriots adieu (or whatever they say in German!) and charged into the teeth of the advancing French Cavalry and Horse Artillery.

A thing about Charges. Charge is a good idea if you have a heavy horse as you will increase your SPs. So if you look at my Cavalry unit, the red circle value of a three denotes that this is Heavy Cavalry so I will get a bonus of 2 times my SPs. Therefore, my 3 SPs become 6 SPs. At the beginning of a Charge, the player must roll 1d10 and roll equal to or less than their Tactical Cohesion Rating or TCR, which is the number located on the red box in the middle right of the counter, in order to see if they can carry through with the intended Charge. So, I have to roll under an 8. I rolled a 6 and would be able to continue with the Charge attack. I survived their Defensive Fire, as Alexander rolled really poorly and was unable to overcome my TCR number to do reductions or force me to retreat. Then I would get my chance to attack with my Charge.

Because this was a very dramatic situation, I decided to only roll one of the 2 dice that you are required to roll during combat (more on this in the next Action Point) first to see if I even hit. You see, the first die is the to hit number. Well, as you can see, I rolled a lowly 1 which meant I whiffed on my attack and was then left hanging in the breeze for future attacks from not only the units I was engaged with but also the units on my right flank. All because my unit was Out of Command. This is a fantastic part of the design though and really makes you think hard about how to move your units so as to remain in their HQs Command Range. You don’t want to have your units not be able to act because they are OOC.
I hope that you enjoyed this look at the basic parts of the activation system for At Any Cost: Metz 1870 from GMT Games. We really enjoyed the game and I will say that it is in very early contention for my Wargame of the Year for 2018! In the next Action Point in this series, we will take a look at the various forms of Combat along with the very interesting use of two dice to resolve these attacks.
-Grant

Handsome Grant, great read. This write-up inspired me to find my own copy.
A personal, intimate question however, as your counters look tip-top: were those clipped with a 2mm or 2.5mm rounder?
LikeLiked by 1 person
I use the 2.5 mm version.
LikeLike