

I have told you this before, but I really have become a fan of smaller, lesser known battles that are gamed. There is something about playing a game, having fun and learning something that you didn’t already know. Such is the case with Kekionga!: A Dark and Bloody Battleground, 1790 from High Flying Dice Games. The struggle for the Old Northwest Territory (what would become the future states of Ohio, Indiana, Illinois, Michigan and Wisconsin) was terribly violent. Massacres and atrocities seemed to follow one upon the other and The Battle of Kekionga in October 1790 was the fist battle fought by the United States Army after the War for Independence. The campaign had been ordered by President Washington against the Miami settlement of Kekionga located near modern day Fort Wayne, Indiana, the center of Native American resistance to US migration across the Ohio River.

On October 17th, the US commander, General Josiah Harmar, reached Kekionga with 1,453 regular and militia soldiers and found that the Miami had burned and abandoned their town. General Harmar sent several companies north of Kekionga to search for the Miami warriors, but the US forces suffered a stinging defeat on October 19th in an ambush led by the Miami war chief Little Turtle near his Eel River settlement. General Harmar retreated from Kekionga to a camp located nine miles to the south.
Learning that the Miami had returned to Kekionga, General Harmar sent an attacking force back to the town on the morning of October 22nd. Two companies of US forces took position along the west bank of the St. Joseph River while three companies advanced across the ford of the Maumee River at this spot, hoping to entrap the Native Americans. The Miami warriors challenged the crossing, killing several men as they waded the ankle-deep Maumee River. In the corn fields and flood plain outside Kekionga, the main United States forces were destroyed.
The Native Americans had their own name for this battle, which was the “Battle of the Pumpkin  Fields”. Since it was fought in flood plain and corn fields, this seems an odd choice, but is one that evokes the true massacre that happened in 1790. They called this battle so because the steam raising from the scalped heads of the US Regulars and Militia, reminded them of split open squash steaming from the cold in the autumn air. That is one of the reasons that I so love these games. I learn history and knowledge about our past, and how our actions as a people affect others and the course of that history. Fascinating!
Now that we have an idea of the history behind the game, let’s take a look at the great components, and especially the fantastic art from Nils Johansson.

Components
Up front, I want to say that this game costs $11.95. There is an option to pay an additional $5.00 to get the counters mounted, and an option to buy fancy thematic cards to use in the game, rather than a standard deck of face cards for another $8.00, but this game is a very affordable entry into wargames that cover great history. With that, you cannot expect large publisher quality with thick counters, mounted map boards and all the trimmings. With that being said, this game is aesthetically pleasing, with its use of eye popping colors, clear and readable text (although the rules “pamphlet” was a little small), and amazing art from a rising star in the wargame graphic business Nils Johansson. In fact, the reason that these games originally caught my attention was the art. It was so evocative and so real, that I just had to get them to play.
 Counters
As you can see from the picture to the left, the counters will require you to get out a straight edge and a razor or X-Acto knife to have some arts and crafts time to cut the counters out. I loved this! I really enjoy clipping my counters anyways but cutting them out was also very fun, immersive and got me familiar with the different counters in preparation for our play. I made a few mistakes, and cut a little too much, or a little too little off of some, but overall the counters turned out amazing and once again, the art was simply fantastic. To see those Miami Braves faces on those counters, with different color schemes representing different units, was just awesome.

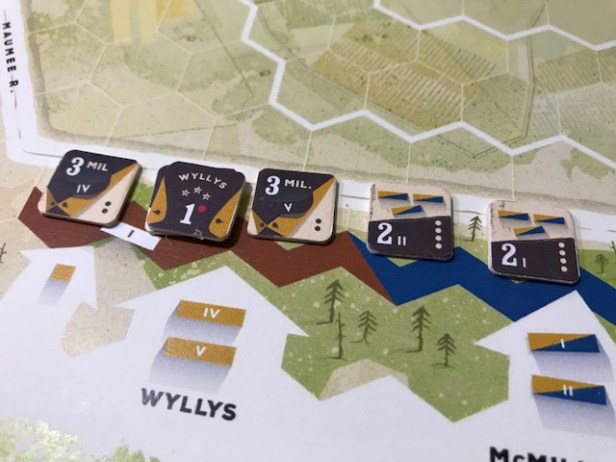
The map is also very well done as it is large, measuring 11″x17″, actually too large as frankly most of the map will not be used as the action tends to focus on the Cornfields located to the north of the Maumee River and to the east of the St. Joseph River. I love the use of the different shades of green and the off-cream colors as well. This definitely makes the unit counters stand out and makes for a very enjoyable play experience. The map was very sturdy and was properly folded so we didn’t even feel the need to use plexi-glass as we wanted our pictures to not have that annoying glare from the overhead light. We own the special printed cards, but they are smaller than normal face cards, so we abandoned them for a simple deck. I think they are nice but not necessary to enjoy the experience. I now want to move onto the game play itself and start with our setup.
Initial Setup and Unit Deployment
Firs off, you will have to provide a deck of face cards to play as well as 1 six-sided die. You can, of course buy the special cards, but they are not necessary to play the game. You will remove all face cards from the deck and give all black cards to the US Player along with one Joker and all red cards to the Native American player plus one Joker. These cards are used to activate units and will boil down to a game of War as each player will draw a card and compare the numbers. The player that drew the highest numbered card will win the initiative and get to the number of activations shown by the cards. So, if you play and win with a 9, you will get 9 activations. This can be a little frustrating as you could potentially lose 2 or 3 draws in a row, but you know that this will generally even out as each player has the same number of each card. The real rough spot will be if you keep drawing medium power cards, such as your 6, 7, or 8 and lose to the other players 9 or 10. This will mean that your solid mid level cards are gone but you will still have your high cards that could come out in the next draw. We actually felt that element was really thematic and captures the chaos and uncertainty of these bloody battles. When there is a tie in the cards drawn, the tie will be broken by the player who hasn’t activated in recent turns. Jokers serve an interesting role. When the first Joker is drawn by either player, this will activate a die roll on the Random Events table. The second draw of a Joker will end the round.

These events attempt to capture some of the random elements that were experienced in these fierce and bloody battles and will include events such as US Bravery!, which will allow the US player to re-roll any one DR for the turn, or Maneto is watching!, which will allow for an increase in one Native American units Combat Factor that is stacked with an un-wounded leader by 1 for the rest of the turn.
These events can be key to the game, but aren’t so overpowered that they break its design by allowing too powerful of actions to be taken. We found that some of the more important ones were the US Bravery! and Native American Bravery! where if you lose a battle you didn’t want to, or cannot rally a unit that simply needs to be rallied, you have this once per turn (once again, not overpowered) re-roll. The ones that were a little frustrating were the Heroes are made! and Kekionga will be Avenged! which allows for a reduced US or Native American unit to be flipped over to its full strength side. Sometimes you have to work so hard to get a unit reduced or Disrupted and with a roll of the die, they are now totally fine. The good thing is these are only used once per game, and if they are rolled again, you simply re-roll.
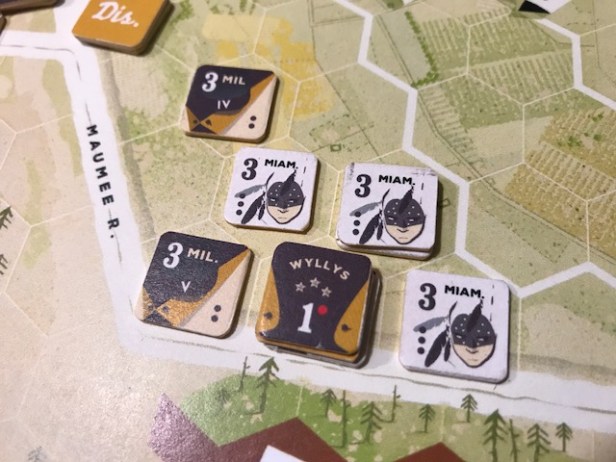
The rules “pamphlet” has a clear graphic illustrating where various units are to be setup on the board. For the Native Americans, they are required to setup in any Woods, Cornfields or Camp hexes that are located north of the Maumee River. Camp hexes play a somewhat important role as once they are abandoned by the Native American player, the US player will gain a Morale. This can be very important and I will cover this a little later.

The US player has to setup according to the different colored stripes located south of the Maumee River. Hall is on the far left with 3 Militia units, Wyllys is in the center with 2 Militia and one Regular unit and McMillon is on the far right with 1 Militia and 2 Cavalry units. Pretty simple. My concern with the setup was that it will be exactly the same for the US each play and once the rules are learned, can be a real disadvantage for the US player. The Native Americans have a little more flexibility, but as I learned the rules and how combat and other elements worked, I told myself that I should simply put all my units in the Camp spaces and the Cornfields. Stay to the safety of the corn rows as they provide some advantage to the Native Americans (especially if they attack out of the Cornfields) and really nullify the advantage the US player has in their Regulars. Units cannot stack together but one unit can stack with a leader. Pretty simple.
Strategy and Gameplay
In my opinion, a good game is one that has rules that are clear, make sense and are not open to much interpretation and that incorporate the theme of the battle or conflict that it is based around. In this respect, Kekionga! does a fantastic job. Earlier, we talked about activations and how they are won with the cards. The activations allow for the following actions:
- Move – units can move an amount of hexes as shown by a number of black dots on their counters. Typically, an unwounded Miami Warrior can move 3 hexes, while US Militia can move only 2 hexes. Cavalry have 4 movement points and the various leaders all have 3 hexes while unwounded and 2 when wounded. When a unit is Disrupted, it loses one movement point. Terrain doesn’t effect movement but it does cost 2 movement points to cross a river, one hex to enter the river and one to climb the bank hex on the other side.
- Fire Combat – Fire can only happen between units in adjacent hexes, with the exception of Regulars who can fire at enemy units up to 2 hexes away but with a +1 modifier. The unit uses the CF that is listed on their counter and must roll equal to or less than this number. The dice roll can be modified for various factors including whether the firing unit is Disrupted (+1), if stacked with a friendly leader (-1), if the target unit is in a Cornfield or Camp hex, (+1), if the target unit is in a Woods hex (+2), etc. Really pretty simple. If the roll is equal to or less than the CF of the attacking unit, the target unit is Disrupted. If already Disrupted, it is Reduced instead, if Disrupted and Reduced it is marked as Routed and finally, if that target is Routed, it is eliminated. So, as you can see, it can take up to 4 hits to eliminate a unit. This can be really tough to kill your opponent, especially if their Morale is high, such as a 5 or 6.
- Move and Assault Combat – Only Cavalry can do Move and Assault. If moving, a Cavalry unit can at any time use a Movement Point to assault a unit. This will be harder to hit as you will add +1 to the dice roll, so with a measly 2 CF, they will only hit on a roll of a 1, but it can be very powerful. Especially since they can then continue their movement after the Assault to get away from the enemy to safety.
- Assault – Assault can be done only if units are adjacent and has some drawbacks. Various modifiers are included such as -1 DR if attacking unit is stacked with an unwounded leader, -1 DR if attacking player’s Morale level is more than double opponent’s Morale level (this can happen quit often) or -1 DR if Native American unit is attacking from the Woods or Cornfields. If the attacker rolls a 6, they miss but also will take a Disruption as the attack went very poorly. If this happens when the attacker is already Disrupted, it will be reduced.
- Rally – A player can attempt to restore a Disrupted unit to normal or convert a Routed unit to Disrupted with a Rally. You simply roll a die and must get lower or equal to your current Morale level. There are some modifiers for being stacked with or adjacent to an unwounded leader or add +1 to the US Rally attempt if they are occupying a Camp hex.
These rules check the boxes for me as far as simplicity goes and there isn’t much room for interpretation. I also really liked the thematic focus of the role of the leaders. They were there to Rally their troops by giving them encouragement. I found that this is key to a victory for either side.
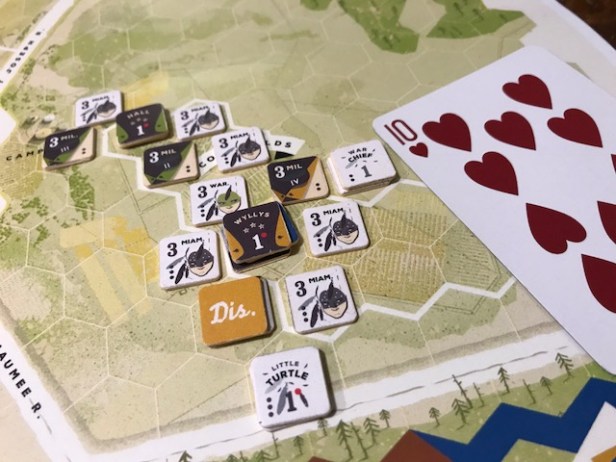
So, how did the game play? Well, it was really not as bloody as I had thought that it would be. Sure, the battles were bad once I was able to lure the US player into the Cornfields where I nullified their Cavalry and Regulars advantages, but I found that the increased Morale that the US player gained through me leaving my camp spaces was a big difference in early battles. Once I vacated the Camps, his Morale had increased to a 5, which meant he would Rally or recover a Routed unit with any roll less than 6. This meant that I spent a lot of time plugging away at his units, doing 1 or 2 hits each turn, only to see him roll less than 5 as a Rally attempt and recover. I know that this took away his ability to attack for that round as he would choose to Rally, which was good for me, but I was having a devil of a time getting his units to break. Partly this was due to some really bad rolling on my part but was frustrating.
I didn’t mention this above, but I really liked that the game didn’t have Zones of Control. This style of game, with these combatants, shouldn’t have this limitation. I feel that the theme is carried through with this more free and open movement system. It allowed us to move our leaders around freely to get them in position to do the most good, it saw many Native American units running between standing US Militia to get into position to take out weakened units and those Cavalry. Much of the time, the Cavalry were all over the place with that 4 movement. I couldn’t keep up. Great decision to leave ZoC’s out of the game, very thematic!
I can see that the design really does a great job though of rewarding aggression as the enemy Morale Level will drop when you kill his leaders, Cavalry or any 2 other units. This meant that I was desperately trying to focus on leaders to lower his morale as well as his Cavalry. He conversely was also focused on my leaders so it was fun to go back and forth with attacks of futility. This too was very thematic as the battle was not fought between crack troops that were well equipped with top of the line weapons and artillery. But was fought out in the middle of cornfields with the butts of rifles, bayonets, war clubs, tomahawks and bow and arrow. This game is a perfect reflection of the period and I really want to give some kudos to Paul Rohrbaugh for his well thought out and considered approach.

How does the game get decided? It has Victory Points, which are gained for various unit eliminations, such as 2 VP for each leader eliminated, 1 VP for each wounded leader, 2 VP for each eliminated enemy unit, 3 VP for each US Cavalry and Regular eliminated and 1 VP for each reduced unit at the end of the game. Our first game was very close but my Miami led by Little Turtle came away with an 11-7 victory! Very close and would have been different if he could have killed or wounded just a few more units.
There are also some variants that make for an interesting experience, and give a great deal of replayability. There is an optional rule that allows Native Americans to retreat before an Assault combat, which helps them keep one step ahead of the US. There also is an option for an additional leader, Blue Jacket and at least 1 Warrior unit, to come in as an additional reinforcement. This action does give the US player 2 VP but can definitely change the tide of battle as leaders help a lot with Rally, as well as with attacks.

In summary, we really enjoyed Kekionga!: A Dark and Bloody Battleground, 1790 from High Flying Dice Games. Really easy rules, good combat system that evokes the bloody hand to hand combat that would have characterized these vicious battles, and the cornfields. I love the cornfields! Have you ever been in a cornfield? With 6′ tall stalks of corn, that would have been dry and brown by the time of this battle. They would have disguised movement, caused great fear and panic among the US Militia when the war whoops would have come screaming through the rows from all directions. There would have been suffocating smoke from the musket volleys. It would have been chaotic, and in battle, chaos leads to death! I can actually feel the fear that they would have felt and any game that can make me feel that way, is a good one!
If you want to see more of the components, check out our unboxing video as well as our interview on Kekionga! with designer Paul Rohrbaugh.
-Grant


That cover art is fantastic. It has this great blend of comic art and papercraft. I’ll have to read your thoughts on it later. I dig the font and aesthetics of the game pieces, too. But man! Cutting them out. That’s next level.
LikeLiked by 1 person