
Churchill: Big Three Struggle for Peace is a fantastic game that pits three players against each other to decide the fate of the world in the waning days of World War II, allowing players to take on the roles of Roosevelt, Stalin and Churchill. The game plays out 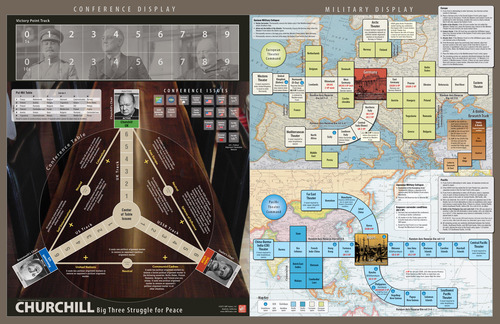 starting in 1943 and focuses on 10 of the historical conferences held between the three super powers’ leaders to discuss the “proper” way to go about fighting the war and how to deal with the post war world and aftermath. The central mechanic in the game is the conference table, which is a queue where each player has a track ranging from 1 to 6 upon which they are attempting to place issues on, and through the skillful use of their deck of Staff cards, win those issues to allow them to use them to their advantage in waging the war or preparing their future after the war is over. After the conference segment is over, a winner is determined and they get to use the issues that ended on their track to perform various actions including clandestine operations, political activity, and military offensives.
I cannot emphasize this point enough but Churchill is NOT a traditional hex and counter wargame, but more of a political tug of war between the three factions. The design has tried to capture the inner workings and behind the scenes action of the military and diplomatic efforts of each country during the war. Historically, before and after each conference, groups of advisors, senior officials and key staff members are abstractly moved (no cardboard counters on a hex map here) between the Allied capitals brokering the deals that created the post World War II world. Each conference sees one of a group of issues nominated for inclusion in the conference. The issues categories include such items as Theater leadership changes, directed offensives, production priorities, clandestine operations, political activity, and strategic warfare (A-Bomb). Each of the historical conference cards independently puts some number of issues “on the table” automatically for discussion, while the players then nominate an additional 7 issues based on their individual strategies and goals. I have said this before and will say it again. The best part of the design is the conference table and stress and tension that comes from fighting over each and every issue. No one issue is a game breaker and no one issue will outright win the peace for you. But, each issue is key to the game as they unfold and change the landscape across which you are battling. Not landscape of terrain and defenses, but pit falls, traps and dead ends.
Soviet Staff Cards Analysis
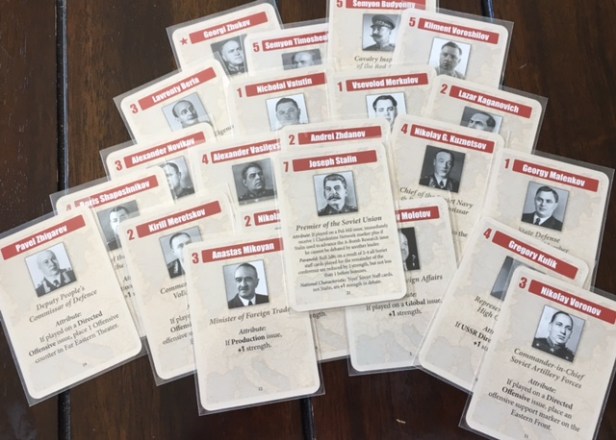
Before I get into tips on strategy, I believe that you need to have a strong understanding of the foundation of each side and their strengths and apparent weaknesses. I love CDGs and have found that the makeup of each faction’s deck will give you a good idea of what type of strategy you should be pursuing with each side. This game is not a true CDG but does use cards to drive the action. As mentioned earlier, the cards represent real period personalities of advisors, political officers and generals, who had the ear of the leaders and could go about working behind the scenes to move an issue into the limelight. Each player will utilize these cards to win those issues and each card provides either a bonus for a specific attribute or, in rare occasions, a negative modifier.
In looking at the Staff cards for each nation, I wanted to compare the relative values of the various cards and compare their focus, or in other words, what attributes each side tends to favor in the makeup of their decks.
First off, each side has a deck consisting of 20 Staff cards, a Chief of Staff plus their leader(s) for a total of 22 cards. These 22 cards consist of four cards of each number value ranging from 1-5. So, for example, each deck has 4 Staff cards with a numeric value of 1, 4 Staff cards with a numeric value of 2, etc. As I was trying to compare the decks, I borrowed an idea from the game designer himself Mark Herman and decided to assume that each card would be used for the attribute that is printed on the card in order to come up with a realistic value that could used for comparison’s sake. So, I would calculate each number by adding up the total numeric values by first multiplying the cards value by 4 (to account for the number of cards for each number 1-5) and then adding their printed attribute bonuses to the total.
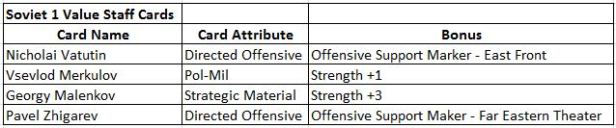
For example, the Soviet 1 value cards calculate as a total value of 8, which is figured by assuming 1 value for each card (4 cards x 1 printed value = 4) and then adding in the attribute bonus as if that card were to be used to move that specific issue or +4. In this example, the four Soviet 1 value cards are as follows:
With this understanding, the following are the total numeric values possible from each nation’s Staff cards, which include the 7 value from their Leader:
United States = 100
United Kingdom = 96
Soviet = 86*
*The Nyet! Soviet national characteristic gives them a bonus to their Staff cards printed value when used to debate any issue.

Another point of explanation is that each side has a designated Chief of Staff card that has a random numeric value in addition to a bonus for a certain attribute. The random numeric value is determined from rolling a 6 sided die and then using that number as the card’s base value. I have assumed that each Chief of Staff would roll an average of a 3 when used. In reviewing the above statistics, your first impression might be that the Soviets have no chance. With their paltry 86 score, 10 full points behind the United Kingdom and a whopping 14 points behind the United States, you might be asking why even bother? I can assure you that the Soviets can be played effectively and win the game, even though their total power is less than the other 2 players in the game. I have won with the Soviets on at least 2 occasions and know the power they have. You simply must play to their strengths and force the issue. I don’t know what your opinion of history is and the Russian strategy, but subtlety wasn’t one of those strengths. Remember, that Stalin’s background was that of a thug and the use of muscle won him his place at the table.
General Soviet Card Strengths
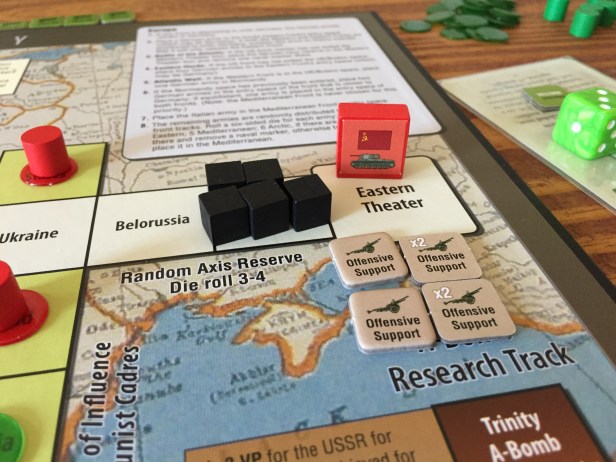
With 8 Directed Offensive cards or 36.4% of their total cards, representing 25 of their 86 power, or 29.1%, the Soviets should go about trying to do their best to secure as many Offensive Support Markers as possible each conference. You will also notice that of the 6 cards that offer an Offensive Support Marker as a bonus, 4 of those are for the Eastern Front and should give the Soviet player a hint that this should be priority number 1. These Offensive Support Markers will aid them in defeating the Eastern Horde of the German Army, as until the Western Allies open the 2nd Front in France, the Soviets will generally be the only ones fighting the Huns.

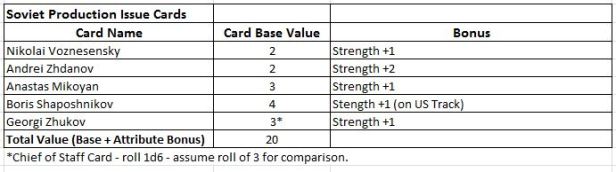
Also, the Soviets are pretty strong on Production Issues as well. They have 5 Production Issue cards or 22.7% of their total cards, representing 20 of their 86 power, or 23.3%. They need resources to fuel the war in the east and must ensure they are winning these issues as each Production Issue won is worth 1 Offensive Support marker. It is also really great to see your opponents have to hand over their hard earned Production if you win their issue. It is always a great feeling to win a Directed Offensive Issue and force your opponents to place two of their Offensive Support Markers or Production in the theater of your choice.
General Soviet Card Weaknesses
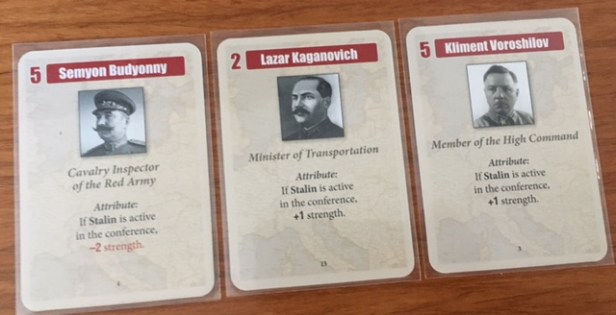
The Soviets do not have much in the way of cards associated with Global Issues (1), Pol-Mil (1), Strategic Material (1) or the A-Bomb Research (2), and have no cards associated with Theater Leadership. This will mean that you will have to use your available cards skillfully to make any progress when these type of issues are on the table. But never fear, you can always debate and gain that +1 bonus or use Stalin to grab those issues if they are important to your overall strategy or at that time during the game.

They also have another weakness in that they have 3 cards that are based upon whether Stalin is active in the conference. Because more often than not, Stalin will be used to gain the advantage on the A-Bomb Research issue early, he will be inactive quite often and this will directly affect 2 of the three cards, with only Budyonny being advantaged while Stalin is inactive. You must also keep in mind that Stalin will be unable to advance an issue during Conference 2, Conference 4 and Conference 7, although he can still be used to debate.

Recommended Tactics for the Soviets
Now that we have a good understanding of the general power and limitations of the Soviet Staff cards, let’s take a look at some of my tactical recommendations for the use of Comrade Stalin and the Soviets. But first, I need you to understand that if you play Churchill optimally, by going about your list of goals and objectives while never paying attention to the other players and what it is that they are doing, you are doomed to fail and lose. It is vitally important to be aware of the progression of the game and to incorporate little tweaks to your established strategy. If you don’t do this, you will all of a sudden come to a realization that you are out of the game and cannot get back into it. What I recommend is, if playing a full 10 conference game, setting three points at which you will take a look at your score as compared to the other players, the position of the various fronts and the location of the A-Bomb marker, and then readjust your strategy. I believe you need to do this in Round 3, Round 6 and again in Round 8 (don’t wait until Round 9 as you won’t have enough time to react to any changes before end scoring). This type of careful attention to your score in relation to the other players, will help you to gauge whether you need to worry about the end game, as remember, that there are many ways to win at Churchill, and not all of them deal with the player that has the most points at the end of the game. I would say that the easiest way to go about a Soviet victory is to grasp the military side of the game with both hands and go at it doggedly. This will put pressure on your opponents to amend their plan and include military conquest of the Axis or face the consequences of a situation where they have the most points but you forced the Germans and Japanese to surrender and win due to one of the catch-up mechanics.
A Strategy of Debate to Take Advantage of Nyet Bonus
Due to the Nyet National Characteristic given to all Soviet Staff cards, which grants a +1 bonus when debating an issue, the Soviet player would do well to judiciously use this ability when it gives an advantage. This will help to close the gap on the discrepancy pointed out above between the nations in overall points. But, you must be careful when you choose to debate as you will in essence lose your next turn at the table as you will be forced to pass and your opponents will have the opportunity to move an issue that is important to them unfettered by you. So debate early, debate often, but debate wisely and be picky as to when to argue, as you may lose more than you gain by debating. Also in relation to debate, remember that Stalin cannot be used to advance an issue in Conference 2, Conference 4 and Conference 7. But, he can still be used to debate an issue, although he will not gain the +1 Debate advantage. In these specific conferences, it is wise to plan to use Comrade Joseph to advance an issue that you really want through debate, such as a UK or US Directed Offensive. Oh, how good it feels to see the Western Allies give you Offensive Support, at your beck and call!
Use State Security & NKVD Staff to Thin Deck

I have found that in any card game (but mostly in deck building games where you will be building your deck to become more and more powerful as you add cards to it), the proper management and manipulation of your deck is one of the major keys to victory. This manipulation will ensure that you consistently draw the best cards from your deck to be able to play them and take advantage of their special powers at the most opportune times. While Churchill is far from a deck building game, as your deck is static and will be used relatively unchanged throughout the whole game, you do have some opportunities with the Soviet deck to thin out the less powerful cards to ensure that your high powered cards come out more often.
The two key cards I’d like to discuss are the use of Vsevolod Merkulov and Lavrenty Beria. These 2 cards are intended to replicate the constant state of paranoia and fear regarding traitors and leaks in the Soviet government. Merkulov is the People’s Commissar of State Security and Beria is the Head of Soviet Intelligence. Both of these cards function the same and have the following text:
After playing or discarding the next Soviet staff card THIS conference, roll 1d6: on a 1, remove that card from the game due to execution (or arrest in the case of Merkulov).
I like to use these cards, when drawn early in the game, to try and get rid of some of the 1 and 2 power cards that don’t offer much benefit. Beware though, as you have to plan this carefully as you don’t want to play a card like Budyonny right after one of these guys. I know that you have to roll a 1 for Merkulov or Beria’s power to kick in and get rid of one of your low value cards, and that the chances of this happening are pretty remote, but early in the game, it is definitely something that you want to focus on and plan for as it will increase the odds that you draw out your 3, 4 and 5 value cards more often in the late game. I would also say you need to make sure you don’t play one of your power cards after these guys ever. It is not worth the risk!
Focus on Setting up the Convoy in the Arctic Theater as Quickly as Possible
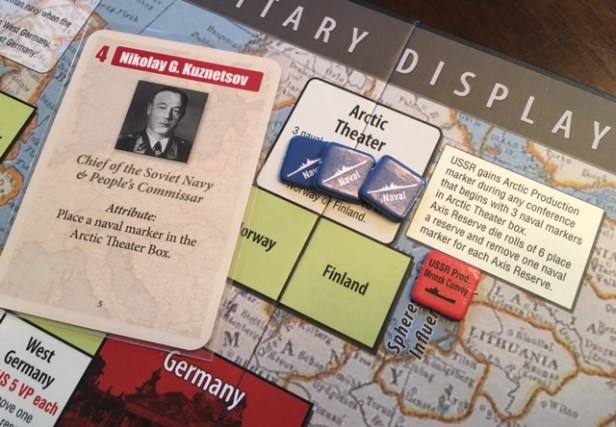
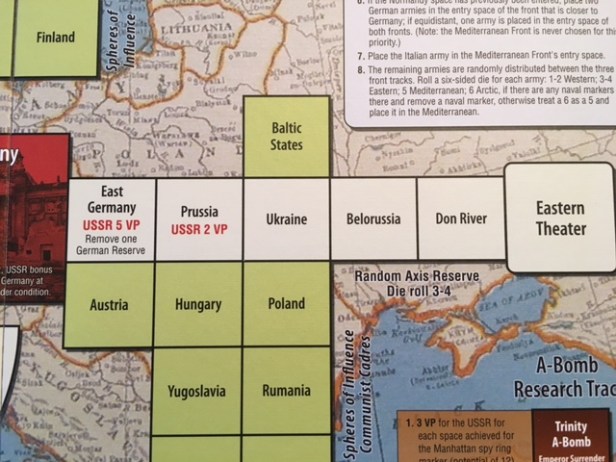
I know this might seem like a no brainer but you must focus on the Arctic Theater quickly as the Soviets in order to gain that very precious additional production marker from the Arctic Convoy. The Arctic Theater box, once it contains three Naval Markers, will provide the Soviets with the Arctic Production Marker during any conference that starts with at least 3 Naval Markers in the box. I have found that this must be taken care of prior to the 3rd conference or you will fall behind in the War in Europe. This additional production marker will add one additional Offensive Support Marker anywhere, but you will want to focus on placing it on the Eastern Front first as you will have the Eastern Horde to focus on and must make headway here to set you up for the rest of the game.
In order to accomplish this, you must spend at least 1 or 2 early Production on placing a naval marker. If you focus on it from Conference 1, it won’t seem as daunting and you will slowly make your goal by the 3rd Conference at the latest. But never fear, also to aid you in placing these naval markers is Staff Member Nikolay G. Kuznetsov, Chief of the Soviet Navy & People’s Commissar, who allows you to place a naval marker in the Arctic Theater Box when he is played. The really good news is that he has 4 power along with the marker benefit, so if you can will yourself to draw him early and often, it will be well with you.
Go First & Use Stalin on the A-Bomb Research Issue

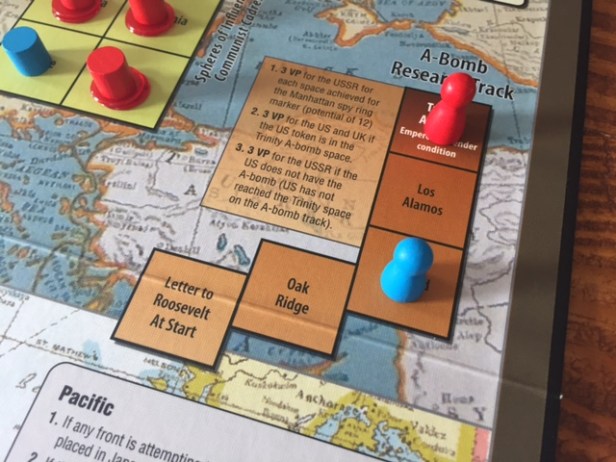
There is power in going first and using the big boy in the deck Joseph Stalin on the A-Bomb Research issue. If the A-Bomb Research issue is moved using Stalin, it will reach his chair location and will be captured without the ability for the other two opponents to debate this issue as the text on his card reads as follows: …if Stalin used to advance the A-Bomb Research issue, be cannot be debated by another leader.
You might ask why should I do this? Well, the answer is simple; victory points. The USSR will score 3 VPs for each space achieved for the Manhattan spy ring marker, which means this area could potentially be worth 12 VPs for the Soviets. More importantly than the outright VP though is the fact that the Soviets can prevent an easy 5 VP for the United States by depriving them of the A-Bomb and the ability to force a Japanese surrender by simply having the A-Bomb marker in the Trinity Space and a B-29 base in one of three spaces including Iwo Jima, Kyushu or Formosa.
If the Soviets win the issue, they will get to automatically advance one space on the track without a die roll, which is a huge benefit. But, simply winning the issue is not a guarantee that the Soviets will stay ahead in the race however, as the Western Allies still get a die roll and on a roll of 4-6 will be able to advance one space. Any player can also spend production markers for a +1 modifier per marker used. It would be great if the Soviets get out far enough ahead that the Allies either begin pumping their resources into trying to make sure they catch up, as this will mean that other areas will be neglected, or they simply give up on the A-Bomb. Remember, if the US doesn’t reach the Trinity space, this is worth another 3 VPs for the Soviets!
Add Directed Offensive and Production Issues Each Conference
An important part of the game is that of the players choosing the issues that will be covered at each conference. Each player will be allowed to choose two issues to place in the center of the table, with the player who won the Agenda Segment getting to place a 3rd issue of their choice on the table and moving it a number of spaces on their track equal to the difference in the values of the winning card to the lowest card. Don’t ignore the agenda segment. It will often feel fruitless to you as the Soviets and you will be tempted to simply throw away a low 1 or 2 value Staff card. Don’t do this. You shouldn’t fight hard for the Agenda Segment either by using your high powered cards, but please don’t give it away. You will find that the UK will be getting all that they want and winning more conferences than they should if you do this.
Your number one priority in each conference is to make sure that there are Directed Offensive and Production issues in play. The Soviets need to generate at least 4-5 Offensive Support markers for the Eastern front each conference if possible, with your ultimate goal being ten, as this will make your war efforts much easier and keep the pressure on your opponents. The way that this can be accomplished is as follows:
- Each round, your base production will be at least 3 (remember that your opponents will have a base higher than yours as the UK has 4 while the US has a whopping 6);
- An additional one production from the Arctic convoys (refer to this point earlier for an explanation);
- Staff cards played on the right issues will give 1-3 bonus Offensive Support markers (refer to earlier discussion on Soviet Staff Card Strengths);
- During Conference 1, 3, 5, 6, 8 and 10 (only 1A and 5A are guaranteed +1) , you will have the opportunity through a die roll to obtain a +1 Production from the Murmansk Convoy;
- Combination of Directed Offensives, Production and the European Leadership will generate 3-4.
This will give you a range of 9-12 possible Offensive Support, if all things work out to your benefit, and makes it clear why you want to place these issues on the table.
Force the Second Front Early (But Not Too Early!)
This is always a tough issue for the Soviets. With the need to make sure they have 9-12 Offensive Support markers on the Eastern Front to have a realistic chance of advancing there, this will mean that they must almost exclusively focus on putting Directed Offensive and Production issues on the table and remember, this is what the Soviet Staff card deck is really built for. But, if they can somehow force the Western Allies to enter the war and force the D-Day Invasion through winning the Second Front Conditional issue, this will make the Axis have to focus resources elsewhere rather than building up the Eastern Horde making your path to Berlin much easier. I recommend that the Soviets place the Second Front Conditional issue on the table during each round starting with round 2. Why wait you ask? Well, I want to first see what it is that my opponents are trying to do before I embark on that tough uphill climb and sacrifice my Production. Most likely, I will be focused on trying to build up the Arctic Convoy with at least 1-2 Production during the first few rounds and will not have enough military power to realistically advance the front in the East, so it doesn’t hurt to try to put this issue on the table early (but not too early!). If the Soviets allow the Western Allies to simply follow through with their historical Mediterranean first historical strategy, they are falling right into their hands as this will allow them to gain valuable victory points.
Remember, if you are able to generate 10 Offensive Support on the Eastern Front, with the most likely resistance there being the 5 German reserves, you will have a 100% chance to advance the Eastern Front. And, with a lucky roll, you will have the chance to advance two spaces on a breakthrough. Pressure is key in this game and keeping it on the Western Allies is vitally important. Once you get your army rolling in the East, the Med first strategy that will most likely be employed by your Western Allied opponents, will only fall into your hands and you will begin forcing them to think differently. They might even get jumpy and place the Second Front issue on the table themselves and you really won’t have to. This will only happen if you rapidly advance the Eastern Front. Your success will put the fear of a loss in their hearts, and you will have won (at least for the moment) as they will now most likely minimize or even outright abandon their initial strategies in order to keep up with your progress militarily.
Delay Invasion of Japan…for as Long as Possible!
Just as the Western Allies wish to delay the Second Front and focus on the Mediterranean Theater to pick up those key victory points, you want to avoid entry into the Far Eastern Theater and will want to avoid the USSR Declares War on Japan Conditional issue for as long as possible. Your first goal must be to reach Berlin. The US and UK might think that they can win by keeping you out of the Pacific. Their ability to score points without Japanese surrender pales in comparison to the 15 VPs that you will gain by winning the race to Berlin and being its sole occupier. But do everything that you can to stay out of the Pacific until you have forced a German Surrender or are knocking on the gates of Berlin. This might mean using Stalin to advance the Conditional issue even though you will be going against your prime directive of gaining Offensive Support and Production to fuel your war drive. Beware, this is their trap that they will set for you and it is a bear trap that will slow down the Russian machine, causing you to waste your resources on keeping that issue out of the center of the table. Sound familiar? If so, it is because this is exactly what you are trying to do to your opponents with the Second Front. Turn about is fair play, so beware!
Focus on Clandestine Network Markers on Eastern Front
As mentioned in the earlier discussion of the Soviet deck’s general weaknesses, Pol-Mil issues are not your forte. You are not terrible at them, but you don’t have many cards to gain attribute bonuses on those issues. You can still make this a factor in your strategy though as you drive through the Eastern Front on your way to victory in Berlin. I recommend that after the Eastern Front advances past Don River (Belorussia at the latest), that you start placing at least 1-2 Clandestine Network markers in the Eastern Bloc countries. Remember that the Western Allies will not want to sacrifice their markers on the countries ahead of your moving Front, as they will be removed once you enter that box, so take advantage of this early by building a solid base that will be difficult for them to overtake and ultimately stop. Remember that when Stalin is used to advance a Pol-Mil issue, you will gain 1 Clandestine Network marker to use, which can be beneficial as you look to establish a basis for your political domination of Eastern Europe. Don’t be fooled though as you will most likely not win through political machinations but should look to use that VP gained through political wrangling as a supplement to your main military strategy.

As you can see from the picture above, I believe that the Soviets should flirt with the thought of placing 1 or 2 Clandestine Network markers in the West to keep them worried (remember the concept of continual pressure to force them to react and spend resources on what you want them to spend resources on). You will want to be very opportunistic about this and obviously not place your markers ahead of the Western Front as they will be wasted. But, keeping up the pressure is key in the battle for the hearts and minds of the people.
Conclusion
Thank you for bearing with me as I have outlined some of the strategy and tactics that I have come to use in playing as the Soviets in Churchill: Big Three Struggle for Peace by GMT Games. I absolutely love this game and have since the very first time I played it in late 2015. With the difficult victory conditions, that change based upon the outcome of both war in Europe and the Pacific, it can be difficult to build a consistent winning strategy that you simply follow with each play. You can plan for some things, and focus on making sure you accomplish major issues (such as establishing the Arctic Convoy early), but you will have to remain flexible and allow your strategy to be changeable to deal with whatever issues are on the table during any given round. But if you remember the points I have shared, including placing Directed Offensive and Production Issues on the table each round, forcing the Western Allies to open the Second front, avoiding war in the Pacific for as long as possible and building your Clandestine Networks in the East, you will win more than you lose. Good luck!
-Grant

Great analysis and right on the money. I would only add that in the 2nd printing I increased Stalin from 1 to 2 Clandestine markers when used on Pol-Mil. Late in the playtesting I lowered it as the Soviets were winning too often with skilled players.
In any asymmetric design there is always one side or so that have obvious strategies. Per my many articles, the Churchill player with its Pol-Mil, ignore the war strategy is how they maximize their effort. If the Soviets do not play the military game the Churchill player can ignore them for the most part.
It takes the Americans to understand where their interests lie and it usually means that they have to drag the British into the war. But as you stated the biggest incentive to get the Western Allies into the war is the Soviet Eastern Front knocking on Germany’s front door.
Great article, thanks… please link this to the BGG page when you get a chance.
Mark
LikeLike
One reason to play Stalin instead of FDR Truman replaces him if he rolls low after using hie card and Churchill can have a heart attack and won’t attend the next conference If Stalin rolls low, his already low valued supporters loos one point from their card, except the one valued cards stay a one. You may not worry about playing Truman instead of FDR, but if the atom bomb isn’t built Truman may not be worth 7.
LikeLike
Accurate forecasting is key to making informed business decisions.”<a href=”https://sapphiresmr.com/”>a Women of Vision</a>
LikeLike