
Scenario Setup
From the playbook, we read the following situation report for Scenario #10 Commando School:
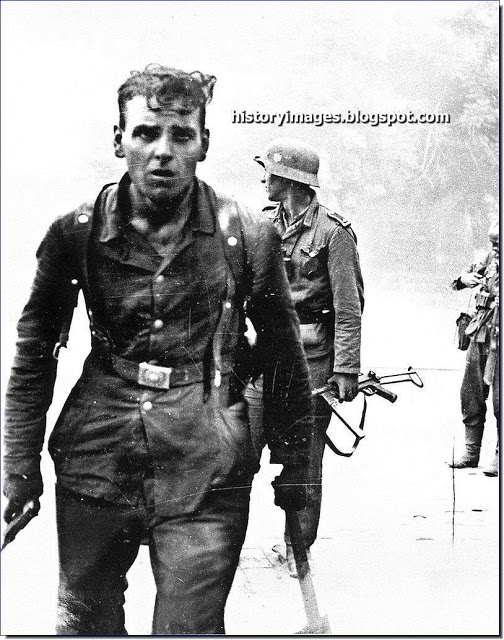
Novorossiysk, Russia, February 4, 1943 – To aid in the success of the Soviet amphibious operation launched against Kleist’s Army Group A near Novorossiysk, a Black Sea Fleet Commando detachment landed a few miles further down along the Black Sea coast.
In order to protect the beachhead’s flank, the commandos hurriedly pushed into the town of Stanichka and holed up in a local university overlooking a man made lake. Elements of the German 73rd Infantry Division quickly counterattacked in an attempt to roll up the flank and drive the invaders back into the sea.

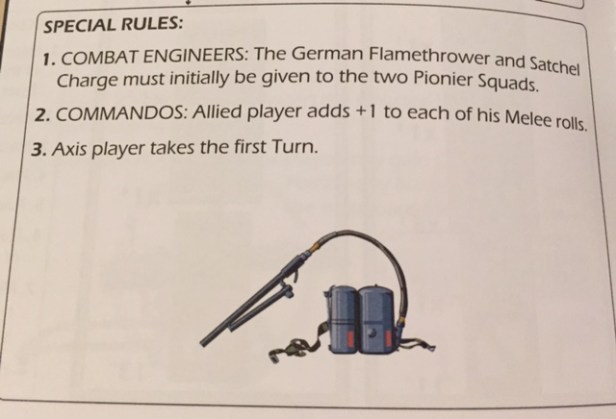
I chose to play as the Germans and Alexander played the Russians, with me as the Attacker (6 cards) and Alexander the Defender (4 cards). The Surrender level was set at 7 for the Germans and only 6 for the Russians, and as I looked down through the unit manifest I could see that this was not your typical Russian mass of humanity but they had really good units with high statistics (Guards SMG – FP 6 (boxed), Range 3 (boxed), Move 5 and Morale 8 as well as Guards Rifle – FP 5, Range 5, Move 5 and Morale 8) as well as really good Leaders (Lt. Khukovsky, Command 2, Morale 9 and Sgt. Bikovets, Command 2, Morale 8). They also had pretty good starting Firepower with that .50 cal MG (FP 9, Range 16 (boxed)) along with a Satchel Charge. I knew that I would have trouble rooting them out of their cover and would have to be very careful about my opening setup so as to avoid having my teams torn to shreds before I could get into cover to assault their positions. The German units were also good (I finally was going to get to use the very elite Pionier units (FP 7 (boxed), Range 3 (boxed), Move 5 (boxed) and Morale 8) but the Pionier units had to start with the Flamethrower and Satchel Charge, which I am not a big fan of. I felt that forcing them to start with these weapons really nullified their statistics until I could either use the weapons (in the case of the Satchel Charge as it is a one time use item) or give them to other units (at the cost of 1 Movement Point).

The Russians would start with control of 3 Objectives (#1, #3 and #5) and the Germans controlled 2 (#2 and #4) and the Russians also started with 9VP’s, which led me to believe that it would be difficult to win by Victory Points alone. This was going to be difficult for my Germans but I was confident in my elite Pionier units and my Rifle units.
The scenario had the infamous Open Objective W which reads “Exit points are doubled”, so with this Objective and the scenario summary, we knew that one of the goals of the Germans would be to attempt to exit the map. I was also concerned about my chances of winning by Victory Points though, even with the doubled exit points, for two reasons, one was that the Russians start with 9VP in hand and two he was the Defender so would get a free VP at each Time Check, of which there were 6 in the game equating to a possible 6 additional free VP. This would give him a VP lead of 15 points, which is very hard to overcome.
The Special Rules for the scenario also scared me a little bit. The one that got me was the +1 Commando bonus to Melee rolls. This would mean that his Guards SMG units (FP 6 (boxed)) would give him an 8FP for Melee (6FP base + +1 for boxed FP + +1 Commando bonus = 8FP). It is important to remember that the Commando bonus is only once per Melee roll and not +1 for each unit in the Melee. If you throw in a Leader with that Guards SMG unit, you all of a sudden are looking at a base FP for that attack of 12 (see previous calculation and add +2 for Command bonus (as both Leaders have a 2 Command) + +2FP for the Leader’s FP if not broken).
The scenario required the Russians to set up first, 12 hexes deep from their edge of the map, so this was in my favor. I never like to set up first but prefer to plan off of his setup. As you can see from the overhead view of the entire battlefield below, the Russians decided to place the .50 cal MG Team on the island in the middle of the man made lake at Objective #1. The .50 gave him a good base 9FP and would allow him to cover the left side of the map in case the Germans decided to run up that road to move off of the map. He also placed a single Guards SMG unit on that side in the cover of the woods (2 Cover) to offer resistance. This setup was brilliant for the Russians as it almost took that side of the map out of my mind as a possible path of attack. I saw the 9FP base as very powerful due to the fact that there was limited cover on that side of the map. Even with a slightly above average roll of a 8, his base Fire Attacks would be 17, and Alexander also always holds onto various Actions such as Crossfire, which gives a +2 when firing at a moving target, so he was going to be bringing Fire Attacks on my teams of 19FP with no place for me to hide! This terrified me, and what I learned later, was one of the major reasons for my defeat. See, according to Sun Tzu, “the supreme art of war is to subdue the enemy without fighting”. I had allowed him to win at setup because I talked myself out of what I wanted to and should have done. The Art of War, still applicable today, in real combat as well as simulated combat.
He also placed an aggressive forward team consisting of a Guards Rifle with a Light MG and an Elite equipped with a Satchel Charge, led by Sgt. Bikovets (Command 2, Morale 8) in the group of buildings near the roads at the front in order to bring fire on me no matter which way I chose to advance. He covered that team with another solid group at the back of the map to allow flexibility in movement to offer support to either his right or left flank depending on where my Germans started from. This reserve group consisted of a Guards SMG, a Guards Rifle with a Light MG, led by Lt. Khukovsky (Command 2, Morale 9).

Now that his setup was complete, I began to strategize the best way for my forces to assault the village and try to win the scenario. I decided to break into 3 separate teams and each would be assigned an objective.
Team #1 – I put Sgt. Biermann (Command 1, Morale 8) in charge of one of the Pionier units equipped with the Flamethrower as well as a Rifle unit (FP 5, Range 5 (boxed), Move 4 (boxed) and Morale 7). My initial plan was for these units to try to hold the left flank and prevent the Russians from moving off of the board to gain easy Victory Points. I then changed my mind and decided that the Flamethrower, with its high FP of 11 and ability to render all Cover to 0, would be more useful to assault the Russians holed up in the buildings at the front. I also planned to use the Flamethrower once to attempt to break those units and then ditch it in order to take advantage of the Pionier units superior 7FP (boxed) either in Melee or to fire on the Russians from distance. The thing is that broken units lose their Firepower!

Team #2 – Team #2 was led by Sgt. Esser (Command 2, Morale 8) and consists of 2 Rifle units equipped with Light MG’s. They have the goal of bringing fire to bear on the Russians in the buildings offering cover for the Flamethrower and potentially adding to the FP of any created Fire Groups. They also would then fall away to cover the left flank in the place of Team #1 as my plans changed. This team would not be my primary attack force but would move and fire when the opportunity presented itself. This team would be harder to break due to Sgt. Esser’s Command 2 bonus so I was expecting them to be able to weather the Russian attacks better than Team #1.

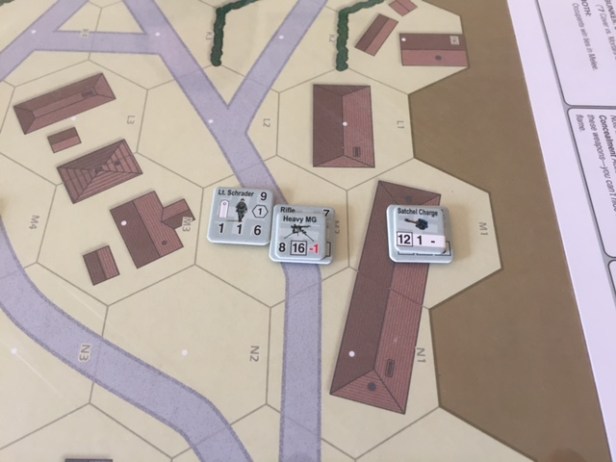
Team #3 – Consisted of a Rifle unit equipped with the Heavy MG (FP 8, Range 16 (boxed) but Move -1) and the other Pionier unit with a Satchel Charge led by Lt. Schrader (Command 1, Morale 9) who would start on the road hex in order to take advantage of a +1 Move bonus to somewhat cancel out the negative movement penalty of the Heavy MG. I initially setup this group thinking that they would be focused on advancing up my right flank to swing around into the buildings near Objectives #3 and #5 to bring fire on the Russians. I also expected them to be opportunistic and move off the map for Victory Points if the opportunity presented itself.
Failed Assaults Followed by a Russian Tactical Retreat Really Limited my Options
The Germans were given the first move and had the Initiative Card. That ability to take the first action is always so critical. But to my dismay, I drew no Move Orders and no Fire Orders. Ugh! I had to discard and this allowed the Russians to move their team back out of the woods to the road hex to set up a good Fire lane as I would advance down that road. On my second hand, I did draw a Move Order and decided to take a risk (I am known for my overly aggressive play) and activate Sgt. Biermann and move his squad down the road to assault the Russians using the Assault Fire Action that allows me to make one Fire Attack with any number of my units/Weapons with boxed Firepower that are currently activated to Move. He took an Opportunity Fire on my units and of course, broke Sgt. Biermann before I could get my Fire Attack off. As you can see, I didn’t roll that well (pulled a 5 for a total of 16FP) and he was able to only be suppressed rather than broken. If he had not broken Sgt. Biermann prior to my attack, I would have broken both of those 2 units with my first assault, and I would most likely be writing a different AAR result. That Assault had failed and now I was out in the open.

Trying to Avoid Melee and Damnable Time!
Usually when I play, I am always aggressively looking for ways to get into Melee combat in order to eliminate pesky units. But with the Special Rules in this scenario giving a +1 Melee Roll bonus to all Russian units, that was yet another item that was in the back of my mind that I was worried about (remember Sun Tzu!). Over the next few rounds, I moved Team #3 up along the road trying to get into the buildings located across the street from both Objectives #3 and #5. My goal in this action was to bring a stronger fire group (using the Heavy MG with FP9) to attempt to eliminate the Russian units holding those objectives and trying to kill my units led by Sgt. Ganz. I was able to move up the road without taking fire due to the fact that the buildings blocked the Russian line of sight.

As you can see from the picture below, several things happened that caused me more issues. The Russians got a free fox hole via an event (Alexander always seems to get good events) which offered more cover to his units. I also had Sgt. Biermann suppressed but my Team #3 was able to take up good positions in the building and in the woods to bring a good fire attack on his units. At this point, I literally pulled 2 Time! rolls in a matter of a few rounds and we advanced quickly to 3 on the Time Track, only 3 more spots from Sudden Death and a chance to end the game prematurely. In our last few games, we have drawn that Time! card a lot (at least 5 or 6 times) and have found that our recent matches have been very short. I understand it is part of the game, but really don’t like that. When on the Attack, time is precious as it takes several rounds to carefully maneuver into position and to collect the cards to improve Fire Orders to be effective. Every Time! card makes it more and more unlikely that I will have the opportunity to do what is needed.

Over the next few rounds, the Russians decided to Advance into Melee with Team #1 in the middle of the road and win, partly due to the +1 Commando bonus but also due to the fact that Sgt. Biermann was broken and suppressed. I felt helpless and lost my first 2 units as he had a base 10FP (Guards Rifle 5FP + Sgt. Bikovets 2FP + +2 Command Bonus to the Rifle and +1 Commando bonus = 10FP) to my 8FP. I actually used the Initiative Card here to try to force him to reroll as he had pulled a 9 and I was sure he would pull less than that but he didn’t and pulled a 10 for a total of a 20FP to my 13FP. I had not only lost the Melee but also lost the Initiative Card. Not good. At this point, his VP total was 13.
Lost my Pictures and Further Struggles
I took several additional pictures of the remaining game but for some unknown reason they were not saved on my phone, so I will have to give a written summary of the rest of the game. Over the next several rounds, I was able to damage Sgt. Bikovets and the Guards Rifle and take them out in a Melee attack of my own which reduced his VP from 13 to 8 but he was then able to eliminate 2 more of my units bringing his VP back to 13. I then tried to take a different tactic to cause him to have to do something a little different. I decided to try to move Team #3 off of the board which would have given me 12VP (remember Exit points are doubled thanks to Open Chit W!) but to my chagrin, the Russians were able to bring a large 22FP attack on my Germans the moment that I came into the open leading to all three of my units breaking. This stopped my movement and then on the next turn he was able to gather a 20FP Fire Order that killed my Pionier unit (giving him 2VP) and suppressing Lt. Schrader. The next round I drew no Move Orders (not that it would have mattered as I don’t believe I could move with either of those units due to being broken, suppressed and carrying that Heavy MG) and he was then able to finish off my other Rifle unit gaining an additional 2VP bringing his total to 21VP. I was able to move Lt. Schrader off of the map gaining 4VP. The game ended on the 1st Sudden Death roll and I didn’t have the Initiative Card to change that outcome. I had lost another match to Alexander with a final score of 18VP, but this time I had lost with the Germans.
Summary & Debriefing
Combat Commander is a fantastic game! Each time we play, it is different and there is enough variety in the events and the various factions that you get a different experience each scenario. In this scenario, I felt as if I lost before we even started. I let the Special Rules and his setup change my initial plan. He had won the battle of the mind and as Sun Tzu said, “The supreme art of war is to subdue the enemy without fighting”. His placement of that Heavy MG on the island really subdued my intentions and caused me to play on his terms. We are now all tied up at 6-6 in our 12 scenarios. My once daunting lead of 5-1 has been eliminated! It is the way the game is made but things will change and I am due to have a scenario where I get all of the rolls, all of the good events breaking my way and drawing all the cards that are needed at the right times. It is inevitable! See you next time!
-Grant

Once again my applause for your report´s game but, again, I ask me why you add the Command Leader Factor to the total FP, in a melee, case to be a leader involved in that combat, I reiterate that the rule (O16,4,1) does not say anything about this; the same in reference to the melee on the help sheet.
Could any of the players in this serie of AARs tell or explain me what section or rules of the game are based to solve the mele in that way, adding the Command Leader Factor?. Thank a lot
José A.
LikeLike
3.3.1.2 Unit Command – A Leader’s Command number is added directly to the FP, Range, Movement and Morale of all friendly squads and teams as long as those units are in the same hex with the Leader.
LikeLike
No where does it say in the Advance Order explanation that you don’t add the Leaders Command number to each unit.
LikeLike
I appreciate the questions. I’m not perfect and have obviously made errors in the past. If you find definitive prof via some other source please share. Leaders participate in the Orders when activated and in my opinion should add the bonus. They are there bolstering and encouraging their men and to me this is what Command bonus is.
LikeLike
Esteem Grant,
Contact with BGG players, including Chad Jensen, creator of the game, (below I leave the link to the discussion forum of this topic in case you want to check it personally) I am surprised by the diversity of views on this. And, in order not to extend myself further, I tell you that the game creator urges the use of command value in melee. With what I accept the “authority” of the creator of the game on the subject and I retract my doubts regarding yours AAR’s.
Also, I tell you that you were doing well before my first comment in the 9th scenario AAR: the command value is added to each and every one of the FPs of the units participating in the melee, following rule 3.3.1.2. No only add at the Total FP.
I regret not to agree on the concept of command, or rather on how the command is exercised during close combat, not before or after. A melee is a total chaos, a save the one who can, and in that chaotic and cruel scenario the command is simply another soldier who fights for his own life. It is my humble opinion.
Comand Commander is a game, like many others, with its rules that make it possible for two or more players to enjoy a good game. If I simply wanted a game, I would play the “Parchis”, or the “Pocker”, where everything is invented; Where black is black and white is white. But a wargame is different, and Combat Commander much more. It is history, is to simulate a fact that has already happened and to do that you have to know the reality of that fact, I do not value the belief or perception of the fact, I am worth the fact itself, and I insist, a melee is the maximum representation of the Chaos in a battle. The troop will feel trained, animated, even related and all thanks to the commanding officer but before the hand-to-hand combat, before seeing the enemy’s face less than a meter. From there, as I said before, it is a save the one who can. For me that’s a melee. I could say that the officer somehow emulates the training of the troop, or their morale, but for that we already have the FP boxed for the troops that are specialists in assaults.
I comment all this just to explain and justify why I understand not to use the command value in a melee, just for that. In addition to considering rule 3.3.1.2 quite ambiguous. and very clear the O16.4.
Anyway I will always say that where there is consensus and enjoy a good game …
I hope to continue enjoying your AARs for a long time. Thank you for your attention and patience.
Sincerely, José A.
https://boardgamegeek.com/article/24166899#24166899
LikeLiked by 1 person
José. Thanks for your research and attention to detail. I have been playing games for a long time and my simple motto is do what the rule says, not what you think. What I mean by this is that if the written rule doesn’t explicitly prohibit the use of Command bonus in melee then it is allowed. As I reread the rules, I saw nothing that changed my thoughts on its inclusion in the FP calculation for melee. But a good discussion anyways and I appreciate your interest in our blog. I love playing games but also love writing down the actions of the game which creates a narrative and tells a story to help me visualize and understand the historical struggle depicted. Thank you!
LikeLike