

I had a slightly different title for this article in my mind before we played the game. I was planning to use Gallia est pacata (Gaul is subdued) but alas, that is not the way it transpired. As you can see from the title (well only if you speak Latin), our 2nd game of Falling Sky: The Gallic Revolt Against Caesar didn’t go Rome’s way with the Belgic Tribes, led by Ambiorix, pulling out a narrow victory over the traitorous Aedui. On War Game Wednesday this week, we played our 1st 4-player game and it was marvelous! This game, more so than any other of the COIN Series of games, is made for 4-players and really shines when given the chance to pit all of the factions, the 3 Gallic tribes and the powerful Romans, against one another. I was given the honor to play the Roman Republic and have control over the vast and powerful armies of Julius Caesar. We allowed Alexander to control the Aedui Confederation, which would be my “ally” through MOST of the game, while Tim controlled the savage Arverni Confederation led by Vercingetorix and Matt played as the unassuming Belgic Tribes.
I learned a lot of lessons about playing the Romans and I will detail those as learning points throughout this entry. I have been intimidated to play them as they are so powerful and seem to be able to destroy anything before them with relative ease. Where I really have my concerns have been over the cost to March (2 Resources per region) and Battle (2 Resources per region). It is very expensive to move and fight with an army that is as large, well equipped and hungry as the Roman soldiers are, I get that! But without proper planning and preparation before Winter comes, the Romans can lose much of what they have fought hard to gain over the course of the game.
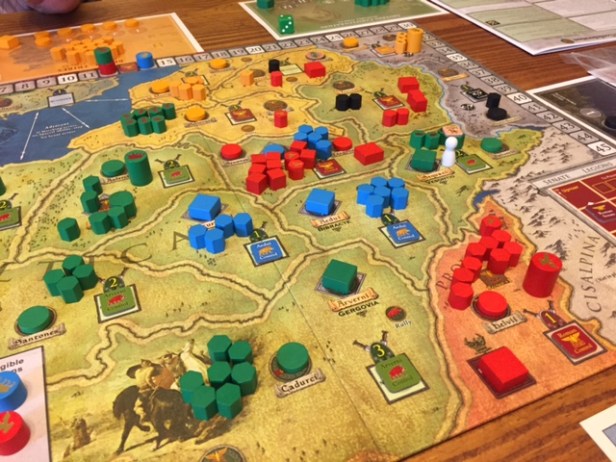
We decided to play The Great Revolt scenario which usually has 45 cards (9 piles of 5 event cards with 3 Winter cards) but it can be shortened to only 30 cards (6 piles of 5 event cards and 2 Winter cards) and we chose to do so as we started later than expected. The 1st few rounds, the newer players were very tentative and definitely afraid to inflame the Romans whose Legions are devastating. As you can see, the scenario sets up the game giving the Romans a good base in the middle of the map at Alesia from which to strike out and subdue the tribes. Due to the Aedui being my “ally” I focused my attention on the Averni in the Vesontio province in order to establish a supply line connecting my Legions in Alesia with Provincia. This effort took me several rounds but as soon as I moved Caesar in my Legions became killing machines and it was over for the Arnverni there. I was able to remove their Citadel, place a Roman Fort to protect from Germanic raiding and connect with Alesia. Goal #1 was accomplished and I was feeling pretty good about things. I had not lost any Legions yet as I was protecting them with my Auxilia and no bad events had come up allowing the Gaul’s to kill off Legions. Caesar finally had his supply line but had spent a good amount of my resources in doing so. Remember, it is expensive to March and Battle.

Learning Lesson #1: Don’t ignore the Belgae! What I began to notice about the game was that the Arverni and the Aedui were paying so much attention to the Romans and their own victory conditions that the Belgae were, for the most part, ignored. They slowly began to spread out in the top of the map taking Brittania to little fanfare from us, taking out the Germanic tribes in Sugambri (which was a little surprising to us but in the end was a master stroke) and beginning to spread to the west into Veneti.
Learning Lesson #2: Don’t leave Provincia undefended! One mistake that I made early in the game was leaving Provincia relatively unprotected after marching north to take out the Arverni in Vesontio. This would cost me considerable time and resources to take back which was one of the reasons that I was unable to have the resources needed at the first Winter card.

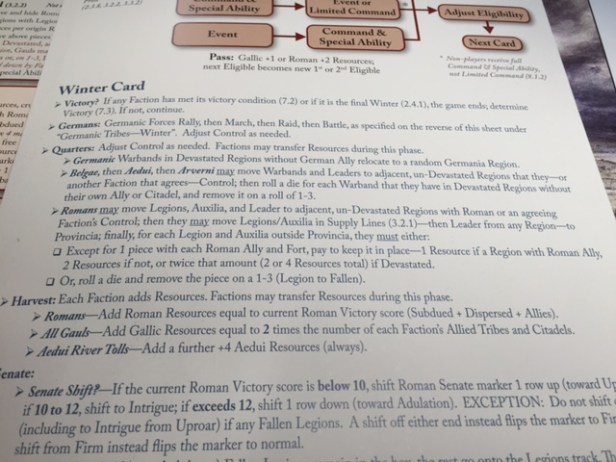
Learning Lesson #3: Don’t get caught out in the cold during Winter! Finally, we came to the 1st Winter card and this is where the game took a turn for the worse for the Romans. At this point, I had a total of 2 Resources. As you know, during the Winter phase, the Romans must pay for their Legions and Auxilia to remain in their locations. With only 2 Resources, I was really only able to keep 1 or 2 units in each of the Roman controlled areas with forts and allied tribes. This meant that I had to move all of my Legions and Auxilia from the Province of Artrebates and Nervii back to Provincia. This left this region unprotected and out of position to fight with the Belgae. I just couldn’t afford to keep my forces there! This was really heart wrenching as I had fought so hard to get troops in that area and put pressure on the Belgic Tribes.
So at the start of the final round (we only had one more Winter card that would end the game), I was left in a position to truly have to start over and try to win back the support of the tribes. I had lost Artrebates and Nervii and now had few resources (I only gained 9 new resources at the Winter phase) for a total of 11 Resources. To make matters worse, my “ally” the Aedui were only 1 point shy of being at their victory condition and the Belgae were only 4 points away. This was a bad spot for the Romans and I knew it was most likely too late. Learning Lesson #4 – The importance of Resources! I started by trying my hardest to Seize resources in Gergovia in order to begin my March back north to attack the Belgae. I was able to wipe out the Arverni resistance here with my powerful Legions led by Caesar himself and begin the process of dispersing the subdued tribes and gaining resources. This gained me about 14 Resources over a two turn period but that was time wasted that I didn’t have to get at the Belgae. The Arverni then began to practice the old “slash and burn” technique to stop my advance and devastated several of their provinces to stop me in southern Gaul. As the rounds continued to move on, I turned spiteful and my only goal was to make sure my “ally” didn’t win, so I finally attacked the Aedui in Avaricum and Bibracte to remove his Citadels (using the Besiege special ability) and his allied tribes to reduce his victory condition.
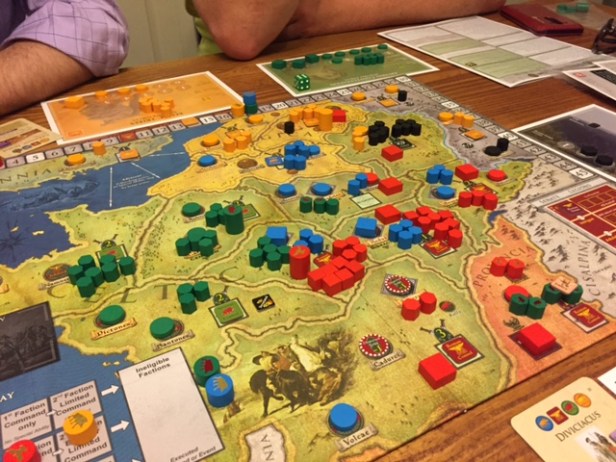
Despite my valiant efforts, the Belgae were basically given a free reign of the north and were able to utilize the Germanic tribes to great effect, taking control of most of the north and coming to within 1 point of victory. The final Winter card was drawn and without having the ability to March, I was unable to do anything to stop the Belgae. So, with that the final score was Belgae with -1, Aedui with -2, Arverni with -6 and Romans with -7! The game is amazing and we really learned a lot of great lessons that will be brought to bear in future games. If you have any advice for me playing the Romans, or comments about my lessons learned, please post below.
And remember, “Horum omnium fortissimi sunt Belgae.” (Of all these [Gauls], the Belgae are the bravest/strongest.) – Julius Caesar
-Grant

I must say that I like Liberty or Death more than Falling Sky. I have only played each once but felt LoD was a bit more balanced. I say that because there was no reason for anyone but Arverni to attack Romans. All the Aedui and Belgae had to do is take get into a country and put down ally’s. Plus the early “alience” between Aedui and Romans, did not help. I would play it again, but prefer Liberty or Death. Thanks for teaching the game to us Grant!
LikeLike
Thanks for the terrific lessons-learned treatment!
Since you asked, a couple ideas for the Romans, some already implied by your observations:
– Seize and Disperse, especially in Belgica, at an early opportunity, both to stock up your Resources and to keep the Belgic Tribes down.
– Remember that other Factions can give you Resources during Quarters. It’s in the Aedui interest, for example to keep Roman occupation of Belgica and/or Arverni areas going.
– Consider treating occasionally with the Arverni. They ended up losing your game in part because their Devastation kept the Romans from Marching north against the Belgae. All the Gauls Share an interest in allowing Caesar to keep their Gallic competitors in check.
Best regards, Volko
LikeLiked by 1 person