An Impossible War: The First Carlist War in the North, 1834-1838 from Bellica Third Generation is a block wargame that recreates the First Carlist War in the North of Spain which was a civil war between the Carlists who supported the succession of the late king’s brother Carlos de Borbón and the progressive and centralist supporters of the regent Maria Christina acting for Isabella II of Spain who were referred to as the Liberals. The game uses blocks representing units but also includes counters and uses cards. I was able to play the game about a month or so ago with Francisco Ronco who owns the publishing company Bellica Third Generation and very much enjoyed the game and how it represented this interesting struggle.
In Action Point 1, we took a look at the Game Map, discussing the point-to-point movement configuration, the various spaces and the delineation of the Carlist versus the Liberal Zones, as well as explained the use of the Rest of Spain smaller map. In this Action Point, we will examine the units available to both sides and cover the importance of Supply.
Units
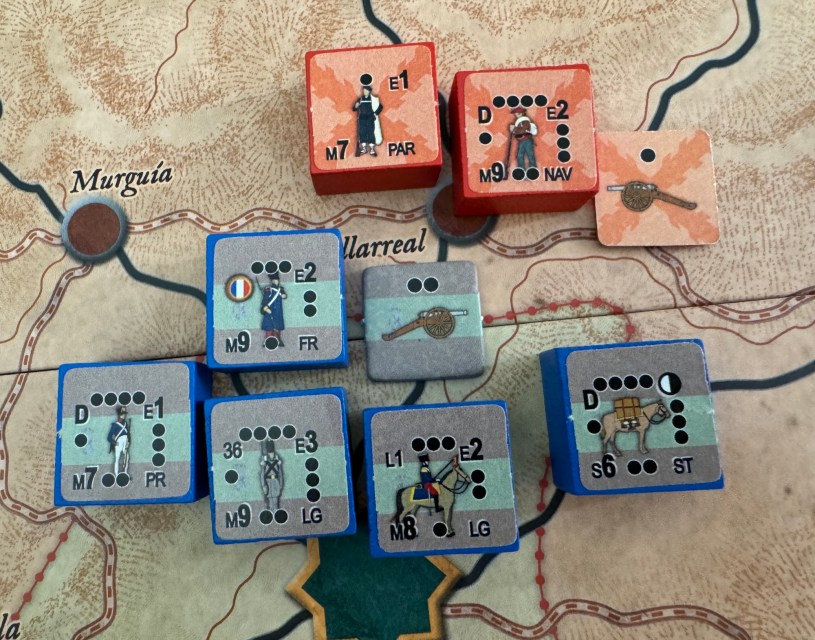
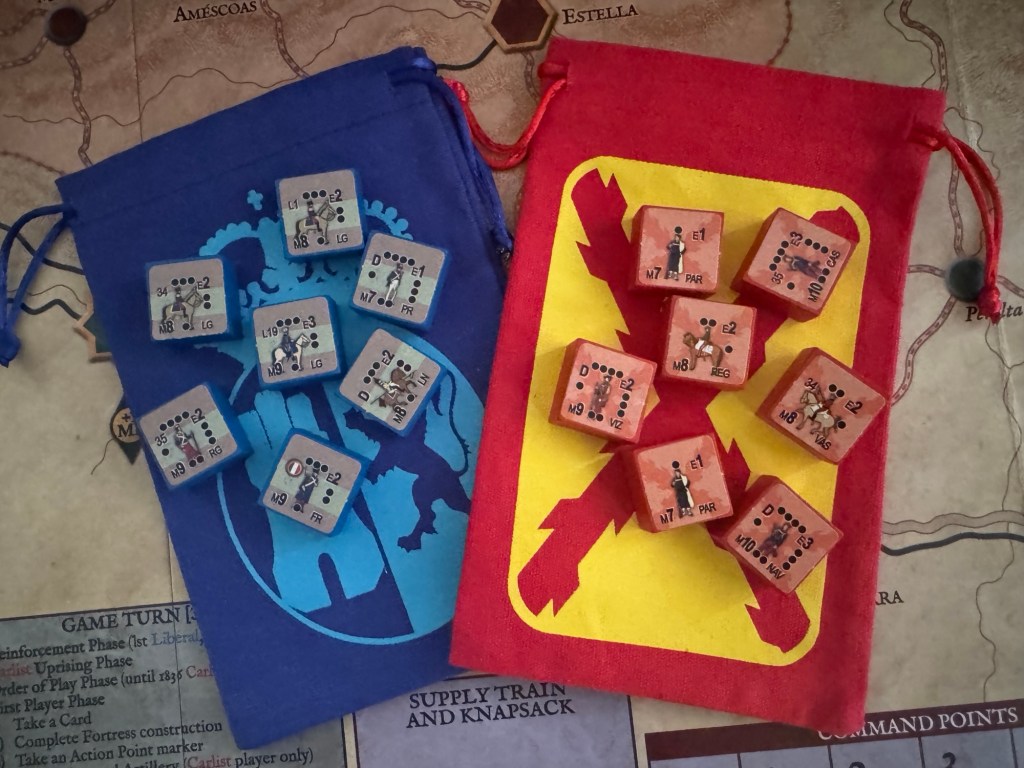
Units in the game represent Carlist (red) and Liberal (blue) armed forces, as well as the logistics needed for these troops to operate in hostile territory. Most of the units are wooden blocks including Infantry, Cavalry, and Supply Trains but there are also cardboard counters representing Artillery, both Field and Mountain, and Knapsack units, which are limited and temporary supplies that are transported by the soldiers themselves.
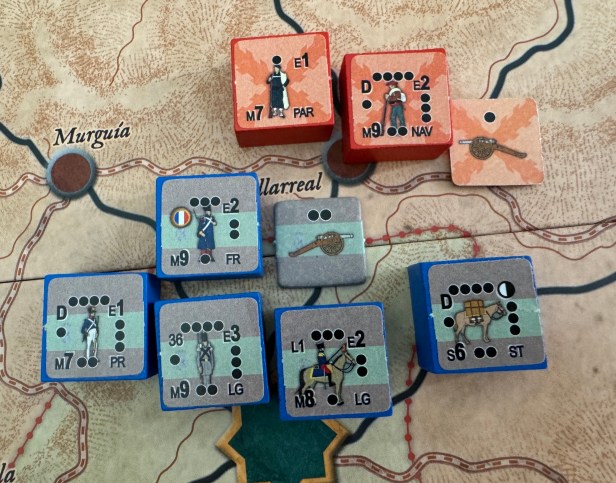
Let’s first take a look at the scale of the game and the units. With Infantry, a single Strength Point is roughly equivalent to a battalion consisting of between 500 to 800 fighting men. The only difference in the Infantry scale between the sides is a Carlist Partida unit, which represents a variable number of local guerilla fighters who are loosely organized in the amount of about a hundred men. For Cavalry, a Strength Point is equivalent to a squadron consisting of about 100 horsemen. For Artillery, a Strength Point is equivalent to 1 or 2 batteries made up of between 4 to 12 cannons of different calibers. The Supply units for the game are a very interesting and granular approach to supply and I very much enjoyed the juggle of keeping these units in good shape and with large moving armies. A Supply Train, which is represented by a block unit with the picture of a pack horse on it, represents a group of carts and pack animals that transport the needed supplies to keep an army in the field including food, munitions, and baggage. On a smaller scale are the Knapsacks that represents the food and munitions carried by the soldiers themselves.
As a Block Wargame, the Infantry and Cavalry Blocks used have various dots located along the edges of the blocks. Some blocks have 4 steps while others have less but usually no less than 3 steps. The exception to this general rule is the Partida units that only have 1 step. The current combat strength of the units determines how many 6-sided dice will be rolled in combat. During combat, for each hit that a unit receives, its strength is reduced by 1, which is shown by simply rotating the block 90 degrees counterclockwise. If a block is reduced below 1 strength then it will be eliminated.
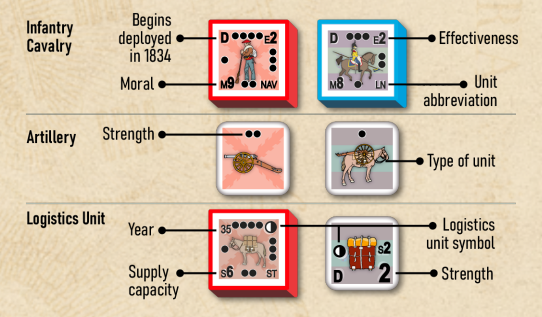
Supply Train Blocks also have pips located on the block which represent the units ability to provide supply to other units. When the Supply unit provides supply to friendly units located in its space, its strength will be reduced by 1 pip by rotating the block 90 degrees counterclockwise. If the block is reduced below 1 strength then it is eliminated. No dice are rolled for a Supply Train in combat as it is solely a logistics unit rather than a combat unit. Supply Capacity is indicated on the units by the letter “S” and a number, such as S6 or S2. The number is the amount of friendly Infantry and Cavalry units that a Supply Train or Knapsack can supply during the Supply Check. A Supply Train with S6 can supply up to 6 friendly Infantry and Cavalry units in its space. A Knapsack with S2 can only supply a maximum of 2 units
Artillery counters show the current strength with the number of pips on the visible side of the counter. The strength determines how many dice are rolled in a Skirmish and how many points of Artillery it will contribute to
a Battle. Artillery units do not receive hits in combat, but they can be eliminated or captured if their side is defeated.
Now that you know the makeup of the units and the various forces represented, let’s take a very quick look at the statistics of each side’s combatants. Before we go any further, I am very hesitant to provide these details as I have gone over them about 10 times and am sure that I miscounted or left out certain units and their abilities. But, this look should give you an overall feel for the differences between the units and their general fighting abilities.
Carlist Units
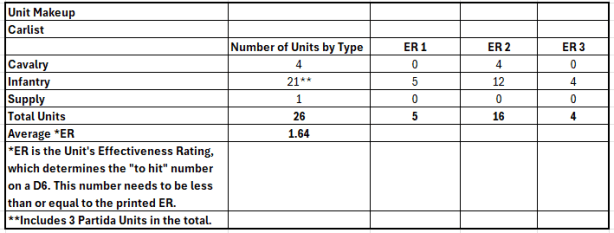
The Carlist player will have access to a total of 26 units. These include 4 Cavalry, 21 Infantry, amongst this number are a total of 3 Partida units, and 1 Supply unit. The Effectiveness Rating for these units, which as described above equates to their fighting prowess with the higher the number the more likely they are to hit in combat, are shown in the below table with 5 units with an ER1 (20.0%), 16 units with an ER2 (64.0%) and just 4 units with an ER3 (16.0%). Keep in mind that Supply units do not have an ER as they are non-combatants.
Liberal Units
The Liberal player will have access to a total of 48 units. These include 10 Cavalry, 35 Infantry and 3 Supply units. The Effectiveness Rating for these units, which as described above equates to their fighting prowess with the higher the number the more likely they are to hit in combat, are shown in the below table with 12 units with an ER1 (26.6%), 29 units with an ER2 (64.4%) and just 4 units with an ER3 (8.9%). Keep in mind that Supply units do not have an ER as they are non-combatants.
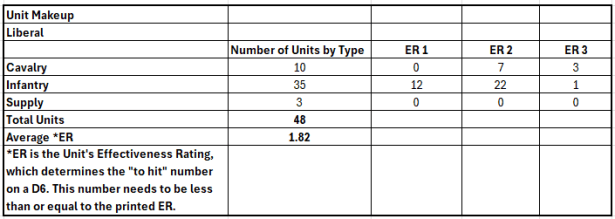
By way of comparison, you can see that the Liberal Units have a slightly better average Effectiveness Rating (1.82 per unit) as compared to the Carlist Units (1.64). This difference is a bit deceiving though as the Carlist player actually has the same amount of ER3 units (4 for the Carlist player vs 4 for the Liberal player) but as a percentage of their total units they have 16.0% of their units as ER3 as compared to just 8.9% ER3 units for the Liberal player. This means that the Carlist units are a bit better and will generally have better units making up their forces than the Liberal player in any given battle.
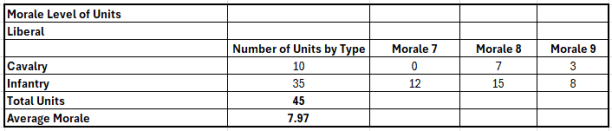
The real comparison, and where the difference between the 2 sides stands out, is in the area of Morale. Morale is indicated by the letter “M” on the units and is shown as a number, such as M7, M8 or M9. This Morale number is the maximum result of the sum of 2d6 that gives a success in a morale roll. Each time during an activation that a unit receives 1 or more hits, it must then roll a Morale check. Morale checks are only made in Battle and never in a Skirmish, Assault, Pursuit, or Rout. If the Morale check fails, the failing unit will immediately be moved to the Demoralized Units Box. Morale is also key for Infantry that are being charged by Cavalry as they will make a Morale check and if they succeed they can initiate a counter charge. If they succeed the check then the attacking Cavalry will be spent and do no damage but if failed the attacking Cavalry unit fires and adds +1 to its Effectiveness Rating.
The Liberal player has an Average Morale value of their 45 units of 7.97 as compared to the Carlist player Average Morale value of their 25 units of 8.76. While not a huge difference, this slight edge to the Carlist player means that their units will be able to more often counter charge and stay on the battlefield as they will not break and become Demoralized as often.
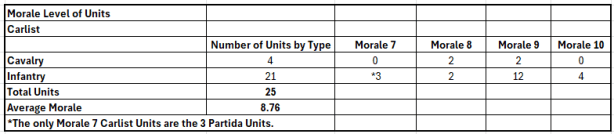
Also, if you remove the 3 lowest value Carlist units, the 3 Partida units who each have a Morale Value of 7, this average becomes much higher at a 9.0 and really starts to show the significance of the Carlist advantage in Morale. In my play with Franciso Ronco, I felt like he definitely had the advantage on the battlefield, at least value wise in the area of Morale, but all it really took was for 1 of his better units to be demoralized and the odds became much more even.
The other advantage that the Carlist units hold is that they are typically fighting on their home turf and supply is much less stringent on their forces. The Liberal player must make consistent campaigns in the Carlist Zone of the board and this will require them to invest more into Supply units such as Supply Trains and Knapsacks.
I very much enjoyed the asymmetry between the Carlist and Liberal forces. It made for a very interesting tactical challenge for both sides as they have to play to their strengths and not get too overly concerned with the numbers. The Carlists will be much more mobile in their defense and look to exploit every gap in a supply line to move around and stay away from the numerically superior Liberal forces, whereas the Liberal player will have to move more methodically to take outlying towns and settlements to be able to shore up their lines and create less opportunities for end arounds by the Carlists. The disparity in the forces was a very interesting choice by the designer David Gómez Relloso and I am sure is reflective of the historical reality of the First Carlist War.
If you are interested, we posted an interview on the blog with the designer and you can read that at the following link: https://theplayersaid.com/2025/07/14/interview-with-david-gomez-relloso-designer-of-an-impossible-war-the-first-carlist-war-in-the-north-1834-1838-from-bellica-3rd-generation/
I also was able to shoot a fairly short video summary of my game play with Francisco Ronco who is the owner of Bellica Third Generation and you can watch that at the following link:
In Action Point 3, we will take a look at the Carlist Uprising Phase and what it means for the game.
-Grant


Very good analysis, Grant. This gives players useful clues about both sides in the game.
Players can take into account also that Carlists have in play their EF 3 units (two of them) from the beginning and Liberals don’t. So, not only the raw statistics have to be counted on, but the moment in which they units appear during the game.
Thanks!
LikeLiked by 1 person
Good point. I probably should have added that in. Thanks for sharing.
LikeLike