
Not every wargame has to be deep. Some of them are light and fast playing and are just fun and interesting to experience. But, with this lightness, that doesn’t mean that the game isn’t a good representation of the history or an interesting play experience. Such is the case with a new game called Road to Independence: The American Revolution, 1775-1783 from Blue Panther.
Road to Independence: The American Revolution, 1775-1783 is the second in a planned series of games that will simulate various important conflicts in American history in a casual format. The first game was called French & Indian War from The Historical Game Company and the third game will cover the American Civil War. In this game, two players clash and take the sides of the British or the Americans fighting over the control of the Thirteen Colonies. One of the interesting things about the game is that it not only includes the Eastern seaboard but also the conflict in the far Western territory, a theater not often covered in games on this conflict. Both players will fight for control of important locations using specially made dice that represent British and American regulars, Native American allies, militia units, and (for the Americans) French and Spanish forces. Each player also has their own deck of Event Cards that will allow special events and actions to occur, ensuring that no two games will play the same.
In Action Point 1, we looked over the Game Board and discussed the two theaters depicted including the Wilderness Theater and the Eastern Theater and their differences. In Action Point 2, we looked at the Location Cards and their use. In this Action Point, we will discuss the various different custom dice and what units they represent and how they are used in the game.
The Custom Dice
One of the best parts of the game was the custom dice and how combat works. The custom dice actually have the silhouettes of the various units available to each side etched into their surface and each of the dice are different colored to make their affiliation and type clear. The game is strategic in scope and there really are only a few different types of units including Forts, Cavalry, Regulars, Militia/Irregular Troops and Cannon. The game does involve conquest which is determined by die rolls against the strength of various Location’s Defenses found on the game map or also on the Location Cards.
Below you can see the dice that are available to the American player. The American has access to dice that are colored light blue, brown, white and yellow. There are 4 light blue dice which represent Continental and Regular Troops. These dice have 1 side that has a Fort, 1 side that has a Cavalry, 1 side that has a Cannon and then 3 different sides that have Infantry including differing values of 1, 2 or 3 denoted by a number shown next to the tricorne and musket symbol. These are the best dice the American player has access to as they provide all of the needed icons to defeat Location Defenses with the exception of the Auxiliary units in the form of Militia and Indian Allies.
There are 4 brown dice that represent Auxiliary units such as Militia and Indian Allies. These dice have 1 side with a Fort, 1 side with a Cannon and 2 sides with an Indian Ally with the other 2 sides being Militia including differing values of 1 and 2. These dice are key when fighting on the Wilderness Front as these typically have Defenses that require at least 1 Indian Ally symbol.

The French dice are white and the Spanish dice are yellow but they are not available to the American player until the French and Spanish have entered the war via a successful die roll. The French dice can be used once per turn and only in a Port Location and the Spanish dice can be used up to 3 times per turn but can only attack in the Wilderness Theater from their yellow colored Locations. The French dice and Spanish dice have the same type and number of symbols as the American light blue Continental and Regular Troops.
Now lets take a look at the dice available to the British player. The British player has access to dice that are colored red, black and light green. There are 4 red dice which represent Regular Troops. These dice have 1 side that has a Fort, 1 side that has a Cavalry, 1 side that has a Cannon and then 3 different sides that have Infantry including differing values of 1, 2 or 3 denoted by a number shown next to the tricorne and musket symbol. The black dice are Hessian Mercenary Troops and are identical in makeup to the Regular Troops dice. Both the Regular and Hessian dice are the best dice the British player has access to as they provide all of the needed icons to defeat Location Defenses with the exception of the Auxiliary units in the form of Militia and Indian Allies.
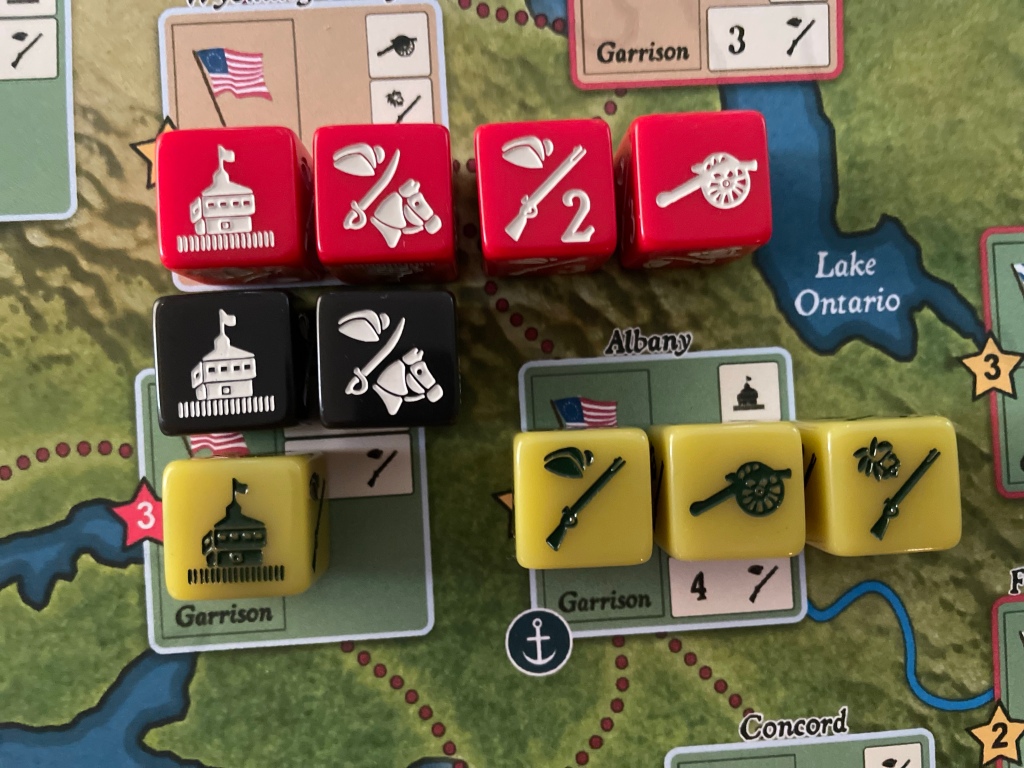
There are 4 light green dice that represent British Auxiliary units such as Loyalists and Indian Allies. These dice have 1 side with a Fort, 1 side with a Cannon and 2 sides with an Indian Ally with the other 2 sides being Loyalists including differing values of 1 and 2. These dice are key when fighting on the Wilderness Front as these typically have Defenses that require at least 1 Indian Ally symbol.
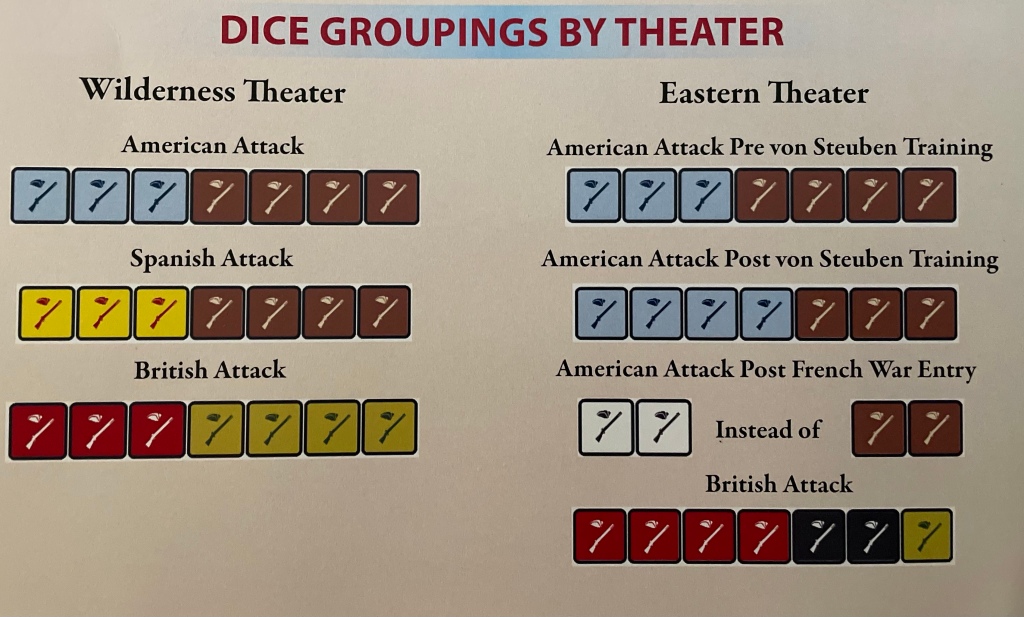
The dice that each player has access is to determined by the Theater in which the combat is taking place as well as what events have gone off at the time of the battle. Below you will see a chart that identifies each side’s dice to be used when attacking in either the Wilderness Theater or the Eastern Theater. Each side has access to 3 Regular Dice and 4 Auxiliary Dice when in the Wilderness. When fighting in the Eastern Theater, the American has the same dice makeup as in the Wilderness unless the Von Steuben Training event has been triggered. After the training happens, the player will then get to use their 4th light blue Regular Troops Die giving them a total of 4 Regular Dice. Remember, in the Eastern Theater there are fewer Indian Allies required as the Location Defenses typically don’t have the requirement. Also while fighting in the Eastern Theater, the British lose 2 of their Auxiliary Dice and gain 2 Hessian Dice making their attacks much more effective and powerful as they can bring to bear a great deal more Infantry power.
Combat
Now that you understand the makeup of the dice, lets take a look at how Combat works.
The Combat System is really pretty cool and uses a modified version of the dice system found in games like Elder Sign, which is a Euro horror themed game where players have to roll dice to obtain different symbols to defeat Ancient Ones and other challenges.
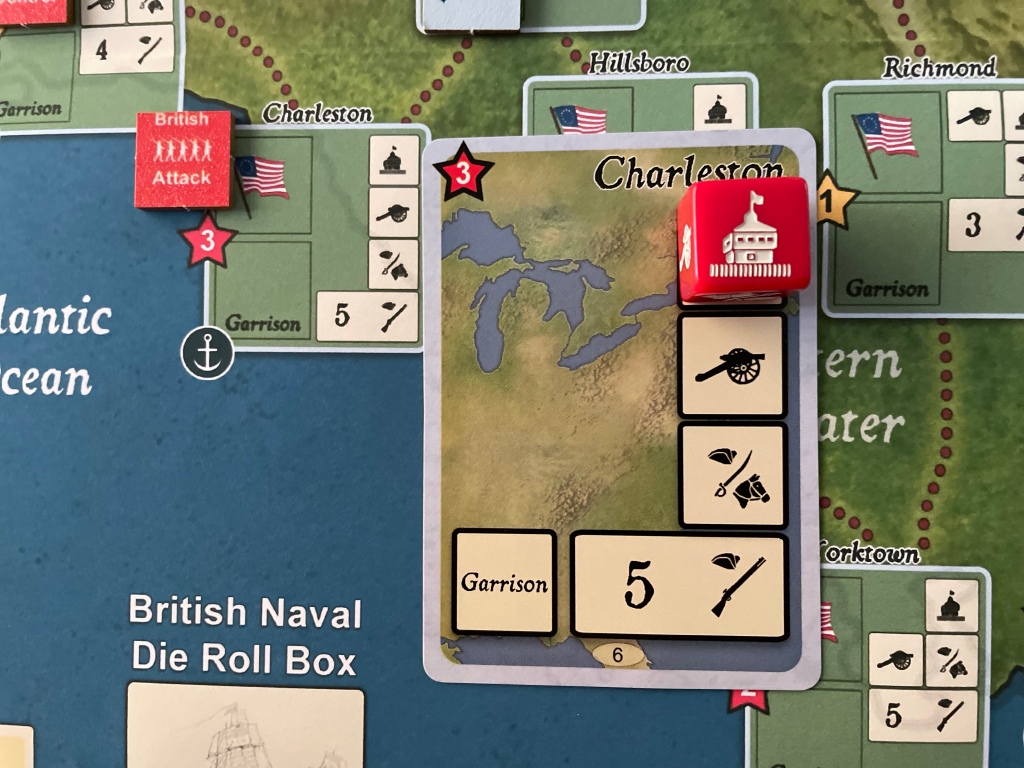
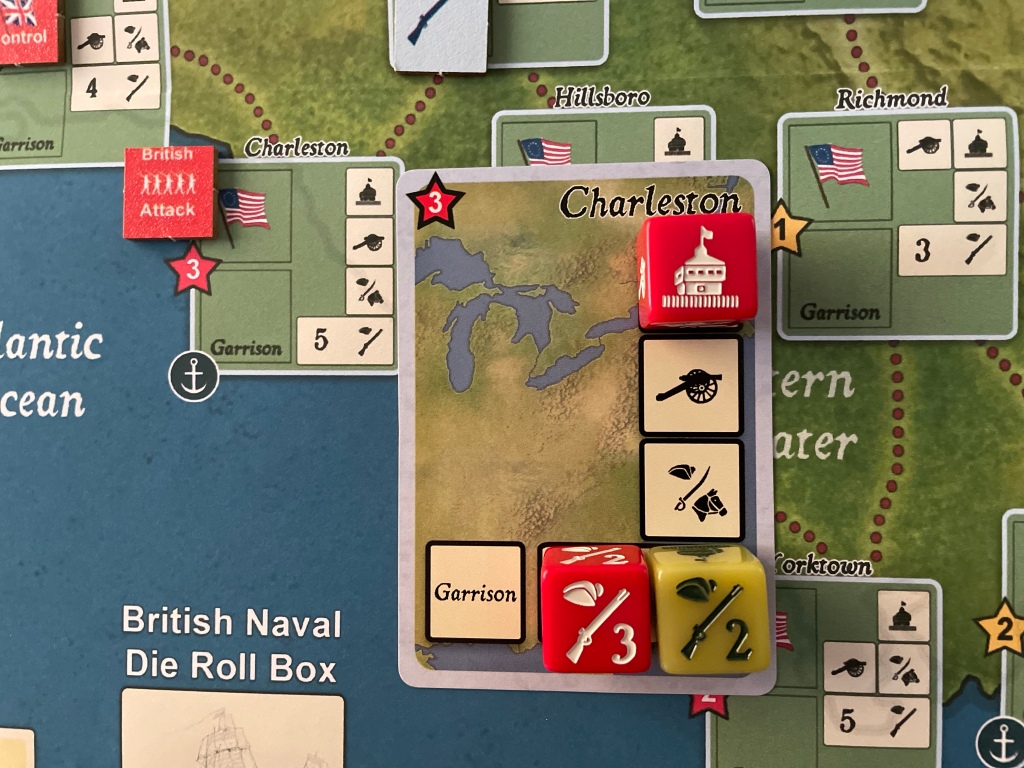
In this Combat example, the British will be attacking Charleston from the adjacent British controlled Savannah. Attacks are only possible from Locations that are controlled by the attacking player. First off, because this battle is located in the Eastern Theater, the British will get to roll 7 total dice consisting of 4 British Regular Dice (red), 2 Hessian Dice (black) and 1 Auxiliary Die (light green). The changes of success here are probably pretty good as Charleston has modest defenses requiring 1 Fort, 1 Cannon, 1 Cavalry and a total of 5 Infantry. At a minimum, this will require the use of at least 5 dice to get the required combination of symbols.
One other note, as we covered this in the Location Cards post, the Garrison Box doesn’t have a unit located in it so there is no requirement to defeat that Defense. If the American player would have located a 1 or 2 strength counter there, it would simply add to the total Infantry needed by 1, making this Location have an Infantry Defense of 6. Another key important element to the Combat process is that you can only satisfy 1 row of Defenses per roll. So even if you roll all of the required elements on your first dice roll, you will have to choose how you use what you have rolled and place those dice on one row and then take your remaining dice and roll again hoping to satisfy one of the remaining rows. Also, if a roll cannot satisfy a defense row, then the player has to lose one die of their choice. This is a way to show casualties and a reduction in combat effectiveness of the remaining troops.
The dice are rolled and we check out the results and compare those to the Location Defenses. Not a great roll though as we only rolled 1 Infantry, 2 Cavalry, 1 Fort and 2 Cannon. In reviewing the needs, we decide to place the Fort result into the Fort Defense Box at the top of the card. The Fort symbol is only located on 1 side of each of the dice so it is more rare than the other results. We also could have used the same logic and chosen the Cannon or the Cavalry.
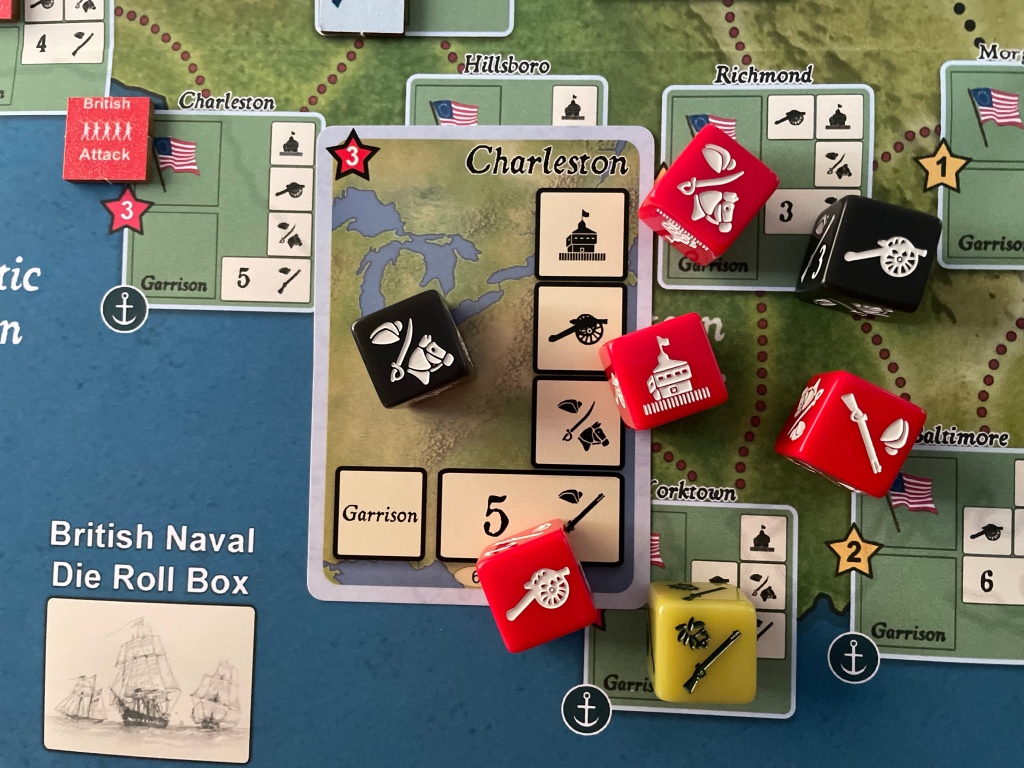
We take the Fort result die and move it into the Fort Defense Box on the Location Card. Then we move onto our next roll but now with only 6 dice being used.
We roll the dice and get a pretty fortunate result! We have some choices here and need to think through the best one. Immediately I see that we have a total of 6 Infantry rolled and on just 2 dice a total of 5 as we rolled a 3 Infantry on a British Regular Dice and 2 Infantry on an Auxiliary Dice. We also rolled 2 Cannon but I think the correct choice here is to use just 2 dice to take out the 5 Infantry Defense.

We place the 2 dice on the Infantry Defense Box and satisfy that requirement as efficiently as possible. If we needed to we could have placed more dice there to satisfy the requirement but we would have been lessening our future roll potential if we had done this. At this point, we have satisfied 2 of the Location Defenses and have to now hope we can roll a Cavalry and a Cannon with our remaining 4 dice.
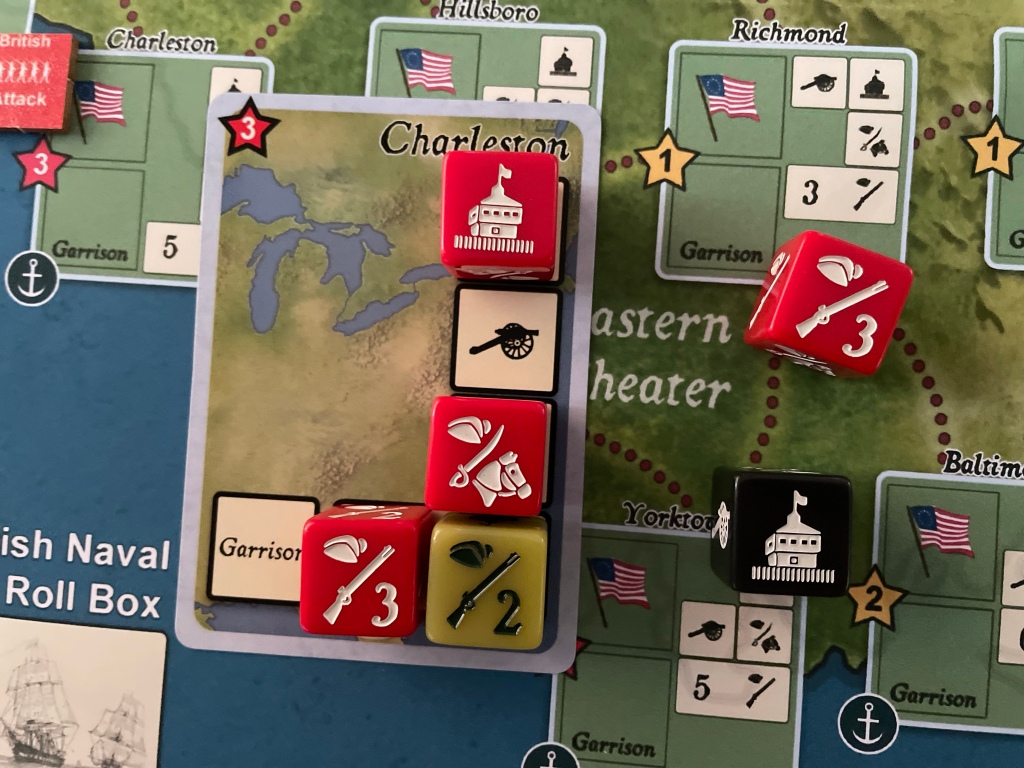
We still have 4 dice left and just need to get a Cavalry and Cannon result. Each of the 4 remaining dice we have are able to generate this result so I think that our chances are pretty good. We roll and come up with 2 Forts, and two 3 Infantry results. Unfortunately, this was not helpful and we have to lose one of the dice and move along. We choose to get rid of one of the 2 Hessian Dice.

We roll our 3 remaining dice, full of confidence, and this results in a Cavalry and a 2 and 3 value Infantry. Well, we choose to use the Cavalry and place it on the Cavalry Defense Box on the Location Card. We are nearly successful and now have 2 dice to get a single Cannon result. We roll and the results are not good with a Fort and a 3 Infantry result. This is a miss and we have to lose a die and choose to get rid of the Hessian Die.
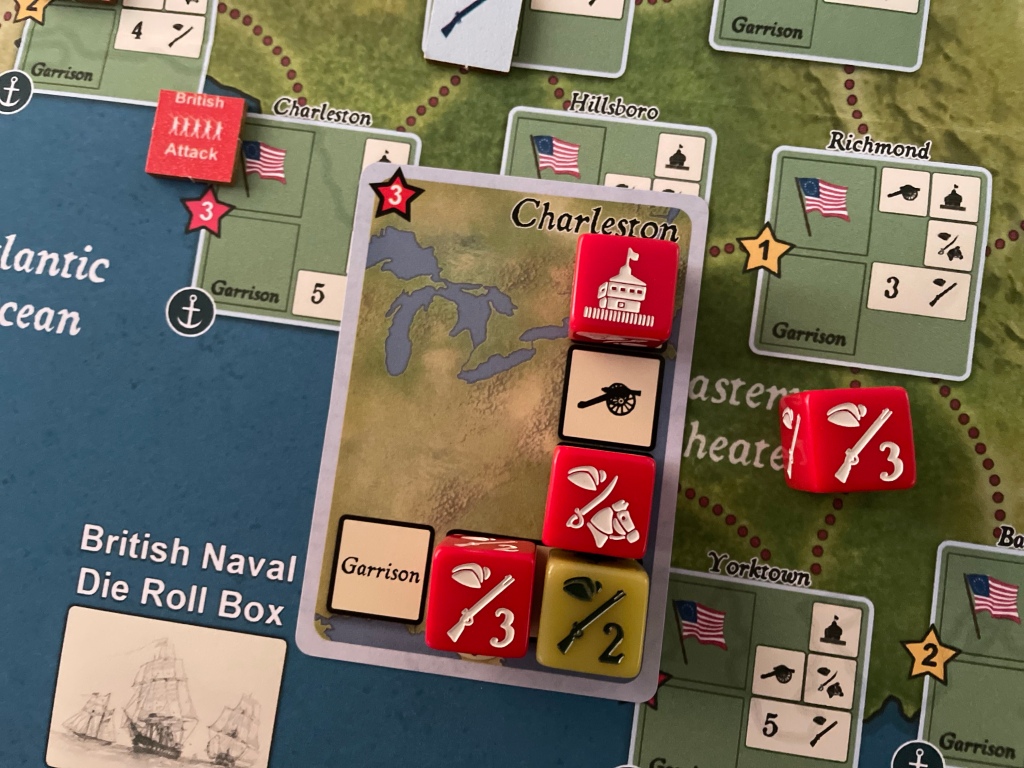
Down to our last roll and we only have the 1 die. We shall hope that luck is on our side and we roll but the result is a 3 Infantry and we fail to defeat the defenses at Charleston and have to retire from the attack.
There are a great deal of choices that must be made during the Combat Phase in this game. I really enjoy how the custom dice are used and the decisions that you have to make. There is a good amount of considering how best to use your dice and their relative odds of achieving the results you are needing during that specific roll. But, you have to remember that this is a lite dice chucking game and the best plans can be dashed with bad luck and poor rolls.
In Action Point 4, we will take a look into the Event Cards and discuss their effects.
-Grant

Grant, thanks so much for your excellent and thorough posts on this game. I’ve been a fan of Elder Sign for years and can’t wait to play Road to Independence! If you’re also an Elder Sign fan, you’ll know that some of the more challenging adventure cards show an arcane arrow symbol pointing down next to the top dice row on the card, requiring a player to complete each dice row in order from top to bottom. For example, If there are three dice rows, I’d have to successfully complete row 1 before I could move on to row 2, and then successfully complete row 2 before attempting row 3. Very challenging!
Another fun game using this same dice/row placement is Age of War (2014, Fantasy Flight) which simulates warlords battling neighboring clans in feudal Japan – great mini-game to throw in your backpack for a trip.
Thanks again for all the time, energy and enthusiasm you put into these posts!
Best,
–Matthew
LikeLiked by 1 person
Thanks Matthew. I need to check out Age of War as since posting these articles many people have mentioned it. Thanks for reading!
LikeLiked by 1 person