Not every wargame has to be deep. Some of them are light and fast playing and are just fun and interesting to experience. But, with this lightness, that doesn’t mean that the game isn’t a good representation of the history or an interesting play experience. Such is the case with a new game called Road to Independence: The American Revolution, 1775-1783 from Blue Panther.
Road to Independence: The American Revolution, 1775-1783 is the second in a planned series of games that will simulate various important conflicts in American history in a casual format. The first game was called French & Indian War from The Historical Game Company and the third game will cover the American Civil War. In this game, two players clash and take the sides of the British or the Americans fighting over the control of the Thirteen Colonies. One of the interesting things about the game is that it not only includes the Eastern seaboard but also the conflict in the far Western territory, a theater not often covered in games on this conflict. Both players will fight for control of important locations using specially made dice that represent British and American regulars, Native American allies, militia units, and (for the Americans) French and Spanish forces. Each player also has their own deck of Event Cards that will allow special events and actions to occur, ensuring that no two games will play the same.
In this series of Action Points, we will take a look at the Game Board and discuss the two theaters depicted including the Wilderness Theater and the Eastern Theater and their general differences, take a look at the Location Cards and their use, discuss the various different custom dice and what units they represent and how they are used in the game, cover the Event Cards and their effects and discuss the victory conditions and which side has a trickier time of reaching theirs.
Game Board
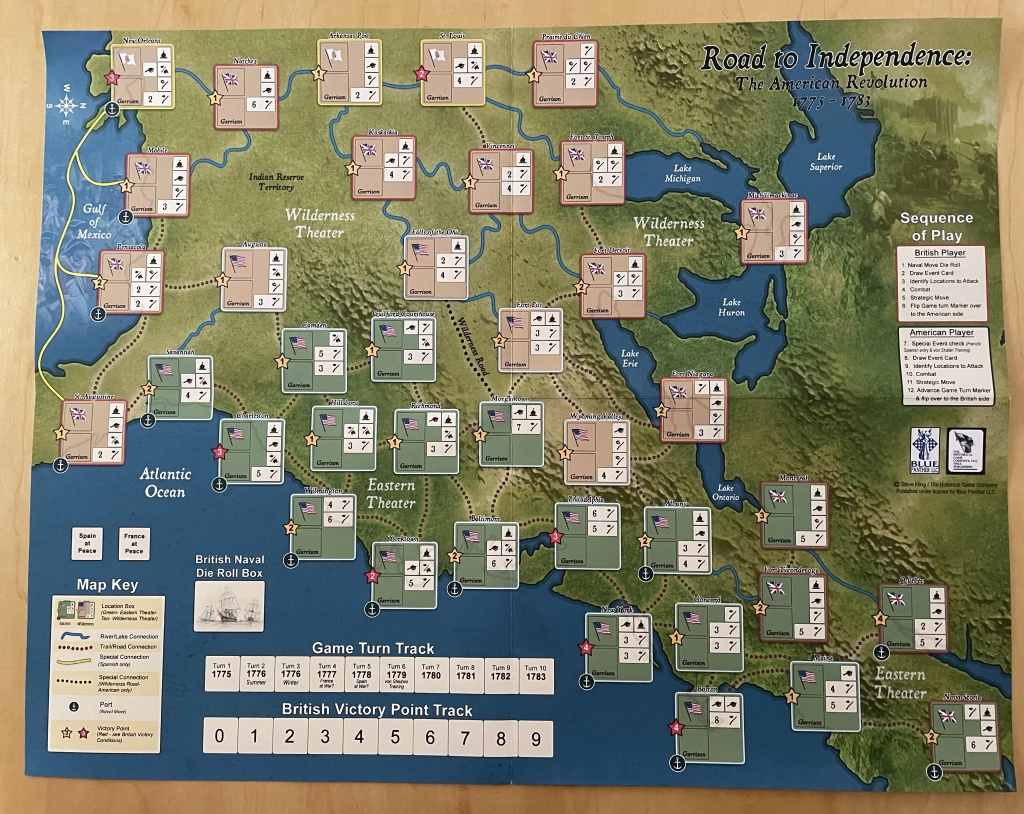
The Game Board is oriented very differently than most American Revolutionary War games that I have played as it is oriented with south on the left and north on the right. The main reason for this orientation is to widen the focus of the board to include not just the original 13 colonies on the eastern seaboard but also to take into account the fighting covered on the western frontier. The game takes into account locations on the frontier such as New Orleans, Kaskaskia, Vincennes and St. Louis.
Locations
As you can see on the board, there are Locations shown in various colored boxes. There are 38 Locations shown with 20 Locations being located in the Eastern Theater identified by green colored boxes and 18 Locations located in the Wilderness Theater identified by tan colored boxes. Each of these Locations is tied to a Location Card that will be used when the Locations are attacked and once captured will be added to the players tableau.

Some of the Locations have an Anchor Icon, which identifies them as a Port Location and they are located along either the Atlantic Ocean or Gulf of Mexico. There are several Port Locations though that are not directly on the water but are just inland and are connected by navigable rivers such as in the case of Albany, Quebec and Nova Scotia. These Port Locations are able to be attacked by the British only when they are either adjacent to them or if they are able to conduct Naval Movement that turn.

The Locations are also connected together via either a Trail/Road Connection or a River/Lake Connection. Trail/Road Connections are identified by a dotted line between 2 Locations and a River/Lake Connection are represented by a squiggly blue line or the presence of a large body of water such as Lake Eerie, Lake Ontario, Lake Huron or Lake Michigan. The really important part about the connections between Locations is that they determine whether either side can attack or not. In order to attack a Location, you must have a connection to the Location from a Location that the attacking side controls. The only exception to this rule is through a Port Location using Naval Movement by the British.
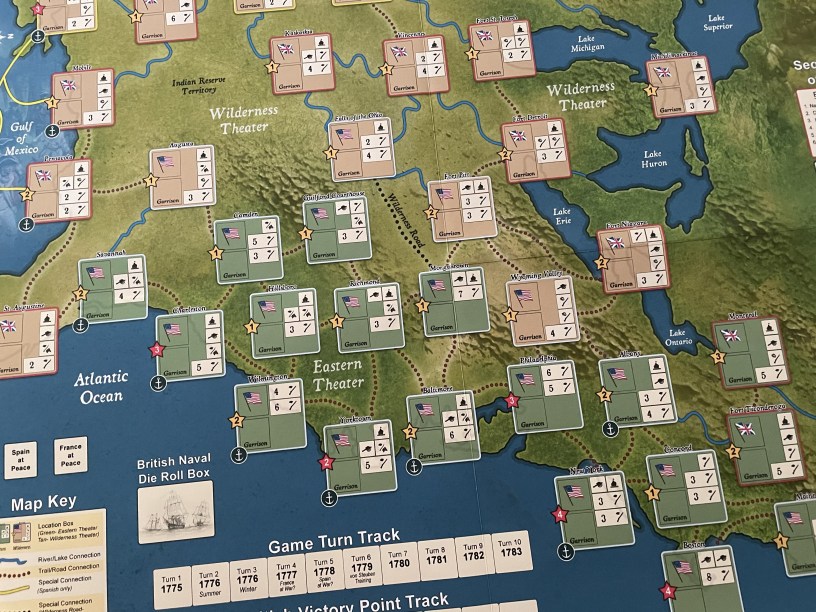
In the picture below, notice that the British will have to attack into Morgantown from Fort Pitt of Falls of the Ohio in order to break any further into the Patriot controlled areas of the Game Board. This is due to the fact that Guilford Courthouse has no Trail/Road Connection to either Falls of the Ohio or Fort Pitt. If the Patriots can hold onto Morgantown, they can control the advance of the British. You will also notice the Patriot light blue Garrison counter placed into Morgantown as an added defense to the Location. There is no reason to place this Garrison in any of the other American Locations because the British cannot attack those Locations until Morgantown falls under their control.

Location Anatomy
Let’s take a bit of a closer look at the Locations and their anatomy and discuss the various icons, numbers and symbols. In the below picture, you can see two Eastern Theater Locations in Hillsboro and Richmond. in the top left hand corner of the Locations is the national flag icon that identifies the Location as starting as either British or American controlled. In the picture, the 2 Locations are American controlled. To the left of the national flag is a star with a number located inside the figure. These are either colored yellow, meaning they are standard Locations or red meaning they are Key Locations important to the Americans and required to be controlled by the British in order to win the game. These Key Locations include Boston, Charleston, New Orleans, New York, Philadelphia, St. Louis and Yorktown. In order to win the game, the British must control a total of 30 Victory Points worth of Locations and must also control 4 of the 7 Key Locations. The Victory Point value assigned to the Locations is indicative of its strategic importance to both the British and the Americans.

In the bottom left hand corner of the Location is the Garrison Box. This is where the players can place their limited Garrison counters to increase the defense of the Location. Both the British and American players have these Garrison counters and can only place them into Locations they control. These Garrison units are returned to the player at the end of each turn and during the Strategic Move Phase of the game, they can be placed out in Locations across the Game Board to increase the defensive value of Locations.
Located to the right side of each Location Box is the Location Defenses. These Defenses are represented by horizontally oriented boxes in the shape of squares and rectangles and contain various symbols that identify the necessary hits to be rolled on the Combat Dice in order to defeat the Location and take control of it through an Attack. There are 5 different symbols that appear in these squares and boxes and they are also sometimes accompanied by a number. In the absence of a written number in the boxes or rectangles, it means that only one such symbol is needed and this can be satisficed with just 1 die. The 5 symbols include Cannon, Fort, Indian, Cavalry and Infantry (including both Regulars or Militia which are not differentiated by symbol but by color of the dice but more on this in a later post in the series).
For example, let’s take a look at the Location Defenses for Richmond. There are 4 separate boxes with one of those being a rectangle. The different boxes denote that the defenses can be defeated by the symbol found in the box but that each defense is separate and will require an individual die to be placed there to satisfy the requirement to defeat the defense during combat. At the top row, the attacking player must be able to satisfy both a Cannon and Fort icon with a separate die. Below that is a lone square box with a Cavalry icon and the bottom defense is in the form of a rectangle and is larger than the squares as it will most likely require more than 1 die to satisfy the requirement to defeat the Location. You will also notice the presence of a 3, which means it will require a total of 3 Infantry to defeat this defense. That can be from 1 die or the combination of a few dice.
Also found on the Game Board are the Spanish controlled Locations in the Wilderness Theater. There are 3 of these Spanish Locations including New Orleans, Arkansas Post and St. Louis. Both New Orleans and St. Louis are Key Locations. You will notice that these Locations are outlined with yellow to denote Spanish control. These Locations are not controlled by the Americans and can only be attacked out of using the lone Spanish Attack Marker as a part of the 3 allowed American player attacks in any given turn. We will discuss this process more in a later post in the series. From the New Orleans Location, you can see a yellow line that connects the Port of New Orleans to the British controlled Locations of Mobile, Pensacola and St. Augustin. This yellow line denotes that the Spanish can attack these Locations similar to how the British attack Ports using their Naval Movement.

Game Turn Track, British Victory Point Track and Administrative Boxes
Found in the left hand corner of the Game Board are several of the Administrative Boxes used to track various functions of the game including the Game Turn Track and British Victory Point Track. You will also notice on the Game Turn Track various reminders about Key Events that occur in those years for the Americans including the France at War Check in 1777 and thereafter until France enters the war and the Spain at War Check in 1778 also thereafter until Spain enters the war. Once France and Spain enter the war, the players will place the France at War and Spain at War Counters into their France at Peace and Spain at Peace Boxes.
In addition to the French and Spanish events, in 1779 the Patriots received rigorous military training at the hands of Baron Von Steuben and from that point forward replace one of their Auxiliary Die with a Regular Die making their attacks a bit more effective.
The game is 10 Turns long and the British always go first each Turn followed by the American player. The British Victory Point Track starts at 25 Victory Points and is adjusted each time a new Location is conquered or lost. IN order to win the game, the British player must have 30 Victory Points and control 4 of the 7 Key Locations as mentioned previously.

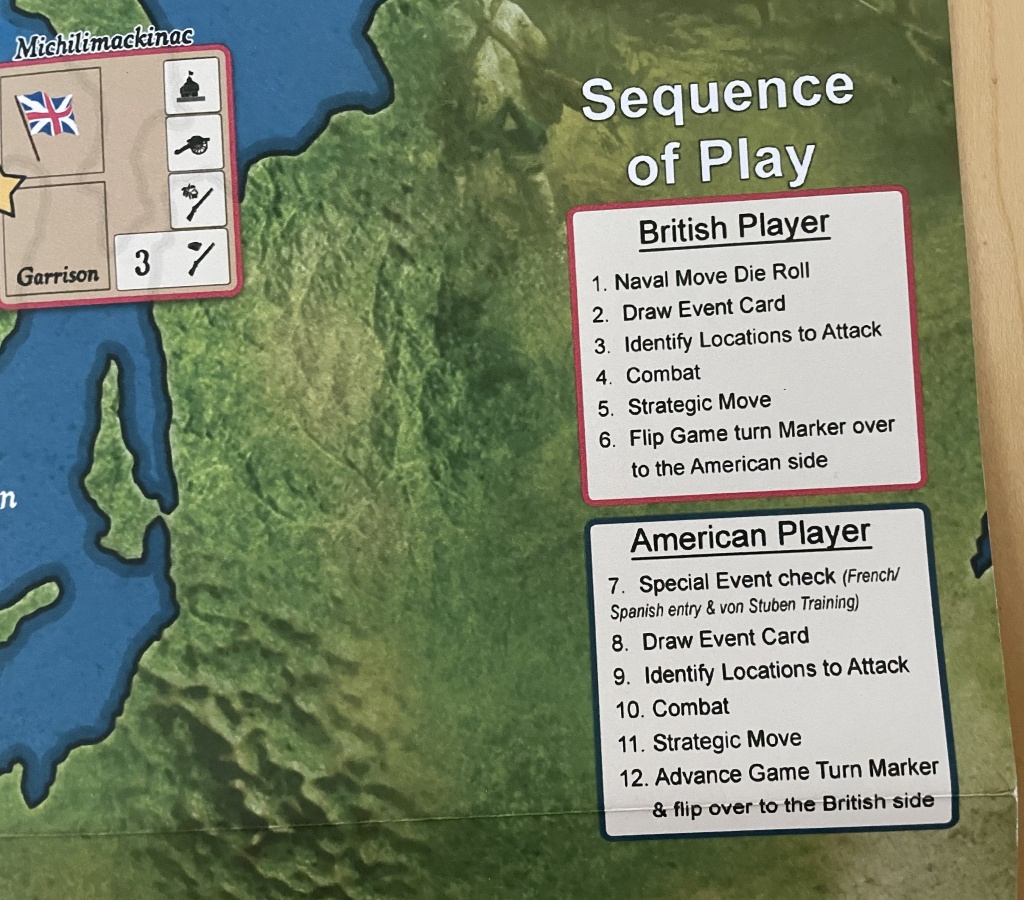
Sequence of Play Box
As is the case with many games, there is a Sequence of Play Box found on the right side of the Game Board. It lists the Sequence of Play for both the British Player and American Player and makes playing the game that much more manageable.
Overall, the graphic design of the Game Board is very good with the expert use of colors to coordinate the starting control of various Locations and the font used is clear and legible and large enough to generally be read by anyone. The background of the Game Board is also very well done with muted colors that don’t stand out too much or take away from the focus of the Locations and also include various points of geographic interest in such as mountains, hills and bodies of water.
In case you are interested, we also posted an interview with the designer Steven Kling and you can read that at the following link: https://theplayersaid.com/2023/09/18/interview-with-stephen-l-kling-jr-designer-of-road-to-independence-the-american-revolution-1775-1783-from-blue-panther/
If you are interested in Road to Independence: The American Revolution, 1775-1783, you can order a copy for $60.00 from the Blue Panther website at the following link.
In Action Point 2, we will take a look at the Location Cards and their use in the game.
-Grant

The first game to use this system, The French & Indian War, published by The Historical Game Company, is also available from Blue Panther https://www.bluepantherllc.com/prod…/french-and-indian-war
A third game in the series is planned, using the same system to cover the US Civil War.
LikeLiked by 1 person
Thanks for the correction. Looking forward to the next entry.
LikeLike