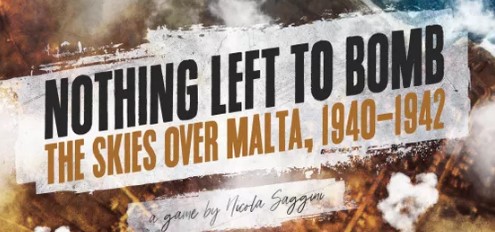
My coverage of the Small Battles Series from SNAFU Designs continue with a look inside their newest offering called Nothing Left to Bomb: The Skies Over Malta, 1940-1942 designed by Nicola Saggini. Over the past couple of years, I have become acquainted with a Spanish wargame publisher called SNAFU Design and they keep turning out these fantastic little baggie wargames on very interesting topics. I first interviewed one of their partners and designer Marc Figueras in early 2021 on his game called Ambon: Burning Sun & Little Seagulls. We next interviewed the incomparable Javier Romero for his design with SNAFU called Santander ’37. Then back to Marc with his Equatorial Clash game. Finally, recently we posted an interview with Ivan Prat on his 12 Hours at Maleme: The German Airborne Landings on Crete, May 20, 1941. I reached out to Nicola and he was more than willing to dish on his new game.
Grant: First off Nicola please tell us a little about yourself. What are your hobbies? What’s your day job?
Nicola: I am slowly crawling towards my fifties, born and raised in Italy with a stint in the US as an exchange student, currently living near Rome. My day job is head of department for one of the biggest satellites manufacturers in Europe, but I am also a father of two, which is probably one of the most challenging jobs around.
Main hobbies: military modeling (jets, tanks, etc.), but I never seem to find the time for it; reading (mainly military history, but also some good fiction) and, of course, wargames!
Grant: What motivated you to break into game design? What have you enjoyed most about the experience thus far?
Nicola: I think mainly a love for military history is what drew me to historical game design. Wargaming offers a unique medium to engage with history, and designing one forces you to first of all research the subject matter and then decide how to distill it in Volko’s great adage: a model of actors and factors and their interaction. Many times, even while I am just reading about a subject, I start to develop a mental model of whether or not that situation could be adapted into an interesting game. Other times, I read a lot about a topic in order to find a way to systematize the information so that it could make sense in a game. I was also fortunate enough to work in different roles with some great designers (David Thompson on By Stealth and Sea, Yasushi Nakaguro on translating some of his games in English) and also with some publishers, all of which I firmly believe has had a role in pushing me over the fence…
Aside from the research, one aspect I really like is seeing how one’s starting ideas coalesce over time into a polished, finished product with art, components, etc.

Grant: What is your upcoming game Nothing Left to Bomb about?
Nicola: It is about the Axis three main but distinct attempts at achieving air superiority (or even air supremacy) over the island of Malta in WWII, in light of a possible invasion that in the end never materialized.
Grant: Why was this a subject that drew your interest?
Grant: As I said above, sometimes you just read something interesting and in the process you find yourself developing a mental model of how the topic could turn into a game. In this case, I was also aided by the fact that I could borrow some ideas from my friend Yasushi and two games of his that have a similar topic: Flying Tigers from Command Magazine Japan and Operation: Pointblank from Bonsai Games’ yearly special magazine on wargaming.
Grant: What is your design goal with the game?
Nicola: To offer an enjoyable experience to the players, spark in them an interest to know more about the history and, given that the game itself sits at the low end of the complexity spectrum, draw new players to wargaming (possibly the most ambitious of the goals!).
Grant: This is game #5 in the Small Battles Series from SNAFU. What are the design parameters of this series?
Nicola: In the words of SNAFU Design: publish small-format games covering “less-wargamed” topics. From the production point of view, this means maps no larger than A2, and materials that can fit in a ziplock. Nothing Left to Bomb is pushing this a bit to the limit in that it has a countersheet of 120 counters, two player mats, two screens that also double as player aids, and the longest rulebook in the series to date.
Grant: What research did you do to get the details correct? What one must read source would you recommend?
Nicola: Mainly books on the topic with as much cross-referencing as possible. But there are several abstractions in the game, so seeking excruciatingly correct details was not so necessary.
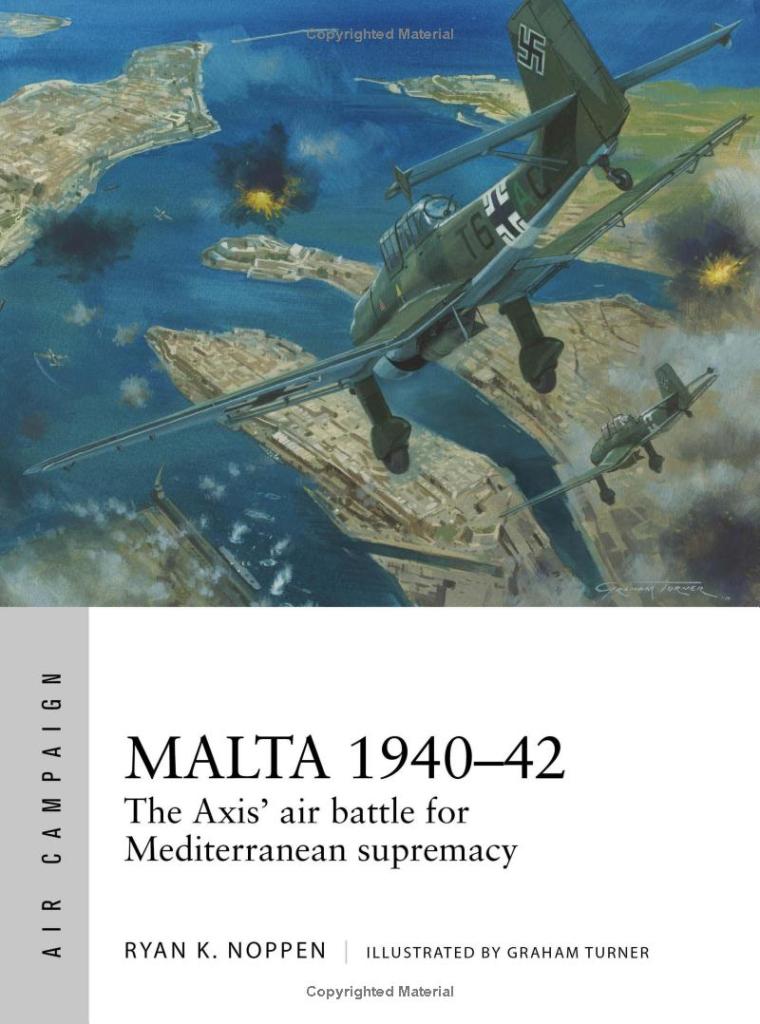
The game comes with a bibliography, but out of all the books mentioned, my personal recommendation for a (light) must-read is NOPPEN, RYAN K., Malta 1940-1942: The Axis’ Air Battle for Mediterranean Supremacy, Osprey Publishing, 2018.
After all, this is the book that literally inspired the game, so readers should find a lot of common elements with the game itself.
Grant: What other series games or systems out there inspired your design?
Nicola: As already mentioned, two games from Yasushi Nakaguro:
- Flying Tigers (https://boardgamegeek.com/boardgame/81000/flying-tigers)
- Operation Pointblank (https://boardgamegeek.com/boardgame/234374/operation-pointblank-strategic-bombing-campaign-fe)
With respect to those designs, I pushed a lot more the “double blind” part of the mechanics in a homage to full double-blind games that are among my favorite when it comes to representing good “fog of war”.
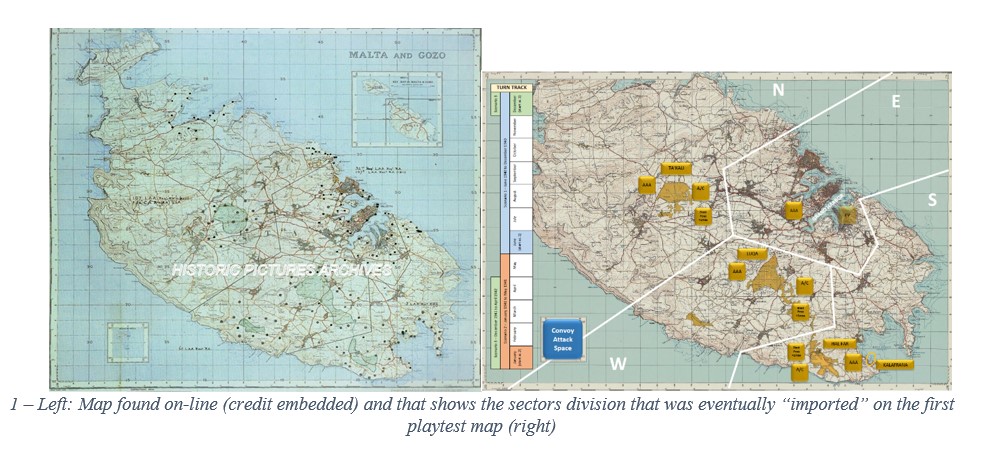
Grant: What areas of Malta are covered on the map? What guided your decisions about the division of the map into sectors?
Nicola: The entire island of Malta has been divided in 4 sectors, based on a 1943 AAA map I found on-line and that served as the first playtest map. This is the model I chose in order to manage the “airspace” over the island, and as such, each sector also contains part of the surrounding sea area. There is a further abstracted, notional space which is the Convoy Box. This represents the area of the Mediterranean west of Malta that could be reached by the Axis air units based in Sicily.
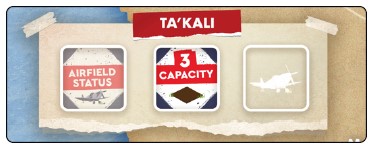
Grant: Where are British airfields located? How are airfields upgraded?
Nicola: Historically, three airfields were “opened” on Malta during the time covered by the game (a fourth was opened literally a few weeks after the end of the third, and last, scenario).
Ta’kali (spelled also Ta’qali) in the North sector, Luqa in the West sector, Hal Far in the South sector. There is also a seaplane base in the south: Kalafrana.
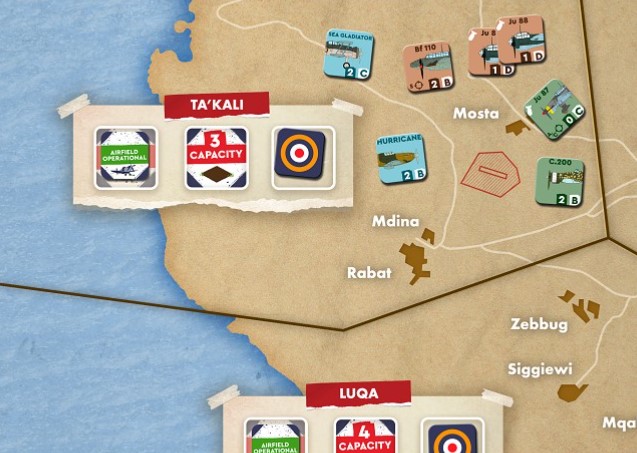
Only in the last scenario, airfields can increase their capacity (and their protection vs. strafing from Axis fighters) by building blast pens on them. This was initiated historically on Luqa and Hal Far with a system of dispersal and revetments that eventually made the two airfields almost connect, but the works were not completed until much later than the timeframe of the game. I nevertheless wanted to give the possibility to the British Player to choose and invest in these improvements earlier on.
Grant: What role do AAA guns play? How are they placed and how are they used?
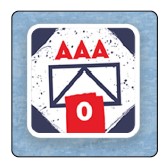
Nicola: AAA guns are the second layer of protection for the different targets in each Sector, the first being the (possible) fighter interception of the raid. AAA rolls on a dedicated table that can cause a certain number of attackers to abort or even to be downed.
AAA comes in “strengths”, starting from 0, all the way up to 3. Higher strength make the AAA more deadly on the table mentioned above.
Each Scenario starts with some AAA in different strengths available to the British Player. Furthermore, it is possible to “buy” new AAA units of different strengths and deploy them when ready (it takes two turns to “build” an AAA unit).
During each turn, AAA units are placed in each sector (one unit per sector) and will be kept hidden from the Axis player until a raid commits to its attack. At that point, the AAA is revealed. Note that Ju87 Axis units (if present) can be used to suppress the AAA before it fires.
Grant: How are Convoys included? What are the benefits to them reaching ports? What benefits do the Axis achieve for attacking and sinking them?
Nicola: No Malta game is complete without Convoys, right? In the case of Nothing Left to Bomb, they are quite abstracted, but they represent an important resource for the British Player. In essence, each Convoy is a marker. Each marker carries an intrinsic AAA value on the visible side, and a number of Logistic Points and Air Units on the other. This latter is only visible to the British Player throughout and represents the maximum that Malta will receive at the end of the turn if the Convoy makes it into Grand Harbour.
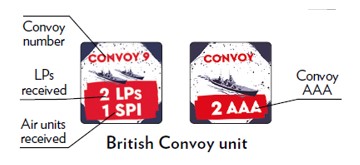
Axis attacks on the Convoy can reduce the number of Logistic Points delivered (down to zero) and, if the Convoy is also carrying replacement aircraft, it can force (once per game only) a damaged aircraft carrier to have to seek shelter in Grand Harbour (this offers the chance to replicate the historical HMS Illustrious situation of early 1941). This represents a possible quicker path to victory for the Axis player, in that sinking the CV counts as having put one of the airfields out of action, with the advantage that the British Player will never be able to repair it!
Of course attacking a Convoy and eventually trying to bomb a CV in Grand Harbour is going to reduce the number of available Axis units for other purposes that perhaps were serving a longer term strategy, so not everything will be possible at all times for the Axis player!
Each Scenario in the game instructs the British player on how to build a pool of Convoy Markers, how many markers can be drawn in the entire game and in which turn they cannot be drawn.
Grant: What is the purpose of the Axis and British player mats? What do these mats look like?
Nicola: The mats are the parts of the board which are kept hidden from the other player. Here, players plan their actions for the turn and keep track of some information not to be disclosed to the other side.
The Axis Player Mat looks like this:
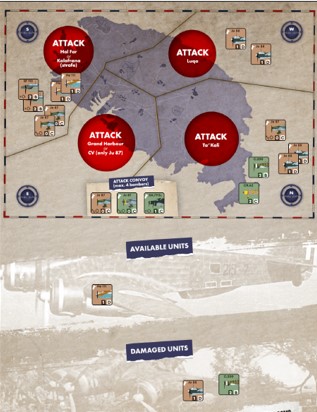
It has an “upside down” view of Malta on top (because the Axis player sits on the North Edge of the main map/board for the sake of convenience) with the four main sectors and the strategic targets in each. There is also the Convoy Box. All of these spaces will receive the units that the Axis player intends to send on the different raids into the different sectors. Note that the Axis payer is not forced to commit all of their forces nor attack all of the targets on the board on each turn. There are subtle decisions that need to be made about how units are used. The bottom half of the Axis Player Mat is divided into two large spaces which are designed to keep track of available units and damaged units.
The British Player Mat is somewhat more articulated:
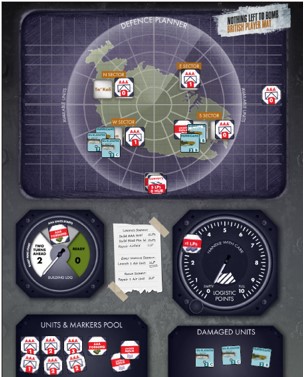
The top part serves the same purpose of the other mat: track where all the different units are placed (based) for the turn and whether or not there is a Convoy arriving (and which). Note that in this case the British player is forced to transfer all of the units on the map, even if they will not be used.
The central part tracks AAA units or Blast Pens under construction vs. readiness and the Logistic Points. In the center there is a reminder of the menu of actions that can be taken and their cost.
The bottom part is once again similar to the other mat in that it has spaces for the available units and the damaged ones.
Grant: What is the anatomy of the various counters including aircraft and AAA guns?
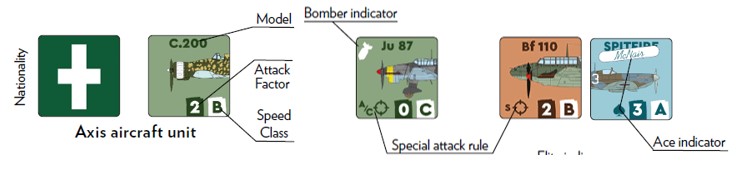
Nicola: Aircraft counters have two sides: the front of the counter has a nice silhouette of the aircraft and the name of the aircraft type, as well as its main combat values and some symbols for special types of attacks. The back displays a national insignia and is used when initially the players transfer their forces on the main map.
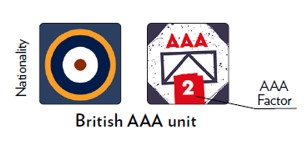
The AAA counters display the RAF roundel on their back (as they stay concealed until the Raid in their sector pushes the attack) and the AAA strength on the front side.
Grant: What is the general Sequence of Play? How does the game play flow?
Nicola: The Sequence of Play has each turn divided in three main phases:
- Preparation Phase
- Raid Execution Phase
- End of Turn Phase
In the first Phase, each Player is engaged in planning their strategy for the turn on the respective mats, with only minimal exchange of open information between the parties. For the British player it means planning the defenses of the Island and deciding whether or not to invest in some long term strategy, like building more/stronger AAA or Blast Pens. For the Axis player it means deciding where to attack and with how much strength, also deciding whether to “faint” some attacks, while concentrating in other sectors in order to stretch the British defense thin and whether or not go for any arriving Convoy this turn. Finally, the British player as a chance to react to incoming raids (but without knowing their composition) by launching intercepting fighters.
The second Phase is where each raid is played out in its sector. Depending on raid composition and how the British player chose to defend the sector, these are all the segment that make up a raid resolution, in a sequence not too different than many other wargames involving air assets:
- Air Defense Segment
- AAA Suppression Segment
- Bombing Resolution Segment
- Strafing Segment
The last three segments use dedicated tables, somewhat reminiscent of CRT’s, whereas the first segment uses the values on the air units involved. Faster aircraft get to shoot first. A roll less than or equal to the combat factor is a hit.
The third Phase is a more classical administrative phase where each player licks their wounds and the British player also receives resources from any Convoy arriving this turn. During this Phase there is also a check on whether or not the Axis may have achieved the Victory Conditions, causing the game to end.
Grant: How does Convoy request work?
Nicola: A pool of Convoy units is built at the beginning of the game according to the Scenario instructions. During the Preparation Phase, the British player decides whether or not to request a Convoy and draws one unit at random from the pool (without showing it to the Axis player). To signal to the Axis player that there is a Convoy arriving this turn, the British player flips the Turn marker.
Note that in some turns of some scenarios it is not possible to request a Convoy. Furthermore, the number of Convoys that can be requested in a scenario is also limited (and smaller than the pool to avoid “counting” of factors on behalf of the British Player) and if a CV is sunk in a turn, no Convoy can be requested the next one.
Grant: What happens during the British Logistics Segment?
Nicola: The British player chooses if and how to employ Logistic Points in order to bolster the defenses of Malta (other than Aircraft, which can only be repaired or acquired via Convoys and/or reinforcements). This means typically building stronger AAA units, repairing damaged airfields and (only in Scenario 3) building Blast Pens. AAA units take one turn to complete, Blast Pens two turns.
Grant: How are Logistics Points acquired and what are they used for?
Nicola: Logistic Points are the main currency for the British player. Logistic Points are needed to build AAA, Blast Pens, to repair bombed Airfields and damaged aircraft, and to launch aircraft to intercept Axis raids. They abstractly represent a mix of men and materiel needed to complete most of the tasks at hand and symbolize the struggle for resources that is one of the key elements of any account of Malta in WWII.
There are two ways to acquire Logistic Point: via Convoys (but you never know what you are going to get until you draw the counter), or by maintaining the seaplane base at Kalafrana operational (1 LP per turn). Historically, seaplanes at Kalafrana brought in pilots as well as critical personnel for air operations. The base was also used as one of the Search and Rescue hubs for downed allied (and Axis!) pilots.
But beware of those pesky Axis attacks: successful bombing of Grand Harbor reduces Logistic Points, successful raids on Convoys reduce the LPs that will be delivered, and damaging Kalafrana will stop that small but steady flow of LPs each turn.
Grant: What is the purpose of the Planning Phase Segment?
Nicola: Briefly: decide which units go in which Sector.
Things are more articulated, though: ALL British Air Units must go on the map, whether they will fly or not it does not matter; Axis units are assigned to the raid in each sector, but the Axis player is not forced to attack in all sectors, nor to commit all of the Air Units available and may well play a game of cat and mouse with the British Defenses.
Grant: How do Raids function? How do British air units go out to Interception?
Nicola: In their essence, Raids are a group of Axis Air Units that attack a particular sector. The Raid composition has no constraint in terms of units, that is: it can be made up of even a single Axis Air Unit, or even just Fighters for a sweep, etc. but it typically will serve a general strategic purpose for the Axis player, like putting an Airfield out of action, decrease the LP’s available, strafe British Fighters on the ground, or simply lure some of the British Air Units that scramble to intercept away from a more lucrative raid.
The British player receives a cue on which sector(s) will be subjected to Axis Raid(s) in the last Segment of the Preparation Phase. At that point, by paying 1 LP per Air Unit, the British Player can decide to launch aircraft from operational Airfields to intercept the raid(s).
Grant: How does air combat work?
Nicola: Air combat uses the two factors on each Air Unit counter. The letter is the speed class of the aircraft, the number is the combat factors. Faster units fire first (simultaneous if in the same class) and a hit is scored if the die-roll is less than or equal to the combat factor. Each firing unit chooses their target, but Allied Aces or Axis Elite units can only be attacked by units in their same speed class or better.
Grant: How does Bombing resolution work?
Nicola: By rolling a single die on the Bombing Result Table. The more units attacking, the better the odds on the table, not dissimilar from a modified CRT.
Grant: How is victory achieved?
Nicola: For the British: survive all turns of the specific Scenario, preventing the Axis from achieving their victory conditions.
For the Axis, there are different paths to victory (checked at the end of each turn):
- All three airfields are Out of Action and the British player has no remaining Logistic Points left to repair at least one of them.
- The CV in Malta’s Grand Harbour has been sunk, two airfields are Out of Action, and the British player has no remaining Logistic Points left to repair at least one of them.
- All in-play British air units are in the “Damaged Units” Box.
Grant: Which side has the harder time of achieving their goals?
Nicola: I would say that it depends on the Scenario. Scenario 1 is probably hardest for the Axis player given the rather scarce air units available, but the British player must be careful in using the LP’s.
Scenario 2 is probably the most balanced, and Scenario 3 tends to slightly favor the Axis (especially considering the large number of units available throughout the game).
Grant: What are some points of strategy for both the British and Axis?
Nicola: I tend to lose often at my own games, so perhaps I am the last person to ask this question to, but here is my gut answer.
British player: LP’s are your lifeblood. Use them wisely and don’t focus on a single turn.
Axis player: have an overall plan/strategy, but be ready to seize the opportunities as they materialize (like the CV in Grand Harbor). Pay attention to unit attrition.
Grant: What scenarios are included?
Nicola: Three scenarios that cover the three main air campaigns waged against the island.
Scenario 1 covers from June 1940 to December 1940, so 7 turns long. In this Scenario, the British player has very few resources at start, but the Axis units are only Italian and are not very good at the task. Furthermore, there is a chance that by October 1940 a lot of Italian units may leave, as they did historically, for the start of the disastrous campaign in Greece. I decided to leave the possibility that this happens later because things are going well on Malta, hence I lengthen the Scenario to December.
Scenario 2 is from January 1941 to May 1941, so 5 turns long. This represents the first attempt by German veterans of other theaters to gain air superiority on Malta and was almost a success, but it did not last long.
Scenario 3 is from December 1941 to April 1942, again 5 turns. This is scenario with the most air units from both sides and represents the climax of the Axis effort. Historically, one can judge that the Axis did obtain air superiority over the island, but then priorities shifted and the advantage was lost.
A note: Malta was subjected to (almost) daily raids from June 1940 all the way up to at least the first full half of 1942, but it is pretty clear from most accounts that there were really three distinct periods in which there was a clear focus on kicking the island out of the war using primarily air attacks. This is the main reason why the game has “only” three Scenarios.
Grant: What are you most pleased about with the design?
Nico9la: Probably the fact that I was able to adapt an existing system to a different historical setting, but with some additions to make it represent the actual actors and factors that I thought of as significant, without adding too much un-necessary chrome. For this I should also thank my developer, Oscar, that was always challenging my choices for the sake of elegance and playability.
Grant: What has been the response of playtesters? How do they feel about the time period now?
Nicola: Those that played the game enjoyed the experience and this has been flattering. Most gamers know the history and role of Malta in WWII, so I am not sure I broke any new grounds in terms of education or awareness, but I recently saw some people on Twitter showing they had bought books on the subject to prepare for the game, and this always brings a big smile on my face!
At least one playtester felt a bit overwhelmed by all the distinctions between bombers, fighters, etc. having no prior knowledge of the subject. This was a bit of an eye-opener because it made me reflect that often times we in the historical game space (niche?) take for granted that all are well-educated enough in the basics that there is no need to explain or introduce the matter. Ultimately, this what prompted us on the team to write the little primer you find in the rulebook.
Grant: What other games are you currently working on?
Nicola: Besides helping one Italian publisher (BlacKnight Editions) with the publication of the game in Italian and also maybe my friend Yasushi with a Japanese edition, I am actively working on two games which are at an advanced stage.
The first one is a solitaire game on Operation Bollebank: a night mission by a Danish armored task force under the UN insignia in the former Yugoslavia that could have turned into a disaster for them. The first playable prototype as well as the first draft of the rules are ready and we should enter development shortly. This is also most likely going to be a SNAFU Design game.
The other game is a 2-player game on the air campaign by the METAF (Mediterranean Tactical Air Force) and more specifically the 57th Bomb Wing (of Catch 22 fame!) to effectively shut down the Brenner line, a railroad that was the lifeline of the German troops stationed in Italy. Troops that had effectively blocked the Allies at the Gothic Line in the winter of 1944-1945. The idea is to turn it a bit into a logistics game (for the German player at least), with the US Player raising havoc on the infrastructure. This game is a bit further behind than Operation Bollebank, but I hope to have the first prototype and rules up and running by the end of the year, mostly depending on how smoothly the development of Operation Bollebank will go.
I have a third “secret” project currently on the backburner. This would be a co-design for a US publisher on a rather sensitive topic, but with a perspective that tries to be less US-centric. I am mainly still in the research phase as it is a topic I almost know nothing about…
Finally, there are two games I intend to pick up next year for which I have done most of the research work, but I still need to build a model that works. They will be both based on games that already exist (think: an adaptation of the mechanics to a new setting/theme) and while for one I have the go-ahead of the designer and publisher, for the other I still need to get permission.
Of course all of this holds until I found a new rabbit hole to fall in!
Thank you for your interest in me and my last design!
Thanks for the great insight into the design Nicola and for responding to my invitation for this interview. I really am looking forward to playing this one as it looks interesting and seems to have some interesting mechanics. It is also very impressive to see your passion for these subjects and I look forward to seeing more of your games in the future.
If you are interested in Nothing Left to Bomb: The Skies Over Malta, 1940-1942, you can order a copy for 26,00 € ($28.12) from the SNAFU Design website at the following link: https://snafustore.com/en/second-world-war/1601-nothing-left-to-bomb.html
-Grant
