
A few weeks ago, I was contacted by one of our followers in Spain who asked if I would be interested in interviewing Marc Figueras on his upcoming game from SNAFU Design covering the invasion of Ambon Island by the Japanese called Ambon: Burning Sun & Little Seagulls. I checked the game out on BGG and was immediately interested. Plus the art is being done by the incomparable Nils Johansson. I reached out to Marc and he was very gracious and more than willing to provide answers to our questions.

Grant: First off Marc please tell us a little about yourself. What are your hobbies? What’s your day job?
Marc: Well, I’m a physicist and I got my PhD in 2001, but after some years as a researcher at the university I shifted my specialization to science translation. So now my main job is as a free-lance translator, mainly from English and French to Catalan and Spanish. I used to translate science books but in the last few years I’ve translated also some history books, all quite interesting! Oh, and I’m married, with two kids ages 9 and 13.
Grant: What motivated you to break into game design? What have you enjoyed most about the experience thus far?
Marc: I always wanted to design a wargame on some “obscure” theme (I mean, a theme not “wargamed” yet), and Ambon fit the bill perfectly and I decided to give it a go. In fact, I always loved wargames on lesser-known topics. Of course, I like a good wargame on Barbarossa, the Bulge, or Waterloo, but I love the “feeling of discovery” when I play a wargame on a topic I knew nothing about.
And when designing a game, I feel the same. I like all the process of discovering a new battle, conflict, or war about which I know very little and slowly translating the information into wargaming form.
Grant: What designers have influenced your style?
Marc: I think I have no “preferred” designers when it comes to the design process. In fact, while the designers I like the most are those using novel approaches to wargaming, when I try to design a game, I tend instead to be quite classical and conservative in the mechanics used. After all, Ambon is a classical hex & counter affair with some twists here and there.
But if you want to know my preferred designers, well, let’s say Mark Herman, Volko Ruhnke, Brian Train, Kim Kanger, John Poniske, Mike Denson or John Gorkowski, just to name a few. Oh, and Richard Berg, as well.
Grant: What do you find most challenging about the design process? What do you feel you do really well?
Marc: I’m very comfortable adapting systems, for example making scenarios for battle systems, like Great Battles of History or, more recently, the very interesting Horse & Musket System by Hollandspiele. For this reason I tend to use classical and well-tested systems or mechanics. When things become tougher for me is when some historical fact, situation or process forces me to create some new mechanics. The process of devising a new mechanic from scratch is really challenging, I think, and I really admire designers who can create new mechanics, new approaches, new points of view for wargaming.
Grant: What is your game Ambon: Burning Sun & Little Seagulls about?
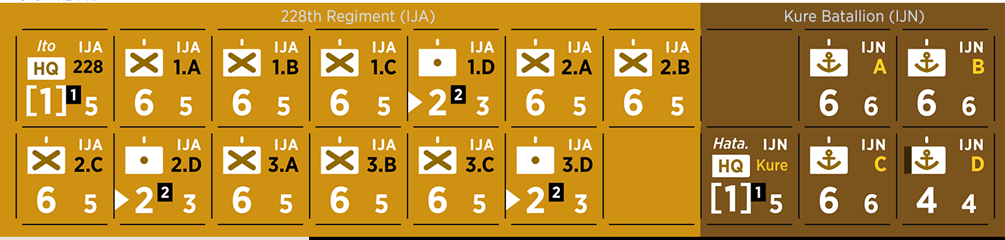
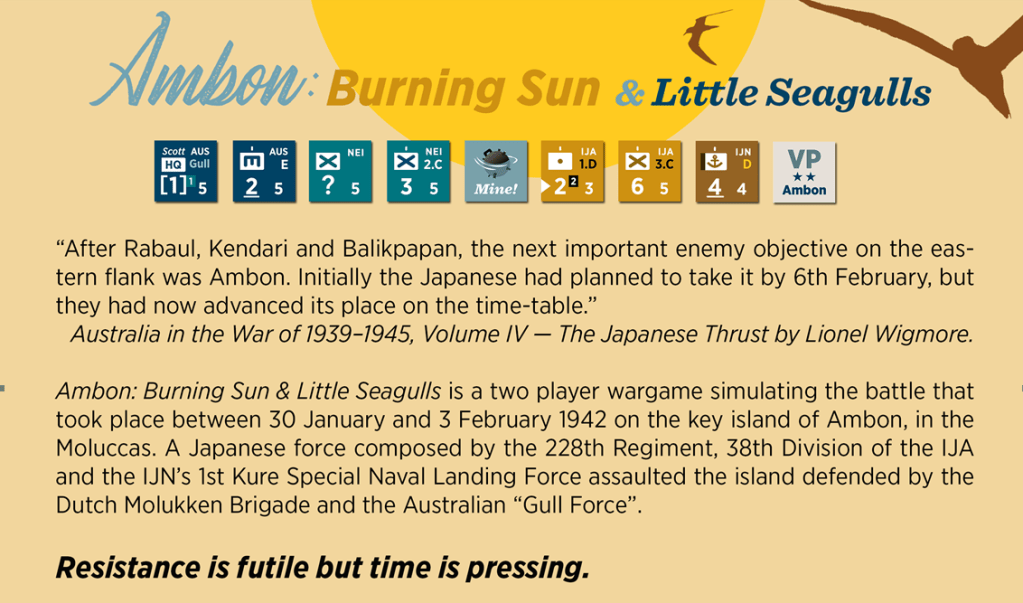
Marc: The game is a simulation of the battle of Ambon, that took place in the small island of Ambon, in the Moluccas, during four days in January-February 1942. The island had a strategic airfield that the Japanese wanted to control, so an invasion operation was launched against the Dutch and Australian defenders. The invasion force was composed of the 228th Regiment of the 38th Division of the Imperial Japanese Army, and the Kure Special Naval Landing Force (Marines) of the Imperial Japanese Navy. The defenders were 3 battalions of the Dutch Colonial Molukken Brigade, and the Australian “Gull Force” formed by a battalion of the 8th Division and some attached units.
Grant: What did you want the subtitle of “Burning Sun & Little Seagulls” to convey about the history of this invasion?
Marc: The burning sun represents the overwhelming Japanese superiority in the action (not tactically, because in numbers, the battle was quite balanced, but in the overall strategic situation…after all, had the invasion force been unable to secure the island, it was just a matter of time and some reinforcements that Ambon would fall). The Australian force defending the island was called the “Gull Force”, so the reference to the seagulls seemed appropriate.
Grant: What kind of company is the publisher SNAFU Games? What led you to publish this game with them?
Marc: SNAFU is my wargaming club. The club has existed since 1992, and about 3 years ago, the club purchased permanent premises and opened a wargaming-oriented shop (SNAFU Store). With a gaming experience of more than 30 years, the dream of creating and publishing our own games has always been in our collective mind. Oscar Oliver, one of the main members of the club saw my design, and he liked it, so the publishing adventure of SNAFU began. Our aim as wargame publishers is to (hopefully!) avoid the traditional “sins” of the wargaming industry: lack of playtest, numerous errata, abusive price…or yet another Gettysburg game. For me SNAFU is not just a publisher, it’s my wargaming club, and we think alike.
Grant: What inspired you to design a game on the Battle of Ambon?
Marc: That’s a somewhat weird story…Some years ago, a colleague (Marià Pitarque, who had the original idea for the game) and I were translating a book about a 17th century Dutch guy of the Dutch East India Company, Samuel Fallours, who got a post in the island of Ambon. That guy (maybe somewhat bored by administrative tasks?) began to draw all the beautiful fishes of the Moluccan waters and then published his drawings in what was to become the first ever all-colour printed book on fish. As we both were wargamers, we thought “Hey…this island, Ambon, in the Moluccas…surely there should be some type of WW2 action that happened there, don’t you think?” Indeed, we easily found everything about the Battle of Ambon, about which we had no idea. But to our surprise, we also found that there was no wargame covering this action. As the operation was relatively small, it seemed a good choice for a small-footprint wargame, with a smaller number of hexes and counters.
Grant: What from the history did you need to make sure to include in the design?
Marc: The Japanese landed historically at various locations, and we wanted to give the Japanese player the same options for landing while adding some more possibilities. On the other hand, the Allied force was known to the Japanese, but of course, the exact location of some small detachments was much blurrier, so we added a small amount of fog of war with hidden units (detachments or dummies).
The main historical drive for the invasion was time: seizing the island as fast as possible – the game should reflect this. The island was a small affair and the Japanese high command wanted to finish it as soon as possible. So, the Japanese player must control key locations of the island and must do it quickly. We introduced a devaluation of victory points as turns advance (e.g. if the Japanese player conquers the Laha airfield on turn 2 he gets 20 VP, but if he controls it on turn 8, he gets only 3 VP).
Another important (but sensitive, see below) point was the mines. The Allies had mined some approaches to the main key locations, and we wanted the mines to have an important role, deterring the Japanese player from trying some landing locations, but not too much, so he can go the risky way, if he wants.
It must be noted that a fortnight after the end of the battle, Japanese troops killed some 300 Dutch and Australian POW’s. One of the reasons for the massacre was the sinking of a Japanese minesweeper due to the mines. At first, we weighed up the possibility of including some reference to the matter linking it to the mines, but we found it quite difficult to do in a proper and respectful manner; besides, the massacre happened well after the battle was over, so ultimately we decided not to include it.
Grant: Who is the artist for the game? Who has their style aided in creating the theme you wanted for the game?
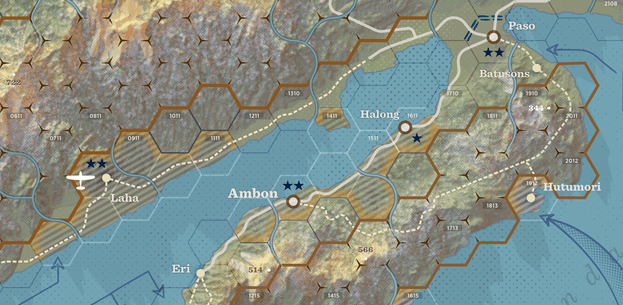
Marc: We started with a map made by Oscar Oliver, who is not a professional graphic designer. The result was very 1980-ish but very clear, like an old SPI map. All playtesting was done with that map and it allowed playtesters to focus on the game and it allowed us to really trim the game until it worked. At some point, Nils Johansson stepped in and the map evolved to a very modern and good looking design. His idea, besides giving a 1940’s feeling, is to explore graphic options other than the traditional “one hex colour equals one terrain type” and bring wargaming maps closer to the current cartographic trends.

Grant: What area does the map include of Ambon Island?
Marc: The map covers all of the island. Although the main actions were restricted to the southern peninsula and to the main axis and roads from the northern beaches to Laha and Paso, the island is small enough to have it all represented on the map. There are zones that are rarely used in the game, although some adventurous player has tried weird strategies around these zones.
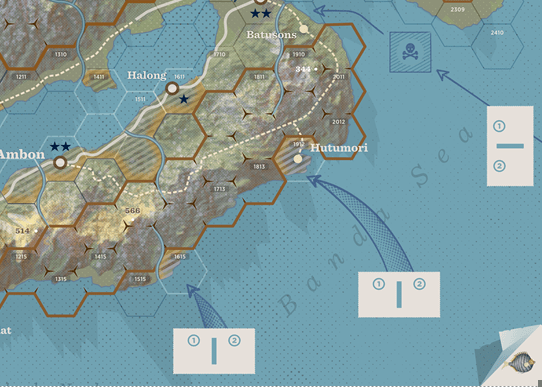
Grant: I notice the map has various landing boxes, each divided in a 1st wave box and a 2nd wave box. How are these boxes used?
Marc: During setup, the Japanese player must place the marines (Kure force) and one of the infantry battalions in any two 1st wave boxes and then, the two remaining infantry battalions in any two 2nd wave boxes. The 1st wave units will land (or try to land) on the first turn. If they are successful, the units in the 2nd wave will advance to the 1st wave box and will land (or try to land) on the second turn.
Grant: What is the scale of the map and the game?
Marc: The map scale is about one kilometer per hex. The turns are about half day, and the main units in the game are company-sized.
Grant: What is the anatomy of the various counters in the game?
Marc: The original counters were based on the work of John Cooper. NATO symbols for the combat units, a small flag for the nationality, a white/grey strip to show the various status of the units. Oscar adapted the counters to the game and then Nils updated the design to fit in with the new map theme and colour scheme.
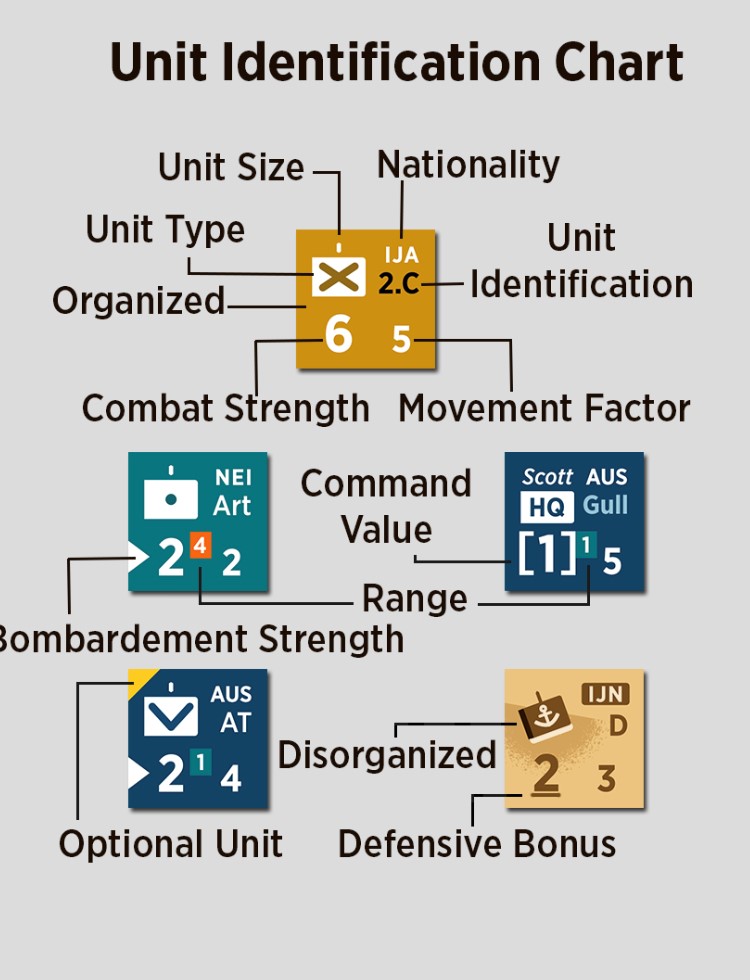
There are two types of counters: military units and markers. Markers are, well, markers (turn, OOS, mine markers and dummies, etc.). Military units are combat units or headquarters. Combat units have unit name and identification, unit size and type, combat strength and movement factor (ranged units show a bombardment factor instead of combat strength, and a range value).
Grant: What is the range of HQ units? How are they used in the game?
Marc: There are no command requirements per se (so no units are ever “out of command”), but HQs, all with a range of 1 hex, can affect combats and rally attempts. An HQ gives a +1 DRM to any combat(s) in its range and a favorable -1 DRM to rally attempts of units in its range.
Grant: How is victory achieved? What is this special Allied surrender in Turn 8? Why is this important to the design?
Marc: Victory, calculated in victory points for the Japanese player only, is achieved by means of the control of key locations on the map and by means of casualties inflicted on the enemy. The objective of the Japanese player is to conquer the three main key locations in Ambon (the city of Ambon, the city of Paso, and the Laha airfield) as well as some secondary key locations as soon as possible. The sooner the Japanese player conquers these locations, the more victory points he will receive. As I commented earlier, we introduced a devaluation of victory points as turns advance, and in fact controlling some locations on the last turn gives negative VPs to the Japanese player, and even more negative VP’s for not controlling them at game end. At the end of turn 10 (or at the beginning of turn 8 if the Allied player has surrendered; see later) the Japanese player adds up all his VP’s: for key locations controlled and for Allied enemy units eliminated, but deducts VP’s for lack of control of key locations and for eliminated Japanese units.
At the beginning of turn 8, if there is still at least one Allied HQ on the map, the Allied player can surrender. In that case, the game ends immediately, and the Japanese player receives a bonus of 5 VP’s, but he does not count VP’s (positive or negative) for key locations still in Allied hands nor for Allied units still on the map (they are not considered eliminated). It’s a tricky affair, as surrender can be used by the Allied player to deny the Japanese some VPs. But VP’s for controlling key locations in the last turn or for not capturing them by the end of the game are negative values, so the Allied Player must carefully calculate his chances.
Grant: What is the general Sequence of play?
Marc: All turns follow the same pattern, with a Japanese player phase, then an Allied player phase, a Rally phase and a Supply check phase. The Rally phase is not performed by the Japanese player during the two first turns (due to the general chaos after landings, etc.), while the Supply phase only affects the Japanese player (Allied units are always in supply) and only on turn 7 (the third day after launching the operation).
The Japanese and Allied player phases are identical, with Movement, Bombardment and Combat steps, but the Japanese have an additional Landing step before the Movement step.
Grant: What role do mines play during the Landing Phase?
Marc: The Allied player places his mines (and dummy mines) during setup in three landing sites, so the Japanese player does not know exactly where and how many mines are in those landing locations. During the landing phase, mines are revealed, and each one (not dummies) gives a -1 DRM for the landing die roll.

The role of the mines changed a lot from the first version. In the first playtestings, each revealed mine could eliminate a Japanese unit, but the outcomes were quite bloody so the players kept landing at locations without mines; it was too risky. So we watered down their effect a bit to favour a more aggressive landing behaviour by the Japanese player.
Grant: I notice that Allied movement is restricted during the first turn. What is the reason for this and what does it represent from history?
Marc: This issue appeared during playtesting. If the movement was not restricted, the Allied player had an easy time blocking the landing by moving to the beaches enough combat factors to simply hold them forever. But it’s historic. Like in Crete, units expected more landings and remained in their garrison stations. In fact, when the battle ended, some Allied units had not moved at all, waiting orders or defending their positions from an enemy that wasn’t really coming.
Grant: How do Zones of Control function in the design?
Marc: Zones of Control are relatively “soft” in this game. They just add a cost of 1 movement point for entering them or for exiting off them, but with movement factors in the range of only 4-6, that’s quite a penalty. So a unit can enter, exit, enter EZOC’s as many times as it wants, if it has enough MP’s available.
Zones of Control do not affect supply tracing nor control of key locations, but they add a malus of +1 DRM to enemy units attempting a rally in EZOC.
Grant: What is the Bombardment step?
Marc: In the bombardment step the player can use their ranged combat units (artillery, anti-aircraft and the optional anti-tank unit) to bombard enemy units within range. To determine the outcome of the bombardment, the player rolls one die and compares the result to the bombardment value of the ranged unit. If the die roll is less than or equal to the bombardment strength, the enemy unit becomes disorganized.
It must be noted that ranged units cannot attack in the combat step (only defend with an intrinsic value of 1).
Grant: How does Combat work in the design?
Marc: Combat is done by means of a classical strength ratio determination and cross referencing it with a die roll on the CRT. Combat is by no means compulsory, but if a unit attacks an enemy-occupied hex while being in the EZOC of a second enemy-occupied hex that will not be attacked during the combat step, that unit has its combat value halved. So, sometimes it’s interesting to make low-odds attacks just to avoid this halving of combat values in another combat.
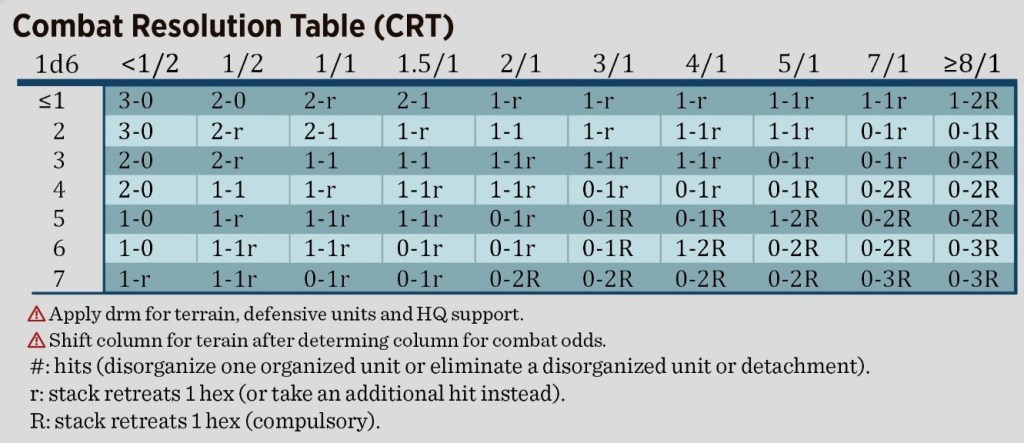
Grant: Is there anything special about the CRT? What was your goal with its results?
Marc: The CRT is perhaps the key of the game. In such small games, with roughly twenty units per side, achieving high odds is not that easy. The game CRT allows for low-odds attacks, giving some chances to the Allied player (which, in theory will be always in combat strength inferiority), but also encourages some risky attacks by the Japanese player. As the rally attempts usually favour the Japanese units, a small attrition could be worth risking for the Japanese player; a controlled attrition against a well defended Allied player could give the Japanese player the victory. Check always the CRT before launching attacks!
Grant: How do Rally attempts work in the Rally Phase?
Marc: During the Rally Phase, disorganized units can perform a rally check in order to be flipped back to full order. Each disorganized unit rolls a die and if the result is less than its current combat strength (or bombardment strength if it is a ranged unit), the unit is rallied; otherwise, the unit remains disorganized. Friendly in-range HQs give a -1 bonus to the die roll, while being in enemy ZOC gives a penalty of a +1 DRM, so it’s a good idea (if you have enough units, which is not always the case) to cycle your front units, as not being in EZOC and near a friendly HQ represents a difference of 2 in DRM!
Grant: What optional rules are included in the design? Why were these not included normally?
Marc: During playtest, we had the feeling that in the long term, the Allied player had a smooth learning curve, while the Japanese player needed more games for reaching optimum gameplay, taking different decisions and exploring the good strategy. So we included some optional rules that boost a little bit the Japanese player. They mostly affect the bombardment, but there is also a rule hiding the second wave in order to make the Allied player guess for one more turn before reacting to landings.
An experienced Japanese player against an inexperienced Allied player can also use the fourth optional rule, a small “what if”, by adding two units to the Allied OoB…Commander Scott, from Gull Force, asked several times the GHQ for mobile artillery and AT assets, and the 2/11th Artillery Regiment was just travelling from Western Desert to Rabaul a week before the battle. It could have been redirected to Ambon…
Grant: How does the game come to an end?
Marc: As I explained above, the game ends after turn 10 or at the beginning of turn 8 if the Allied player has surrendered. In both cases then victory is assessed.
Grant: What are you most pleased about with the outcome of the design?
Marc: Since the game is a small-format one, with few units and few hexes to play, I was somewhat worried that the gameplay could be always the same, without much room for different strategies. But after all the playtestings, it was clear that, in general, no two games were alike. The small fog-of-war of the Allied player with his detachments and dummy units and with his mines, coupled with the different landing options for the Japanese player, means that games can be very different. That’s the point I like the most about the design. As the Japanese player, what’s the best for me? Do I send everyone to the southern peninsula, trying to grab all VP’s there but making it much easier for the Allied reaction and defense? Or do I spread out my forces, landing at distant points so the Allied player cannot concentrate all defenses in a single front?
Grant: What type of experience does the game create for players?
Marc: I think the experience is very different if you play as Allied or as the Japanese. For the Japanese player, besides the key decision I commented on in the previous question, time is pressing, so you’re always feeling that you need to go faster, but without risking too much in low-odds combats, as each eliminated Japanese unit costs you 2 VP’s. As stated above, we tried to adjust the CRT to favour some level of risk-taking by the Japanese player but without going mad in useless very low-odds combats.
For the Allied player, the situation seems hopeless, but you must remember that your aim is not winning the battle, but slowing down the Japanese advance. You don’t know where the Japanese troops will land, but you can bluff to some extent with your detachments and dummy units and, with some luck, you can delay some Japanese landings one or two turns (and that’s already quite an achievement!). Then, if you can set up some good defensive positions, a one-to-one attrition goes in your favour (although you must always take into account that the rally attempts are more difficult for you than for the Japanese player). And do not hesitate to give up some key location for reinforcing a good defensive position somewhere else.
Grant: What other designs are you currently working on?
Marc: We have some interesting projects at SNAFU, indeed. In fact, this game wants to be the first one of the “Snafu Small Battles” series, some by me and some by other designers. All these games will have the same format: A3 or A2 maps, a maximum of 140 counters per game and not overly complex rules.
For my part, one of the future “Snafu Small Battles” will be (hopefully) a post-Napoleonic era tactical one, about four battles of the Latin-American Wars of Independence (all fought in present-day Ecuador in 1820-1822).
Another one, still in its infancy, is a game about a failed attempt of invasion of Spain through the Pyrenees in 1944, led by maquis, guerrillas and exiled Republican civil-war combatants, with the aim of seizing a small part of Spain (the Val d’Aran valley, in Catalonia) and prompting the Allied powers to intervene and overthrow Franco’s fascist regime.
Finally, a game that we hope will be the origin of the “Snafu Small Wars” series is a game on the very unknown war of 1941 between Ecuador and Perú. The main operations of the war lasted just one month and were focused in the coastal border zone between the two countries. With some abstract management of the other fronts of the war (mountains and jungle), it’s a game that fits in with SNAFU publishing strategy and schedule.
Thanks for the great insight into the design Marc and for responding to my invitation for this interview. I really am looking forward to playing this one as it looks interesting and seems to have some interesting mechanics.
-Grant

Purchase options should be noted here.
LikeLiked by 1 person
I provided the Snafu Store link but the game is not yet available. Should be soon though.
LikeLike
I still don’t see it; maybe I’m too old.
LikeLike