
Unless you haven’t been paying attention to our Twitter feed and some of our recent posts, you will be aware of one of the more interesting projects that we have covered so far this year in By Stealth and Sea from David Thompson and Nicola Saggini. This game follows elements of an Italian commando frogman unit during World War II called Decima Flottiglia MAS. Under your command, teams of frogmen will pilot manned torpedoes in attacks against the Royal Navy in the heavily guarded harbors of Gibraltar, Algiers, and Alexandria. The game is coming to Kickstarter soon and we reached out to David to do an interview on the inside mechanics of the game and the design process.

Grant: What history does your upcoming game By Stealth and Sea cover?
 David: By Stealth and Sea is all about the Decima Flottiglia MAS (Decima Flottiglia Motoscafi Armati Siluranti, Italian for “10th Assault Vehicle Flotilla”), which was a commando frogmen unit of the Italian Royal Navy. It was active during the Battle of the Mediterranean, using manned torpedoes, speedboats, and Gamma frogmen to attack Allied vessels. The game specifically focuses on the manned torpedo elements of Decima Flottiglia MAS.
Grant: What other games inspired your design?
 David: That’s a tough one. There are a few games on the topic. Depths of Courage Volumes 7 and 8 by High Flying Dice Games and Attacco a Malta and Attacco a Suda cover the topic to some degree, but I hadn’t played those until well after development of the game was underway. This is going to sound a little strange, but probably the biggest inspiration to the gameplay comes from a mechanism inspired by the euro game Robinson Crusoe. In that game, you have a choice to assign one or two pawns to most actions. If you assign one pawn, you have to roll action dice to check the result, but if you assign two pawns, you are assured success. I love the tension and decision making of that mechanism, and I also love that it allows the player to drive the level of variance in the game, balancing certainty against action economy. I lifted that mechanism for the human torpedo action phase in By Stealth in Sea.
Grant: What sources did you consult on the history of the period?
David: A LOT! This is the bibliography that my design partner, Nicola Saggini, and I put together for texts that directly influenced the game. We are also including a full annotated and expanded bibliography for the companion book we’re writing for the game.
- Bevan, J. (n.d.). Operation Tadpole: The Royal Navy’s Underwater Diving Operations, Gibraltar 1940 – 1945.
- Borghese, I. V. (2009). Sea Devils: Italian Navy Commandos in World War II. Annapolis, MD: Naval Institute.
- Crociani, P., Battistelli, P. P., & Stacey, M. (2013). Italian Navy and Air Force elite units & special forces 1940-45. Botley, Oxford: Osprey Publishing.
- De Risio, C. (1992). I mezzi d’assalto. USMM – Ufficio Storico della Marina Militare. Rome.
- Greene, J., & Massignani, A. (2004). The Black Prince and the Sea Devils: the Story of Valerio Borghese and the Elite Units of the Decima MAS. Cambridge, MA: Da Capo.
- Kemp, P. (2002). Underwater W London: Brockhampton.
- O’Hara, V. P. (2008). Frogmen Against a Fleet. Naval War College Review: Autumn Summer, Volume 68, Number 3. Rhode Island: Naval War College Press.
- Schofield, W. G., & Carisella, P. J. (2005). Frogmen: First Battles. Boston, MA: Branden Books.
- Spertini, M., & Bagnasco, E. (2005). I mezzi d’assalto della Xa Flottiglia MAS, 1940-1945. Italy: E. Albertelli.
- Zapotoczny, W. S. (2017). Decima Flottiglia MAS: the Best Commandos of the Second World War. Oxford, UK: Fonthill Media.
Grant: Who is your co-designer Nicola Saggini? What expertise and insight did he bring to the project?
David: Nicola is probably best known in the gaming world for his translations. He’s worked on Greater East Asia Co-Prosperity Sphere and Fury at Midway (from Japanese to English), and Here I Stand and Falling Sky (from English to Italian). He has been remarkably important to the design of By Stealth and Sea. He reached out to me early on to collaborate on the game, as he had himself conceived of a similar game, albeit quite a bit crunchier. He had a ton of ideas — great ideas that we’ve incorporated into the game — but he did not have a core gameplay system. It has really been a perfect marriage. I have led the game design, though he has provided significant improvements to the system. Meanwhile, he’s led all of the historical research and provided insight and suggestions for how it should be integrated into the game.
Grant: What were specific elements from the history that you wanted to model in the game?
David: All of them! Seriously, when I set out to design an historical wargame with DVG, embracing the history is of the utmost importance. Each mission has been carefully crafted, down to the actual target ships and their placement, the inclusion of the actual operators and their likenesses, accurate harbor defenses, etc. When you play By Stealth and Sea, you will be experiencing the most accurate portrayal possible of this interesting piece of WW2 history.
Grant: The game is a solitaire affair with cooperative options. How do the rules change for these differing modes?
David: The rules don’t change at all. Full disclosure: this game was designed first and foremost for solitaire play. But it’s easy to divide control of the three human torpedoes you control in the game for cooperative play.
Grant: The game sees commandos riding these SLC’s. What does SLC mean and who in their right mind would do this?

David: What we call manned or human torpedoes are actually called siluri a lenta corsa (SLC’s, slow-running torpedoes). A pair of Italian operators would pilot these manned torpedoes and attack the Royal Navy and its allies in ports in the Mediterranean (specifically: Gibraltar, Algiers, and Alexandria). It takes a seriously brave (and skilled!) person to pull that off. The Italians essentially invented the concept, though it was quickly emulated by naval special forces across the world.
Grant: I understand that failing and somewhat unreliable equipment is a big part of the design focus. Why is there a Faults Deck and Faults Check Phase at the start of each turn?
David: In addition to dealing with the impressive defenses of the Royal Navy, the operators had to overcome constant technical faults with their equipment, including issues with the SLC’s, warheads, breathing gear, and wetsuits. The earlier missions — when the operators were still using prototype equipment — were the most difficult. Missions actually had to be aborted due to technical problems. In the game, we have captured this concept through the Fault Deck. The Fault Deck consists of cards from each element listed above (with the SLC broken further down into three key parts: the transmission, ballast tank, and battery). At the beginning of each mission, you construct the Fault Deck based on the technology level of each element. The better the technology, the less likely it is to experience a fault. And technology levels for the individual elements do not have to progress in tandem.
Grant: Can you show us a few examples of these Fault Cards?
David: Sure. In general, there are two types of Fault Cards — those that have an immediate effect that can’t be repaired, and those that can be repaired later.
 Breathing gear is an example of the former type of fault. When you draw a Breathing Gear Fault Card, you will be required to make a Repair Check (using the operators’ Repair skill represented by a number of 6-sided dice they will roll) to see if you can overcome the fault. If you fail, their breathing gear is damaged. Based on the level of damage, this could negatively impact their stamina for the mission and make them more susceptible to being stunned when attacked by patrol craft and make it much more challenging to escape.
In contrast, some of the SLC and warhead faults can be repaired. For example, a ballast tank fault will force an SLC to stay surfaced. This is extremely dangerous, as SLC’s are much easier to detect when surfaced. But even if you fail an initial Ballast Tank Fault Check, the operators can always take a repair action later in the mission to repair the ballast tank.
 On the below Ballast Tank Fault Card you will notice the circular space on the right side of the card. This is where you will place the SLC token from the Ballast Tank space after you fail the initial fault check which reminds the player that they can repair this in a future turn by using an action.
Grant: What is the general Sequence of Play?
David: Each mission begins with a Forward Positioning Phase. This phase abstractly reflects the impact on the SLC’s and operators based on where the mission began. If they had to travel a significant distance, the operators will be fatigued and the SLC’s more vulnerable to technical faults.
After completing the Forward Positioning Phase, the game is divided into 12 turns. Each turn is sub-divided into four phases.
- In the Fault Check Phase, you check to see if any SLC has experienced a fault.
- In the SLC Phase, each SLC uses two action points to take actions.
- In the Harbor Defense Phase, the Royal Navy’s harbor defenses react.
- In the Clean -up Phase, you prepare for the next round by performing some minor housekeeping on the board.
Grant: What do the SLC Cards look like and why did you decide to track the things you did in the design like batteries, ballast tank, transmission and warhead?
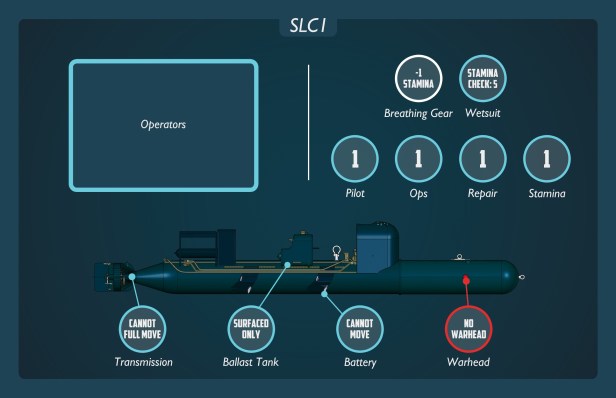
David: I knew from the start of the design, that I wanted players to have a strong attachment to their operators and the SLC’s. I figured the best way to do that is to have individual SLC sheets, each with their own unique states, rather than some simple abstraction. I wanted players to get a sense that each SLC largely operated in a vacuum once the mission was underway. Integrating the various aspects of the operators and SLC onto the SLC sheet gave me an easy, elegant way of tracking skill and technology progression over the course of multiple missions, while also tracking the individual faults during a single mission.
Grant: What skills are tracked on the card and how are these used? How do they increase?
David: Operators have four skills: Pilot, Ops, Repair, and Stamina. Each of the skills affect multiple aspects of the game, and no single one of them can be ignored without significant implications.
Pilot is used for the most fundamental of actions — moving the SLC efficiently, navigation, and diving quickly when things go awry.
Ops is critical for actually completing the core intent of the mission — destruction of a target. Ops allows you to handle the warhead by detaching it from the SLC and attaching it to the target. Ops is also used for evading the anti-torpedo nets that block entrance into the inner harbor.
Repair is used for avoiding fault checks or repairing faults that do occur.
Stamina lets operators recover if they become stunned (either through exhaustion or successful attack), and it allows them to escape at the end of a mission.
When playing one-off missions or through a historical campaign, operators’ skills are determined by the mission setup. But in a custom campaign, you can advance one skill of your choice per mission, if an SLC either entered the inner harbor or successfully attacked a target.
Grant: During the SLC Phase each mini sub gets to take actions. What can these actions be used for and how many does each SLC have?
David: I alluded to this a little bit above, when I mentioned the Robinson Crusoe action point system, but in greater detail: Each SLC gets two actions points. In general, you can use one action point to attempt an action, though that requires a successful skill check. Alternatively, you can use two action points to take an action, with assured success. For example, if an SLC is in trouble and wants to quickly dive, it could use one action point and make a Pilot Check (which has a skill check of 4). That means you’ll need to roll a 4 or higher to be successful. Alternatively, you could use both action points to dive without rolling. Critically, you can only attempt a specific action once per turn, so you don’t have the option of attempting an action a second time if you fail a roll on a first attempt.
There is a wide range of action options (15 in total), though of course not all will be applicable to every situation. I described most of them at a high level above (in relation to the skills), but generally speaking they can be largely grouped as actions related to controlling the SLC as the operators approach the target (moving, changing direction, diving and surfacing, and evading the anti-torpedo net), actions related to manipulation of the warhead (detaching from the SLC and attaching to the target vessel), dealing with technical faults (repair), and escaping safely after the mission (scuttling the SLC and swimming to safety).
Grant: What decisions do players have with these actions that increase the tension?
David: The core tension about managing action economy and probability is discussed above. But in addition to that, you’ll often have to weigh which action is the best for any particular situation. If a patrol craft has detected an SLC, is it better to repair a ballast tank fault so that you could then try to dive to safety? Or maybe you push your luck and try to get away from it before it can make a successful attack? Should you go for the more difficult but valuable targets in the inner harbor, which would require evading anti-torpedo nets, or do you play it safe and go for the cargo ships in the lightly protected roadstead? The game features a mixture of “strategic options” (which targets should you attack) and turn-by-turn tactical options (how do I best evade this current threat).
Grant: I know that you have gone to a lot of trouble to identify all the historical pilots on the Operator Cards. Why was this important and how did you go about giving each operator a different advantage or ability?
David: It’s important for me in each of my historical designs — Pavlov’s House, Castle Itter, etc — to accurately reflect (and pay respect to) the history to the greatest extent possible. I want players to know about these brave men, who were willing to take great risk. For that reason, researching their physical likeness is important. But I also want the game to reflect any unusual features or extraordinary skills they may have had. Nicola was primarily responsible for identifying the real-world, historical inspiration for the special attributes possessed by some of the operators based primarily by their actions during the nine missions featured in the game. I then translated those attributes into the concepts in the game.
Grant: Can you show us a few of these operators and their advantages?
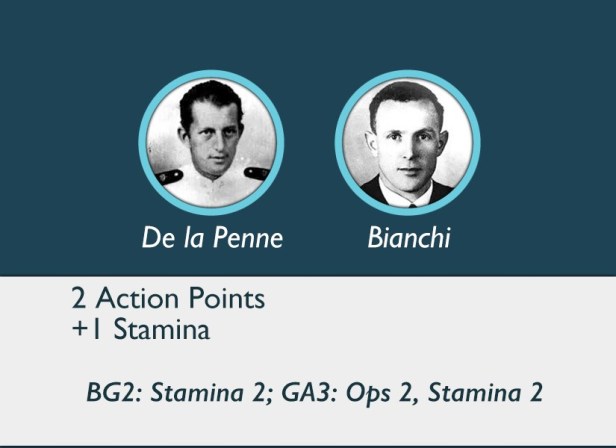
David: Absolutely. Here is De la Penne and Bianchi’s card. We gave them a +1 to their Stamina skill checks. This is largely inspired by an extraordinary feat of stamina performed by De la Penne during the group’s first mission in Alexandria. During that mission, the operators were experiencing significant technical faults with their SLC. Ultimately De la Penne — with a ripped wetsuit — had to drag the SLC the last twenty meters to their target: the battleship HMS Valiant. Damaging the HMS Valiant — along with the Queen Elizabeth during the same mission — was the pinnacle of Decima Flottiglia MAS’s success.

And here is Birindelli and Paccagnini’s card. If they are ever captured during a mission, you receive 1 VP at the end of the mission. This represents the impact of Birindelli’s captivity, during which he was able to communicate information back to his allies concerning Royal Navy knowledge of Decima Flottiglia MAS activities.
Grant: Once a mission is complete how do teams escape? What happens if the operators fail their escape attempts?
David: The game has a special action called Escape, which works differently than the other actions. An Escape action is triggered by a successful Scuttle SLC action, a successful Attack from SLC action, or as a result of a Patrol Craft Attack or Shore Base Mortar. If operators fail to escape, they are captured by the Royal Navy. In a one-off mission or historical campaign, you just lose victory points. But if your operators are captured in a custom campaign, they are unavailable for the rest of the campaign.
Grant: Why is scuttling the SLC’s a last final step for missions? What happens if the operators fail?
David: Scuttling the SLC represents the operators concealing how they performed their attacks. It’s important to deny the Royal Navy any insight into the method of the attack, and especially in gaining better insight into the SLC technology. If the operators fail, it means that they were unsuccessful in the attempt — thematically, this can be represented by a wide range of real-world events: an SLC might be discovered on a beach, the wreckage might be found at the bottom of the sea, etc. If the Scuttle SLC action fails, you lose victory points.

Grant: What happens during the Harbor Defense Phase?
David: During the Harbor Defense Phase, the Royal Navy responds to the manned torpedo attacks. The extent of the defenses are determined by which Harbor Defense elements are in play. For example, during the first mission there is no Underwater Dive Team or Shore Based Mortar, so you will skip those steps. Those defenses are introduced in later missions. In one-off missions or in an historical campaign, the mission instructs you about which defenses are in play. During a custom campaign, the harbor defenses are improved based on how well you’ve done during the campaign.
Harbor defenses include: searchlights, patrol craft responses and attacks, underwater dive teams, anti-torpedo nets that guard the inner harbor, and shore based mortars.
Grant: What is the Alert Deck and how do these cards effect the game?
David: The Alert Deck is a deck of 36 cards, numbered 2-12 with the distribution of the possible results of a 2d6 roll. In other words, the deck consists of just one 2 and one 12, but six 7’s. The Alert Deck is used by most of the Harbor Defense elements. When you draw an Alert card, you check its value against the target number listed on the Harbor Defense element. The target number is based on a variety of factors such as the state of the SLC and whether it has a Detected token. If the Alert card value is equal to or higher than the target number, the Harbor Defense element is successful. After you use an Alert deck card, you discard it.
In addition, the 12 value Alert Deck card has a special feature: Alert. When you draw the 12 value Alert card, you resolve the Harbor Defense element as normal. Then immediately search through the Alert Deck discard pile and find all the cards of the lowest value. You remove those cards from the game, shuffle the discard pile back into the Alert Deck, and continue playing. In this manner, the Alert Deck becomes increasingly more challenging during the course of a mission (simulating the increased alert level by the Royal Navy).
Grant: How do patrol crafts move? What are they looking for in order to become alerted?
David: The key for patrol craft movement is whether an SLC is currently detected or not. If a patrol craft is within three hexes of a detected SLC, the patrol craft will move towards the SLC. Otherwise, the movement of a patrol craft is determined by a movement chart.
Patrol craft respond to a number of factors: whether an SLC is surfaced or submerged, whether it has already been detected (by searchlights, an underwater dive team, or another patrol craft), and whether it is in the inner harbor.
Grant: How does a patrol craft attack work? What happens to the SLC if successful?
David: Patrol craft attack any SLC’s in the same hex as them. The likelihood of success for the attack depends on whether the SLC is submerged or surfaced. If successful, the operators on the SLC are stunned. When the operators are stunned, they only have one action point to use per turn. If an SLC is successfully attacked and the operators were already stunned, the operators are forced to immediately attempt an escape (with a poor chance of success) and they don’t have an opportunity to scuttle the SLC.
Grant: How do the SLC’s go about setting warheads on ships? How are they successful in destroying these ships?
David: Once the SLC’s arrive at a target, they need to detach their warhead from the SLC (which requires a successful Ops skill check) and then attach the warhead to the target (another Ops skill check). Once they have performed both of those actions, they have successfully attacked the target ship.
Grant: How is success of missions determined?
David: Victory is determined by how many victory points you score during a mission. You receive one VP for each SLC scuttled, one VP for each pair of operators that escape, and VP equal to the value of each ship successfully attacked. A score of 0-3 is a failure, 4-6 is a draw, 7-10 is a minor victory, and anything above 10 is either a major or epic victory.
Each mission also includes the historic result of the mission for you to compare against your level of success.
Grant: How does the Campaign Mode differ from only missions?
David: You can play one-off missions. When you do that, you just set the mission up as instructed based on the historical situation and attempt to win as explained above.
You can also play an historical campaign. Your goal there is to play through all the historical missions in sequence, to see how well you perform.
But really the intent of the design is to allow you to play through a custom campaign of all nine missions. In a custom campaign, you get to increase the skills of your operators (by reaching the inner harbor and attacking targets) and increase your tech levels (by spending victory points). But the better you do in each mission, the more likely the Royal Navy is to improve its defenses.
Grant: What items can be tracked over time other than skills and increases?
David: You are able to increase the four skills of the operators (Pilot, Ops, Repair, and Stamina). The game also provides guidance for tracking medals and promotions for the operators, though those elements have no gameplay impact.
You spend victory points to improve your forward positioning (which reduces fatigue and faults), as well as advance the technology of your SLC’s, warheads, wetsuits, and breathing gear.

Grant: How do technology advancements work? What options for advancement are there and how do players “purchase” these?
David: You spend victory points earned during a mission to increase your technology levels for SLC’s, warheads, wetsuits, and breathing gear. At the beginning of the game, each of these can be improved independently, but as they reach the upper technology levels, they often become dependent on other technologies. For example, for you to reach the pinnacle of SLC technology — the SSB — you must have maxed out the advancements for not only the SLC but also the warhead and breathing gear technologies.
Grant: What has been the experience of playtesters? What elements do they really like?
David: I think there is a mixture of favorite elements from playtesters. Certainly many playtesters are most interested in this rather niche historical topic. We have received an amazing response from Italian players and players from Italian heritage who are proud of the valiant efforts of these operators and who are tired of some of the negative stereotypes of the performance of the Italian military during the Second World War.
In addition, playtesters enjoy the quick-playing nature of the individual missions, coupled with the campaign progression options.
The core action system mechanism has also been well-received.
Grant: What are you most proud of with the design? What does it do very well?
David: I think the turn structure does a good job of keeping you engaged. It’s straight-forward, exciting, and quick. Which means you spend your time making interesting decisions during the SLC Phase and anxiously awaiting the flip of each alert card during the Harbor Defense Phase.
Grant: What other similar type games could you apply this system to? Would this not also work on land based commandos, aircraft or other types?
David: That’s an interesting question. To be honest, I haven’t given it a ton of thought, because I know my next solitaire wargame effort is going to be completing the design for Soldiers in Postmen’s Uniforms. However, I expect that if the game is well-received, the obvious follow-up would be a game about the British chariot operators. They were directly inspired by Decima Flottiglia MAS. While the British didn’t have a ton of success, they did have a handful of successful missions, to include one where they worked with former Decima Flottiglia MAS operators (after Italy’s capitulation). In addition, the Italians had planned for an attack on New York city using a CA-class midget submarine, which I think would make for an interesting follow-up.
As for whether the system could be used in other genres – yea, I think there’s some opportunity there for sure. Commando raids would be an excellent topic to explore, and makes for a nice counterpart to the Valiant Defense series of games.
Grant: When does the game come to Kickstarter? When does DVG anticipate fulfilling the game after a successful Kickstarter?
David: The Kickstarter launches on 25 February. I think the idea right now is to fulfill somewhere around the July 2020 time frame.

Thanks for your time in explaining the game and it design process to us. I am really interested in this one and have appreciated your regular updates on social media. I have played a prototype of the game a few times and have really enjoyed the systems, particularly the Action Phase and the choices you must make. I also find the Alert Deck very interesting as well and feel that your treatment of it has been really revolutionary. I look forward to seeing this game come to life in its final form and to see others enjoying the game as much as I did.
-Grant


Thanks so much for allowing me to do this interview with you, Grant. I really enjoyed it!
LikeLike