There are certain wargames out there that become somewhat of a cult classic after a few decades. Initially, these type of games are not widely released and most people never get to experience them and then they go out of print. In fact, the limited availability is sometimes the cause of the cult status. Over the years, people will play and discover these jewels and speak fondly of them to others and it begins to generate a nostalgic almost preternatural hype. Hype is normally seen as a bad thing camouflaging a poor design or hiding the fact that it doesn’t do something well. But more often than not, people feel strongly about these games because they are good…but were never really given a chance because you just couldn’t find a copy to play. Such a game is Angola!, which was originally published in limited quantities by the Ragnar Brothers in 1988, and then picked up by Multi-Man Publishing later. I have heard lots of comments over the past 5 years or so and have seen many posts on social media about it. Heck, the game is ranked #82 on BGG in the War category if that tells you anything. But, I didn’t get the chance to discover this 20+ year old gem until recently while attending WBC.
Angola! deals with just a brief portion (July 1975 through April 1976) of the decades-long Angolan civil war that began in the 1970’s with the fall of Portugal in the area as a colonial power. The civil war was fueled by the tension of the Cold War era as both the United States and Soviet Union backed different factions providing them with weapons and equipment. The war was a power struggle between two former anti-colonial guerrilla movements, including the communist People’s Movement for the Liberation of Angola (MPLA) and the turned anti-communist National Union for the Total Independence of Angola (UNITA) with the National Front for the Liberation of Angola (FNLA) and Armed Forces for the Liberation of Angola (FAPLA). FAPLA and MPLA make up the Soviet-backed horses in this race while the UNITA and FNLA are Western-backed. And this is a very important aspect of the game and will reveal itself at the end of each turn as players who are losing will have to make the key choice about how much aid to accept from their allies.
The Map and Its Colors!
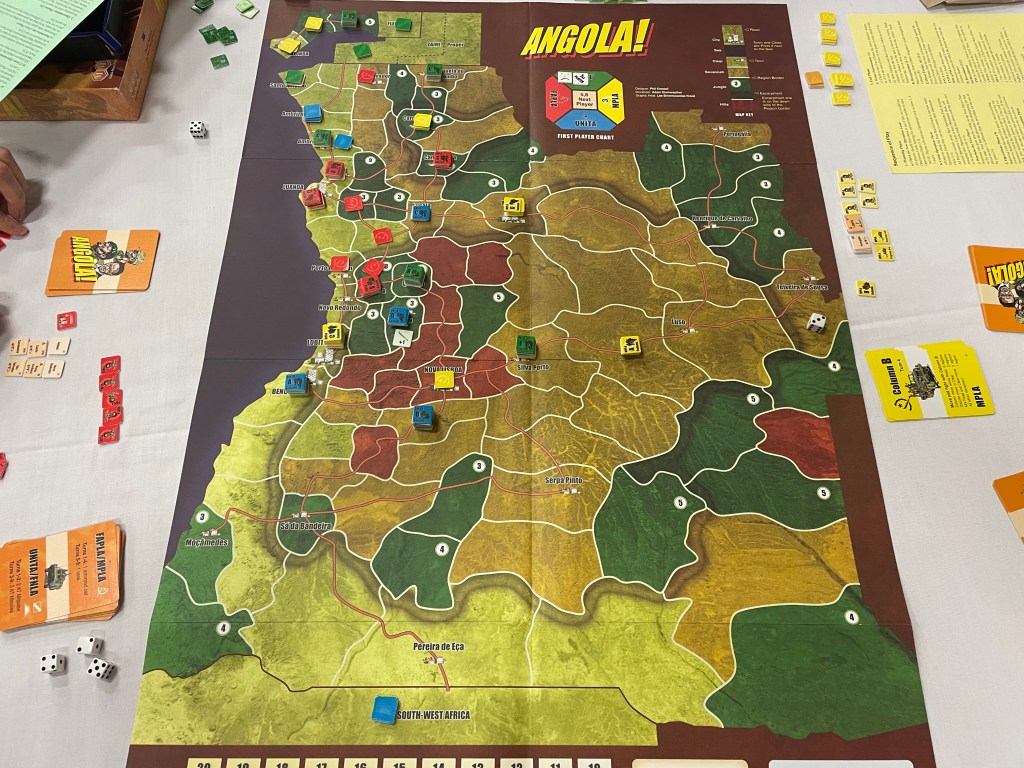
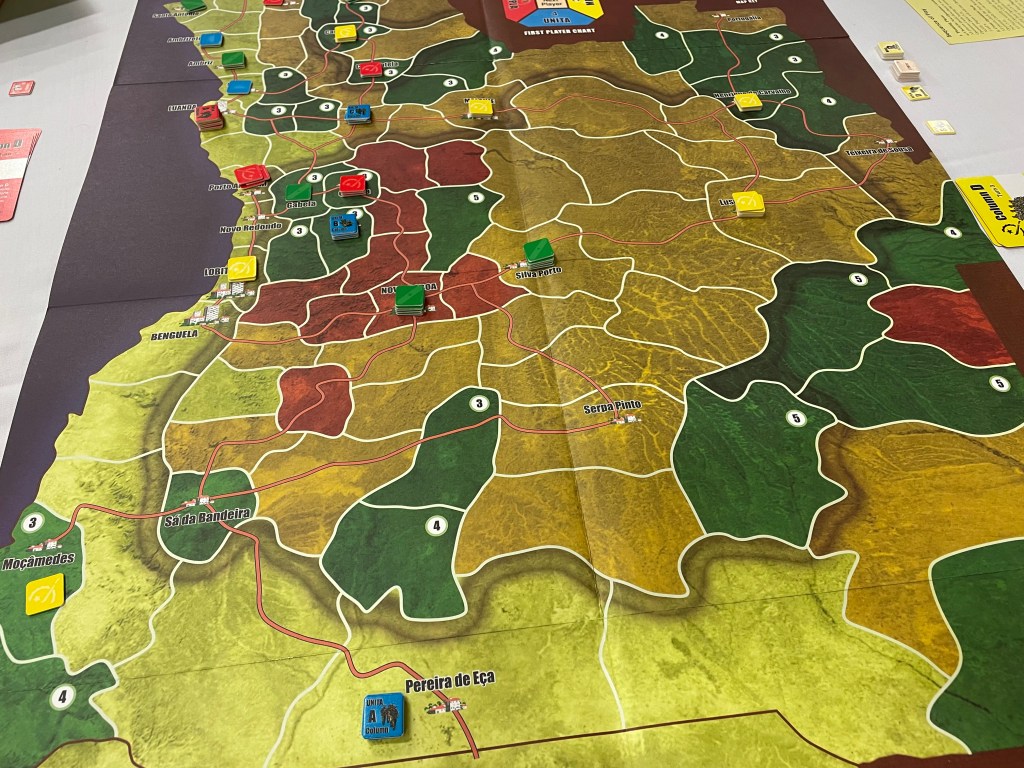
The first time I saw pictures of the map for Angola!, I didn’t know what to think. Was this multi-colored mess intentional? Did they want to make my eyes explode in their sockets? Or was their something more intentional in this chaotic mass of colors? And the conclusion I came to after playing this for 6 hours was a little bit of all three. But, my initial impression was that it looked like someone ate a bunch of Fruit Loops cereal and then expelled that all over the map. But after getting into the game, moving my units around the board and trying to utilize the terrain represented by these colors to my advantage, I came to have a different feeling about the look of the map and realized that it assisted me in my thematic immersion into the game. After seeing the colors in this way, I gained a new appreciation for the intentional use of such colors for the map.
But the key to the colors is that they are tied to a different type of terrain. There are just four terrain types used in Angola!: Clear (light yellow), Jungle (deep green), Savannah (burnt yellow) and Hills (brick red). There is no mistaking what terrain your units are located in when in a specific region as the region consists of just one color…and this makes for a very easy to play part of the game. To various African cultures, colors are very symbolic and their clothing and fabrics are very colorful and mean something to each different region. I think that the use of the various colors was functional in the game but also was a hidden homage to the rich culture in this area of Africa.
Team Based Wargame
I want to focus on the fact that this is a 2-4 player wargame that I would prefer to play as a 4-player game because it is a true team based game. Not in the sense that the COIN Series is, where each faction has a loosely based alliance of convenience with one other faction, but a true team game where 2 players will win together and 2 players will lose together. There is no other victory condition for the four factions except victory in amassing VP’s through the control of cities and towns. I have never really played this kind of wargame and it was a bit unnerving as I had to have a paradigm shift to remember that the green units (FNLA) were aligned with my blue units (UNITA) and I had to understand that we were truly working together and not just loosely aligned. This partnership really provided each of the allied factions the opportunity to use each other’s forces as their own, not in the ability to move them around or attack with them, but to use them as cover for your rear and also to bolster the defense of key areas as aligned troops in the same space will defend together.
The game also encourages table talk amongst the players to discuss plans for upcoming rounds but it has to be done at the table. No walking away to another room to go over the map, the disposition of your stacks and the location of your objectives for that round. Doing it this way, makes it a lot harder to mask your intentions and hide attack plans so you have to understand how best to discuss tactics. It also is important to look at the Initiative Track and understand the order that operations will be carried out as timing of movements and actions is very key. The way the track is set up you will never have a back to back allied activation, which I think is a good choice for the design, but you need to understand if you will have 2 of the first 3 turns and how best to utilize that at the beginning of the round. This game really promotes the team concept in this regard and felt very refreshing as we were truly working together the whole time rather than just at certain times.
Interesting Use of Cards
One of the best parts of the design is the concept of pre-constructing your Command Deck prior to the turn beginning in the Planning Phase. This means that you have to look at the board state, make some assumptions about what your opponents and your ally is going to do that turn and then plan accordingly. This command and activation system is really unique and created some very interesting internal discussion in my head as I was putting these cards in order. After the players have gone through the process of building this deck and committing in secret to the order in which these cards will be drawn and activated, then the fun starts. The players take turns activating their units in the determined order. What comes out of the process is a lot of “oh no’s, “I knew it’s” and even some “********” as player’s plans, and ultimately their effect on your plans, unfold right before your eyes. I am probably making this seem a bit more dramatic than it actually is but it is really tense and you just keep hoping that your plans are able to be carried out and your opponent doesn’t steam roll your Column A stack before you can activate it.
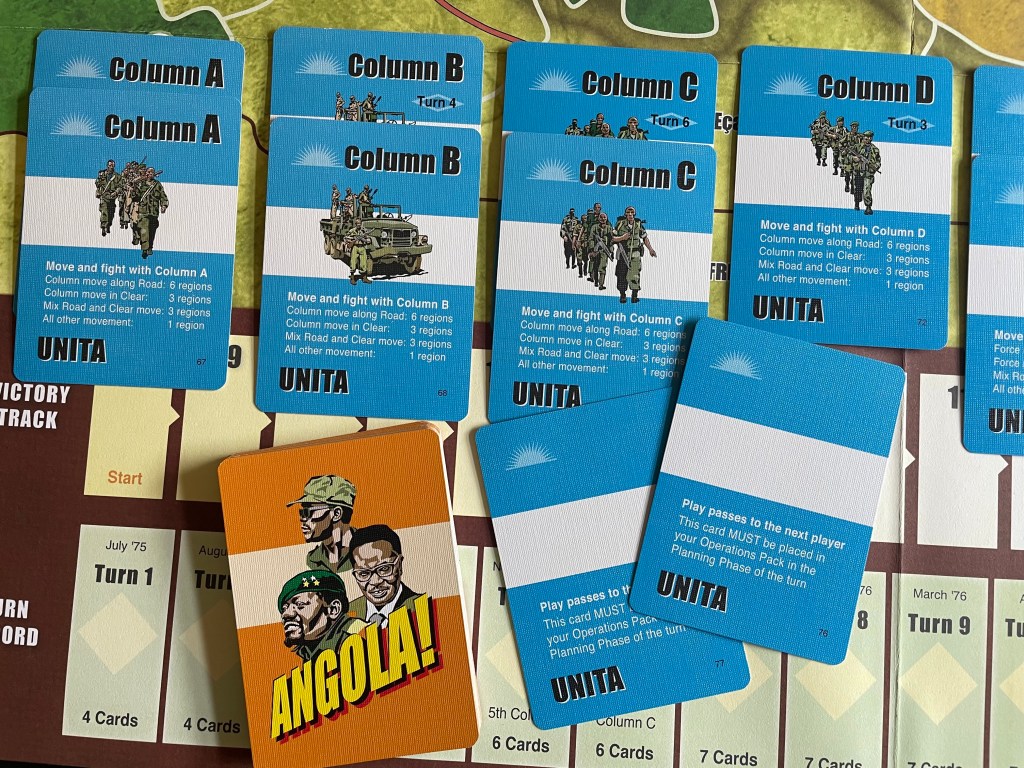
The other really interesting part of the cards is that each player other than FNLA has at least 1 Pass Card in their deck that they have to include in their final constructed Command Deck each turn. In fact, the UNITA player has 2 such Pass Cards and these can be really painful if you don’t plan well and take your pass(es) at the right time! Not being able to do anything for a full turn doesn’t feel good but your only solace here is that every player has to experience a pass and you will have an opportunity to deal them some pain before you have to pass, or even pass again in the case of UNITA. I found in our play that lots of us chose the Pass Card early in our decks as sometimes you do want to sit back and see how things are going to play out before you commit yourself to your course of action. But, if you do this each turn, your opponents are sure to pick up on this tactic and make you pay for it…but that is what is great about this aspect of the game.
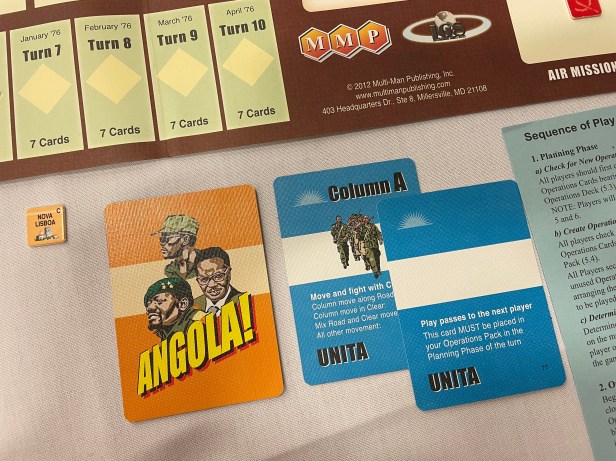
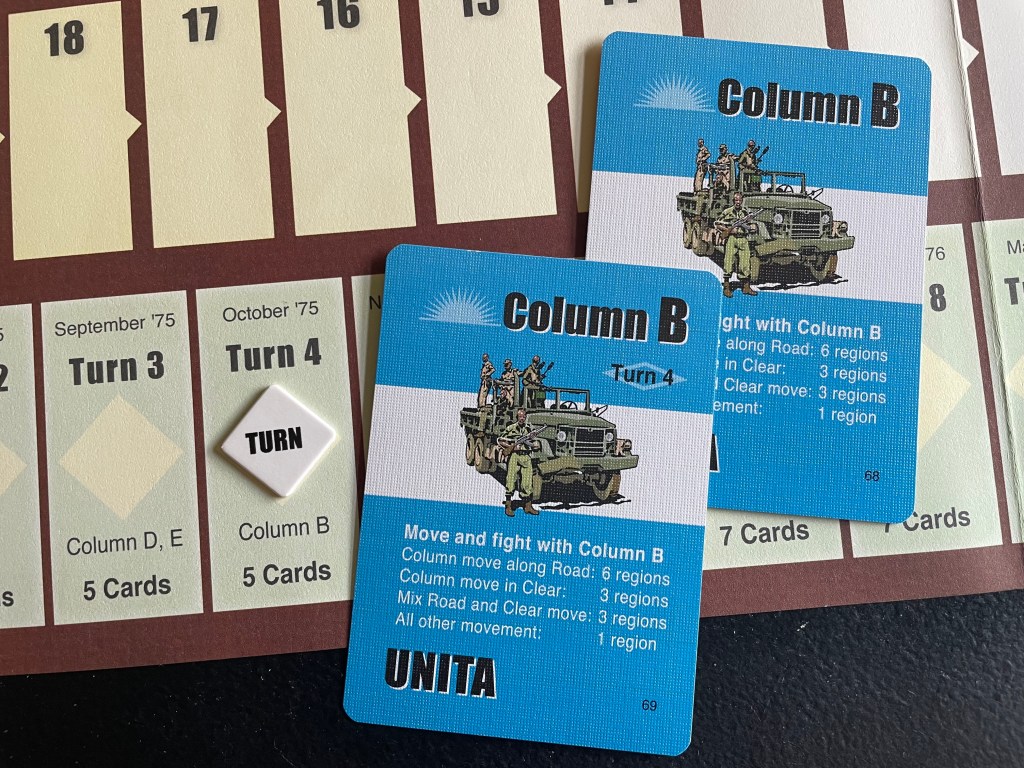
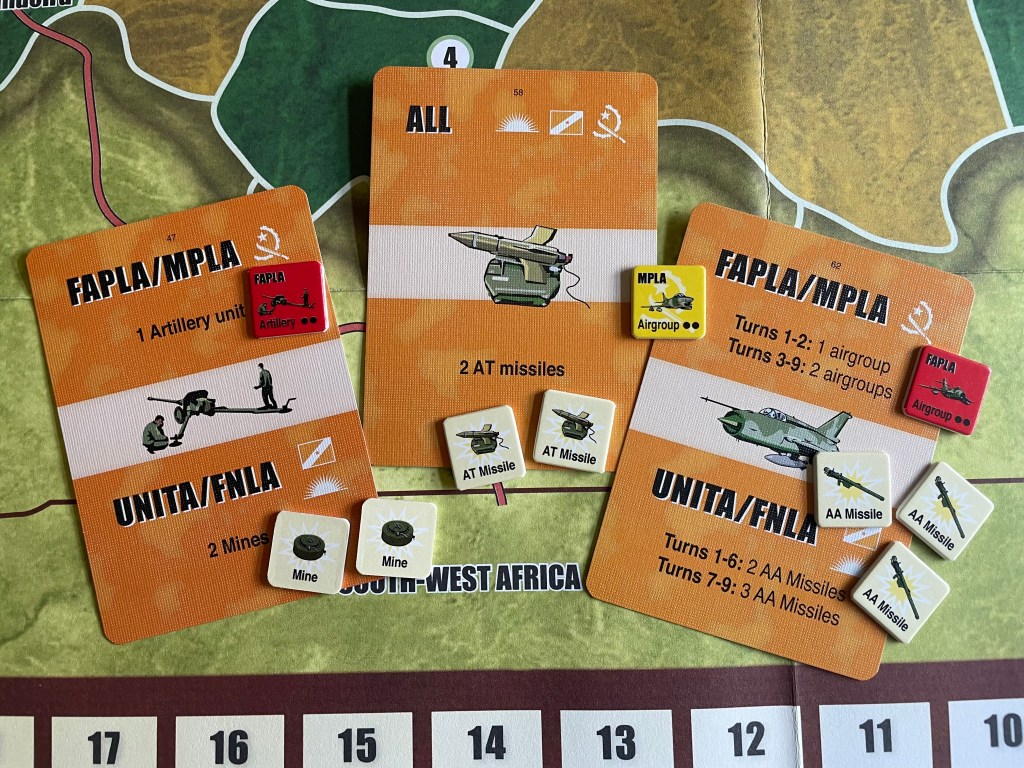
Finally, players will not get access to all of their cards until the turn when they appear has happened. If you look at the Turn Track you will see that certain turns denote not only the number of cards that players can play each turn but also provide reference to various Columns being added to the players available cards. For example, in the picture below in Turn 4, players will gain access to a new Column B card that they can add to their available cards. They might have already had at least one Column B card but now they will have two and this can drastically change how plans are made each turn. When you have more than one activation card for a specific Column, this means you can potentially activate that Column to move and fight multiple times in the same round. This is a game changer as players can then have the flexibility to move a good sized stack and engage in two different battles in the same turn. I noticed that at the end of the game, players had combined their stacks into larger stacks and were activating them twice each turn. I really liked that players had this flexibility but also liked the extra tension it added as you now had to worry about more than one attack from a good stack.
Very Interesting and Unique Initiative System
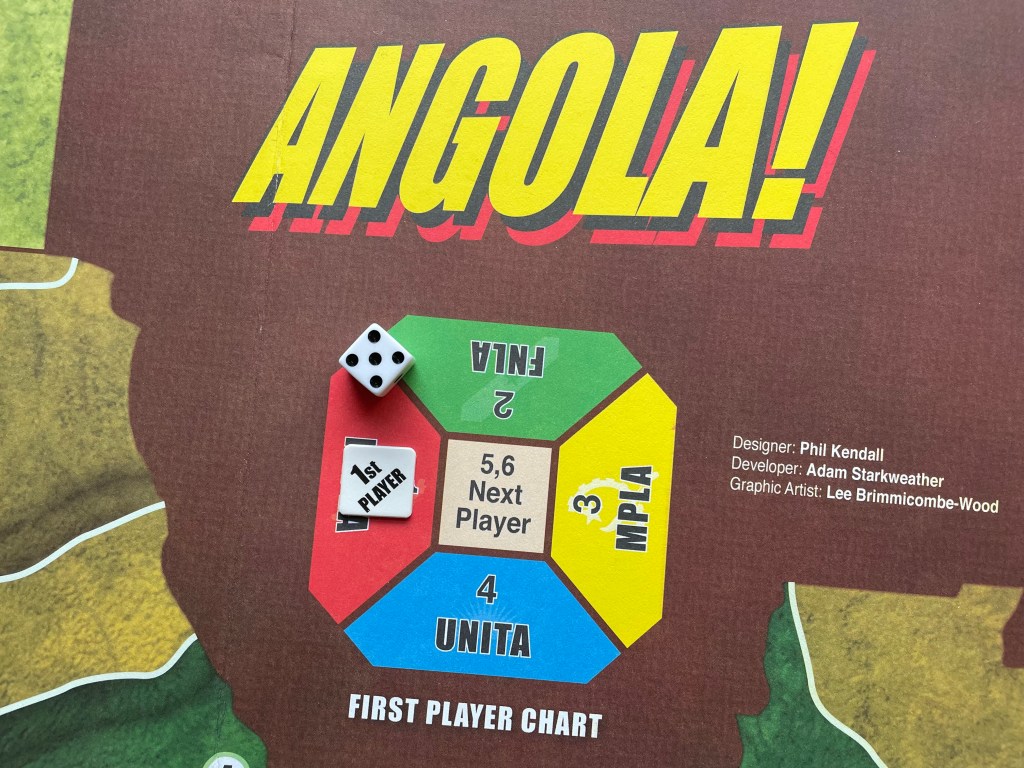
I know I keep using the word unique a lot in this piece but frankly it fits in almost every part of the game. Another very interesting aspect of the design was the way that Initiative is determined, which simply means who acts first in the upcoming turn. First off, this step in the process happens after players have assembled their Command Decks for the turn. Let me restate that so you get it. After the players build their Command Decks for the turn, the Command Decks that determine what and when they are activating their units, the turn order is then determined. On Turn 1, that is a bit different than in later turns though as on the first turn a d6 is rolled and order is determined on a result of 1-4 with 1 meaning FAPLA is first, 2 meaning FNLA is first, 3 meaning MPLA is first and 4 meaning UNITA is first. If a 5 or 6 is rolled, you just roll again until you get a result of 1-4 and assign accordingly. After Turn 1 is when things get a bit more interesting. At the c step of the Planning Phase, the player who was first in the previous turn will roll a d6. If they roll a 1-4, then the assignment of Initiative is the same as for Turn 1 but if a 5 or 6 comes up then the Initiative simply moves to the player that is sitting to the left of that player (and in this game you sit in order as outlined on the First Player Chart.
So what does this all really mean? Well, it means that you can never know who will act first and in what order the turn will unfold. This creates some really interesting opportunities for players to have lots of unexpected happenings. Remember that they have already built their Command Deck before this step and sometimes you try to build that deck according to what you want to do and where. If the turn order changes significantly after you have built this deck and the situation and location of units on the board also changes, you will have to adjust. For example, let’s say that you wanted to activate your A Column and move into an area and attack a smaller stack there because you feel you can defeat them and need to control the city or town beyond them. Well, if the turn order changes and they have the opportunity to go first, they can move that smaller stack out of your range, move it into a better defensible terrain or even move another nearby stack to join with that smaller stack to even up the numbers and make your goal that much harder to obtain. That is the genius in this turn order determining process. It simply makes your plans very hard to rely on….and as wargamers and fans of history, we know that no plan survives contact with the enemy!
This innovation really creates some uncertainty and keeps the game very unpredictable. Players cannot just assume they will get to act when they thought and also that they can’t expect to be able to use their stacks and assets to accomplish the goals they laid out in the Planning Phase. I truly like this more than an I-Go-U-Go format because that is very predictable and lends itself to a total different situation where players can better plan. I like the chaos that this turn order brings and I found it to be a really great way to emphasize the importance of planning and also of having a back-up plan ready to go in case things don’t turn out the way you expected.
Reliance on Foreign Powers – Direct and Covert Foreign Aid
As this Civil War was backed and funded at least partially by outside powers, and the fact that Zairos, South African and Cuban troops fought in Angola, the design incorporates the concept of Direct Foreign Aid and Covert Foreign Aid into the game. At the end of a Turn, the players will count up the number of Victory Tokens that they control. These Victory Tokens represent the control of cities and towns on the board and when a player loses a location, they have tp provide that Victory Token to the player that took it from them. As you can see in the Direct Foreign Aid Table below, players that have a lot of these Victory Tokens don’t get Foreign Aid as those countries willing to give to the cause are always watching and monitoring the situation. You do really well without their help and they will not help but if you struggle and are losing the war and losing ground, they will step in and provide a certain number of random units.
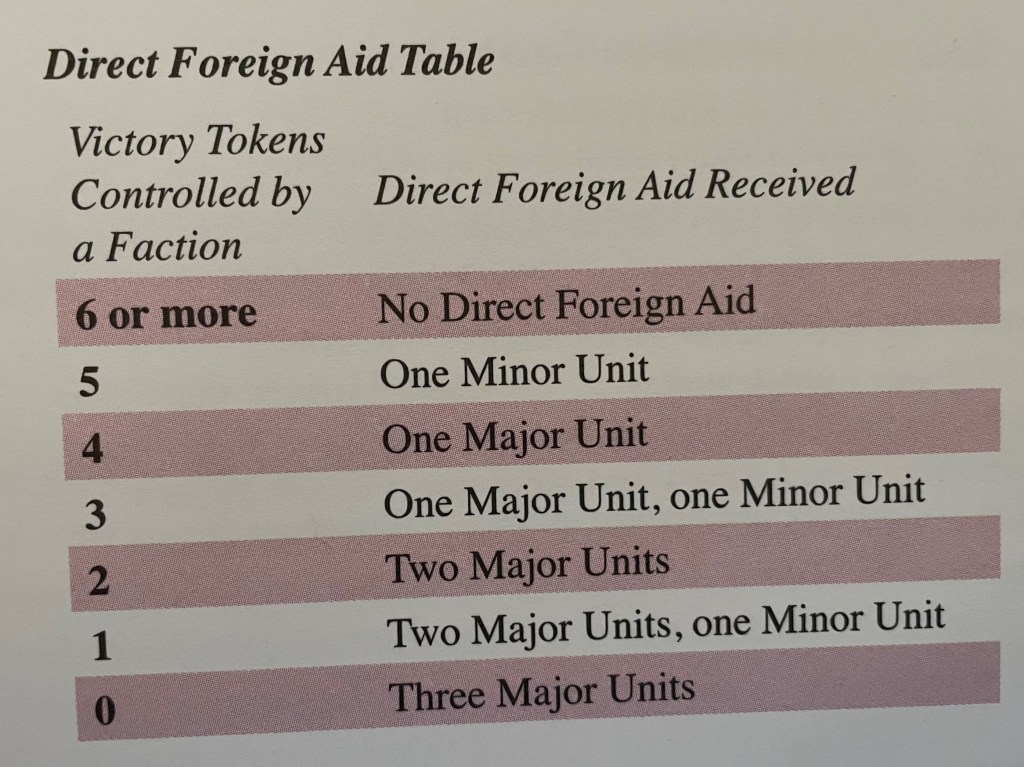
The Foreign Aid will increase as the number of Victory Tokens shrinks. The Minor Units are things such as an engineers that can nullify the terrain advantage of defending units, Armored Cars that provide a number of combat factors as well as Die Roll Modifiers and artillery batteries that can bombard and take out enemy units before combat starts. Major Units are a bit different and can be very powerful. These Major Units are a different color/shade from the controlling faction and typically have the name of the foreign power giving the assistance. These typically are tank units and they add significant combat factors (3-4) and also provide a Die Roll Modifier to combat or Airgroups that can attack troops before the battle starts to eliminate resistance. Both of these more powerful unit types are susceptible to attacks from anti-tank missiles and anti-air missiles.
But this is not where the Foreign Aid stops. They will also give additional units under the Covert Foreign Aid. This Covert Foreign Aid represents advisors, mercenaries and equipment that is provided to the combatants secretly. At the end of this phase, the players will get a chance to secretly bid for a number of reinforcement cards between 0-5. Players will use a d6 to record their bid secretly and then all players will reveal their bids in Turn Order. Then in Turn Order, the players will draw the number of Reinforcement Cards that they bid for and get those assets from their supplies. If a single bid was higher than the other bids, this will lead to a Propaganda Victory for the highest bidder’s opponent. This Propaganda Victory means the opposition will gain a VP. Think of this as your enemy saying to the people of Angola that the FAPLA/MPLA coalition is taking aid from foreign masters and not trusting in the strength of the people. This casts some doubt in the minds of your supporters and foes alike and hurts you in the long run. So this is a really tough choice that matters for the players. The benefits of the Foreign Aid are obvious and when you are behind sometimes you have to simply bite the bullet and bid high so you can assure yourself of the needed assets to get yourself back into the fray. But this choice can put you even farther behind the leaders and you have to think this through carefully. I also thought that this part of the game became somewhat of a cat and mouse game as well. You can bid high an assure yourself of lots of aid with a VP loss, or bid low, even if you badly need the aid to take advantage of your opponent and close the gap with a Propaganda Victory of your own. Really interesting choice here that plays into the strategy of the game.
Terrain is a Major Character
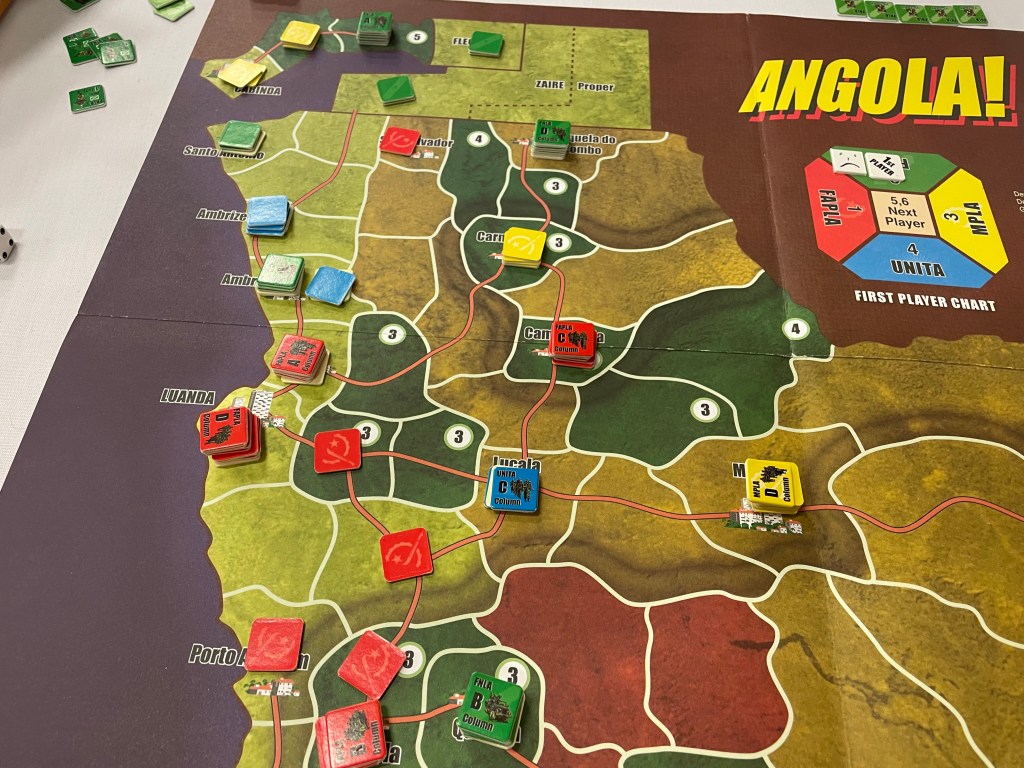
I already mentioned the different types of terrain and their colors being shown on the map. But, Terrain is more important than you might think as it not only provides combat bonuses but also shapes from where and how your enemies might move toward your cities and towns to capture them. The one Terrain type that is really important and can protect you when you don’t have the forces to do so is the Jungle. You will notice located in the large green areas, which represent Jungle, that there is a number in a white circle. This number is the Jungle Rating number and determines how hard it is for troops to move through these areas. The higher the number the thicker and more dense that jungle is. When a player attempts to move one of their stacks out of a Jungle without using a road, they must first roll equal to or greater than the printed Jungle Rating. If they roll less than, they will be unable to move but they then can place a Machete marker in that space with that force which will give a +1 DRM for their next attempt to move out of that Jungle. The reasons these Jungles play such a large role is you generally know that your opponents can only reliably approach your cities and towns through a Jungle with a Road running through it as this will eliminate the need for the rolling higher than the Jungle Rating.
One other point about the Terrain is that both Hills and Jungle offer the defender an additional d6 in combat. Cities also provide the defender with an additional die in combat as long as the attacking force doesn’t contain Engineers. These dice are used to roll off and the higher the dice the better. Once rolled, each player will take their highest result and then the Defender’s Dice Score will be subtracted from the Attacker’s Dice Score and this is the Dice Score. This number can be a negative number and is used to increase or decrease to the Combat Odds.
So in the case of movement and in combat, the Terrain is a major part of the game and players need to study the terrain near their objectives to better plan for what they might need to overcome or protect. I really found this aspect to be fascinating and used the Terrain to my advantage on several occasions.
Victory is Earned Through City/Town Control
In the end, this game is about the control of Cities and Towns. When a player controls a City or Town, they get to keep and control that Victory Token and they will total up the number they control at the end of a round and if they have a greater number than their opponent they can move their Victory Track Marker closer to their victory. If they have more than 15 more than their opponent, this can be up to 3 spaces of movement. But control also is important because players can deploy their Direct Foreign Aid there or even recruit their own forces there. Also if a player controls certain areas identified as key for their faction, this can provide them with additional troops in that are and more soldiers is always a good thing. So for all these interesting and fancy mechanics, players need to remember that their goal is to control the most spaces. This requires them to be aggressive, but to also carefully plan out their attacks so as to not weaken their grip on any of their regions because nothing is worse that throwing all your resources at a single city and gaining that city only to see you then losing 2 or 3 of the ones you controlled.
Long Play Time
The only real knock that I had on the game was the very long play time. In our first play, we had 3 new players and one player who had played a few times previously and the game still took us the better part of 6 1/2 hours. Now, with experience, I believe that the game can be done in less time but still will take 4-5 hours as there are a full 10 turns in the game. The reason for this is that there are lots of very intense phases to the game, starting with the Initiative determination, moving to the building of Command Decks and the executing of those commands and then the number of combats. With 5-7 cards in your hand and four players, that is 20 to 28 cards (with some of those involving a Pass Card) that must be done each and every turn. We found that a single turn took 40 minutes at a minimum. I don’t mind it though with this one as it was very engaging and we saw many ups and downs for each side so everyone believe they were in the game at almost all times.
I do think that this play time could be lessened if the game provided useful player aids. The player aids given simply were copies of the text taken from the rulebook for the major parts of the game including recruiting, combat, foreign aid and movement. Nowhere on the player aid was their a copy of the CRT or the Combat Dice Table that determines the number of dice based on terrain (those were found on the back of the rulebook). These player aids could be redone, and I am sure have been and placed on BGG, but they could have been provided in the base game and aided the game in coming to a bit more acceptable time of conclusion.
Fiddly
This game is very fiddly. There I said it. There are large stacks of counters, sometimes 10-12 high depending on the number of units included and the Equipment counters, and it can be really painful to remember what is included in them and precarious to move them about. I have sausage like fingers and found myself awkwardly fumbling around, trying not to topple my stack or my opponents’ stacks over as I was moving my stacks all the while trying to be cagey and not exposing the inclusion of the best counters in those stacks. That to me is fiddly. The combat was also a bit fiddly and is not your typical odds based calculation and CRT analysis that we find in many wargames. Also, the game is not for the feint of heart as it is long playing and the rules have something to be desired in their organization and structure. It is also not elegant as I have seen many others describe it as. I would say that nothing about this game is really elegant, but…all that being said, it manages to do something truly unique and continually blew my mind how it all just seemed to perfectly work together to create an engaging, interesting and strategically deep game of area control. I for one really love this game and can let it’s warts be overlooked because it precisely does what it tries to do and that is simulate the chaos of a Civil War in Angola.
A Real Classic
My final conclusion is that this game is a classic. The mechanics are supremely interesting, with the Command Deck construction and everchanging turn order, and I love the emphasis on planning. Players can never get comfortable with their position though and must always be on the go to attempt to try and take victory from their opponents. I also really enjoyed the team based approach. You know that I love the COIN Series from GMT Games and its multi-faction approach to dealing with these complex insurrections and civil wars. COIN Series games share lots of common elements with this game, and I would argue that Volko Ruhnke used this game as a basis or inspiration for his COIN system. In COIN, players control different asymmetric factions that are allied but these factions have to win in their own way. They usually share at least one victory condition, so they work together out of necessity, but there will come a time when they will turn on each other for their own personal survival. Angola! doesn’t require players to turn on one another. In fact, they have to work together to the bitter end or they will most assuredly lose together. The two systems are definitely different but there are similarities and commonalities. I just think that Angola! is a great game that creates a true partnership between players and has them work together to win as a team. This is very unique in most multi-faction games and I really liked it. I would play this one at any time and look forward to future opportunities to play again. I would only play this one as a 4-player game though as that was how it was really designed. This one has impressed me and I love it!
-Grant

Glad you liked the game, Grant. It is available direct from MMP: https://mmpgamers.com/angola-p-107
And it is the inspiration for Crown and Crescent, on preorder with MMP, as discussed in your 8/22/22 interview with designer Bryan Collars: https://mmpgamers.com/crown-crescent-p-356
LikeLiked by 2 people
I’ve always been super interested in this. The Angolan Civil War was just the wildest Cold War conflict in Africa – complicated by China and the US supporting the same movements (both to stick it to the Soviets), the major involvement of Cuba (which sometimes seemed to be the senior partner in its alliance with the USSR), and the MPLA government pragmatically making deals with US oil companies. So you could have a Cuban soldier with a Soviet gun defending an American-owned oil rig against a US-equipped, Chinese-funded guerilla.
LikeLiked by 1 person