
Last summer, I came across this interesting looking wargame from a new company called They Were Soldiers: Battle of the Ia Drang Valley that was heading to Kickstarter at the time. The game was a 2-player turn-based operational level design based on the battle for LZ X-Ray during the larger Battle of the Ia Drang Valley in Vietnam, 1965. Since that successful campaign, Cadet has designed and completed another successful campaign for a game called Nguyen Hue ’72: The 1972 Easter Offensive in Vietnam.
They recently announced their next Kickstarter project that would take their system to World War II with Armies & Alliances: Arnhem ’44 – Operation Market Garden. The game is currently on Kickstarter and I reached out to my contact there Kevin Talley who acts as one of the Developers on the team for his input into the design to give us a better picture of how this new game plays.
If you are interested in Armies & Alliances: Arnhem ’44 – Operation Market Garden you can back the project on the Kickstarter page at the following link: https://www.kickstarter.com/projects/647106057/aanda-arnhem-44-operation-market-garden?ref=f42jmx&token=ec030c0c
Grant: First off Kevin now that you’ve completed 2 successful Kickstarter campaigns for They Were Soldiers and Nguyen Hue ’72 how do you feel Cadet Games is coming along?
Kevin: Well, the research, design, prototype and playtest part of the company is way ahead of the “funding, production and inventory” side of things. Since we started making games in 2020, we have 8 games finished, but only 4 of them Kickstarted (including the two-in-one with They Were Soldiers/Hill 875 and now this one. So, Hamburger Hill, 13th Valley, Laos ’71 and Blitzkrieg ’40 are ready to produce, but those are still going to take a couple years yet. In the meantime, we have a whole slew of designs getting through development – which will make the impending production backlog ever-larger. I guess it is a good problem to have.
Grant: What lessons have you learned that you have brought to bear on your new campaign?
Kevin: We got a lot of feedback from the pledge crowd, so we try to learn from what the community wants. Adding Hill 875 to the “flip side” of They Were Soldiers was a suggestion from a KS backer, as was the “Marc Von Martial” upgrade of the map art for Nguyen Hue ’72 (and that was a GREAT idea). There are a lot of good ideas that come from the community, so we are listening.
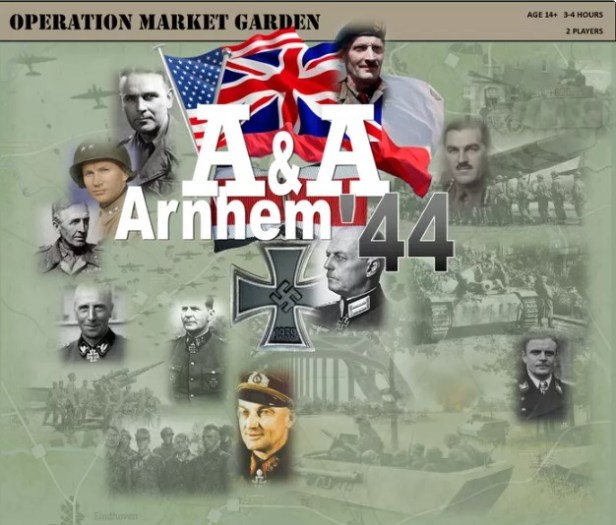
Grant: What is the focus of your new upcoming game Armies & Alliances: Arnhem ‘44 – Operation Market Garden?
Kevin: We have all talked about what we wished to see as the next operational title for an “A&A” style game – and Arnhem stood out as a perfect fit. That campaign is just perfect for a famous, short, tense, balanced and strategically important historical WWII wargame. Having waited long enough for someone else to make it, we finally just did it.
Grant: What does the A&A in the title stand for? What is the focus of this new series? Is the A&A a play on Axis & Allies? What should that tell gamers about the design?
Kevin: Armies and Alliances is “our” A&A, and the reason we decided to go with that moniker is because that is exactly what everyone says when they see the game…”Oh, it’s A&A Arnhem.” Right? So we thought why not call our WWII series what everyone else was gonna call it anyways? Hence A&A.
Well, here’s the truth about that. We know that “Axis & Allies” is their trademark, so we can’t call our games that (duh). But they are very consistent with the brand – it is always “Axis & Allies” fully and clearly – not “A&A.” So, our letters stand for something else and we point that out on purpose. If one googles A&A, for instance, you get 32 million business results – everything from plumbing to dental, optical care, automotive service, accounting, wholesale toys, jewelry, everything. It might be the most “un-trademarkable” set of letters in the English language. As to what it says about the design? Well, it is a low-to-medium complexity wargame using minis and larger maps that plays quickly and has a large-print, highly illustrated, simple ruleset. Sounds like all our games, doesn’t it?

Grant: Who is the designer of the game? What was his design inspiration?
Kevin: RJ Mills designs all of the games. His first wargame ever was SPI’s original Arnhem (he told me he had the little folio version his grandparents bought him for a dollar at the Mountain View, CA flea market back in ’79). That game had issues with stacking and the combat system, totally abstracted air and some other quirks. But it had the perfect scale of combat and general complexity for a “Market Garden” game. So, RJ started with that scale and OOB and designed a completely new game for minis. With cards (like we always use), air rules, totally different stacking, combat system, airborne supply, air defense, victory conditions, and more.
Grant: What was important from the history of Operation Market Garden to model in the game?
Kevin: The combat system had to be one that allowed for the actual historical outcomes of Market-Garden combats between multiple battalions in a low-complexity “A&A” style game. This is not easy to do. Frost’s battalion held out against repeated attacks by larger forces over a period of several days, same thing with the Germans protecting the south bridge approach at Nijmegen. A traditional A&A-style “dice/hit” system would never work (all the units would be destroyed quick and in big piles off-map, like A&A D-Day). SPI solved the problem in their original Arnhem design by basically “throwing out” their whole combat system/CRT for infantry defending in a city, but we thought that was lame. Our solution is one of the coolest and simplest combat systems ever. It is really something. Variations of this combat system are already in other designs we are making.
Grant: Is there a plan for games on the other two bridges that were targets of Operation Market Garden?
Kevin: The game is the whole campaign – all the bridges from the Eindhoven AO in the southwest map up to Arnhem in the Northeast map. Son, Veghel, Hell’s Highway, Nijmegen, Groesbeek Heights, etc. are all covered at 2,000 meters per hex. The Arnhem ’44 name is used for easy recognition, but the game covers all bridges and battle zones of the whole operation.
Grant: What is the general flow of play and the Sequence of Play?
Kevin: Allied turn is first. Draw allied cards. There is an air phase after T2 and an Airborne supply segment after T3, then allied move, combat. Next is German Cards, move and combat, then move the game turn marker up by one and start the next allied turn.
Grant: What is the scale of the game? Force structure of the units?
Kevin: 2,000 meters per hex, 1 turn set (Allied/German) = 1 day of the battle. Units are mostly battalions.
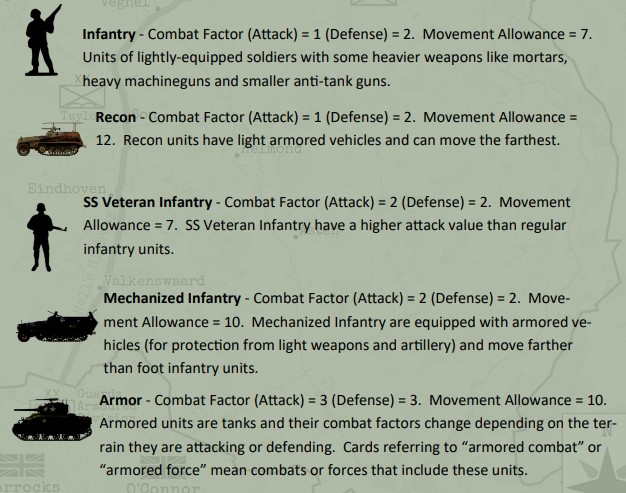
Grant: What different units do players have available?
Kevin: There are lots of different units to make sure that the feel of the battle is replicated. There are infantry, SS Veteran infantry, recon, mechanized infantry, armor, heavy armor (the Germans had some of the new “Royal Tigers” in the battle), artillery, ABN artillery, 88MM Flak Arty, Self-Propelled arty, Fighter aircraft, Bomber aircraft and of course Transport aircraft to bring the airborne units into the game. There is also a special Allied engineer unit that can be pretty interesting as there are bridges that need to be repaired.
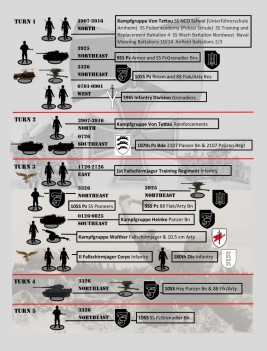
Grant: What are the Reinforcement Cards used for?
Kevin: Like many games, these serve as a place to put the little minis and markers at setup. With each turn, during the movement phase, the players deploy those units that are marked to enter for that turn at whatever hex or hex range they are allowed to enter the map at as identified on the card. Since the map starts out almost clean, with just 6 German units on-map at start, it is cool to see all the little minis for both sides on the cards – it’s like seeing a little parade for the OOB for both sides on the table.
Grant: How do Airborne units come into the board? What special rules govern airborne landings?
Kevin: The airborne battalions “land” by being placed within 1 hex of a designated map hex (indicated on the reinforcement card) for each brigade/regiment during the allied movement phase – mostly this happens on T1. They can’t land on an enemy unit, but they can land in a ZOC. During their landing turn, they can move after landing, but their allowance has been cut back because most of their move points are considered “used for the drop.”
Grant: How do airborne units draw supply? How does this differ for airborne artillery units?
Kevin: ABN units are “in-supply” as long as they are within 7 hexes of their particular division DZ (a designated hex that never moves). If they go out of that range, they can still be useful for defense, but they are considered OOS (and cannot attack and move at half their normal allowance).
ABN arty units have special rules that require them to be in the 7-hex range also, but they have to be supplied with ammo during the “airborne supply segment” of the air phase, or they can run out (and then they can’t fire). This little mechanic was put into the game as an easy way to duplicate the supply-drop dynamic that really hurt the British 1st ABN during the operation. The airborne divisions in the game aren’t very powerful in terms of firepower, and their arty units are their big punch in terms of combat factors. If those run out of ammo and can’t fire, it really has an effect on their attacking and defending capability. So, even though the mechanic is unique to arty ammo supply, it serves the purpose of tying successful air-drop resupply to division capability without a complex set of rules. The Germans can shoot down the re-supply planes, recover “off-target” supply drops, and snatch drops that land in contested hexes. All of this happened in the battle, so it adds a cool dimension to the air phase where both sides are hoping for the die to roll their way, so to speak.
Grant: How do you handle canal and rail bridge demolition?
Kevin: Just like the original Arnhem from 1976, it’s just a simple die roll that happens whenever an allied unit enters a hex that has a canal bridge or RR bridge hexside. If the bridge blows, its gone for the game unless the special allied engineer unit can repair it. If it doesn’t blow, it stays as “intact” for the whole game also. And, just like “Arnhem” from ’76 (and the real battle), the big bridges don’t get blown up. The ones at Grave, Nijmegen and Arnhem cannot be destroyed – so it is the handful of smaller “canal” bridges that matter as far as holding up XXX Corps getting to Nijmegen. There are 3 or 4 of these that can really matter, but the allied Engineer unit fixes a bridge quick. The worst one to have demolished is actually what happened in real life, with the first one in the southwest corner of the map blown up at Son. Each blown canal bridge basically costs an extra day in moving the allied force in range to attack at Nijmegen, which is the critical crossing that controls a German decisive victory. And the clock is ticking because the Brits can only hold at Arnhem for so long.
Grant: How do Zones of Control effect movement and supply?
Kevin: Units must stop when entering an enemy ZOC, and they pay a 1-point MP penalty to exit a ZOC. Supply cannot be traced through an enemy ZOC, unless a friendly unit is in the affected hex to nullify that ZOC for supply-trace purposes. This is a big deal because the whole XXX Corps operation is supplied along that one road, and the Germans have a ton of little units (not powerful, but still units) that can be deployed over several turns all along the allied supply corridor waiting for the right moment to move into a position to throw a ZOC onto the road. Because supply state for movement purposes is taken at the outset of the Allied turn, even if a simple Allied unit movement “opens” the road, all the Allied XXX Corps units located “past the blockage” have to move at ½ allowance for that turn’s move phase. If this happens such that combat is required to open the road, only “in-supply” units can conduct normal combat, so that creates big trouble sometimes. At the last turn, the Germans get to take score and bonus points for any OOS Allied units – and so it’s easy to see how this can be a HUGE deal for the German player. Historically, this was a very big deal, with German arty or even a single StuG III or Pak 40 often blasting the supply columns supporting the advance, and convoys of tanker trucks with the XXX Corps fuel delayed or destroyed as they came up “Hell’s Highway.”
Grant: How does combat work?
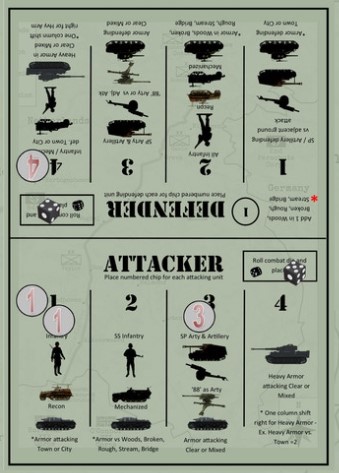
Kevin: Different unit types have different combat factors. When a combat happens, the units stay on the map, and little number markers go on the Battle Board in their little places, representing the unit factors for both sides (and any contributing terrain and supply effects too). Any cards that add factors are placed as well. Then a die is rolled for both sides and it goes in its place on the BB too. You add everything up for each side and the number corresponds to a line on the CRT – where your little force roundel is placed (either as “attacker” or “defender”). Losses are applied by rule (for more intense combats), or on the differential (for smaller engagements). Sometimes units can choose to retreat rather than take a step loss. It is super-easy but accounts for elements that more complex systems usually include – terrain, supply state, leadership and special effects (cards) – without a complex odds-calc CRT, rules for column shifts, a chart of DR modifiers, etc. It even looks simple. It works for the battle perfectly.
Grant: How are cards used in the design? Can you show us a few examples?
Kevin: Cards do all kinds of things in the game – and allow for a ton of what we call “easy chrome” in any design. That’s why all of our games always have the cards. An example is the “PIAT” card, which gives the British airborne a +2CF combat factor bump when played in any one combat against German armor or recon elements. A German example is “Commandeered Bicycles”, which adds 3 MP to any one infantry or SS Infantry unit for that turn’s movement phase. Both players get to use one card during their turn and another during the other player’s turn of each game day (so they can each “play” 20 cards, theoretically over the 10 turns). Cards can affect the air phase, supply dynamics, combats, movements, retreats, reinforcements, bridge demo, river crossings, air drops, AAA, die rolls, you name it. And, because of how the draw works, there is always a buried card – so the one you are counting on might never turn up! Talk about cool. It makes each game unique each time. The Allies even have a card called “Special Jeeps” that makes it possible for 2 battalions to make it to Arnhem Bridge during the first turn landing and movement phase, instead of just 1. Anyone who knows the battle knows how big this can be for the Allies (but you’d have to have the card in your starting hand or your first turn draw for it to make a difference).
Grant: What is the makeup of the Combat Results Table?
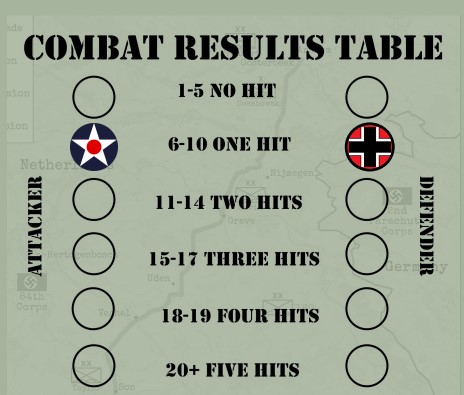
Kevin: We got this CRT from another game designed by one of “our guys” years ago. If you look at it, you will quickly see how simple it is – and how it perfectly works to progressively adjust probability with very small changes in applied factors. Not only that, but this CRT progressively decreases the importance of the die roll as mass is applied, to the point where the DR doesn’t even matter at the highest applications of combat power based on stacking and the combat rules. And, because loss determination is based on the differential, the OTHER GUY’S die roll matters almost every time as well. Super simple, and yet very intricate in how it accounts for each combat factor, card effect, die result and opposing die result. I think it’s just brilliant.
Grant: Who are the artists on the project? What about their style fits with this game?
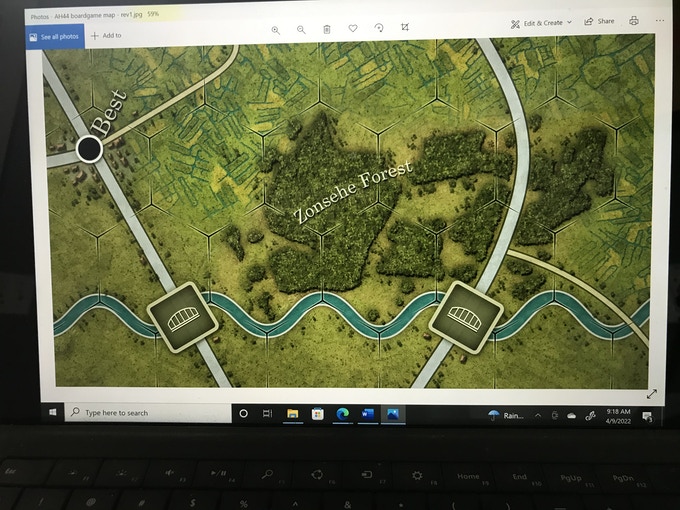
Kevin: We had such a great experience with Marc Von Martial on the 1972 Vietnam Easter Offensive game, that we immediately approached him for our “Market Garden” map as well. The prototype is what we have pics for on the KS, but the final version is going to be even more beautiful. It will be the coolest Market Garden map ever made, rest assured.
As for all the rest, RJ does all the layout for everything, as usual. Box art, Rulebooks, game cards, OOB cards, roundels and markers, most of that stuff is collaborative (I help there too).
Grant: How does the Air Phase work?
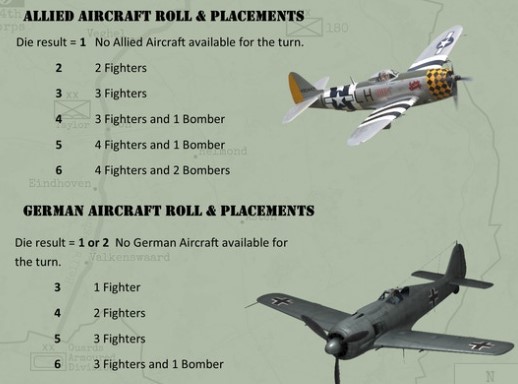
Kevin: This is a very cool part of the game. The Allied player rolls a die and gets a certain contingent of planes based on the roll. They then place their planes wherever they want (not knowing whether or where the Germans might get planes). Then the German rolls and finds out what they get to work with (odds are it will be less than the Allied player, but you never know what the dice will do). Then the German places their planes, if any. If fighters occupy the same hex, we have air combat. If not (or after Air combat is over and someone controls the airspace), then we have air defenses and ground attack rolls. It is a lot of fun. The actual battle didn’t really feature much in the way of effective Allied air (or German, for that matter), but there were a couple of notable instances where it did (or might have) mattered. While it isn’t a huge part of the design, it can make a difference for both sides – especially if the player knows or can see where that difference might be.
Grant: How does Air Combat work?
Kevin: If fighters occupy the same hex after both sides have placed, then you have air combat. High dice wins (subject to card effects). So, neither side’s planes are any better than the others, mass obviously matters most. Bombers and transports are automatically shot down if they are unescorted. Nail biter. I should add that the transports are only engaged during the “airborne supply” segment – not during the reinforcement drops of the movement phase. So one lucky German fighter can’t smoke the entire reinforcement drop of the 327th Infantry, for example.
Grant: What does the map look like? What strategic considerations on movement and attack are created by the layout?
Kevin: The map is beautiful. Marc seems to have a knack for terrain that looks like it is real and being viewed from a “medium altitude” airplane. I really like his graphic style. Because of the 2000m hex scale, it REALLY works for this map. I should add that, in the first place, the guys who designed the original Arnhem back in ’76 really did great with the chosen scale. It allows for the entire campaign to be included – from Eindhoven to Arnhem – and the players can really see how the whole operation is dependent on the sum of the parts. The other thing that happens because of the layout is the “off-map” German movement. This is a big part of the game (and a place where our design differs substantially from the old game). The possibilities for German incursions along the Allied LOC are greatly enhanced with this dynamic, and it makes for a far more complex tactical problem for the allied player each turn, especially as the game progresses.
Grant: What scenarios are included?
Kevin: The 10-turn historical campaign is the game. Because the final score isn’t taken until the end of German T10, there usually isn’t a clear winner until that time (though, even if the German got all of XXX Corps OOS on the last turn, if 15 of those units were over the Rhine by then it would still be an allied win).
Grant: How is the game won?
Kevin: The Allies win a decisive victory by doing what they planned to do historically – get the XXX Corps over the Rhine at Arnhem. The Germans win by preventing this from happening, but can usually only get a decisive victory by keeping the XXX Corps units on the south side of the Waal (preventing the crossing at Nijmegen). Minor victories for either side happen when some combo short of these objectives is achieved, with the deciding factor coming down to a few points from the loss differential or the number of allied units OOS. Either side can indeed win a decisive victory, the game is quite balanced, but it isn’t likely to happen for either player unless they have a good plan at the outset. The 10 turns go quick and there isn’t a lot of time in the game to recover from errors.
Grant: What has been the experience of your playtesters?
Kevin: Often, the game appears to be going quite evenly, when something “gives” someplace that opens up the “bonus point” calculus. On the German side, the eventual defeat of the Brits holding the Arnhem bridge is huge, for the Germans can’t get their heavy armor into the Betuwe (are between Arnhem and Nijmegen) until they can cross that one bridge. There is a ferry, but it can’t handle the big Tiger II’s. On the Allied side, it is the successful crossing of the Bridge at Nijmegen, without which all of the XXX Corps units are scoring bonus points for the Germans (any that are south of the Waal). Somewhere in the middle (both of these occurrences happening) is where most games get interesting – literally “in the middle” of the Betuwe – is where the Germans are facing off against the XXX Corps during the final turns and victory comes down to each side’s combined losses and whether the German has a ZOC someplace across Hell’s Highway on the last turn. Because it can go either way each time, and the thing has some very good balance, playtesters who began their experiences with a lot of trash-talk about “wiping the floor” with the other guy and such were almost universally humbled by the end of game 1 into contemplations of what they would do differently next time. Like all good wargames, there are preferred formulas to solve the puzzle, and figuring them out is half the fun. Add in some cards and dice and you really have a project!
Grant: What stretch goals are available?
Kevin: We kept it simple, like Nguyen Hue ’72, and just offered some quantity savings (especially on the shipping) for folks who might have a group or a friend who would love a gift. Since we are going to make these games with all the goodies anyways, we didn’t want to bother with unlocking certain types of minis or certain cards, although we might do that kind of thing in the future. Our backers really haven’t asked for that kind of campaign in our last two successful Kickstarters, but you never know what might be “cool” down the road.
Grant: When can we expect the game to be fulfilled?
Kevin: Our production partners are very quick getting stuff turned around. We had the money for the last campaign on Feb 17th or so and they took the files and had a complete sample game done by March 25th. Production is happening now for the Easter Offensive Game and we expect to have it in our storage facility and shipping before October. As such, our timeline for this project (the KS goes ‘till June 30) is to have the games shipping to the backers by this coming March.
If you are interested in Armies & Alliances: Arnhem ’44 – Operation Market Garden you can back the project on the Kickstarter page at the following link: https://www.kickstarter.com/projects/647106057/aanda-arnhem-44-operation-market-garden?ref=f42jmx&token=ec030c0c
-Grant
