Nubia: Egypt’s Black Heirs is a solitaire game where the player controls the Black African civilization made up of three Christian kingdoms in the Nile Valley including Nobadia, Makuria, and Alodia. The culture of these kingdoms goes back to Ancient Egypt and the legendary Kingdom of Kush but is now far removed from those days of glory and survival is now the focus. The game is set in 1172 AD and Nubia is currently under siege from various other tribes and kingdoms. The game covers a period of 400 years, and will see the player attempt to defend the Nubian civilization against the pagans of the Funj, and a jihad of marauding Arabs who have designs to acquire your land.
The game is a States of Siege design where enemies will advance down five different Path towards the capital city of Soba. The player will have to manage their affairs, dealing with the abilities of new Kings, staying in communication with the Coptic Church through various skill levels of Cosmopolitans (Priests) and seeking the aid of other Christian Kingdoms such as Portugal. The player will gain a number of Efforts each turn that will be used to take various actions on the Paths and in the management of their kingdom.
In this series of Action Points we will cover the Game Map, examining its various Paths, Tracks, Boxes and the Royal Assets that the player must manage to fend off their enemies, take a look at the makeup of the Event Card Deck and how the cards drive the action by confronting the player with social, political, military and economic challenges, examine the various options that the player has in the assets held in Downtown Soba and on the Royal Assets Track including how your Uru or King is chosen each round, how they are used and how they might die, the use of Bishops, arranged marriages and throwing your daughters to the wolves in the name of forging alliances, we will cover the various ways that the player can attack the Meks on the Paths and some of the special locations and finally we will take a look at how Victory is achieved or Defeat happens.

Game Map

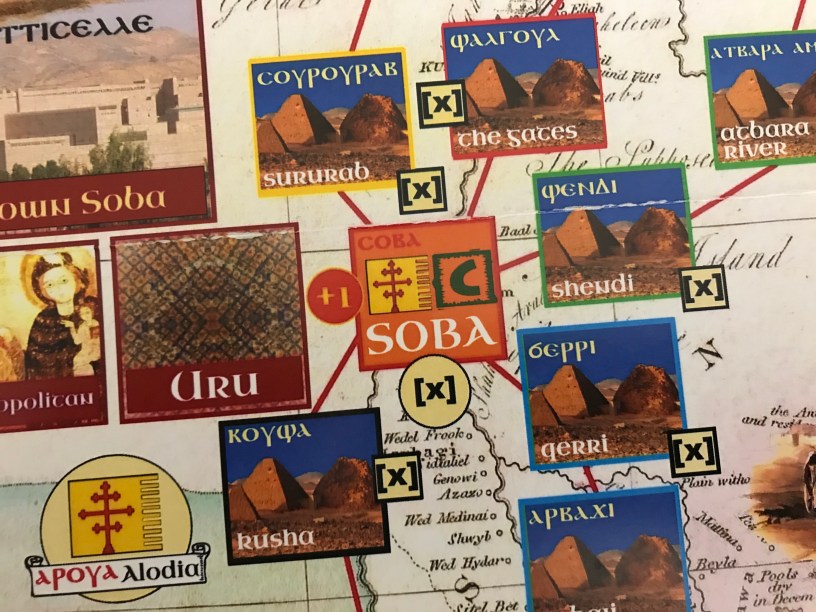
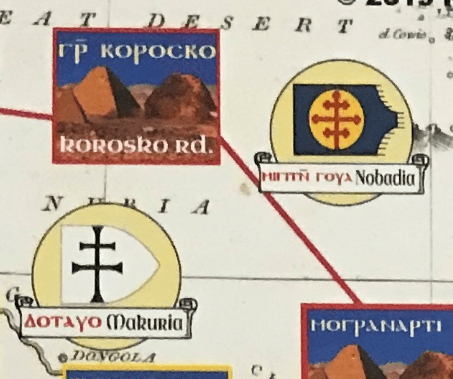
The Game Map is an 11″ x 17″ full color sheet that shows the upper Nile River Valley, which is roughly equivalent to modern day Sudan. The main focus of the map is the center which represents the capital city of the Kingdom of Alodia named Soba. The designer mentions that he simplified the existence of the three separate kingdoms for game purposes and chose Alodia as the center point of the game. If you look closely at the map you will notice that all three flags of each separate kingdom are included on the Game Map with both their traditional Nubian name and English name after. These flags serve no game purpose but it is nice to see this type of historical detail included in the game as it sets the tone and theme of the struggle.
Paths
The entire focus of the game is the Paths that lead to the capital city of Soba. If Soba falls to an advancing enemy, which are referred to as Meks, the game is lost. You will notice that there are five separate Paths that lead to Soba ending in the orange Soba Collapse Box. Each Path is made up of several boxes that are referred to as Lands with their names written in Old Nubian at the top and English on the bottom of the box. These Paths are where most of the game action happens and each of the Paths is assigned a letter (A, B, C, D and E) as well as a corresponding die value shown with a red die shaped square box and a number of pips drawn in them. These correspond to die rolls that are made throughout the game.

All of the Paths consist of 5 Lands with the exception of Path B which is a bit longer with 7 Lands. This simply means that Path B is further from your enemies goal of sacking the capital of Soba than the other Paths. The Meks located on the Paths are activated only by the 27 Event Cards and the following is a break down of how many Event Cards are associated with activating each of the Paths.

As you can see, Path B and C is where most of the action happens, with the most activated Path being Path C and the least activated Path being Path D. We will cover this a bit more in our second post when we discuss the Event Cards.
Faras
There are several interesting elements that are included on the tracks that are important to the play of the game. The first element we will take a look at is the Cathedral icon located in Faras on Path B. At the end of the turn, if Faras is Mek controlled, meaning that the red Ayyubid Mek counter has progressed to or past this box, the player will have to replace the green Beja Mek with the green Kanz Mek on Path C. The Beja Mek is a bit weaker with a Defense Value of 4 as compared to the Kanz Mek that has a 5. This means that it will now be more difficult to defeat the Kanz Mek that inhabits Path C. This change is permanent as the Beja will never return.
This is significant as the earlier this happens in the game the worse for the player. As Path C is the Path that is most often activated vie Event Cards, the player will have to focus most of their efforts on that Path in fighting back the advancing green Mek, whether the Beja or the Kanz. As you will have to roll a D6 and hope to equal or exceed the Defense Value of the Mek, you should try to stave off the advance of the Ayyubid Mek on Path B as long as possible. If you do this it will be much easier to fight the green Mek back to keep them from advancing into Soba and ending your game.

The other effect that is tied to Faras is the availability of the Shenoute Metropolitan (Priest), which is the best of the 4 Metropolitans available to the player. These Metropolitans are also included in their own draw cup and are drawn when the Event Card directs the player to and their printed number is added to that of the Uru to total the players final Efforts available for the turn. The Metropolitans have the following numbers: 0, 1, 1 and 2 (Shenoute). This means that 25% of the time, you will have no additional Efforts, 50% of the time you will have 1 additional Effort and 25% of the time you will have 2 additional Efforts.
If at the end of the turn, a Mek is located in Faras the player will remove the Shenoute Metropolitan from the draw cup. If the player ever gains back control of Faras, the Shenoute will be returned to the Metropolitan draw cup. The fall of Faras is tied to a historical event in 1235 AD that disrupted contact between Nubia and the Coptic Pope in Cairo. The loss of the Shenoute means that the Pope is sending less capable prelates to Nubia.
Defections
As you follow each of the Paths toward their terminus at the orange Soba Collapse Box, you will notice in the final Land before Soba there is an [X] symbol in a yellow box that is referred to as a Defection. If at the end of the turn, for each of these Lands that contain a Mek the player will have to randomly move one of the Uru counters from the draw cup to the Mosque Box located in the lower right hand corner of the map. These Uru are your Kings and they each have a printed number on their counters that are randomly drawn when the Event Card is played. The Kings provide their printed number toward the total Efforts (actions) available each round for the player.

As these Defections occur, sometimes it can be a good thing as it will thin out your available pool of Kings and get their lower numbers out. But, unavoidably you will also randomly draw one of your best Kings and this can be devastating. You must also remember that as the Uru are placed into the Mosque Box, they stay there and each time there is a Collapse Check when a Mek enters the Soba Collapse Box, the player will have an increased chance of failing the roll as you are trying to roll higher than the total counters there on 2D6. This Defection is very thematic as the allied noble houses are reacting to this danger and are losing faith in your leadership and jumping ship before the inevitable collapse.
Downtown Soba Boxes
As you look to the left of the orange Soba Collapse Box, you will notice 4 boxes that are used by the player as holding boxes for their various drawn pieces as well as available assets that can be used throughout the game. These boxes include the Uru Box, Metropolitan Box, Bishops Box and Downtown Soba Box.
In the Downtown Soba Box, the player will place the 4 Land Sale Tiles, the 2 Dynastic Marriage Tiles and the 6 Princess Tiles. These are used to gain additional Efforts throughout the game and will be explained more in depth in a later post.
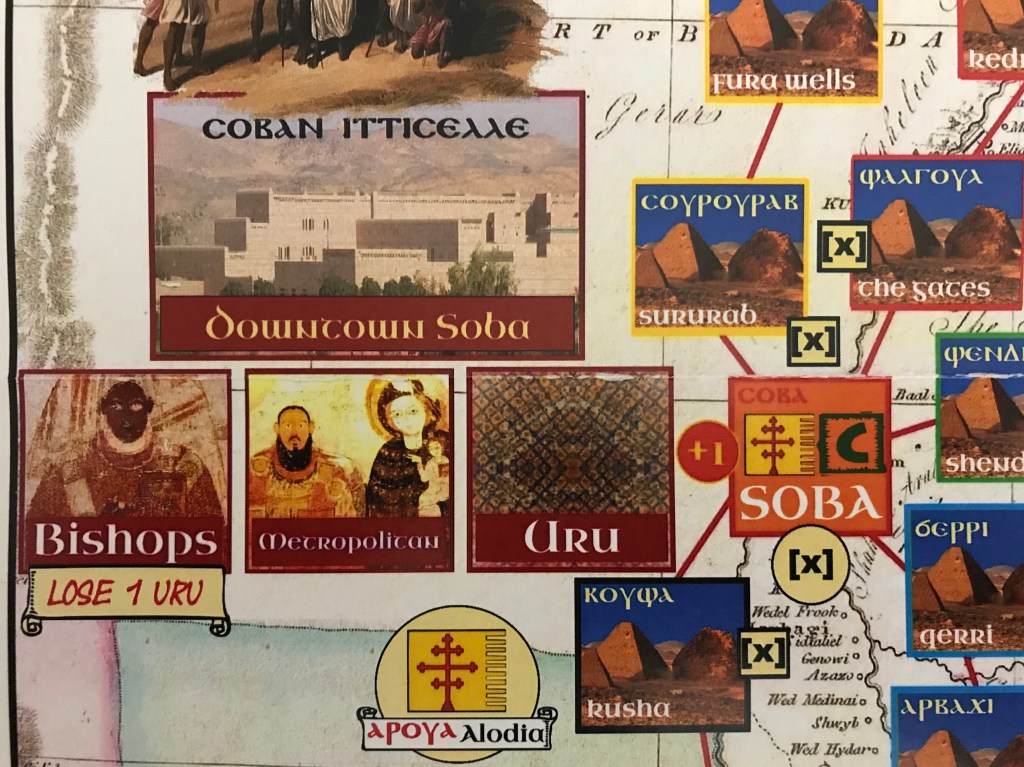
In the Bishops Box, there are three Bishops that can be used to gain a single Effort that must be used immediately. But there is a price for this action as the player must discard a random Uru from the draw cup and place them in the Mosque Box similarly to Defections. Bishops were able to travel anywhere, had lots of local connections and were respected in the Nubian Kingdom and as such made the perfect spies to gain key insights into goings on and conspiracies in the ranks but their use in this way brings disrepute on the monarchy and decreases their power base.
The Metropolitan Box and Uru Box are simply a holding space for the drawn Metropolitans and Uru for that turn so the player can readily see how many Efforts they have to spend.
Crusade Level
Located between Path B and C is positioned the Crusade Level Round Box that will change throughout the game and is connected to the Land Sale Tiles in the Downtown Soba Boxes. There are a few Event Cards that direct the player to roll a D6 to determine the Crusade Level. This Crusade Level is representative of how the Crusades are going in the Holy Land and how it is effecting things in Nubia. The Crusade Level has 3 different levels; 0, 1 and 2. The higher the number, the poorer that the Crusades are going for the Christians and the Muslims are diverting their attention toward other goals, namely spreading into Africa and buying up valuable land along the Nile. When the player decides to sell land to gain additional Efforts by selling a Land Tile they will have to reduce the final number of Efforts earned by the Crusade Level. So, for example, if they sell a 4 Effort Land Tile while the Crusade Level is at 1, they will only net 3 additional Efforts as they have to reduce the number by the Crusade Level. My suggestion on this aspect is that you shouldn’t worry too much about it as it is a random roll to determine the Crusade Level and it will only change a few times per game so you cannot necessarily control this aspect. Simply be ready to sell when the Crusade Level is in your favor as it may change.
There is a penalty to Sell Land though as you will have to reduce your Army Asset on the Royal Assets Track by the current Crusade Level when you sell. So beware! This can hurt you more than it is worth as you have to keep those Royal Assets high and if they get low you can force Defections and Collapse Checks.

Slavery Pool/Ethiopia
I appreciate that these type of issues are being included in wargames nowadays but it still makes my skin crawl a little bit. Slavery was a part of the struggle between Nubia and the various pagan tribes along the Nile River. After wars, slaves would be captured and then sold or traded to other tribes. In the game, you will notice that there is a circle located to the right of Path D that is called the Slavery Pool. In this circle is kept the Slaves counter until it is obtained by the player.

If the player ever defeats the Shilluk Mek on Path D (not the later Funj Mek) the player may take the Slaves counter and place it in the Downtown Soba Box. Possession of this counter gives the player the chance to block one Arab Mek as it attempts to move down their Path. But, it can only be used against an Arab Mek. An Arab Mek is identified with a white oval behind the Defense Value on the Mek counter. When the Arab Mek attempts a move, the player must simply return the Slaves counter to the Slavery Pool. This is an important aspect of the game for the player and obtaining the Slaves counter will aid in keeping the Arab Meks, including the Ayyubids, Juhayna, Kawahla and Kanz, at bay on Paths A, B and E. Once the Shilluk Mek is replaced by the Funj, the Slaves counter is removed from the game. The historical reason for this is that in Arab culture, it was acceptable to trade in pagan slaves but not in other Arabs. So when the pagan Shilluks get replaced by the Arabic Funj, this ends the practice of using slaves taken in battle to pacify other aggressive tribes.
As for the Ethiopians Box, this box holds the lone Ethiopians counter which can be earned when a Special Event Card is played during the late game. If the card is played and there is a +1 Feudal Marker present on Path D, then the player can place the Ethiopian counter on that Path and can then roll 2D6 for each Effort on this Path to drive back the Mek there. This can be very valuable and you have to pay attention to it and know that the Event Card is nearing and do your best to have the appropriate marker there. Good luck though as this is really tough to accomplish (I have only ever had it work on one occasion and I have played the game 10+ times!).
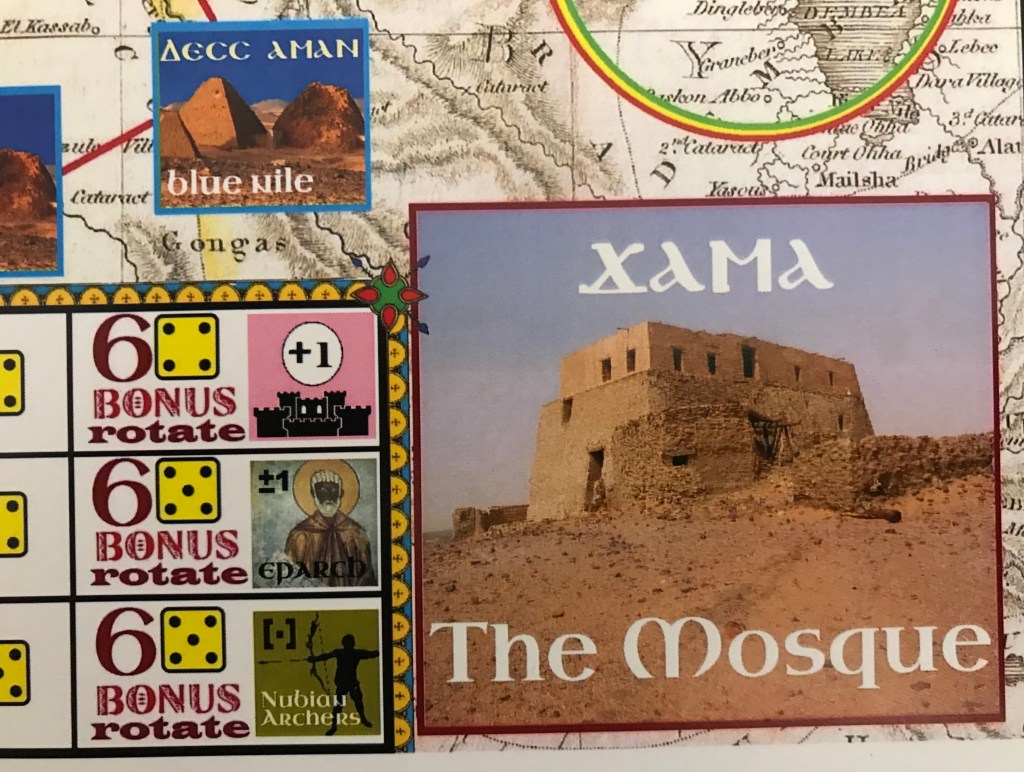
Xama – The Mosque
We already discussed the Mosque Box but remember that when any Uru defects, is killed in battle or discarded for any other reason, they are placed into the Mosque Box, where they will accumulate and each time there is a Collapse Check when a Mek enters the Soba Collapse Box, the player will have an increased chance of failing the roll as they are trying to roll higher than the total number of counters located in the box on 2D6.
Royal Assets Track
Found prominently at the bottom of the Game Map is the Royal Assets Track. This Track is important as it tracks three very important aspects to Nubian culture including Nobility, Kingship and Army levels. If any one of these Tracks ever reaches the 0 Box with the C symbol in an orange box this means that a Collapse Check is triggered as this aspect of Nubian culture has been eradicated.
Each turn the player can spend their Efforts to attempt to increase these assets by rolling a D6 and rolling greater than or equal to the number in the die symbol in the next box above where the marker is located.

To the far right of the Track next to the 6 Box is a Bonus Asset that can be earned when the marker reaches this level. We will discuss these Bonus Assets more in a later post but they involve counters that the player will earn that can be placed onto the Game Map on a specific Path to give a bonus. These Bonus Assets are very important and should be a focus of what the player is using their limited Efforts on.
The Game Map is clear and fairly interesting in its graphic design and I really enjoy that various historical elements were included on the map that don’t necessarily provide any in game effect or benefit other than to reinforce the theme and history of the Nubian experience.
In Action Point 2, we will take a look at the makeup of the Event Card Deck and how the cards drive the action by confronting the player with social, political, military and economic challenges. We will also discuss what makes this iteration of the classic States of Siege Series different from others in the system.
-Grant

Grant, I’d like to remark on this series of games, hopefully without coming across too negative. It can’t be easy to design a game–much less a solitaire wargame of good quality–and one has to be careful not to bite the hand that feeds oneself. But that said… I feel that my interest in this style of game is pretty much tapped out, and it’s not just the States of Siege variants; I can immediately think of at least a few other series from different designers/publishers that give me a similar feeling. After a handful of plays, I find myself losing interest, feeling a sense of walking down the same block multiple times, seeing the same fence again and again, albeit with a fresh coat of paint (i.e. a change of theme). Sometimes the new paint job seems very appealing on the surface, but in reality, it’s still the same fence.
On a more positive note, many of these games can be enjoyed maybe a half-dozen times or so before feeling stale, then they can be sold or donated to someone else who maybe has never played the series before, with the hope someone will get to experience something new and engaging.
Would love to see you cover this general subject of how game designers go about trying to avoid the pitfalls of game sequels coming across as retreads. Probably not an easy subject to discuss with some designers, but I would think some veteran designers would have some insightful things to say on the subject of “sequel-itis”
LikeLike