A few years ago, we played the game Lincoln designed by Martin Wallace and published by Worthington Games. That game used a very interesting and unique deck building/destruction mechanic where cards drove the action of moving forces, recruiting units and being played for events but then some cards would be removed from the deck after use and new cards would be introduced in a phased approach. The system creates some really interesting choices and dilemmas with how to use those cards and we enjoyed the system very much.
Now that same system is being used to simulate the European Theater of World War II in a game called Struggle for Europe 1939-1945. Similar to Lincoln the game is a fast playing and light two-player card-driven strategy wargame that allows players to re-fight the entire struggle for Europe at a strategic level in under two hours. As the decks are cycled throughout the game, the Allied player adds some better quality cards, with the Russians and Americans entering play during the 1st and 2nd reshuffle. The Axis player will burn through their early game quality cards, becoming weaker as resources dwindle. The underlying game mechanism is one of “deck destruction” rather than the more normal deck-building.
In Action Point 1, we looked at the Game Board and the Locations and various Boxes and Tracks that are used to play the game as well as examined the various pinch points on the Point to Point Movement system that create a very interesting tactical puzzle. In this Action Point, we will take a look at the makeup of the Axis and Allied decks and discuss the very interesting deck destruction mechanic, including a comparison of the differences in the two decks and what that means for each of the players.
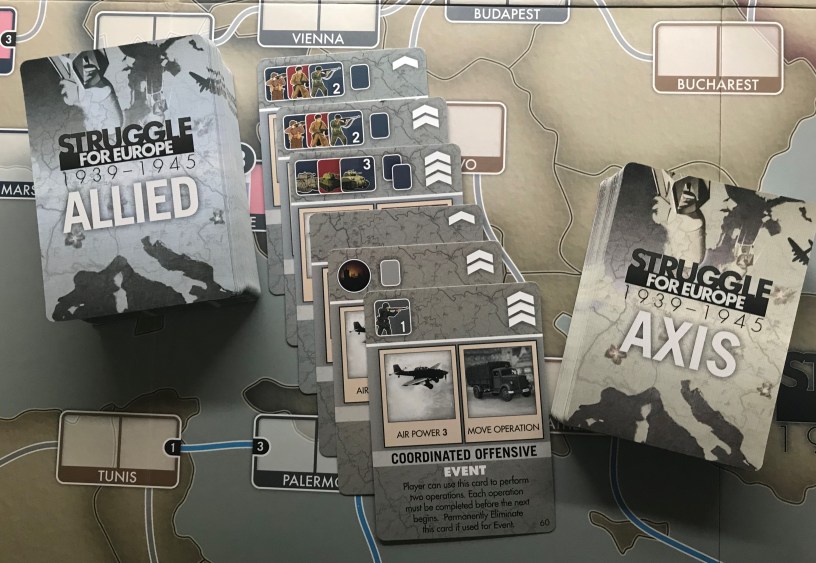
Cards
Cards are the main focus of the game and the cards are used to take various actions on the board including movement, attack, bringing on new units and taking certain special actions. Each side has their own unique deck and there are actually three different smaller decks that comprise the decks. The three different decks are denoted with the use of Chevrons in the upper right corner of the cards. The cards contained in deck 1 have one Chevron on the card while the ones for deck 2 have two Chevrons and deck 3 have three Chevrons. As the game progresses, each player will add in the remaining parts of their decks in order and this will create a mix of all three decks as they are reshuffled.

During game play, each player will have their respective cards in their own play deck. These decks are specific and unique to the Allies and the Axis and are very different in their makeup and how powerful the cards contained in the decks are. The Allied cards are used to perform actions by both the Western Allies, including the British and United States, and the Soviets. The Events can also be used by either the Western Allies or the Soviets.
Card Anatomy
Let’s take a closer look at the anatomy of the cards. Each card has three distinct sections. The upper section consist of icons that represent the army and fortress counters that can be built with the card or the possible use of the card for special actions such as Strategic Bombing. These icons show the type of counter that can be built, either infantry counters or tank counters, as well as the strength of the counter from 1-3.
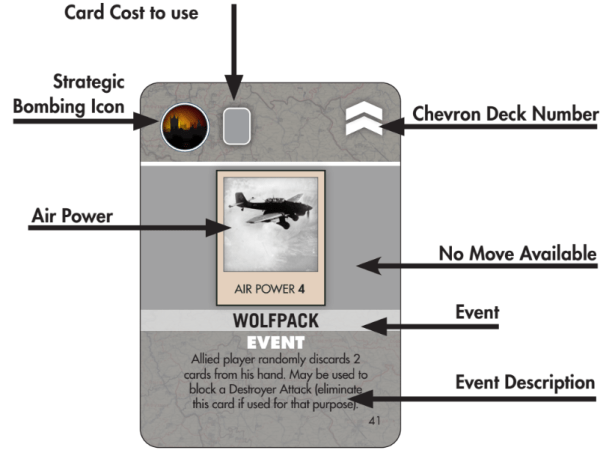
The middle section consists of icons that allow for the player to perform movement (shown as either a truck or an amphibious transport) and add air support to
battle shown as a plane and called Air Power with a number from 1-5 following.
The bottom section consists of events that affect game play. Some event cards are Battle Event cards and may only be played during battles to improve the players final outcome. The whole concept of the cards is that they are multi-use and will have more than one option for use, but only one icon or event on a card can be used when played. This is my favorite part of the design as it simply forces upon the player some really difficult choices as you must manage your limited hand of cards to get the most return that you can.
Now that we have discussed the anatomy of the cards, let’s take a look at how the decks are setup and how each deck is different.
Card Setup
Each player separates the cards of their Axis or Allied deck into three piles; one pile of 1 Chevron, one of 2 Chevrons and the other of 3 Chevrons, keeping each separated. Each player then takes the cards with 1 Chevron and shuffles them. Place them face down to form the starting active play deck for each player. The decks with 2 and 3 Chevrons are placed to the side to be shuffled in later.
Each side draws cards from their respective starting active play deck (1 Chevron), up to their hand sizes to form their hand. Players may look at and play cards from their hand during game play. There are a few limitations on the number of cards as follows:
- The Axis hand size is six cards for the entire game being adjusted only by the Strategic Bombing Track.
- The Allied hand size starts the game at five cards, adjusted by the Strategic Bombing Track as well. Once the Allied 2 Chevron cards are added to the play deck, the Allied hand size becomes six cards, adjusted by the Strategic Bombing Track. Once the Allied 3 Chevron cards are added to the play deck, the Allied hand size becomes seven cards, adjusted by the Strategic Bombing Track.
The player may not draw cards if they have as many cards in their hand as their hand size allows. Number of cards is a huge part of the game and the more cards the player can have in their hand the more options they will have. Keeping the Axis hand limit at 6 is very important for the Axis player and really takes some diligence as the Allied player will try to do Strategic Bombing often to get that hand size down. You simply cannot ignore Strategic Bombing. Even the Axis player should do some Strategic Bombing but obviously not as a focus. It not only effects the hand size though as it does grant Victory Points as well.
The 1 Chevron Deck is stacked in favor of the Axis player. As you can see from the table below, the Axis will have access to more powerful units (2 Strength Infantry and 3 Strength Tanks) than the Allied player at start and must focus on being aggressive. A good goal for the Axis should be forcing the Allies out of Paris and driving them back through Normandy, Dunkirk and Antwerp by the 5th or 6th turn of the 1st deck and get them off mainland Europe. After that is accomplished, the Axis must quickly turn their focus to the Eastern Front and start building up there for the launch of an attack as soon as possible. But generally not before the start of the 2nd Deck as they cannot build units until the 2nd Deck unless the Axis enters one of their Location Boxes.
![]()
The real advantage that the Axis has in the 1 Chevron portion of the deck is their advantage with Air Power. Each time a player enters a battle as the attacker they must play an Air Power Card face down. These Air Power Cards have a bonus to combat of between 1-5 and are the price of initiating combat. When you look at the numbers in the table above you will see that the Axis Average Air Power Value is 3.3 as compared to the Allied Average Air Power Value of only 2.5. This means that the Axis has to attack early and often as this is their main advantage. If you wait too long before the Allies get their feet under them, and their better cards begin to make their way into the deck, you will be fighting an uphill battle.
In the table below you will notice that during the 2 Chevron Deck the Axis advantage begins to lessen as the Allies can now build better and more powerful units and also gain more cards that allow them to focus on Strategic Bombing. The big difference though is in the change of the Air Power advantage.
![]()
During the 2 Chevron Deck, the Axis Average Air Power Value falls to a 2.7 while the Allies Average Air Power Value increases to a 3.5. This doesn’t mean that the overall advantage has disappeared for the Axis but that only the advantage is lessening. Remember, that certain cards must be permanently removed and placed in the game box when used to place army counters on the board. Sometimes, these cards contain the Axis players highest allowed Air Power of 5. This action of bringing on these units ultimately erodes your advantage as you must permanently discard any card that places a 2 Strength Infantry or a 3 Strength Tank unit.
![]()
The 3 Chevron Deck majorly favors the Allies as they have significant additional Air Power to use and can continue to build the larger higher strength units such as Tanks. They also have additional Strategic Bombing cards added but at this point of the game the Allies need to be focused on their drive on Rome and ultimately Berlin.
Finally, lets take a look at the number of cards in each deck and how this affects the game. The Allied Deck is used as the timer for the game so it has 20 additional cards.

The game will end when the Allies 3 Chevron Deck is exhausted. The Axis recycle pile is reshuffled to create the Axis play deck as many times as needed after their third deck runs out. The 3rd Allied deck is their final deck and when it runs out of cards, and the Allied player has no more playable cards in their hand, the game ends.
There are a few special circumstances listed in the rules regarding the cards that I need to share with you. The Soviet Allies may not move or build during the 1st Allied play deck. The Soviet Allies can move and build starting at the shuffle for the 2nd Allied play deck. The only way this will change is if the Axis player enters a red location prior to the Allied starting play deck running out of cards, the Allied player will immediately shuffle in their 2 Chevron cards with their remaining play deck and recycle pile
to create their second play deck and the Soviet Allies come into play. The USA however can only enter the game starting with the shuffle for the 3rd Allied play deck.
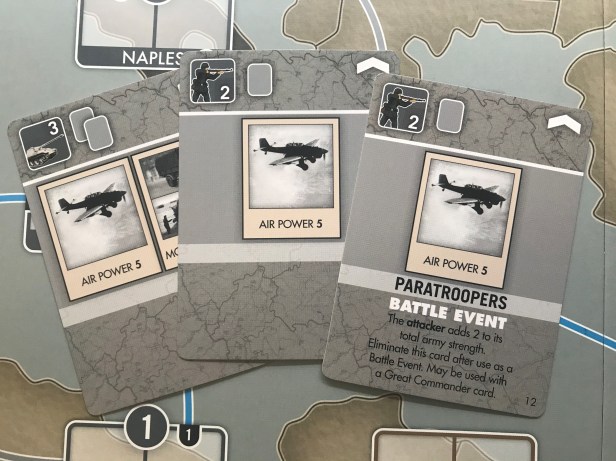
The key that you have to remember about the cards is that you will have some 1 Chevron cards in your deck the entire game, as you only get rid of the ones that require a permanent discard such as the 2 Strength and 3 Strength units. This means you might also have not played the more powerful unit cards early on in the game and they would have been placed into the discard pile to be reshuffled into the deck at the end of your first exhaustion of the deck. I want to show you a few of the cards I am talking about.

Remember that each card has three sections. Sometimes though the sections won’t contain any information or options as shown above. Let’s first take a look at the card on the far left of the above picture. This can can be used to place a 3 Strength Tank unit onto the map but it will require that you permanently remove this card from the game. That is fine but notice that in the middle section the card can be used as an Air Power 5, which is the best Air Power card included in the deck, or also as either a Land Movement or Sea Movement. When this card is removed from your deck you will lose access to the abilities shown in the middle section and this can be the source of much angst over the decision of how to use it. Do you really need that 3 Strength Tank unit now? Can you hold the areas you have and only play a 1 Strength Infantry unit instead? Are you going to want to move an army by Land Movement or Sea Movement this turn and do you have the appropriate cards to do so? In looking at the next card pictured, you will notice the Event listed in the bottom section which can be a very powerful strategy in and of itself in attacking your opponents hand of cards. This card also allows for the placement of a 3 Strength Tank unit but has a very low value Air Power in the center section. Each card must be measured for value not only in the entirety of the deck but in your immediate hand. The final card pictured brings on a 2 Strength Infantry unit but then has a good powered Air Power card of 4. The Allies don’t have many Air Power cards that good so you should be cautious about playing it for the unit. I like that you have to think about a lot of things when playing cards. If you don’t think about and plan your moves you will find yourself not doing much each turn and that can be devastating depending on where in the game you are at.
In Action Point 3 we will take a look at the various units involved in the game and how the Location Boxes work on defense and attack.
-Grant

Thanks for this, I own Lincoln but I’m curious about card ratios and Event mechanics in this game; not sure if I want both yet!
LikeLike
I will cover some of the Events in my next post but you can see from the tables I included in the post the differences in each sides cards.
LikeLike
Nice analysis.
Any word on why the company changed from really striking card designs (displayed during the Kickstarter campaign) to the less attractive ones in the final product? Seems very odd.
LikeLike
Hi Grant. Great analysis.
In this game is essential to know the number of cards of each side and their ratio to maximize your play.
In my opinion strategic bombing is not very useful for the axis on the contrary is a good tool in the hands of Allies.
LikeLiked by 1 person
I don’t believe you need to know each card as many as simply duplicates but you need to understand that the Allied Deck starts out weak and gets strong while the Axis Deck starts strong and weakens over time.
LikeLike
(testing wp login issue sorry)
LikeLike
Hi… I’ve tried to reach Worthington before, & as recent as 2 days ago, but sadly no response. The issue is use of sea movement cards…(in Struggle for Europe 1939-1945).
1. Is it correct that a card with mid section of land & sea movement can only be used for only one of the two options? In other words, a unit cannot go from London to Normandy (sea movement) & then use LAND movement off of the same card to go to say Paris? Your example of sea & land movement to a non adjacent location in the example on page 7 of your rules is vague. Do you need 2 cards played to do that or is ok to move on land after a naval move?
2. I attacked London in our last game, & amassed 16 pts to 15 for the Allies, however the Allied player used a battle event card stating he could move in one unit from any adjacent friendly territory to reinforce. Unfortunately, the only place he had was Bergen. The North Sea separates the allied unit from England. Could he just move in without a new naval action on a card, or not at all because Bergen is not considered adjacent?
Thanks for your help…Bill Meyers
LikeLike