 In Action Point 1 covering Gato Leader from DVG, we took a look at the various Campaigns, setup for those Campaigns, including spending SO Points to buy particular experienced Submarines and then outfitting them with various upgrades, and a simple example of how Submarines make contact with convoys.
In this Action Point, we are going to take a look at what happens once the convoys are contacted by Submarines and how combat works.
Draw Convoy Card
After determining the number of contacts made after searching a certain Map Space, the players will then simply draw the top card from the Convoy Card deck. This deck contains the Convoy Cards that players will encounter and they are made up of large flotillas of merchant ships, sometimes with up to 8 different ships, some with escorts and some with naval escorts that represent ships of the line, including Battleships, Destroyers and even Aircraft Carriers. Once a card is drawn, the player will then immediately draw a second Convoy Card but will only focus on the bottom part of the card that will outline any Special Conditions that exist for this engagement. Sometimes these conditions are very fortunate. Sometimes not so much but players will have to learn how to deal with both opportunities and challenges that present themselves.

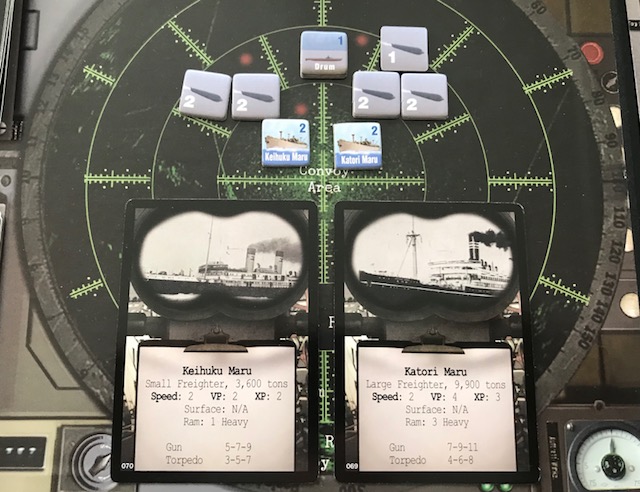
In this example above, the player drew a very small convoy that contains only 2 merchant ships. The merchant ships are placed on the map according to the layout shown on the Convoy Card. When placed, the merchant counters bearing question marks called Unknown Ship Counters are used to denote the ships. You will notice that these ships have yet to be identified and will require that the Drum moves into range to identify the targets. Submarines can identify ships up to two spaces away. Then the Drum is placed in the Long Range area which is the last space on the Tactical Display. If a ship has the Infiltrator Special Ability, during this step they can be set up on the Tactical Display in either a Medium or Short Range area. When the Drum approaches the merchant ships, the player will draw a card off the top of the Merchant Card deck and find the named counter to replace the Unknown Ship Counter with.

When the Drum identifies the two ships, it draws the following cards with a specific named ship on it. In this instance, the nearest ship is identified as the Katori Maru, a huge 9,900 ton Large Freighter and the furthest ship is the Keihuku Maru a 3,600 ton Small Freighter. The Katori is worth 4VP if sunk while the Keihuku is only worth 2VP.

Combat
Now comes the fun part. Because there are no escorts on the Tactical Display, the Submarine can approach without fear of being detected. It is usually easier for escorts to detect surfaced Submarines but the benefit to the player is that they can move faster while surfaced (2 Movement Surfaced vs. only 1 Movement Submerged) and they can also fire their Deck Gun and not just rely on torpedoes. After doing what is called Lag Movement, the Drum decides to submerge and fire two different spreads of torpedoes at each ship. A Submarine can fire any number of torpedo spreads at any number of targets but remember that Subs generally can only have 10 torpedoes in the ready to fire position. Once fired, a player must take a turn to reload their tubes at a very slow rate that is determined by the Subs experience level. In this case, the Drum decides to fire 4 torpedoes at the Keihuku Maru and 5 at the larger more valuable Katori Maru.
 Each of these spreads must now perform a Torpedo Dud Check. Torpedoes used by the US Navy during the early part of World War II were notoriously unreliable and half the time wouldn’t arm and explode when they hit. This is reflected in the game with a required Torpedo Dud Check when any torpedoes are fired.
When fired, each spread must roll on the Torpedo Dud Check table which is based on the year of the campaign. But, I invested in the Torpedo Modification in the setup, so rather than rolling on the 1942 column, which is very bad, I will roll on the 1943 table which is much better as on a roll of 7-10, all of the torpedoes will run true as compared to only a 10 on the previous column.
I roll and get a 6 for the first spread aimed at the Keihuku, which means only half the torpedoes will run correctly or 2, and I roll an 8 for the spread fired at the Katori which means all torpedoes will run correctly. Now, we move to the Hit Phase.
The game uses a very interesting system for these attacks. You don’t necessarily roll for each torpedo individually, but roll for all torpedoes in a spread together by rolling 1 die for each and then taking the highest modified number of the bunch. If there are more than one torpedo on target, the player will get a bonus modifier of the total torpedoes hitting the target -1. So, for example, with the 5 torpedoes aimed at the Katori Maru I will gain a bonus of +4 to my to hit rolls (5 torpedoes – 1 = +4). I roll five 10 sided dice and the highest single number that I rolled is a 5. Not good. But, after adding in the +4 bonus for the spread, as well as my Torpedo Skill modifier of +1, and while taking a -1 modifier for shooting from range 1, my final modified roll is a 9. Awesome….well, what does that mean?
You have to look at the target card to understand what numbers you need to hit and do damage or sink the target.
 If you look at the bottom of the card you will see a series of numbers for both Gun and Torpedo attacks. The lowest number is the minimum number needed to do damage to the target and if you roll between a 4-5, you will inflict one light damage hit. If you roll 6-7 you will do one heavy damage hit and if you roll 8+, you will sink the ship. So in our example, the modified 9 is good enough to send the Katori Maru to the bottom and the player will score 4VP and gain 3XP. In the game, 2 Light Damage hits will equal 1 Heavy Damage hit and 2 Heavy Damage hits will sink a ship.
This part of the game is really fun and sometimes you will sink several ships outright with lucky rolling. But, sometimes you will struggle to do damage because the dice just aren’t kind. It is important to continue to move and attack in order to be able to sink enough shipping to score an acceptable amount of VPs and accomplish your patrols.

There is a lot more to this game than the simple elements I have shared with you. There is a fairly involved system of escort detection of Submarines, random movement of those escorts, as well as attacks from escorts and even merchant ships that you will have to learn to play this game. I also really like the damage system for the Submarines when they are hit by enemy ships. Each ship will be given a damage number and when that ship attacks, there are no rolls for their attack as they generally hit unless you have taken actions to avoid them such as Deep Diving or Crash Diving. When hit, you will draw a random counter from a cup and refer to either the Light Damage or Heavy Damage sides. The Light Damage is not lasting while the Heavy is and can only be removed while in Port or from certain Events. Each of these damage counters will count toward your Hull value and if you meet that value the Submarine is considered to be sunk. Evasion can be used by Submarines to reduce those counters from Heavy to Light but you still have to worry about those hits accumulating and sinking your boat.
I hope that you have been able to get a good idea of how Gato Leader plays from these two Action Points. I have really enjoyed this game and found that there are meaningful decisions at almost every turn. Do I attack that convoy I just spotted even though I have only 3 torpedoes left and am leaking oil making my boat easier to detect? Do I try to simply take a long range shot at the target and then bug out before I can be detected and attacked? Do I cut my Patrol short and go back to Port before I push it too far? What type of Events will I encounter on my way back to Port that might finish me off before I can repair and refit? Great system, great game that really is a joy to play.
-Grant
