
Featured image credit: Nick Stevens. http://nick-stevens.com/
As promised, this will be a bit of a long running series detailing High Frontier’s many features. I want to examine the thrusters in this post. What makes a thruster good? What makes it bad? What are the trade offs? Keep in mind High Frontier is primarily about the science, so while Phil did do some minor fudging of mass values to give the game some balance (justifiable, since it’s abstracting the necessary power plants and heat radiators in the basic game), you will find that performance correlates directly to real world examples and proposals. So if a particular technology is a good idea for a specific target in real life, it’s likely applicable in the game as well.
When is Fuel not Fuel? When it’s Propellant!
As I briefly explained before, fuel is a bit of a misnomer in this game but it’s a straightforward term that gets the point across. All things move because of Newton’s Third Law (let’s keep it simple and leave Einstein out of it!) On Earth this is generally accomplished by the fact that human locomotion pushes against the underlying ground which propels us forward. Cars use combustion engines that have pistons, that move axles which turn wheels that push against the ground to generate movement. Jet engines use air to mix with fuel that is burned in a chamber and goes out the nozzle, so you are pushing against the surrounding air to keep moving. In a nut shell, to move forward you need to push back against something.
But what about space? It’s a vaccum, there’s NOTHING to push against. What this means is you need to bring the stuff that you’re going to push against to move forward. This is what we mean by propellant, and most of the thrusters in High Frontier use water as the mass to push against and throw outside the spacecraft to move. For some of the thrusters in the game (the chemical boosters that the crew cards have) it is indeed true that their fuel is also their propellant (check the Reference Guide for details on the H2-O2 rocket engines). Current rocket technology mixes fuel with O2 in a tank to burn and goes through a nozzle in the back of the spacecraft, so its analogous to the way a jet engine works. The other thrusters use different kinds of power plants (electrical or nuclear in many cases) so the actual fuel used isn’t really a concern, it’s the reaction mass they need to push against and propel the rocket forward. This is why water tanks are universal “fuel” for all of the game’s rockets.
The Tyranny of the Rocket Equation
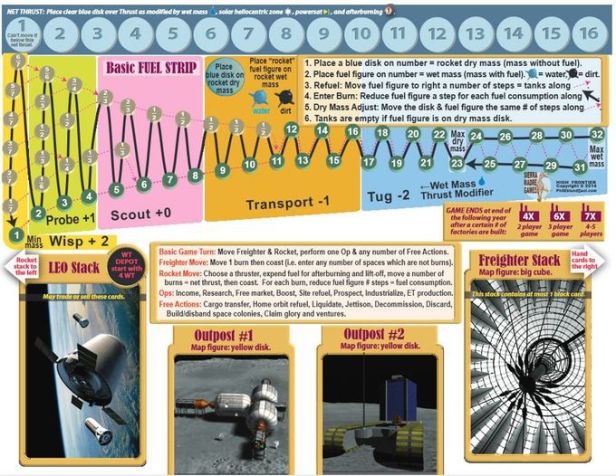
First, let’s revisit the rocket diagram. I touched upon the notion that a fuel step cost is NOT constant. A tank at mass 5 provides for 3 steps of fuel while one at mass 8 provides 2. At the lower end, mass 2 and 3 can provide 6-7 steps. This is why, as Alexander pointed out, you can’t just bring all the fuel you have because as the mass of the rocket increases so does the cost of moving it. At some point, more becomes less.

The other salient observation to make here is that your wet mass determines the spacecraft’s class. You will find that for spacecraft between mass 5 and 8 there’s no effect (Scout Class), For mass values 9 through to 16 there is a penalty of -1 to thrust (Transport Class). For mass 17 onwards it’s -2 (Tug Class). For mass 4 and lower you actually get benefits, which is very important. From 2 to 4 it’s +1 (Probe Class), and for mass 1 it’s +2 (Wisp class). The importance of mass class can’t be overstated. It can be the difference between landing on a site or stuck in orbit.
Consider the classic chemical booster and its 10-8 value. Assume you want to land on Mars and have just enough fuel steps to go through the lander burn, but not enough to “after burn” to increase your thrust. Thanks to being Mass 4 or lower you automatically get a +1 boost for a net 11 thrust to stick the landing safely (rather than brave the perils of using aerobraking and rolling the die). Of course it also means you can only carry with you low mass components to the surface. That Free Electron Laser (with its 5 mass points) isn’t going to the surface of Mars by exploiting mass class.
Some really fine thrusters (like Metastable Helium) are mass 5 which means they can’t benefit from wet mass class change at all to increase their thrust beyond their initial value. As a final note, remember that “after burn” occurs BEFORE computation of mass class, so you CAN engage Open Cycle Cooling and burn just enough steps of fuel to change your mass class and get a double benefit (+1 thrust, +1 wet mass class change) on that move. While planning a mission, it’s usually best to look a the target site and figure out what the rocket configuration needs to be for landing (including Open Cycle Cooling where applicable) and work backwards by adding fuel you will burn to get there in the first place.
Beam Power
I have yet to comment on the fact that a large number of thrusters have yellow colored thrust values with a small triangle icon. What this means is that those cards can have their thrust increased if you have the right special ability available. Remember how crew cards come with abilities?

The ESA and India crew card have it and it’s called POWERSAT. This presumes that the space agency assembled a collection of powerful satellites on Geosynchronous Earth Orbit and are able to transmit this power to any rocket in the solar system for an additional +1 thrust capability. I highlighted before how the difference of even 1 more thrust can mean the difference between being able to land on a site and cursing from orbit.
Why yes, this player is often the target of pandering, pleading and cajoling to lend his awesome array of powerful satellites for others to benefit from, why do you ask? Negotiation usually ensues.
Mass Drivers
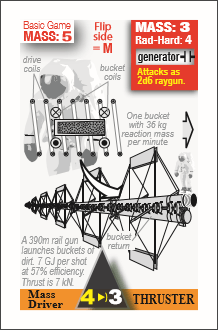
One of the basic rocket thrusters in the game can use dirt as reaction mass. Note, that it’s not limited to dirt, it can also use water but dirt is easier to obtain from a site than water and this impacts your strategy. Of course the thruster itself has average thrust and efficiency, but the ease of refueling makes it much like the tortoise of High Frontier, slow and steady gets you there. Of course, depending on where it is you’re going you may need a different thruster to land on your target.
Giant Space Blankets

Solar sails aren’t really rocket thrusters. Rather than have a different kind of component, Phil created them using his rocket statistics so you could treat them like any other thruster card. They are huge gossamer films that need to be lightweight and extremely thin. Under the games definition a mass point is roughly 40 tons. The sails are therefore under the game’s mass point scale and charged with a mass of 0 which just means that whatever mass they add to a rocket is considered negligible. Of course, if you just use the sail by itself the dry mass of your rocket stack is set to 1 since that’s the minimum any rocket can have in the game. Since they aren’t rockets they don’t require reaction mass. They generally use radiation pressure from the sun to propel them forward. This is analogous to a sailing boat on Earth using wind to propel its motion (and hence where the term “solar sail” originates from). That explains the fuel consumption of zero. This radiation pressure however, is quite feeble and can’t be used to move a lot of mass, hence the thrust value of 0.

The distance from the sun impacts its thrust capability. Around the Earth Zone there’s no benefit or penalty, but closer in (Venus +1, Mercury +2) you get a boost and further out (Mars -1, Ceres -2, etc.) you get a penalty. Does this mean sails are useless at the Earth zone and beyond? Not at all, since you get a +1 thrust boost if your mass is 4 or less. At mass 1, you get a +2 bonus for mass class, so a crew with a sail starts at 2 thrust. Naturally the next question is, since you can’t carry much, how useful is it?
Actually quite a bit. Since you get the solar boost depending on which zone you START your move from, nothing prevents you from sailing close to the Sun during one move (and slot into the Mercury zone) and then the next turn use the huge bonus to fling yourself outwards towards other targets. Sure, you probably won’t be coming back from the target, but the solar sail is really an expendable space blanket and as long as your components are mass 4 or less you can fling them relatively cheaply one by one to the site you need to. If the site has an atmosphere (typically Mars) there’s another consideration to keep in mind; they can enter an aerobraking space (“parachute” icon), but they are immediately destroyed and go back to your hand. Thin gossamer film sheets burn up in an atmosphere of any kind.
In the advanced game Solar Sails can further benefit with the use of slingshots, boosting their usefulness by increasing the distance they can reach. Speaking of which-
Gravity Assisted Slingshot Maneuvers
Technically, this is an advanced game rule, but quite frankly, I never see a reason to NOT include it in the base game, it’s so simple to use. Some routes cross actual planets (called FLYBY spaces) representing gravity assisted maneuvers that add free moves to your rocket.
Once you enter a flyby space you are allowed to enter as many burn spaces for free as the number indicated on the flyby space. They are also cumulative, so if you can line up your rocket correctly you can cross multiple flyby locations (typically Mercury and Venus together) this is another good way of saving fuel on a trip. Different planets have different bonuses associated depending on their gravitational pull. Earth and Venus get +2, the Moon, Mercury and Mars +1, Jupiter gets +4, etc. The reason it’s an advanced game maneuver is that Venus is not always available to give a flyby boost per the solar chart, but having it always available in the base game doesn’t break it in any way. Just make sure everyone agrees to use it if you’re playing the base game.
Fun with Fractions!
You may have noticed some black side cards have fuel consumption expressed as fractions like: 1/2, 1/3, etc. This seems to trip some people up. The best way to wrap your head around this is to use an analogy.
MPG is an acronym for “Miles Per Gallon” meant to express fuel efficiency in vehicles here on Earth. Just replace miles with burns and gallon with fuel step. Up till now each burn has cost at least 1 step of fuel and as much as 8 (meaning your thrusters were really counting gallons per mile). With fractions, we turn this cost on its head. A fuel consumption cost of 1/3 effectively means that each step of fuel allows you to enter up to 3 burns. For 1/2 it means you can spend 1 step of fuel and enter up to 2 burns. Note that you don’t keep track of the fractions (unless you’re playing a variant that does so), which means if you spend the fuel and don’t move the full amount of burns you don’t get to “keep” those moves for the next turn. Use them or lose them.
Evaluating a Rocket Thruster
Keep in mind these are my own opinions formed by my personal playing experience as well as learning from other players by either watching or reading their game sessions. You may discover that a particular thruster is more or less useful depending on your particular situation.
Thrusters have three main properties that impact their value: mass, thrust and fuel consumption. Some rockets have high thrust but also high fuel consumption. Others may be the opposite, low thrust but also low fuel consumption. A few are very efficient with good thrust but are high mass. Others have very low mass but aren’t fuel efficient. Some can after burn, others can’t. Some are solar powered which can be a benefit or a penalty depending on where you’re going. Most can benefit from the power satellite ability (assuming that player card is in the current game). Generally speaking, most thrusters can get you anywhere you want given enough resources and turns, but High Frontier is also somewhat of a race game. Someone may claim the planet or site you wanted and you don’t want to plod around forever trying to build the “perfect rocket”. That said here is my commentary regarding the different thrusters available in the game when you begin.
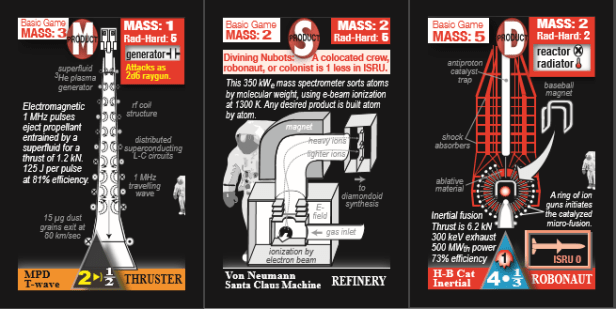
Metastable Helium and Ponderomotive VASIMR are the most efficient thrusters (fuel consumption of 1) with a mass to thrust ratio of 1. They are probably the most flexible rockets for mission planning but take care of the fact that they aren’t meant for making landings on large sites (6 or higher). They can get you there cheaply but you’ll need something else for landing and taking off a site unless you’re claiming small real estate.
The De Laval Nozzle and Hall Effect have a favorable thrust to mass ratio (higher thrust than mass) but with fuel consumption 2 they hog more fuel but are otherwise similar in thrust to their efficiency 1 counterparts. Less mass means they can travel farther or carry more massive components. The Ablative Plate should fall in this category but it’s mass to thrust ratio is 2 to 1 making it inferior to the other two. The black side isn’t all that better; it’s basically a copy of the Ponderomotive VASIMR. I honestly recommend you do NOT play with this thruster card in the base game; its inclusion in the third edition is more to complement the interesting Project Orion nuclear reactor than anything else (a card I’ll discuss – you guessed it! – in another post).
The Mass Driver is in a class of its own being the only dirt propelled thruster. It has more mass than thrust but average fuel consumption of 3. Its key advantage is being able to use dirt rather than water as fuel as I indicated earlier.
The high thrust Cermet NERVA can give access to larger dwarf planets and its low mass means it can carry more as long as you can make the trip cheaply or carry less but still have enough range. The other fuel efficiency 4 thruster is the Mirror Steamer. It’s mass is a fantastic 0 but the thrust is only 3 (and solar powered at that). However, it’s still pretty good for inner solar system travel* . As a mass 0 it’s an expendable thruster much like the photon sails (which I discussed above and won’t rehash again in this section).
Crew Cards won’t generally be used to make long trips (though they are more than capable of reaching Mars assuming they’re going on a joy ride and don’t take anything else with them). They will instead be your site to orbit and vice versa rockets when you need to land on big bodies (size 6 or more). Still, it pays to be creative, you may find yourself using them in an emergency (like coasting into a different solar zone so you can use your space blanket).
One final aspect you want to consider is whether your thruster will be a candidate for ET PRODUCTION at your target sites. The black sides of these cards will provide a better thruster that often improves fuel efficiency (though perhaps at the cost of thrust) or it may have less mass or some combination of both. When you auction a card, everyone can see the black side, so there’s no surprises.
This concludes our overview of dedicated thruster cards. Some robonauts can also act as thrusters (as shown in the sample black cards I have posted). I’ll discuss them in their own post since their capability for prospecting and refueling is relevant to their game value.
-Francisco
* It used to be that the only reason to buy this card was to build its original black side which was the Salt Water Zubrin thruster; a ridiculously overpowered rocket thruster from the original game that was often a game breaker. It has been redesigned in Colonization and 3rd Edition as an advanced thruster requiring special fuel. We’ll get to those in a future post.
