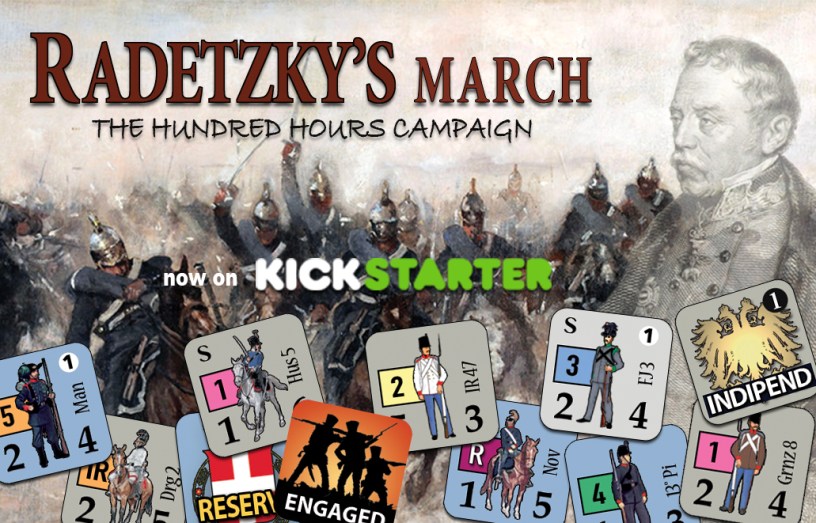
Last week, we were contacted by Sergio Shiavi who has designed a right neat looking wargame covering the last campaign of Field Marshall Josef Radetzky fought in 1849 between the Austrian Empire and the small Sardinian Kingdom. This game is currently on Kickstarter and you can visit the campaign page at the following link: https://www.kickstarter.com/projects/1162877589/radetzkys-march-the-hundred-hours-campaign
As the campaign has already started, we worked quickly with Sergio in order to get this interview posted as soon as possible and we thank him for his time and efforts in meeting this goal.
Grant: Tell us a little about yourself Sergio. What games do you prefer to play? What do you do for a living?
Sergio: Many years ago I worked as a cartographer for a military museum in my city of Turin, Italy drawing battle maps for displays. Once again, a few years ago I started again to work as a cartographer, essentially to illustrate historical books.
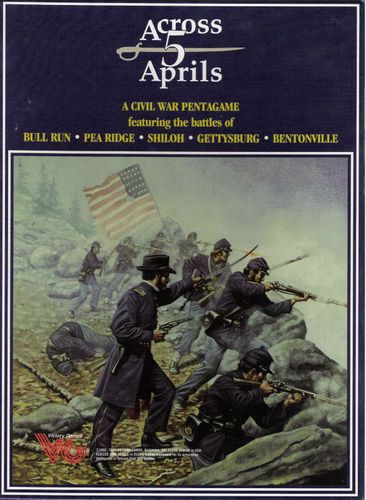 My favorite games are simple, including such titles as Leipzig, The Russian Campaign, Napoleon’s Last Battle, and Across 5 Aprils.
I also really like The Dark Valley designed by Ted Raicer but I have not found anyone to play it with. I also play a lot of “Strafexpedition”, which is a war-game designed by my friend Andrea Brusati.
Grant: What is your design philosophy?
Sergio: I think a game must, first and foremost, be simple to understand and pickup but that doesn’t mean it has to have overly simple mechanics. It has to try to recreate the chaos of the battle and model the important parts but without being influenced by overly complicated rules. And then, as the cartographer in me, it must be beautiful!
Grant: Is this your first design gig? If so, how did this opportunity arise?
Sergio: I designed a game about the siege of Sevastopol for the museum where I worked, then I had a long break with my activity for professional reasons. Radetsky’s March was born because the campaign we are talking about was fought near my home, and a simulation was missing. For years I had been thinking about collecting material and putting a playable game together.
Grant: What historical event does Radetzky’s March: The Hundred Hours Campaign cover?
Sergio: The game is about the campaign of 1849, also called the 100-hour campaign because in 4 days it was all over. It was also Radetzky’s last campaign, and perhaps the most famous.
In short, the Piedmontese prepare their army to invade Lombardy; as they do, the Austrians attack further south crossing the same river and penetrate into Piedmont. It’s a really strange and very particular situation to play.
Grant: What did you feel was important to model in this game to capture the historical accuracy and theme of this campaign?
Sergio: In my opinion, the game reflects very well the reality of the campaign, including the confusion and the contemporaneity of the movements of the armies. The OOB is also very accurate and takes into account many variables. For example, most of the cannons are often inserted into the values of the infantry counters, just as they actually did.
Grant: What do you feel you had to sacrifice from history to make a playable campaign?
Sergio: I would like to think of an improvement to the system that would allow blind play to mimic the fog of way, where you can not exactly locate the enemy forces, and know what is coming toward your lines. But I preferred to make it easier to play and also more fun.
Grant: What are the force structures for the units and what is the scale of the game?
Sergio: The counters are battalions of light infantry, infantry regiments (along with a pair of guns) and cavalry divisions (2 squadrons). The artillery counters represent 12 to 20 guns.
Each hex represents 1 km and the turns represent about three hours, except for the night, which is a single turn.
Grant: I read that the following units are included amongst the playable forces: Hussars, Uhlans, Dragoons, Line infantry, Grenzer, Jäger, Artillery, Bersaglieri, Pontoon Crew, Commanders. How difficult was it to make each of these type of units feel unique?
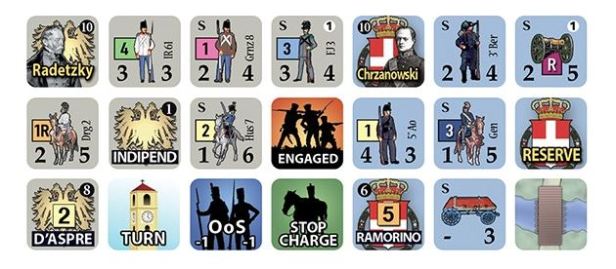
Sergio: They have a different design and some specific skills and also have different ratings for movement and combat. During the campaign, the Austrian light units did wonders, they were practically everywhere!
Grant: What are the specific advantages or special abilities and uses of a few of these units?
Sergio: The commanders are very abstract, they have quite similar ratings, even if the Austrians have a higher command range: they command whole corps!
We will look at cavalry units. During the movement, cavalry unit (or stack), if they belong to an activated formation, can charge opposing units positioned in open terrain if they have enough movement points to enter the objective hex of the charge. For the resolution consult the Charge Table (note that the table differ depending on whether the target is made up of cavalry or infantry). Cavalry units that win a charge occupy the enemy hex and may, if they have enough points, continue the movement and / or charge. If the target of the charge is a cavalry unit it may attempt to evade the combat and withdraw 1 or 2 hexes at choice, if the die obtains 1 to 4.
I will also share with you some specific rules about bridge units. To bridge, the player must bring an active bridge crew unit into the hex adjacent to the river and declare the construction of the bridge, turning the counter and showing the bridge side. At the end of the next turn the bridge is ready and on the following turns the units can go there by paying the foreseen costs (in other words, it takes 1 full turn to set up the bridge).

In the case that an enemy unit is adjacent to the bridge under construction it is completed only if, by rolling a die, the result is 5 or 6. A bridge can be dismantled simply by declaring it; in the turn that happens, the counter is turned and from the next turn it can resume movement. A bridge is destroyed if an enemy unit can cross it or win a combat with units that defend the bridge. A bridge crew is captured if enemy units enter its hex. A bridge crew always follows the fate of the units with which it is stacked: if they retire, the bridge crew retreats with them and if they are destroyed, the crew is destroyed. The elimination of a deck crew (or the destruction of a bridge) does not satisfy loss steps but allows you to gain 3 victory points.
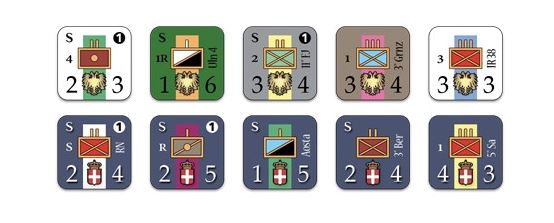
Grant: What is the anatomy of the counters? Can you show us a few examples?
Sergio: Here is a look at a unit with the various numbers and designations explained.

Grant: What role does command play in the game and how did you handle its design? Why?
Sergio: The command in the game is abstract and chaotic: you know that sooner or later you will be able to activate those units but you never know HOW and WHEN; this generates a great uncertainty in the players and forces you to always be very careful in your decisions.
Grant: What is different about the Commander in Chief counters and how they activate command?

Sergio: The Commander in Chief counters allow you to activate several formations at the same time. This can have a truly devastating effect on your opponent, especially if you have planned a general attack. The minor commanders are important, but their formations have a fairly limited force.
Grant: How do Command Points work in the design? Why did you feel this was a good choice for the game design?
Sergio: I wanted an activation system that reminded me a little of Across Five Aprils but at the same time gave you the chance to attack before the other formations move, so as to surprise them.
The Command Points represent a theoretical estimate of the ability to move and fight of the two armies. As can be seen on the Turn Record Track the availability of points varies depending on the army and the game turn. These differences try to reflect the different operational attitudes of the two armies: while the Piedmontese are generally quite active at night, the Austrians tend to move little during the morning becoming very active in the second part of the day.
The procedure is pretty straight forward. At the beginning of the turn both players check the amount of command points available on the turn record track; each point allows to activate a corps (Austrian player) or a division (Piedmontese player). Secretly and separately the players decide which corps or divisions to activate, by selecting the appropriate command counters, adding to them the “INDEPENDENT” counter and placing them all inside a convenient container where they can be mixed and extracted alternately during the turn. Note that command counters can only activate military units belonging to their own formation or units that do not have a specific designation.
I think this part of the game works very well.
Grant: I noted one of the stretch goals are cards that aid in the solitaire play of the game. How do these cards function and how does it make the solo game improved?

Sergio: The cards will already have a track of pre-established actions, each card will say which formations will be activated and what will be the tactical behavior, in battle, of the units. The cards will be drawn each round for the activations of the player’s enemy.
Grant: What different scenarios are included in the game? Please share with us some of the historical outcome of these scenarios?
Sergio: In addition to the starting scenario there will be the scenarios of the most important battles including:
Mortara and La Sforzesca: this double fight is very interesting because it starts when the Austrians are already past the river and are on the move towards Mortara and Vigevano. In Vigevano, the Austrians were stopped by the Piedmontese while in Mortara, much more important as it was a strategic crossroads, they won by capturing many prisoners.
Novara: it is the final battle, which the Piedmontese were winning because the Austrian reserves were too far away to make a difference. But unexpectedly, the Piedmontese regiments that were advancing were stopped and retired, giving time for Radetzky’s reserves to arrive and defeat the Piedmontese.
Ramorino obeys orders: The last scenario concerns the deployment of a division that had received a different order from what it then did (its commander, Ramorino, was later shot for treason); the hypothesis is that if it were deployed where he had been ordered the Austrians would not have successfully passed…
Grant: Who is the graphic design artist for the game? Do you personally prefer the alternative to silhouettes with NATO symbols for the counters?
Sergio: I designed all the graphics for the game, I hope you like it! So, I prefer to play it with the silhouettes but drawing these counters with the NATO symbols is fun!
Grant: How does the map aid in telling the story of the campaign? What level of research went into the map?
Sergio: The map is very accurate, I am lucky to have the military museum nearby where all the documents can be studied. It was very useful to know which roads existed, which bridges were in place and where they were located.

Grant: How is combat handled in the design? Can you show us an example of the Combat Results Table and explain your design choice for its results?
Sergio: As you can see below, the CRT is not very bloody as the clashes of our wars were not comparable to the Napoleonic ones. Moreover, losses can also be absorbed by withdrawing, and this seems to me to work in historical terms; maneuver was always preferred versus the fight to the last man. But this is not always possible.
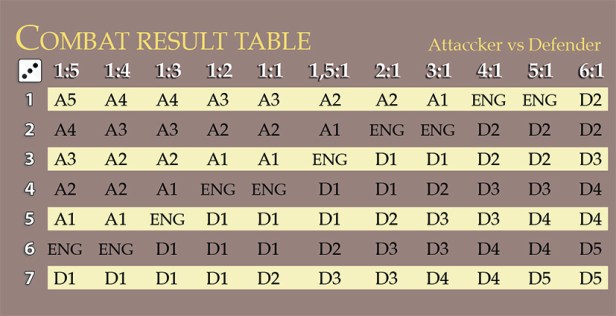
Here is an example of a combat taken from the rulebook to give you an idea of how it functions:

Grant: Why are cavalry charges important to include in the design?
Sergio: Cavalry at the time was extremely important, it is no coincidence that the image I chose for the box is a painting with a charge made by the Piedmontese to the Sforzesca. The cavalry charged often in squadrons or in pairs of squadrons, very rarely in already large formations, even if sometimes it did happen. The charge in the game is a powerful but very fragile tool, you have to choose carefully when to launch it. And you must have a bit of luck. Even the threat of a charge can be just as effective as the charge itself. For more detail on the process, refer to question above where I laid out the procedure.
Grant: How do players determine victory?
Sergio: In every play test the victory was clear, with almost no need to calculate points. However, there is a system of points that can be achieved by eliminating units, exiting the map or occupying key cities.
Grant: What has changed in the design from playtesting? Please give a few specific examples.
Sergio: At the beginning, I had foreseen using Zones of Control in the design, but after several plays I began to realize that this rule allowed the corps and divisions to spread out a lot, in an absolutely unrealistic way. Taking it away instead forces the players to keep their forces very grouped, the risk of being isolated and cut off is too large.
Grant: What is next for Sergio Schiavi? What have you learned through this process? What advice would you give someone looking to run a Kickstarter campaign?
Sergio: What will I do next? It depends, if I can successfully finance the game, I’ll have to then move into printing and shipping. After that is accomplished, I would like to dedicate myself to designing some other games. As for my thoughts on Kickstarter, having not finished this campaign, I don’t know how to answer your question. I really don’t have experience with this and don’t know if it is the solution for someone who wants to do these kind of games. I think it will work out well and I also have hope that it will, but we will have to wait and see.

I want to thank Sergio for his work with me on this interview and for his amazing looking game. He was worried about his responses in English but he did pretty well. It is always impressive to me when someone chases their dream, uses the talents they have and believes in their eventual success. If you are interested in backing Radetzky’s March: The Hundred Hours Campaign, you can follow this link to the Kickstarter page: https://www.kickstarter.com/projects/1162877589/radetzkys-march-the-hundred-hours-campaign
-Grant

Very interesting interview. I don’t regret that I’m supporting this project. Good luck!
LikeLike