In the September Update from GMT Games, four new P500 games were announced. Among those was Saint-Omer to Saint Saint Crispin: Tactical Battles of the Hundred Years War designed by Mike Nagel, which is a prequel to Sun of York also designed by Mike and published by GMT Games. That month I added 2 new games to my growing P500 list but was hesitant on Saint-Omer to Saint Crispin only because I really didn’t know much about it and hadn’t played its predecessor Sun of York. With that lack of knowledge about the game, I decided to reach out to Mike to see if he would be willing to do one of our designer interviews and he agreed. I want to thank Mike for his great responses, as well as how quickly he was able to respond. Without further ado, here is our interview:

Grant: Mike, first off tell us a little about yourself? What games do you like to play? What games have you designed?
Mike: In real life, I’ve been an applications developer and information technology jack-of-all-trades for nearly thirty years, working for the New Jersey court system.
 I’ll play pretty much anything that’s engaging and immersive, which is why I tend to prefer war games that model reality in some fashion over euro games that are more abstract.
I’ve designed the “Flying Colors” series and Sun of York for GMT Games, the “Ancient Battles Deluxe” series for Victory Point Games, War in the Wind for Compass Games, Tech Bubble for Worthington Games, and Tactical GameX for myself as a print-and-play system. I also did a module for the “Advanced Tobruk System” from Critical Hit. I’ve also got a lot of stuff in the pipe, but I’ll leave that for later!
Grant: What do you most love about design? What do you struggle with?
Mike: I think what I love most about design is the challenge of modeling historical events through somewhat straight-forward mechanics. When successful, I’ve created a means through which players can write their own story about what occurred or may have occurred. It all comes down to the opportunity to actively exercise my imagination. To a certain extent, this is also what I love about my current job as an applications developer trying to automate physical processes. I’ve been able to take lessons learned from both and apply this knowledge.
I mostly struggle to contain my own design interests. I have a very short attention span. Once I start a project, I just want to get it done and then move on to the next thing eating away at my consciousness. This likely drives my developers nuts!
Grant: What is your design philosophy?
Mike: Decide in advance what needs to be modelled and make sure to focus only on those features rather than getting mired in minutiae. I think I’ve been improving in this since the first publication of Flying Colors. I also try to bring something new to each of my designs, if not mechanically, then at least in subject matter.
Grant: What events from history does Saint-Omer to Saint Crispin focus on?
Mike: Saint-Omer to Saint Crispin focuses on the large number of tactical engagements that occurred during the Hundred Years War. It does not cover the campaigns that led up to those battles, but the engagements themselves. The first of these engagements was Saint-Omer, following the naval engagement at Sluys. However, there was very nearly an engagement prior to that at La Capelle, so I decided to throw that in as a hypothetical. The last battle included is Agincourt, as alluded to by the “Saint Crispin” reference (and the famous speech from Shakespeare’s Henry V) in the title. I got a query on BoardgameGeek as to why none of the battles after Agincourt were included. If I did that, the title wouldn’t be quite so cool, right? Also, I fully intend to cover those later battles in an expansion tentatively titled “After Agincourt.”
“This story shall the good man teach his son; and Crispin Crispian shall ne’er go by, from this day to the ending of the world, but we in it shall be remembered – We few, we happy few, we band of brothers; for he to-day that sheds his blood with me shall be my brother; be he ne’er so vile, this day shall gentle his condition; and gentlemen in England now-a-bed shall think themselves accurs’d they were not here, and hold their manhoods cheap whiles any speaks that fought with us upon Saint Crispin’s day.”
Grant: What elements from this time period are important to model in a wargame?
Mike: This is an interesting question as I believe that not only are there important elements to model, but also important elements not to model.
With few exceptions, each battle that occurred during this period involved a large preponderance of English longbows defending against charging French knights (mounted and/or unmounted) over a battlefield that was a few football fields in length and breadth. There really was no “maneuver” per se. The French charged, got shot up, and if they managed to engage the English, the latter withdrew. Any maneuver occurred before the battle to get the most to the best ground. It amazed me still that these same “tactics” were continued for a hundred years! The English pretty much employed the same tactics, and the French adapted only by adding more armor.
Given these, one of the features of a battle that I chose not to model was maneuver. Since units pretty much only moved backwards and forwards, I eliminated the need for a hex grid and detailed movement mechanics. Given that these battles involved pushing units into a meat grinder, the ability to keep them there is paramount, so command and control are very important to model.
Grant: The game is promoted as an evolution of the system presented in Sun of York. What has evolved with the system? How do these changes effect the play experience?
Mike: There have been several comments concerning the clarity of the rules in Sun of York, particularly with regards to flank attacks. To try to simplify this process, I’m including flank panels that can be slid into place to clearly indicate how a captured wing (or “battle”) causes that wing to become the new flank for the battlefield. Even though the core of the system provided in Sun of York remains intact in the new game (combat’s the same, morale’s the same, movement’s the same), there is an entirely upgraded command system that fits better with the more “organized” nature of Hundred Years War battles as opposed to the scrums that occurred during the Wars of the Roses. I believe players will find the new rules much clearer and refined.
Grant: How do the Action Decks work and how are they changed from Sun of York?
Mike: The critical change to the Action Decks is that combat units have been removed. This leaves Command Cards (whose skewed distribution of values runs from 1 to 5), Event cards, and “Hesitation” cards. These latter cards do nothing when drawn but take up space in a player’s hand. Each player has an identical deck of 55 cards, which are half the size of the Sun of York decks.
Grant: What are some examples of the special Event Cards? How do these work and can you show us some images?
Mike: Event Cards each have a cost in “command stratagems” (command points played from cards, rather than derived from leaders on the map). The more the event costs, the greater its impact upon play. Here’s a couple of examples:

The “Rally” card allows a player to move a combat unit that has been routed back into his or her reserve. During each turn, a player always has an opportunity to rally his or her routed units. However, this typically comes with the risk of permanent elimination of the unit that is attempting to rally. The “Rally” card allows a no-risk recovery by auto rallying a unit at a low cost in command.
The “Confusion” card is more expensive, as it costs three command stratagems, and simply denies a player  the ability to play command stratagems at all during a turn. When played at an opportune time, this card can turn the tide of a battle.
Grant: What element of combat do the Action Decks help to model?
Mike: Actually, the Action Deck has very little impact on combat. Combat is a “free” action that any engaged units can do. The Action Deck does include a few event cards that enhance the combat effectiveness of certain unit types, particularly longbows.
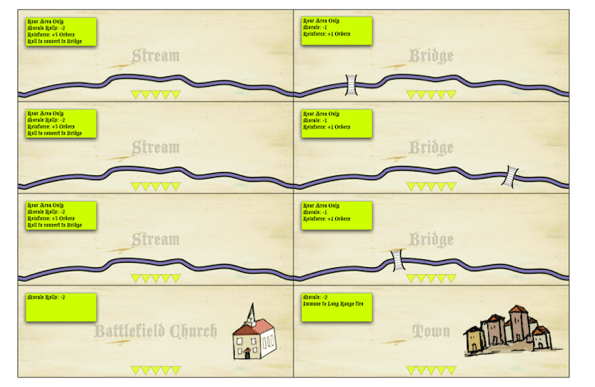
Grant: How does having a map change the game? What are Terrain Tiles used for?
Mike: The lack of a map was probably the most complained about feature of Sun of York, even though that game was designed specifically to not use one. Sun of York was designed to play more like a miniatures game using cards rather than lead. I decided to use a map with Saint-Omer to Saint Crispin partly to appease those players who dismissed Sun of York for its lack of a map. I’ve taken the added step of including rules describing how Sun of York can be played using the map and components from the new game. Secondarily, I wanted to use a map in the new game to limit the amount of space required for play. An uncluttered game of Sun of York takes about 6 by 4 feet of table space, where Saint-Omer to Saint Crispin is back to a standard 34 by 22-inch area.
Terrain Tiles are used to vary the battlefield. These are placed on top of certain areas, depending upon scenario setup. Terrain includes a variety of effects like stalling movement, protection from ranged attacks, and enhancing unit abilities in combat. Terrain examples include Woods, Walls, Towns, Battlefield Churches, Streams, Bridges, Hills, and the seemingly omnipresent “Bad Going” that represents bogs, sand, and anti-cavalry defenses.
Grant: How does basic combat work? What changes the cost of various orders?
Mike: As noted previously, combat does not cost anything. A combat unit rolls a number of six-sided dice equal to its cohesion, trying to roll a result on each die less than or equal to its ability rating. Each successful roll results in a “hit.” How the hits are applied is where Saint-Omer to Saint Crispin begins to deviate from Sun of York. In the latter, all hits were applied to all defenders in a balanced fashion, to indicate the unprofessional, scrum-like nature of combat. This method still holds for ranged combat in the new game, but not for melee combat. Now, combat units are assigned to opposing units, so hits are assigned to the opposing combat unit. Additionally, if the attacking unit has a cohesion significantly higher than the opposing unit, combat rolls can be assigned to other, adjacent combat units. When a defender is forced to retire through rout or elimination, the attacker gets a free “break through” attack on other defending units. Finally, there is also a “clash of arms” table that allows units to get additional dice when attacking less armored unit types.
Grant: How does initiative factor into turns? How can it be lost?
Mike: At the beginning of each turn, both players roll a die with the higher roll gaining the initiative. The player who held the initiative the previous turn reduces his or her roll by the number of turns the initiative has been retained. Initiative is critical as grabbing it results in taking a double turn, allowing a player to apply even more damage to the opponent before they can react.
Grant: How does command work and what has changed in this game?
Mike: Command is used to get units moving and to play Event Cards. It is acquired in one of two ways. The first is through the command ratings of leaders in play. A leader on the map can either assign one command point to each unit in his area or apply his command rating (typically two points, give or take) to units anywhere on the battlefield. Players have to decide how this command is going to be used before units start moving. This pool of movement commands may be enhanced through the discarding of command stratagems (command cards). Command stratagems may also be used at other times to play Event Cards. Different movement actions cost a varying number of command points (for instance, it costs one point to advance a unit, but two points to withdraw a unit from an engaged area).

Grant: How are leaders rated and what was your process to assign these factors?
Mike: Leaders are rated for command (providing command points), leadership (affecting a unit’s morale), and combat ability. Leaders are actually generic within the game. The leaders chosen for use are based upon the described effectiveness of the historic personalities at the battle. So, if a historic leader was described as being inspirational in combat, he might get a higher leadership rating. If noted as having engaged (or attempted to engage) an enemy leader in hand-to-hand combat, he’d get a higher combat ability. A leader with clear control over his forces would get a higher command rating. The process is pretty subjective, based upon anecdotal evidence. A neat example of this is John of Bohemia at Creçy, who was blind. Regardless, he insisted that he be taken to the frontlines so that he could put his sword to the enemy. Of course, he and all of his retainers were slaughtered. John would clearly get a high leadership value, but low command and ability values.
Grant: What is the force structure of units? How did you go about creating the OoB’s for the game? What was challenging about this process?
Mike: During the period of the Hundred Years War, there really was no “force structure” as we know it today. Nobles put together their own forces, be they mounted or unmounted, bowmen or men-at-arms. Determining OoBs is a challenge for this period as there are no reliable indications of who fought with what, and in many cases, exactly where. This was another issue that some folks had with Sun of York and its “random” OoBs. During this period, we could sort of glean the types of units that may have been available through accounting roles. I used this expected distribution to create likely armies that might have fought rather saying what units were there with no reliable evidence. Given the changes from cards to counters for combat units in Saint-Omer to Saint Crispin, I could no longer do the “random army” thing and had to back-pedal somewhat on this issue (although, for a while I considered drawing armies from an opaque cup or bag, but decided that would not really work in the long run). Now, the armies that are presented in each scenario are really just best guesses based upon subjective battle descriptions.
Grant: What is the anatomy of the counters? Can you show us some examples of the various units?
Mike: Here are a couple of combat units. Note that these are playtest units, so they’ll probably look a lot different once the game is published! I lifted the graphics from an on-line DBA site, so shhhhhhhh. 😉
 Here’s a killer English knight (KT) unit. The two bars in the upper right corner indicate that it can move two areas when activated. The ‘3’ value in the lower left is its ability rating (or what it needs to roll, or less, to achieve a hit). The ‘-1’ value indicates that the unit has veteran status and receives this bonus when checking for disengagement. The ‘5’ value is the unit’s starting cohesion value, which simply means the number of dice it rolls in combat.
Here’s an example counter for an English longbow (LB) unit. It differs from the KT unit in a couple of important  ways. First, the single bar in the upper right corner indicates that it only moves one area when activated for movement. It has two ability ratings in the lower left, one in black and the other in yellow, rather than just one. The ‘3’ is the unit’s long-range ability, while the ‘1’ refers to its melee ability.
Grant: What are some of the special units? How do the French knights effect the battlefield? Why are the English longbowmen so feared? Any other special units we can look forward to?
Mike: Units are pretty much what you’d expect for a game on medieval battles: longbows, crossbows, knights, cavalry, men-at-arms, levies, billmen, and pikes. If a unit were qualified as “special,” it would have to be artillery that was in limited use during the period and available in a couple of the battles. These give the owners a hairy one-shot ranged attack at charging attackers, but then get abandoned once engaged (they were just too difficult to move and use).
Knights (either French or English) were pretty much the tanks of the time. They were heavily armored (both the rider and later the horses) and difficult to bring down from the ground. The French knights were feared in particular because there were a lot of them. Remember where the fighting is going on. These were noblemen who had something to lose. There was nothing quite as frightening as being charged by a half-ton of armored animal and rider with a pointed stick and an attitude!
On the flip-side were the English longbowmen. Again, remember where the fighting was going on. It would be way too expensive to ship an equivalent number of knights from England (not that they would want to come anyway, given the threat of invasion from Scotland). Longbows were very cheap, and arrows were easily replenished (particularly after a battle where they could be simply retrieved and reused). Longbowmen could also be trained pretty easily as well (although to be really good, it took a lot of practice…but we are talking 100 years here).
The English would typically fire volley after volley of arrows to take out the French knight’s horses, making the knights easier to deal with on foot. Over time, the French began to armor their horses as well. A battle between these forces really came down to who would break first. If the longbowmen could drive off the knights, victory was assured. Otherwise, they would have to withdraw from the onslaught of the knights.
What really seems to have made the difference was leadership of the armies. Whoever was better able to keep their army on the field and active would win. This is a good segue into your next question!
Grant: How does the morale system work? What can be the results of a failed morale check?
Mike: Morale is handled in a very unique way in this game than in Sun of York. I really want to show the psychological effects of being ordered to charge a wall of shields with swords and pikes sticking out of it. Given that the victor of a battle during this timeframe came down to who held the field at the end, keeping your army from leaving it was paramount. So, I wanted to balance the ability of an army’s leadership to order units into harm’s way that would ultimately prefer to be anywhere else.
This is done through a morale mechanism that’s called a “disengagement check.” At the beginning of an army’s turn, all units that have sustained damage must make a disengagement check. They roll a die for each hit sustained, trying to roll equal to or less than their current cohesion. This roll is modified by the leadership value of a leader in their area. If any of these rolls fail, the disengagement check fails. Now here’s where it gets interesting. If the roll succeeds, a unit’s cohesion is reduced by the number of hits it sustained. If the roll fails, the unit must fall back, but it ignores all of the hits it sustained. This mechanic represents the willingness of a unit to engage the opposing force, knowing that doing so could lead to its destruction. A good leader will keep the units engaged. Poor leadership will see the units slowly back away and eventually rout from the battlefield in the face of an advancing enemy.
This mechanism works very well, is relatively realistic, and it saves having to deal with pre-engagement morale checks (thus, saving a lot of extra die rolling).
Disengagement checks are also performed in a variety of other capacities, particularly when checking the effects of certain events.

Grant: How do leaders affect disengagement checks and what abilities do they have to change a result?
Mike: As noted, leadership values affect disengagement checks. Leaders also have the ability to change the outcome of a disengagement check with the discard of a command card. They can, in effect, force a unit to disengage (which is important if the unit already has a low cohesion, thus saving it from rout or elimination) or keep a strong unit from disengaging. This latter mechanic is all new to Saint-Omer to Saint Crispin (it does not exist in Sun of York).
Grant: How many scenarios are included in the game? How long do the scenarios typically take to play?
Mike: There are eighteen scenarios included. Each takes about two hours to play.
Grant: What scenarios are your favorites to play and why?
Mike: I’m going to cop-out on this question. I like them all equally. LOL! Seriously though, there are some nice straight-up fights like La Capelle, the huge classics like Poitiers, and the weird ones like Blachetaque. It all depends on the itch that you want to scratch.
Grant: What are the victory conditions or do they vary by scenario?
Mike: There are a couple of ways to win. Capturing the left and right wings or the center constitutes a decisive victory. Failing this, it comes down to how much damage you can dish out to your opponent. Each army has a varying “army loss level.” If the loss level is exceeded when time runs out, your opponent gets a tactical victory. If neither or both army loss levels are achieved, whoever suffered fewer losses wins a marginal victory.
Grant: I understand that there are rules included allowing players to design their own custom armies. How has this been received by playtesters?
Mike: As of this moment, the playtesters have not gotten to the DYO rules. They’re still focusing on scenario balance. Still, several are very happy that these have been included.
Grant: What has changed through the playtesting process? Please give some specific examples.
Mike: We have changed a couple of things due to playtesting. The aforementioned “Confusion” card was changed from an entirely different mechanic where a side’s units would attack each other. This was a hold-over from Sun of York, but we determined that it was too deadly an effect. Additionally, there’s really no historical precedent for that happening during the Hundred Years War, so I had no problems changing the card. Playtesters also found that the charge mechanics were a little too tough on defending missile units (longbows and crossbows), as the latter would not have a chance to defend against these units as they approach. We added a new mechanic called “move to contact” where missile units get a shot at close range using their long-range Ability values, which also makes longbowmen behave a little more accurately, historically.

Grant: What are you most proud of with the design and the changes from Sun of York?
Mike: That’s tough to say specifically. Sun of York is one of my favorite games with regards to the design process. I think Saint-Omer to Saint Crispin may actually trump it. I believe I’ve taken an excellent system and improved it significantly through the changes to the command system, plus being able to clarify a lot of the original mechanics. If you like Sun of York, I think you’ll really like Saint-Omer to Saint Crispin. If you had some issues with Sun of York’s game mechanics or components, you should give the new game a close look, particularly if you’re interested in this vast medieval period.
Grant: What else is in the design future for Mike Nagel?
Mike: Ooof! … a lot! First of all, the fourth volume in the Flying Colors series, Under the Southern Cross is very near to ‘graduating’ to publication status on GMT’s P500. This excellent volume’s scenarios were designed by Steve Paul and involve South American battles during the 19th century. I’ve also got two games on Legion Wargames’ P250 list: Navarchoi (fleet command in the ancient world, a card-driven naval game involving lots of oared ships), and Captain’s Sea (ship to ship combat during the age of sail, where players manage the resources aboard their ships to out-maneuver, out-gun, and capture the enemy). Both of these are ready for publication, only needing some more pre-orders. Additionally, I’ve developed a module for Lock n Load Publishing’s “Lock n Load Tactical” series that’s undergoing playtesting. I’m also waiting for Victory Point Games to settle down a bit following their move so that I can make a new version of Ancient Battles Deluxe available in a hugely upgraded format. This new version will be truly revolutionary as a lot of the mechanics have been upgraded in some very cool ways. The next new design to hit the table will probably be Blade and Bow, which I started about a year ago or so. This is a new ancient (if I can say that!) game that employs squares rather than hexes for movement (there’s something that’s always bugged me about ancient games and hex grids) and a card-driven activation system. I also have a massive upgrade to my free Tactical GameX print-and-play game on the way, once the dust settles down elsewhere. I’ve created new units and redone the maps (again). I just need to test a new command system that I’ve built for it (hopefully it’ll work out). Once done, I may either keep it as a free print-and-play game (replacing Tactical Game X), or I may retain the latter and see if I can offer the new system up for professional publication, as I think it’s beginning to diverge sufficiently from the originally adapted “PanzerBlitz/Panzer Leader” system to stand on its own. Finally, I’ve got a card-driven game on the Wars of the Roses called Plantagenet hanging over my head. This is still a couple of years away as I need a lot more time for testing as it’s likely the most complex game that I’ve designed, with a lot of sub-systems and card interactions. I expect to retire in a couple of years, so that’ll be the opportune time to complete it. I’ve also got an incomplete near-dark-future tactical system that I created to use with some way cool sci-fi terrain I got off of Kickstarter. There’s plenty of other stuff that’s percolating away in my fevered brain, too!

Thanks for your time Mike in doing this interview. I appreciate the quality of your responses and really am eager to see how the game turns out. I would also be very interested in talking with you about a few of your other games in design as they look really interesting as well.
If you are interested in pre-ordering a copy of Saint-Omer to Saint Crispin: Tactical Battles of the Hundred Years War for the P500 price of $49.00, you can follow this link to the GMT Games game page: http://www.gmtgames.com/p-660-saint-omer-to-saint-crispin-tactical-battles-of-the-hundred-years-war.aspx
-Grant
