
Based upon the design of Paul Koenig’s D-Day Series, Arnhem Bridge was the first to be released in the Market-Garden series in 2011, covering all the events that happened there during the first three days. The game is made for 2 players and each player will command either the German defense or Allied forces trying to push to the bridge. The goal of each side is to capture key objectives, such as both sides of the bridge or city and town hexes marked red on the board, while limiting casualties to their own forces and inflicting them upon the opponent’s.
I mention here at the beginning that the game is an INTRODUCTORY-LEVEL WARGAME, and will be reviewed as such. Yes, the introductory-level is intended to make the game simple to learn, easy to play and most importantly…FUN! So for those that are looking for a deep and involved gaming experience that includes weather, morale rolls, counter-attacks and ZOC’s, this might not be the game for you. Although, I will say that I enjoyed playing the game as it was easy to learn, quick playing (played in about 90 minutes during our first play and with understanding of the rules and the sequence of play, it was played in about 50 minutes) and is a decent historical simulation on the battle, although some points are not totally accurate (I’m looking at some of the strengths of the British units here).
 Game Data:
Complexity: 3 on a 9 scale
Solitaire Suitability: 8 on a 9 scale
Unit scale: Each unit is 1 company to regiment, each hex is 0.6 kilometers, each (day) turn is about 4.5 hours, and each (night) turn is about 10 hours.
Game Components:
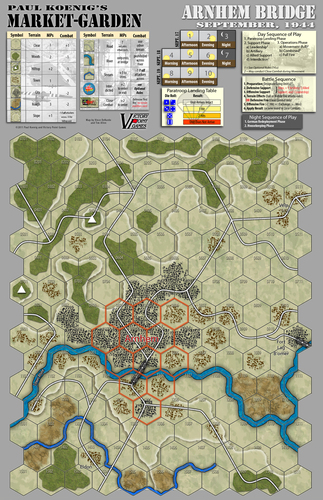
● 1 11 x 17” card stock map with tables, game turn track, sequence of play, etc.
● 40 1/2″ double-sided game pieces
● 28 5/8″ round double-sided markers per bridge including hit markers, artillery support, Allied support and Leadership
● One 4-page full color Standard Rules booklet
● 1 sheet of Exclusive Rules covering the specifics for each bridge
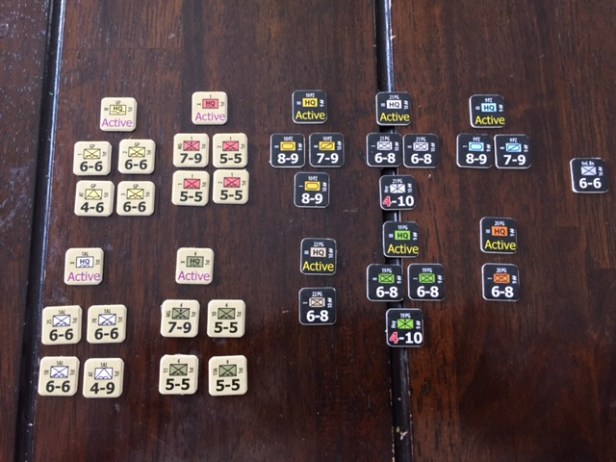
The game is played over a series of 10 turns (8 day turns and 2 night turns) over three consecutive days, September 17-19, 1944. Each side starts with a certain amount of units, with the Germans starting on the east side of the map and the Allies beginning play on the west side of the map. Both sides are trying to get to the bridge in order to hold it as well as to occupy City and Town hexes (marked in red on the game board) to score Victory Points.
The Sequence of Play is fairly straightforward and is as follows:
- Paratroop Landing Phase which consists of the deployment of new reinforcements to
 the board which have been assumed to have landed in an “off map” situation and have had to make their way to the game board itself. This “off map” situation is thematically represented by the Germans getting a roll of a 6 sided die for each arriving unit as they endured anti-aircraft fire upon their descent, fire at their landing zones and resistance in the form of small skirmishes in making their way to the game board. On a roll of a 1 or a 2, their is no effect to the arriving units. But, each unit takes a hit on a roll of 3 or 4, with 2 hits being inflicted on a roll of 5 and the unit being destroyed on a 6 (although this destroyed unit doesn’t count toward end game scoring).
 - Support Phase (Day Turns Only) consists of each player rolling a 6 sided die to determine the amount of Artillery Support (German only) or Allied Support (air power) markers that are received. On a roll of 1 or 2, the player receives 1 marker, on a roll of 3 or 4, 2 markers and on a 5 or 6 the player will get a maximum of 3 markers. These markers are used during combat in order to affect the combat rolls, either positively for your units or negatively for your opponent on rolls.
- Operations Phase (Day Turns Only) involves moving your units and attacking the enemy with several different types of combat including full fire, mobile fire and close combat. More on combat later.
- German Redeployment Phase (Night Turns Only) includes only the German player moving any or all of his units that are not adjacent to enemy units up to 1/2 their Movement Allowance. Nothing else happens during night turns.
- Housekeeping Phase which includes advancing the Game Turn marker with a victory Check if at the end of Game Turn 10.
What is Market-Garden: Arnhem Bridge About?
Now that I have shared the basics and structure of game play, I would like to take a look at several of the elements in the game. I will take a look at Components, Gameplay, Combat Resolution, Use of Terrain and End Game Scoring.
Components:
The game comes in a zip-lock plastic baggie of roughly 6″ x 10″ but once opened, it doesn’t disappoint! The components are of great quality. The double sided counters are die cut and are made from thick cardboard. The information printed on the counters is clear, readable and the colors are interesting and help the counters to stand out against the backdrop of the game board itself. NATO unit designation symbols are used to denote infantry, mobile infantry or mechanized or tank units and each counter represents one of the actual historical companies that fought in the battle at Arnhem Bridge. The game board is printed on a thick card-stock, once again with very clear printing and using vivid colors that stand out and are interesting to look at. The graphic design allows enough detail in the terrain to be interesting, but not so much that it becomes overwhelming. I also like that the hexes are a little bigger than normal and allow for 2 counters to be un-stacked side by side in each hex for easy readability. Player aids are printed at the top of the game board, allowing for clean, easy access to the most commonly referenced information. This is always a great life saver for me and I love when I can follow an outline printed on the game board to remember the Sequence of Play and other easily forgotten or confused steps or rules. This simply helps game play to not become bogged down by constant reference back to the rules.

One interesting thing about the rules is that there are three parts to the full-color rulebook. These parts include general rules that are to be used in all of the games in Koenig’s Market Garden series that revolve around movement, terrain modifiers, unit statistics and markings, the chit-pull system and the various types of combat; the exclusive rules that apply only to the Arnhem Bridge game, and optional rules that allow players to add some extra flavor to their games if desired. We didn’t read through the rules before sitting down to play and it only took about 20 minutes or so to get a good understanding of how to play. I was a little perplexed by the lack of clear instruction about the use of the exclusive versus the optional rules as we simply used both of them during our first play.
The game is played with one side going, followed by the other side going but not in a traditional manner. The difference here is that each side must rely on a random chit-pull mechanism that determines which group of chits can take actions for that part of the turn. When determining the units that can be activated, a representative “HQ” chit for each color-coded group of units is placed into a cup. During play, these chits are randomly drawn, allowing all of the surviving corresponding colored units to take their actions. Due to the random nature of activation, players never really know the order that their units will act, which causes difficulty in truly coordinating tactical maneuvers between the different units. Since disorganization and loss of communication were some of the major hurdles that the Allied soldiers faced during Operation Market-Garden, the chit-pull mechanism makes great thematic sense and actually was a very interesting (and somewhat frustrating) part of the game. This chosen system definitely is not your traditional I-Go-You-Go affair though, and truly throws some unpredictability in the turn sequence that I truly enjoyed and found very appropriate to simulate the chaotic nature of this race for the bridge scenario.
Combat in Arnhem Bridge is interesting as well although I found it a bit too simple. But remember that this is an INTRODUCTORY-LEVEL WARGAME! The design does a lot to simplify combat calculations and uses no Combat Results Table or CRT. This doesn’t necessarily mean combat is too simple or boring, though, just different to what I am used to in more advanced games and it seems, a little wonky at times! In fact, the system allows for 4 different types of unit actions, three of which are combat related including full fire, mobile fire, and close combat. All of these combat types can result in damage to the attacking or defending unit; or an exchange that causes damage to both units (this was my favorite part!). The units in Arnhem Bridge are resilient and can withstand multiple hits before being destroyed. This is much simpler than other wargames that usually have you rotate a counter or flip it over to its reduced sided, and uses a small double sided differently colored “Hit” counter that slides under the chits to show how much damage they have taken. The single hit counters are yellow while the two hit counters are orange and are located on the reverse side of the counter. A unit can sustain a single hit without any negative impact, but the second hit causes a loss of -1 to its attack power, and a third hit destroys the unit entirely.
Of the three combat types, full fire is the one that is the most familiar and probably the type that is used most often. Full fire allows a unit in an adjacent hex to an enemy unit to use its entire action to roll against its own combat strength and see if the attack is successful and does damage to the enemy. Mobile fire is the second type, and acts as a movement/combat hybrid; while only half as effective as full fire, a unit engaging in mobile fire can move using half of its movement, and then perform a half strength fire attack. Both full fire and mobile fire only take the attacking units’ strength into consideration when calculating the outcome of a battle and this is something that I found too overly simplified in the game but more on that later. As long as the number rolled on a 6 sided die is less than the combined strength of the attacking units, which will have been modified by terrain as well as the inclusion of Artillery Support or Allied Support markers, the defending unit takes a hit.
Close combat however, is a bit different than the previous 2 discussed types and gives an advantage to the defender. In close combat, the attacking player enters the same hex as the defending player, and combat commences, with each player rolling against their unit’s strength (ignoring any modifiers due to terrain) until a player takes a hit. In the case of close combat, however, the defender gets the first attack. This is a very important rule that has some very dramatic implications. Close combat is quite a gamble for the attacker but with strict confines created by the terrain on the game board itself, becomes a necessary risk in order to push forward and get to the bridge before the enemy does. It is also important to remember that in close combat, a hit requires that the party taking the hit must retreat from the hex so this is also a strategic weapon to be used by the attacker to dislodge a tough unit from a hex that will allow for advancing upon an objective, such as the bridge head itself with is worth 5VP to the player controlling both sides at game’s end.
Use of Terrain:
One of the most intriguing aspects of all wargames is terrain, and Paul Koenig’s Market Garden: Arnhem Bridge uses terrain effects quite well. Different types of terrain can affect movement, as well as the effectiveness of full and mobile attacks. In addition to terrain in a given hex, features of a given hex side can affect gameplay as well. For example, a hex side that borders a river cannot be crossed, and there are several sloped hills on the map that can affect combat accuracy. With the overarching goal of rushing the bridge in an attempt to take control over it, much of the terrain located on the outskirts of Arnhem is not used. For example, there is a great hill located to the north west of the City and with the -3 modifier provided against enemy attacks, it was tempting to try and place one of my tanks on it to fire down on the advancing Brits, but without Zones of Control to slow them down, I would simply watch as they ran past me and out of range.

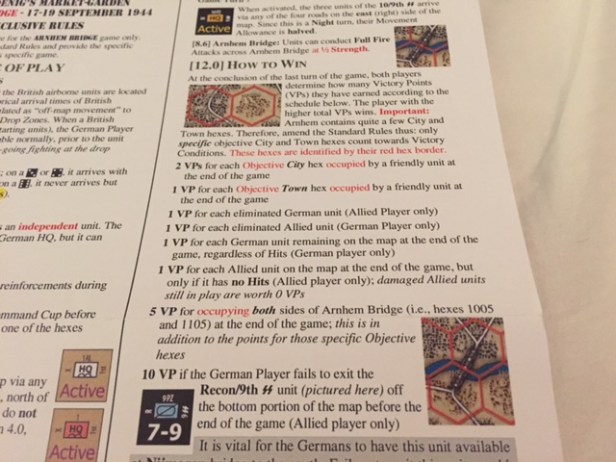
End Game Scoring:
Scoring in Arnhem Bridge was handled a little differently than most other wargames I have played. Usually, there are strongly defined win conditions, while success in Arnhem Bridge was a little more complex. Holding certain objectives, such as City or Town hexes marked as red on the game board, scored as well as scoring for destroying an enemy unit. I also liked the fact that British units that remained on the board but that were undamaged counted as a point for the Allies. This caused me as the Germans to simply look for ways to damage each during the last few turns so that he couldn’t score from them. I liked that twist!
What I Liked About Market-Garden: Arnhem Bridge
Paratroop Landings – I truly enjoyed the aspect of the German player getting a die roll for each arriving unit to see if they were damaged or destroyed. This element seemed very thematic to me and was also a little bit of fun. I really enjoy games that try to include all aspects of combat in the design while not bogging them down. This can be extremely difficult to accomplish but the designer in this instance did a wonderful job of dealing with this aspect.
Chit-Pull System -see my fairly thorough discussion on this aspect above in the Gameplay section but I think this is the BEST part of the design! Great use of this thematic element that simulates the lack of communication and inherent chaos of an assault behind enemy lines by scattered Paratroop units.
Ease of Combat – I enjoyed that combat was simplified. Roll under the Attack Factor or strength of your unit after taking into account all negative (from terrain, damage, etc.) and positive (Artillery support) modifiers. I liked the design choice here for an INTRODUCTORY-LEVEL WARGAME as it made the rounds move quickly and didn’t require you to refer to a complex and always tiny printed CRT to see what hit or not. I also really liked that units could take one hit without a negative effect. This seems correct as minor wounds or damage wouldn’t have affected the fighting capability of a unit but major wounds and losses would have.
Scoring System – As mentioned above, I was glad to see an alternative scoring system for this scenario. It would have been very easy to simply have the victory condition be controlling the bridge or controlling the most of Arnhem but there was thought given to the objectives for each side and it truly felt balanced as our games have been generally close and tend to always be decided by whether or not one side holds the bridge or not, as holding the bridge is worth a total of 8VP (5VP for holding both bridge hexes + 1VP for the south Town hex + 2VP for the north City hex).
What I Didn’t Like About Market-Garden: Arnhem Bridge
Concerns with the Game System – Overall, as mentioned above, the game system works for an INTRODUCTORY-LEVEL WARGAME on the battle, but in my opinion it leaves out 2 very critical elements, even for an introductory-level game.
- I can’t understand why the combat system doesn’t take into account the defenders strength. The combat system is simple, which I think is a good thing, but might be too overly simple; seeing as how it is simply attackers strength less the effects of terrain, compared then to a die roll. For some reason, the defenders strength has no impact on the equation. So, if an Infantry unit is attacking a Panzer unit, there is nothing taken into consideration for that 10″ armor that they must pierce in order to damage the mighty Panzer tanks. No requirement for heavy weapons, no negative modifier to the roll accounting for this armor? I just ask myself why? I know that the combat system is supposed to be simple in order to make the game playable for those that are not used to heavy wargames but this is not a good point of the design. Conversely, a Panzer tank attacking an infantry unit gets no extra bonuses but simply uses its relatively higher attack value of 7 or 8 but no added bonuses. This point is a major concern for me in the design.
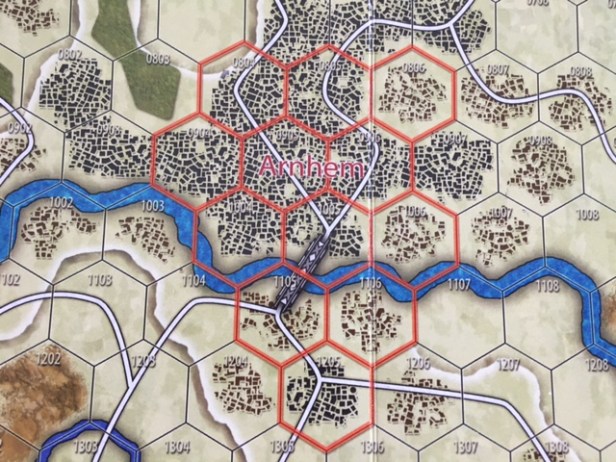
- Then there is the lack of Zones of Control. In looking at the game, the main focus and goal is to move toward the bridge and capture it. The path to move to the bridge is through fairly dense urban hexes with a road leading right to the ramps. Strategically, a German commander would have lined the streets with their best units to prevent the enemy from simply riding right down the middle of the street to the bridge. This commander would have given orders to fire on anything approaching and would have had reserve units located in the buildings to the left and right of the streets to prevent small unit interdiction through the back alleys. These units would have taken up positions to bring heavy fire upon any approach hex and this is typically simulated in other games through the use of a Zone of Control. This ZOC would cause advancing units to stop while taking fire from an adjacent unit but in this design, the units just kind of ride on by, waving to the nasty MG-42 nests on the 2nd floor of the buildings and blowing kisses to the Panzers hidden in or behind the piles of rubble! In reviewing the history of the campaign, one of the major problems the British had in advancing on the bridge was that relatively small German forces had taken up positions in the woods and on the outskirts of the city and effectively pinned down most of the advance of British forces toward Arnhem. This, in my opinion, is a major design flaw and should be house-ruled or cause a redesign of an otherwise fun and good playing game. I have illustrated this point with the slideshow below where the British 4-6 Infantry unit simply moves right down the street between 4 better groups of units (an 8-9 Tank, three 6-8 Mobile Infantry and a crack 6-6 SS unit) without taking fire or being stopped! Seems silly doesn’t it?!?
Summary/Conclusion
I really liked Paul Koenig’s Market-Garden: Arnhem Bridge! I really liked ALMOST everything about it….except for the lack of Zones of Control and not accounting for unit strength in defense, but only in attack. Keep in mind that I reviewed the game as an INTRODUCTORY-LEVEL WARGAME but my analysis may have strayed from that key point slightly. This is a good game, just a game with some ugly parts that need revised!
I liked the thematic elements including the simulation of the lack of communication and organizational chaos through use of the blind HQ chit-pull mechanic. The order that units are activated is completely random, which can affect the ability to build a strategy, as unit locations can change a lot during play. But this part is great! Also, the chaos manifests itself in the fact that the British player does not know exactly how much of their scheduled support they will receive in any given round, nor how many of their units will be wounded or killed as they parachute into the battlefield. I love to feel pressure and frustration as I play these wargames. I imagine that this is exactly how Montgomery would have felt as his grand plan slowly faded into ignominy as the troops failed to take their objectives and the dream of crossing over the Rhine ending the war by Christmas disappeared and was replaced by an additional 9 months of heavy fighting.
Overall, Arnhem Bridge is a success in my opinion! I enjoyed playing it as an INTRODUCTORY-LEVEL WARGAME but it leaves me wanting MORE! As I have thought about you reading this review and your response and ultimate decision as to whether you will go out and buy the game or not, I feel that I may not have succeeded. I believe that your opinion about this game should be made after primarily asking yourself what it is that you are looking for? If you are looking for an easy gateway into the wargaming genre with some chaos and uncertainty in the fun and easy game play, then buy Arnhem Bridge! If you are looking for a realistic simulation using all of the buzzwords in the industry such as ZOC, CRT, etc., then you might want to look elsewhere! As for me, I liked it but feel a little unsatisfied, like when my wife tries to sneak in ground turkey in meatloaf! (I swear to you I can tell the difference!). I definitely want to check out the next 2 installments in the series and I am sure I will see things differently then. If you are interested in Arnhem Bridge, you can purchase it on the Victory Point Games website at http://www.victorypointgames.com/paul-koenig-s-market-garden-arnhem.html for $23.99!
-Grant
