

The Battles of Saratoga (September 19 and October 7, 1777) marked the climax of the Saratoga campaign giving a decisive victory to the Americans over the British in the American Revolutionary War. British General John Burgoyne led a large invasion army southward in the Champlain Valley from Canada, hoping to meet a similar force marching northward from New York City, and another force marching eastward from Lake Ontario; the southern and western forces never arrived, and Burgoyne was surrounded by American forces in upstate New York. Burgoyne fought two small battles to attempt to effect a break out, Freeman’s Farm on September 19th and Bemis Heights on October 7th. They took place eighteen days apart on the same ground, 9 miles south of Saratoga, New York. They both failed. Trapped by superior American forces, and with no relief in sight, Burgoyne retreated to Saratoga (now Schuylerville) and surrendered his entire army there on October 17. His surrender, says historian Edmund Morgan, “was a great turning point of the war because it won for Americans the foreign assistance which was the last element needed for victory”. So the question must be asked, had Burgoyne’s other armies arrived and were able to link up to increase their assault forces, what would have been the result of the battle? And, pending the outcome, how long would another such defeat had taken the French to decide to enter the fray? We shall never know but in this fast playing wargame, you will have a hand in trying the battle out to see if you can change history.
Saratoga 1777 AD
 As is the case for this collection of fast playing wargames from Turning Point Simulations, Saratoga 1777 AD is a key battle in the Revolutionary War and was chosen as one of 20 such battles that were focused on in Mitchell and Creasy’s well known book Twenty Decisive Battles of the World.
We posted an unboxing video of this game to give you an inside look at some of the great components all packaged in a nice and concise unique “box” designed to fit on your shelf as a series of books. In my opinion, this is a medium weight game, mainly due to the fact that the rules aren’t overly complex, with the rule book only weighing in at 8 pages (this is a good thing), but each side has unique challenges and advantages to either aid or vex their efforts. I truly enjoyed the combat priority system and the maneuvering necessary to effectuate either a hardy Patriot defense of Fort Neilson or to properly assault the fortifications from multiple directions to keep the pressure on the rebels.
 The counters are surprisingly good in this game, although somewhat simple, and there are only three different types, including Combat Units, Leaders and informational markers. The counters that represent units are color coded and contain various information such as their historical unit designation, type, including a color showing their formation, and what Formation Commander that they report to and can be activated by, the unit’s combat rating and movement allowance. These Formation Commanders can also provide an attack bonus that increases the odds of units scoring hits in battle. These values range from 0 to +2.

Command-Control and Movement
There were two parts of the game that I particularly liked, that felt really appropriate for a game covering the Revolutionary War. First off, was the Command-Control aspect of the units. The first thing each player does at the beginning of their Command Phase is to check whether their Formation Commanders are in Command Span of their units. As you can see on the Patriot Formation Commander counter pictured below, this commander (representing Brigadier General Ebenezer Learned) has a Command Span of 2, which means that he can control units up to 2 hexes away from his location, not counting his own hex. If units are caught Out-of-Command, they will have an Out-of-Command marker placed on them and will be unable to activate this turn. Due to problems with terrain, the noise and fury of battle and lack of any formal communications system such as radios, Command Radius is an aspect that must be represented in any pre-modern wargame and Saratoga does a bang up job of accomplishing this thematic element.


You will also notice the Overall Commander counter above shows Commander in Chief of the British Forces Lieutenant General John Burgoyne, whose Command Span is much better than the Patriot’s Learned at a 5 vs. 2. The C in C units also have an Activation Rating that shows the number of Formation Commanders that the C in C can activate. In this case, Burgoyne has a 3, which simply means he can activate 3 different Formation Commanders, who in turn have their own Command Span and can activate units that comprise their formation. This is a great part of the game as the C in C has to be positioned so as to maximize the number of units they can activate and move each round. This is very problematic for the attacking British as they only have 1 C in C unit who has to move from side to side of the board during combat in order to activate units so that they can move into position to attack the Patriots. This turns to Burgoyne activating one side of his attacking army and then moving hexes equal to his generous movement allowance of 6 to the other side of the formation to activate those units until they can make it close enough to the Patriots to begin their assault. This slow and plodding movement felt very appropriate, albeit frustrating, especially taking into consideration such aspects as terrain, small one lane country dirt roads, narrow bridges and dense and thick forests. If using these country lanes, units gain a movement bonus but cannot gain that bonus if they have to move through a unit that is stopped on the road. So, you have to plan these movements to gain the maximum distance possible, which can be a little bit painstaking but is very fun.
Combat

The combat system is pretty straightforward with units assigned a combat value based on letters A-D and then using a Combat Fire Priority system where A units fire first followed by B units, then C units, etc. The defender always fires first, as the attacker must position itself into an adjacent location in order to attack and can move up to 3 hexes distance in doing so. No single unit in a hex can be fired on more than once until all units in that same hex have received fire. This thematic battle system felt really period appropriate and was very enjoyable. The only complaint that I had about was that it was sometimes hard to remember which units still hadn’t been fired upon.
The Combat Results Table (CRT) is very straightforward and A units are the best, hitting on a modified die roll of 3-6, while D units fire last and hit on a modified 6. We found it very important to make sure stacks had a good mix of counters but it is vitally important to have at least some A units.

Combat results from the battles are counted in Step Losses and each unit can take 2 such Step Losses before they are flipped over to its reduced side or 4 Step Losses in order to be eliminated. But the best part of the Combat System is the Morale Track.
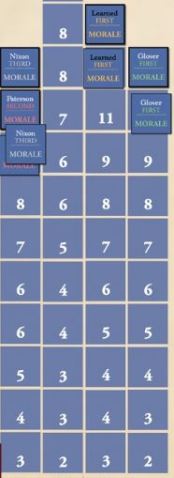 Each time a unit is flipped to its reduced side or eliminated, the entire Formation must make a Morale Check against their current Morale Level on the Morale Track (Patriot Morale Track pictured to the right). This Morale Check involves the player rolling 2d6 and comparing their results to the Morale Level of that Formation. For example, if Glover’s Formation has a unit that flips due to incurring its 2nd Step Loss, he will roll 2d6 and hope to have that number be 10 or less. If he happens to roll an 11 or greater, then the entire Formation, including all units of that Formation, are considered to have broken and will now retreat away from the attacker one hex. This does allow the attacking Formation to get a free fire attack on the retreating Formation, which can be devastating and cause significant losses to those units. These broken formations don’t stop to gather themselves or have the ability to recover and will continue to retreat one hex each round if possible, and if they cannot, either due to enemy units being in their path or the edge of the board, they are considered to have surrendered and are counted for VPs at the end of the game. I will have to say that this aspect was very tense and each time you had to make a Morale Check, we would groan, as it was very possible to roll high and have a perfectly stable Formation break. I really enjoyed the makeup of the Morale Table as it takes into account the quality of the troops making the check. For example, if you look at the above below, you will notice the British side starts higher and reduces a little more slowly than the Patriot side. This is reflective of the fact that the British troops were seasoned, battle hardened veterans who were professional soldiers as opposed to the relatively poorly trained raw Patriot forces. The Combat in Saratoga is fantastic and was definitely our favorite part of the experience.

Fog of War
While there are not an inordinate amount of counters in this game, the stacking limits keep the size of the stacks relatively small with a maximum of 2 units allowed. But stacks can also include Leaders, as well as any number of informational markers, including Step Losses, Out of Command, etc.. This is where a strictly enforced Fog of War aspect is recommended where no one can examine stacks of units. You are allowed to always know the strength of the top most unit so you cannot cover them up with informational markers. It was very fun, and very thematic as intelligence was not very good in the 16th century, to not really understand what units I was attacking and really whether or not my attacks would work out well or not. As you can see from the below picture with several stacks, it is hard to remember the contents of each of your own stacks, much less what power your enemy has in theirs. I really enjoyed this Fog of War and would recommend that you enforce it as another of the many thematic elements to the design.

Should I Get This Game?
We really enjoyed playing Saratoga and would heartily recommend it to anyone that enjoys good, quick playing wargames. The history is also great as I happen to truly enjoy learning about the American Revolutionary War and the aspects of this key battle. But, be warned that the amount of counters is pretty significant for such a small gaming area and you will need tweezers if you have fat fingers like mine. The game can get a bit chaotic and stacks can become quite disorderly and if you are anal retentive, it might be hard to look at the map with all of those cockeyed stacks. But other than that, the design is very tight, the rules are simple and fairly easy to master and convey the difficulties and barriers to proper combat in the 16th century.
For more information on the game, please visit the game page on the Turning Point Simulations website: https://www.turningpointsimulations.com/Details.cfm?ProdID=13&category=1
-Grant


I enjoyed this game very much. It played well and had lots of action despite being a smaller type of game. Great game overall with lots to do and a good game to help a non gamer learn the ropes of board gaming
LikeLike